


photorec
Accidentally deleted files or photos? In this tutorial, we’ll learn how to recover deleted files in Linux using PhotoRec. In a previous tutorial, we discussed the steps to recover deleted files using a Linux utility named TestDisk and the PhotoRec utility is created by the same company. Let’s find out how to use PhotoRec to recover deleted files.
不小心删除了文件或照片? 在本教程中,我们将学习如何使用PhotoRec在Linux中恢复已删除的文件。 在上一教程中,我们讨论了使用名为TestDisk的Linux实用工具恢复删除文件的步骤,而PhotoRec实用工具由同一家公司创建。 让我们了解如何使用PhotoRec恢复已删除的文件。
什么是PhotoRec? (What is PhotoRec?)
TestDisk was created by CGSecurity to recover deleted partitions. PhotoRec, on the other hand, was created to recover media files that were deleted from SD Cards and other removable media. That’s why the name “PhotoRec” which is short for “Photo Recovery”. That’s not to say PhotoRec cannot be used for other file types, you sure can.
TestDisk由CGSecurity创建,用于恢复已删除的分区。 另一方面,PhotoRec的创建是为了恢复从SD卡和其他可移动媒体删除的媒体文件。 这就是为什么名称“ PhotoRec”(“照片恢复”)的简称。 这并不是说PhotoRec不能用于其他文件类型,您肯定可以。
如何使用PhotoRec在Linux中恢复已删除的文件? (How To Recover Deleted Files in Linux using PhotoRec?)
Before we begin, we need to install PhotoRec on our Linux system. It comes packaged with the testdisk utility and not as a separate package.
在开始之前,我们需要在Linux系统上安装PhotoRec。 它与testdisk实用程序一起包装,而不是单独包装。
1.在Linux上安装PhotoRec (1. Installing PhotoRec on Linux)
To install PhotoRec, run the below command:
要安装PhotoRec,请运行以下命令:
sudo apt -y install testdisk
Once the setup is complete, you can download and run the Photorec utility using the command below:
设置完成后,您可以使用以下命令下载并运行Photorec实用程序:
sudo photorec
2.运行PhotoRec并开始扫描已删除的文件 (2. Running PhotoRec and Begin Scanning For Deleted Files)
For this demonstration, I’ve created a random image file and deleted it. Let’s go ahead and recover this file.
对于此演示,我创建了一个随机图像文件并将其删除。 让我们继续恢复该文件。

Let’s fire up PhotoRec in our terminal. To make things easy, navigate to the directory that you want to run the recovery on prior to running the command.
让我们在终端中启动PhotoRec。 为了简化操作,请在运行命令之前导航到要在其上运行恢复的目录。
sudo photorec
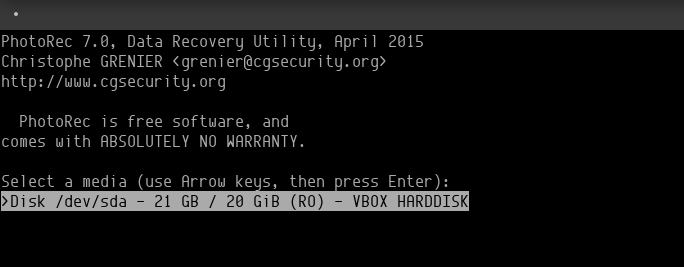
When you’ve started PhotoRec, select the hard drive that you want to run the restore operation on and hit the enter key.
启动PhotoRec后,选择要在其上执行还原操作的硬盘驱动器,然后按Enter键。
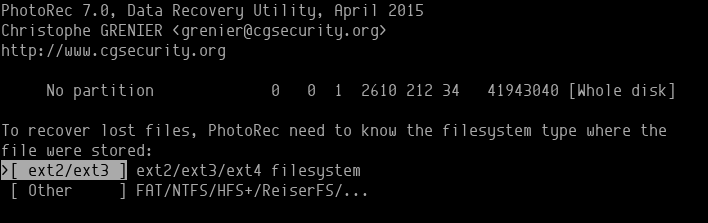
The next screen will ask you to select the partition that you want to run the recovery process on.
下一个屏幕将要求您选择要在其上运行恢复过程的分区。

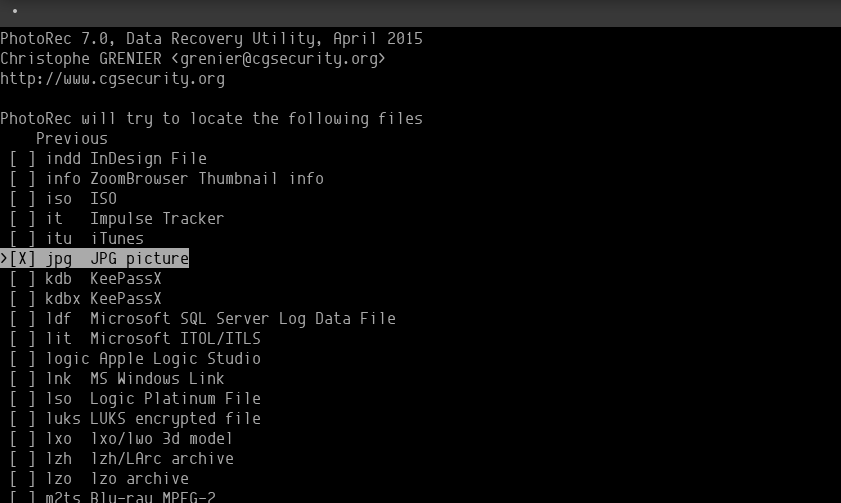
Before you proceed, make sure you select the file type from the file options menu which you can access on the partition selection screen.
在继续之前,请确保从文件选项菜单中选择文件类型,您可以在分区选择屏幕上访问该文件类型。
As we know, we’re only looking for our JPG file, I’ve selected that extension. Anything else is unnecessary and will just consume more time. Select the file type that you’re looking for and proceed.
众所周知,我们只是在寻找JPG文件,因此我选择了该扩展名。 其他任何事情都是不必要的,只会消耗更多时间。 选择您要查找的文件类型,然后继续。
Next is to select the partition type which in our case is ext4.
接下来是选择分区类型 ,在本例中为ext4。
Now select if you want the utility to only look at free sectors or the entire drive.
现在,选择是否要让实用程序仅查看空闲扇区或整个驱动器。

You might have noticed, when I ran the command, I was in the ~/Desktop directory.
您可能已经注意到,当我运行命令时,我在〜/ Desktop目录中。
This is where the command will start looking at by default unless you navigate to a specific folder on the next screen.
除非您导航到下一个屏幕上的特定文件夹,否则默认情况下将在此处开始查看该命令。

Once you’ve finalized the folder you want to start looking into, press the letter C and the program will begin searching for files.
完成要开始查找的文件夹后,按字母C ,程序将开始搜索文件。
3.恢复恢复的文件 (3. Restoring Recovered Files)
Great! So we’re all set to let PhotoRec restore deleted files for us. It may take some time depending on how many file types you’ve selected.
大! 因此,我们所有人都准备好让PhotoRec为我们还原已删除的文件。 可能需要一些时间,具体取决于您选择了多少种文件类型。
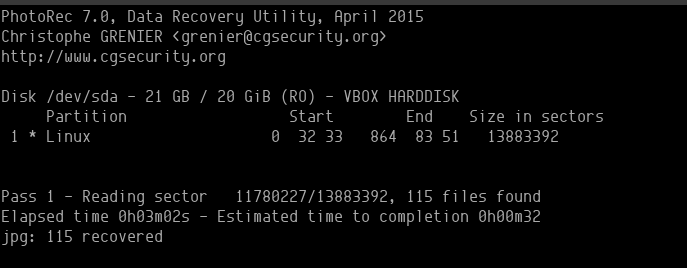
A folder named recup_dir will start to restore all the files that were recovered. You can access the files even when the recovery is in progress.
名为recup_dir的文件夹将开始还原所有已恢复的文件。 即使恢复正在进行中,也可以访问文件。
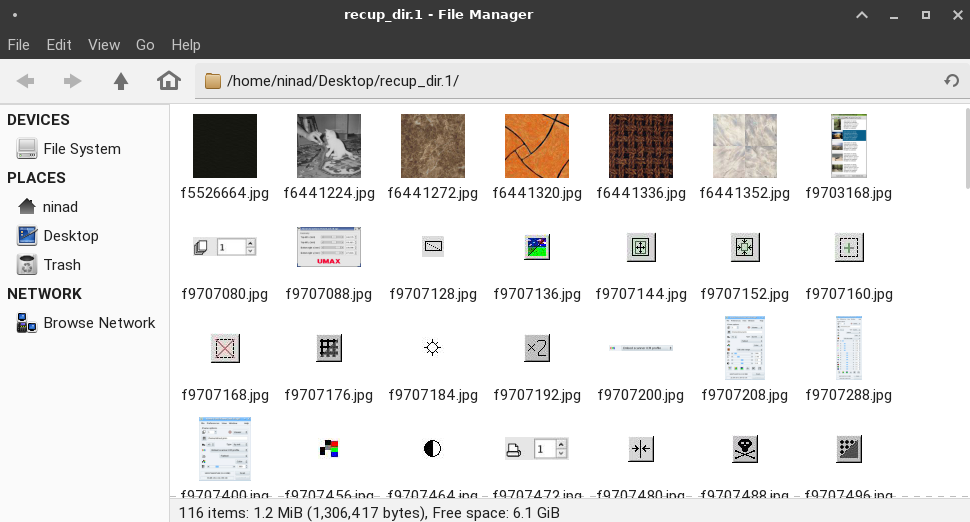
Great, we now have a list of all the files that we deleted previously. You can look for the file that you want here since the filenames aren’t restored by PhotoRec.
太好了,现在我们有了以前删除的所有文件的列表。 您可以在此处查找所需的文件,因为PhotoRec不会还原文件名。
为什么数据恢复有效? (Why Data Recovery Works?)
Noticed how saving a file on the hard disk takes time, but deleting is almost instantaneous? Let’s understand that first.
注意到将文件保存到硬盘上需要花费时间,但是删除几乎是瞬时的吗? 首先让我们了解一下。
When you store data on your hard drive, the data is stored in blocks. Each block contains a piece of the data. The first block usually contains the metadata for the file in question. Each block of data is written one at a time at the speed of the hard drive.
当您将数据存储在硬盘上时,数据将存储在块中 。 每个块包含一块数据。 第一块通常包含有关文件的元数据。 每个数据块都以硬盘速度一次写入一个。
But when we delete a file, only the first block which contains the metadata is deleted. The operating system no longer can detect the file because it’s metadata is lost and hence considers the blocks free for writing new data.
但是,当我们删除文件时,只会删除包含元数据的第一个块 。 操作系统不再能够检测到该文件,因为该文件的元数据丢失了,因此认为这些块可用于写入新数据。
This is where recovery tools come in. Since only the metadata is lost, the job of the tools is to make the meta available for the operating system for reading.
这是恢复工具的用武之地。由于仅丢失元数据,因此工具的工作是使元数据可供操作系统读取。
They read the hard drive sectors one by one, block by block, and find correlated blocks. Once all the correlated blocks are found, the recovery utilities remake the metadata.
他们逐块,逐块读取硬盘驱动器扇区,并找到相关的块。 找到所有相关的块后,恢复实用程序将重新制作元数据。
And that’s how you are able to recover a deleted file.
这样便可以恢复已删除的文件。
PhotoRec如何工作 (How PhotoRec Works)
Like other file recovery utilities, PhotoRec scans data sectors on the hard drive to find the data size. Once it finds the data size, and the hard drive and data is intact (not defragmented or overwritten), PhotoRec begins the data recovery process by looking for adjacent data blocks and recreating the meta for them.
与其他文件恢复实用程序一样,PhotoRec扫描硬盘驱动器上的数据扇区以查找数据大小。 一旦找到数据大小,并且硬盘驱动器和数据完整(不进行碎片整理或覆盖),PhotoRec就会通过查找相邻的数据块并为其重新创建元数据来开始数据恢复过程。
Since the utility can’t search for a specific file, it will return all the files that are found and save it in a folder. You can then sort through the files and restore the one required.
由于该实用程序无法搜索特定文件,因此它将返回找到的所有文件并将其保存在文件夹中。 然后,您可以对文件进行排序并还原所需的文件。
At the end of the process, all the files that were still lying around on your hard drive will be available for you to restore.
在此过程结束时,您仍可以使用硬盘上仍然存在的所有文件进行还原。
结论 (Conclusion)
I hope that you’ve been able to use PhotoRec to recover deleted files on your Linux system. There are a lot of other utilities that you can also try if PhotoRec didn’t work for you.
我希望您已经能够使用PhotoRec在Linux系统上恢复已删除的文件。 如果PhotoRec对您不起作用,您还可以尝试许多其他实用程序。
Here’s a list of top 20 data recovery tools for Linux. I’m sure you’ll find one that suits your needs best!
这是Linux上排名前20的数据恢复工具的列表。 我相信您会找到最适合您的需求的!
翻译自: https://www.journaldev.com/37328/photorec-recover-deleted-files-in-linux-ubuntu
photorec


 349
349

 被折叠的 条评论
为什么被折叠?
被折叠的 条评论
为什么被折叠?
 到【灌水乐园】发言


