


 本文是一篇关于Python连接和操作MySQL数据库的教程。首先介绍了如何安装Python的MySQL连接器,接着讲解如何建立数据库连接,创建数据库和表,插入、选择、更新及删除数据,最后演示了如何删除表。
Welcome to Python MySQL example tutorial. MySQL is one of the most widely used database and python provides support to work with mysql database.
欢迎使用Python MySQL示例教程。 MySQL是使用最广泛的数据库之一,而python提供了与mysql数据库一起使用的支持。
Python MySQL (Python MySQL)
First of all we have to install python mysql connector package. To install mysql package do the following: go to the Scripts directory in the python. For my case:
首先我们要安装python mysql连接器包。 要安装mysql软件包,请执行以下操作:转到python中的Scripts目录。 就我而言:
D:\ Software \ Python \ Python36-32 \ Scripts (D:\Software\Python\Python36-32\Scripts)
Open command prompt here. Then give the following command:
在此处打开命令提示符。 然后输入以下命令:
D:\Software\Python\Python36-32\Scripts> pip install pymysqlYou will see as following:

您将看到以下内容:
That’s it, python mysql connector package is installed.
就是这样,python mysql连接器软件包已安装。
数据库连接 (Database Connection)
I am using xampp for my database. This is an optional step, if you have MySQL already installed then you can skip this step.
我正在为数据库使用xampp。 这是一个可选步骤,如果已经安装了MySQL,则可以跳过此步骤。
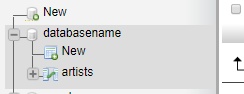
Before starting coding run the xampp control panel and start Apache & MySQL. From browser (https://localhost/phpmyadmin/), I have created a database named databaseName which is shown below:
在开始编码之前,请运行xampp控制面板并启动Apache和MySQL。 从浏览器( https://localhost/phpmyadmin/ ),我创建了一个名为databaseName的数据库 ,如下所示:
Python MySQL示例 (Python MySQL Example)
First we have to build connection with the mysql. The following will connect to mysql database in python program.
首先,我们必须与mysql建立连接。 以下将在python程序中连接到mysql数据库。
import pymysql

#database connection
connection = pymysql.connect(host="localhost",user="root",passwd="",database="databaseName" )
cursor = connection.cursor()
# some other statements  with the help of cursor
connection.close()
First we have imported the pymysql, then established a connection. The pymysql.connect() takes four arguments. First one is host name i.e. localhost, and the rest three are as they are declared. Using this connection we have created a cursor that will be used for different queries.
首先,我们导入了pymysql ,然后建立了连接。 pymysql.connect()接受四个参数。 第一个是主机名,即localhost,其余三个是声明的主机名。 使用此连接,我们创建了一个游标,该游标将用于不同的查询。
Python MySQL示例–创建表 (Python MySQL Example – creating table)
Let’s now create a table named Artist having columns – name, id and track.
现在,让我们创建一个名为Artist的表,其中包含列-名称,ID和轨道。
import pymysql

#database connection
connection = pymysql.connect(host="localhost", user="root", passwd="", database="databaseName")
cursor = connection.cursor()
# Query for creating table
ArtistTableSql = """CREATE TABLE Artists(
ID INT(20) PRIMARY KEY AUTO_INCREMENT,
NAME  CHAR(20) NOT NULL,
TRACK CHAR(10))"""

cursor.execute(ArtistTableSql)
connection.close()
A table named Artists will be created. You can see it in your browser.
将创建一个名为Artists的表。 您可以在浏览器中看到它。
Python MySQL插入 (Python MySQL insert)
Now our interest is to insert some row entities in the table. First you have to write the queries to insert different data, then execute it with the help of cursor.
现在,我们的兴趣是在表中插入一些行实体。 首先,您必须编写查询以插入不同的数据,然后在游标的帮助下执行查询。
import pymysql

#database connection
connection = pymysql.connect(host="localhost", user="root", passwd="", database="databaseName")
cursor = connection.cursor()

# queries for inserting values
insert1 = "INSERT INTO Artists(NAME, TRACK) VALUES('Towang', 'Jazz' );"
insert2 = "INSERT INTO Artists(NAME, TRACK) VALUES('Sadduz', 'Rock' );"

#executing the quires
cursor.execute(insert1)
cursor.execute(insert2)


#commiting the connection then closing it.
connection.commit()
connection.close()
Python MySQL选择 (Python MySQL select)
We have inserted two rows in the above code. Now we want to retrieve those. To do this have a look at the following example:
我们在上面的代码中插入了两行。 现在我们要检索那些。 为此,请看以下示例:
import pymysql

#database connection
connection = pymysql.connect(host="localhost", user="root", passwd="", database="databaseName")
cursor = connection.cursor()

# queries for retrievint all rows
retrive = "Select * from Artists;"

#executing the quires
cursor.execute(retrive)
rows = cursor.fetchall()
for row in rows:
   print(row)


#commiting the connection then closing it.
connection.commit()
connection.close()
It will output:

它将输出:
Python MySQL更新 (Python MySQL update)
Suppose, you want to rename the name of the first artist from Towang to Tauwang. To update any attribute of any entity do the following:
假设您想将第一位艺术家的名字从Towang重命名为Tauwang。 要更新任何实体的任何属性,请执行以下操作:
updateSql = "UPDATE  Artists SET NAME= 'Tauwang'  WHERE ID = '1' ;"
cursor.execute(updateSql  )
Python MySQL删除 (Python MySQL delete)
To delete an entity you have to execute the as followings:
要删除实体,您必须执行以下操作:
deleteSql = "DELETE FROM Artists WHERE ID = '1'; "
cursor.execute(deleteSql )
Python MySQL示例–删除表 (Python MySQL Example – Drop Table)
Sometimes you may need to drop any table before creating any new table so that name collision does not take place. To drop the Artists table, you can do this as following:
有时,您可能需要在创建任何新表之前删除任何表,以免发生名称冲突。 要删除“艺术家”表,可以执行以下操作:
dropSql = "DROP TABLE IF EXISTS Artists;"
cursor.execute(dropSql)
Then the Artists table will be dropped from the database databaseName. This is all for python mysql tutorial. For further information you can visit here.
然后,将Artists表从数据库databaseName中删除。 这就是python mysql教程的全部内容。 有关更多信息,请访问此处 。
翻译自: https://www.journaldev.com/15539/python-mysql-example-tutorial


 576
576

 被折叠的 条评论
为什么被折叠?
被折叠的 条评论
为什么被折叠?
 到【灌水乐园】发言


