


In previous articles here at Experts Exchange, I explained how to install Microsoft Office Picture Manager 2010 with Office 2013 and Office 2016/365. This was necessitated by Microsoft's removal of Picture Manager from the Office 2013 and Office 2016 suites (and, of course, Office 365). It had been included in Office 2003, Office 2007, and Office 2010, but with its departure since 2010, we certainly did not expect it to re-emerge in Office 2019 — we can now confirm that it did not!
在此之前在Experts Exchange上的文章中,我解释了如何在Office 2013和Office 2016/365上安装Microsoft Office Picture Manager 2010 。 Microsoft从Office 2013和Office 2016套件(当然还有Office 365)中删除了图片管理器,因此需要这样做。 它已包含在Office 2003,Office 2007和Office 2010中,但是自2010年以来一直退出,我们当然不希望它重新出现在Office 2019中 -现在我们可以确认它没有!
If you went straight from Office 2010 (or earlier) to Office 2019, you may be surprised and disappointed to find that Picture Manager is not included in the suite. This article explains how to install it alongside Office 2019.
如果您直接从Office 2010(或更早版本)转到Office 2019,则可能会感到惊讶和失望,发现该套件中未包含Picture Manager。 本文介绍如何与Office 2019一起安装它。
As mentioned in my previous articles, Picture Manager is a component of SharePoint Designer 2010, which is available as a free download at the Microsoft site:
如我之前的文章中所述,Picture Manager是SharePoint Designer 2010的组件,可以从Microsoft网站免费下载:
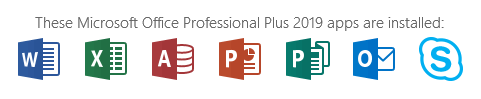
32-bit 32位 http://www.microsoft.com/en-us/download/details.aspx?id=16573 http://www.microsoft.com/zh-cn/download/details.aspx?id=16573 64-bit 64位 http://www.microsoft.com/en-us/download/details.aspx?id=24309 http://www.microsoft.com/zh-cn/download/details.aspx?id=24309The 32-bit/64-bit distinction refers to the bit-level of your Office applications, not the bit-level of your Windows. For this article (and all the screenshots in it), I used a Windows 10 Pro 32-bit system with 32-bit Office Professional Plus 2019 that contains these apps (sadly, no Picture Manager):
32位/ 64位区别是指Office应用程序的位级别, 而不是 Windows的位级别。 对于本文(及其中的所有屏幕快照),我使用了Windows 10 Pro 32位系统和32位Office Professional Plus 2019 ,其中包含以下应用程序(不幸的是,没有图片管理器):
After downloading the correct bit-level of SharePoint Designer 2010 for your Office environment, run its setup file. You will see the license agreement, which I recommend reading in its entirety, but the key term is this:
为您的Office环境下载正确的SharePoint Designer 2010位级别后,运行其安装文件。 您会看到许可协议,我建议完整阅读该协议,但关键术语是:
1. INSTALLATION AND USE RIGHTS. You may install and use any number of copies of the software on your devices.
1.安装和使用权利。 您可以在设备上安装和使用任意数量的软件副本。
Acceptance of the license agreement will result in a legal installation of Picture Manager, i.e., one that is in license compliance.
接受许可协议将导致Picture Manager的合法安装,即符合许可要求的安装。
Continue with the setup wizard and you'll see this:
继续安装向导,您将看到以下内容:
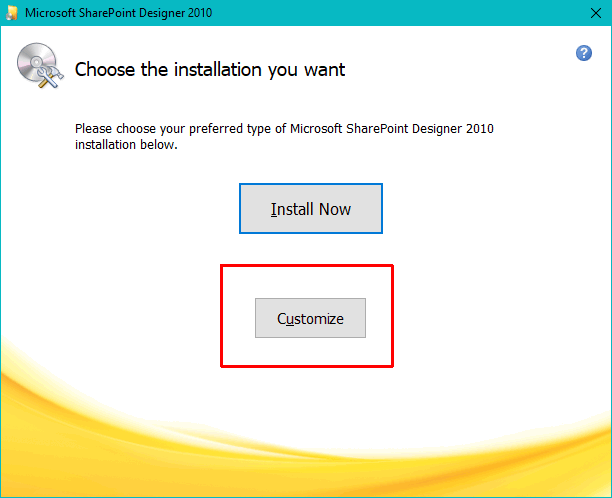
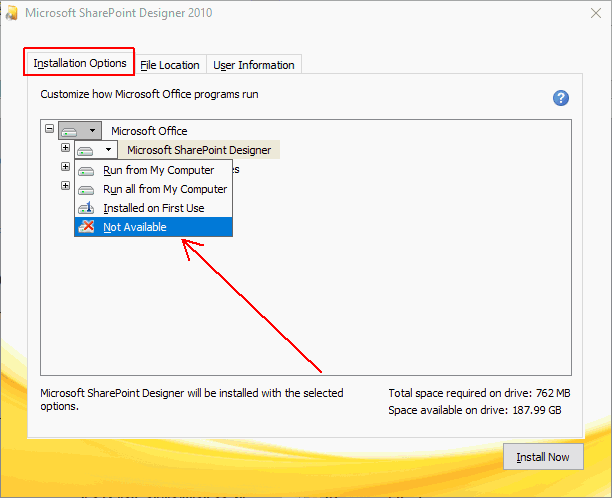
Click the Customize button, NOT the Install Now button. Then, in the Installation Options tab, click the drop-down arrow in all three main areas under Microsoft Office and select Not Available:
单击自定义按钮,而不是 立即安装按钮。 然后,在“ 安装选项”选项卡中,单击Microsoft Office下所有三个主要区域的下拉箭头,然后选择“ 不可用” :
After selecting Not Available in all three main sections (Microsoft SharePoint Designer, Office Shared Features, Office Tools), you will see this:
在所有三个主要部分(Microsoft SharePoint Designer,Office共享功能,Office工具)中选择“ 不可用”后,您将看到:
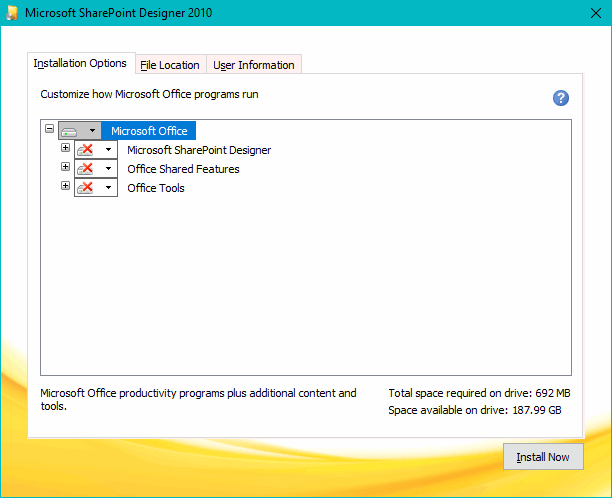
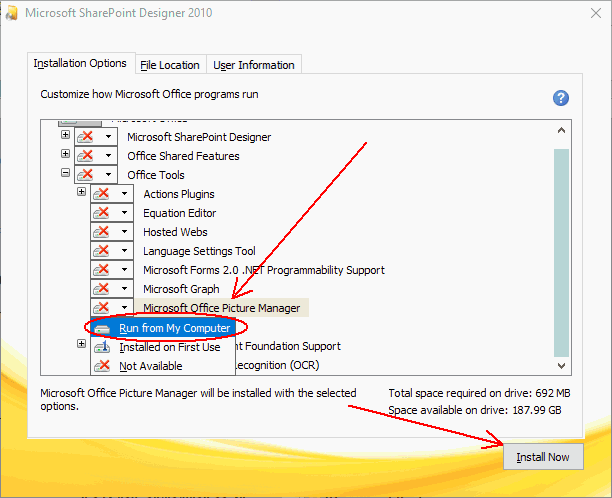
Next, expand Office Tools by clicking the plus sign and you will see Microsoft Office Picture Manager. This is the only component that you need to install. Click the drop-down arrow next to Microsoft Office Picture Manager and pick Run from My Computer, which causes the red X to disappear. Then click the Install Now button:
接下来,通过单击加号展开Office Tools ,您将看到Microsoft Office Picture Manager 。 这是您唯一需要安装的组件。 单击Microsoft Office Picture Manager旁边的下拉箭头,然后选择从本机运行 ,这将导致红色X消失。 然后单击立即安装按钮:
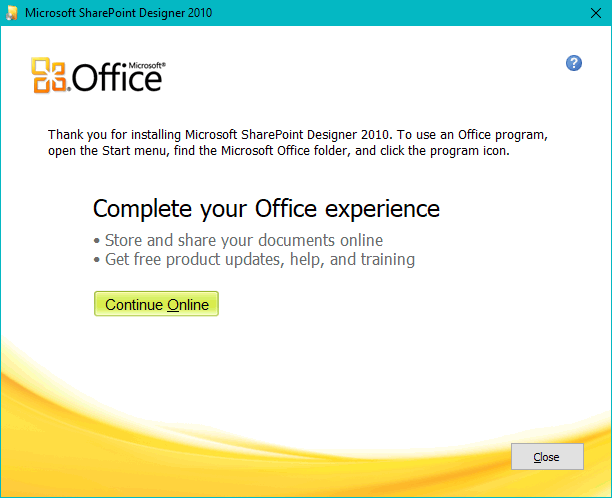
The installer will run and you will receive the installation completed dialog:
安装程序将运行,您将收到安装完成对话框:
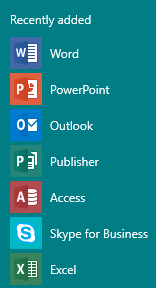
Here's what my Windows 10 Start menu looked like right after installing Office Professional Plus 2019:
这是安装Office Professional Plus 2019之后我的Windows 10开始菜单的外观:
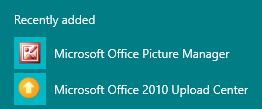
Here's what it looked like right after installing Picture Manager2010:
这是安装Picture Manager2010之后的外观:
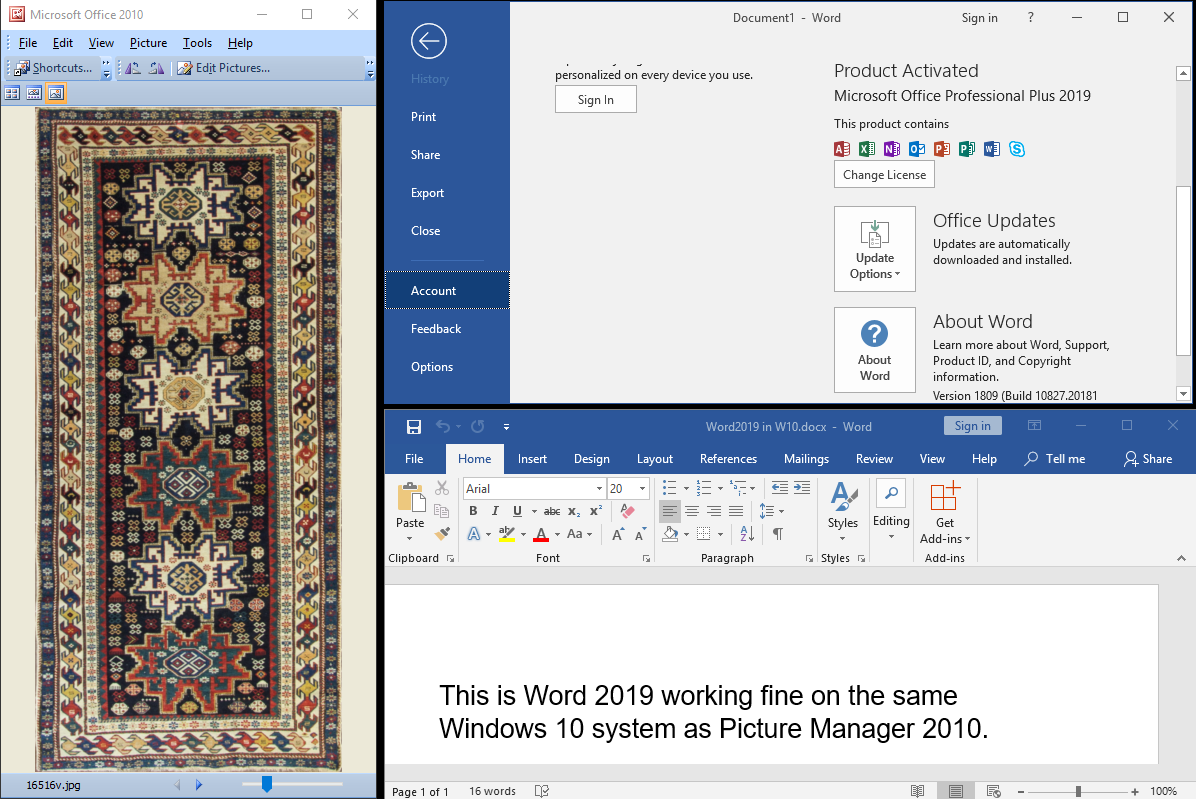
Microsoft Office Picture Manager 2010 works well alongside the Office 2019 applications:
Microsoft Office Picture Manager 2010可以与Office 2019应用程序很好地配合使用:
The main purpose of this article is to show that Picture Manager 2010 can work on the same computer with Office 2019 (and to explain how to achieve that). However, it's worthwhile to note that the method in this article does not rely on having Office 2019 — or any version of Microsoft Office — installed. So, for example, if you have another office suite, such as LibreOffice or OpenOffice, but still wish to have Picture Manager, this technique works fine. In fact, it works with no office suite installed.
本文的主要目的是表明Picture Manager 2010可以与Office 2019在同一台计算机上运行(并说明如何实现)。 但是,值得注意的是本文中的方法并不依赖于安装Office 2019或任何版本的Microsoft Office。 因此,例如,如果您有另一个办公套件,例如LibreOffice或OpenOffice,但仍然希望有Picture Manager,则此技术可以正常工作。 实际上,它无需安装Office套件即可工作。
If you find this article to be helpful, please click the thumbs-up icon below. This lets me know what is valuable for EE members and provides direction for future articles. Thanks very much! Regards, Joe
如果您发现本文有帮助,请单击下面的大拇指图标。 这使我知道什么对EE成员有价值,并为以后的文章提供了指导。 非常感谢! 问候乔


 1382
1382

 被折叠的 条评论
为什么被折叠?
被折叠的 条评论
为什么被折叠?
 到【灌水乐园】发言


