


android
这篇文章介绍了如何向Google地图添加天气图层。 我们希望将天气信息添加到地图上,以便可以查看有关云,温度,压力等的信息。
在上一篇文章中,我们讨论了如何获取天气信息以及如何解析数据以创建UI,现在我们想向地图添加其他天气图块。 为此,我们开始创建一个包含地图活动的示例项目。
如果我们使用Android Studio(按照我的建议),则非常简单且快速。
在Android Studio中创建Android Map项目
第一步是在Android中创建一个Google Map项目。 与往常一样,我们选择File-> New project,并在插入一些项目信息后进入此页面:


现在,我们选择Google Map Activity。 Android Studio将在我们的项目中创建用于处理Google Map的所有内容。 最后要做的是添加密钥以使用地图。 如果您查看项目内的文件,您将找到创建调试密钥的方法。 拥有钥匙后,就可以使用地图了。
将天气图块添加到Google地图
下一步是向Google地图添加天气图块。 为此,我们将使用开放天气地图作为天气提供者,但您可以使用其他天气提供者。 我们在MapsActivity(或创建项目时使用的类的名称)中修改setUpMap并添加一个新的TileProvider 。 Tile提供程序是必不可少的,我们必须在提供程序中实现该接口,以便获取覆盖地图的图像。 瓦片是在地图上表示的图像。 对于OWM,我们用于检索图像的URL是:
http://tile.openweathermap.org/map/%s/%d/%d/%d.png其中%s表示我们要使用的图块类型,例如云,温度等,而其他三个整数(%d)表示缩放比例,x,y坐标。
在我们的例子中,我们使用一个UrlTileProvider ,它可用于从HTTP连接中检索图块。 我们的实现非常简单:
private TileProvider createTilePovider() {
        TileProvider tileProvider = new UrlTileProvider(256, 256) {
            @Override
            public URL getTileUrl(int x, int y, int zoom) {
                String fUrl = String.format(OWM_TILE_URL, tileType == null ? "clouds" : tileType, zoom, x, y);
                URL url = null;
                try {
                    url = new URL(fUrl);
                }
                catch(MalformedURLException mfe) {
                    mfe.printStackTrace();
                }

                return url;
            }
} ; 最后,在我们的setUpMap()方法中,将地图提供者添加到地图中:
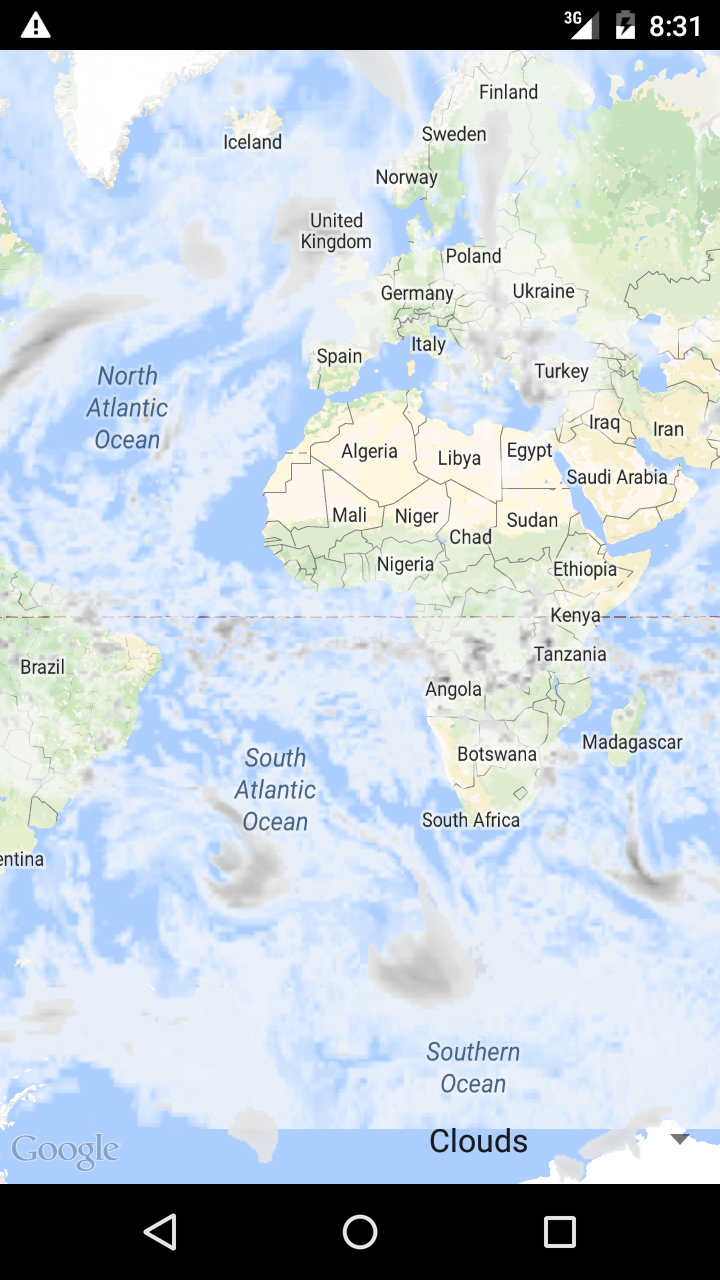
tileOver = mMap.addTileOverlay(new TileOverlayOptions().tileProvider(createTransparentTileProvider())); 其中tileOver是实例TileOverlay 。 运行示例,我们得到:

添加天气数据图块
现在,我们想在地图上添加一个微调框,以便我们可以选择要在地图顶部添加的信息类型,例如温度,风,压力等。
这非常简单,因为我们可以修改activity_maps.xml并添加微调器:
<RelativeLayout xmlns:android="http://schemas.android.com/apk/res/android"
    xmlns:tools="http://schemas.android.com/tools"
    android:layout_width="match_parent"
    android:layout_height="match_parent">

  <fragment  android:id="@+id/map"
android:name="com.google.android.gms.maps.SupportMapFragment"android:layout_width="match_parent"android:layout_height="match_parent"
tools:context=".MapsActivity" />
<Spinner
android:layout_width="wrap_content"
android:layout_height="wrap_content"
android:layout_alignParentBottom="true"
android:layout_alignParentRight="true"
android:layout_marginBottom="10dp"
android:layout_marginRight="10dp"
android:id="@+id/tileType"/>
</RelativeLayout>最后,在onCreate()中,添加代码来处理微调器:
spinner = (Spinner) findViewById(R.id.tileType);
String[] tileName = new String[]{"Clouds", "Temperature", "Precipitations", "Snow", "Rain", "Wind", "Sea level press."};
ArrayAdapter adpt = new ArrayAdapter(this, android.R.layout.simple_spinner_item, tileName);
spinner.setAdapter(adpt);
spinner.setOnItemSelectedListener(new AdapterView.OnItemSelectedListener() {
@Override
public void onNothingSelected(AdapterView parent) {
}
@Override
public void onItemSelected(AdapterView parent, View view, int position, long id) {
// Check click
switch (position) {
case 0:
tileType = "clouds";
break;
case 1:
tileType = "temp";
break;
case 2:
tileType = "precipitation";
break;
case 3:
tileType = "snow";
break;
case 4:
tileType = "rain";
break;
case 5:
tileType = "wind";
break;
case 6:
tileType = "pressure";
break;
}
if (mMap != null) {
tileOver.remove();
setUpMap();
}
}
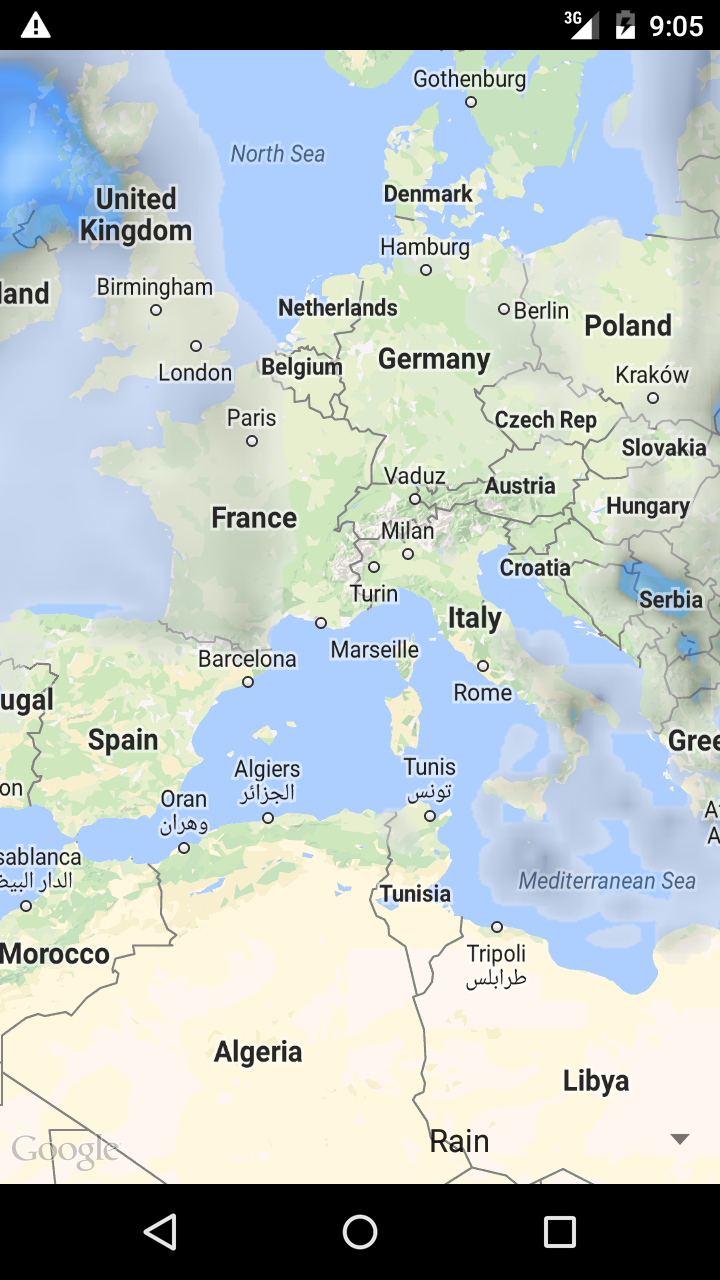
});我们仅列出所有图块类型,并且当用户选择其中一种时,我们会在地图顶部显示相关图像。 例如,如果选择温度图,我们将:


如果查看图像,您会注意到该图块几乎覆盖了后面的地图。 发生这种情况是因为我们没有一种简单的方法来修改地图的透明度。
将透明磁贴添加到Google地图
如果我们希望天气数据不覆盖后面的地图,那么最后一步是修改我们的提供程序。 下面显示的代码是从此帖子派生的。 换句话说,我们创建了一个自定义提供程序,以便我们可以更改在地图上添加的图像的不透明度:
public class TransparentTileOWM implements TileProvider {
    //private String url;
    private Paint opacityPaint = new Paint();
    private String tileType;

    private static final String OWM_TILE_URL = "http://tile.openweathermap.org/map/%s/%d/%d/%d.png";

    /**
     * This constructor assumes the url parameter contains three placeholders for the x- and y-positions of
     * the tile as well as the zoom level of the tile. The placeholders are assumed to be {x},
     * {y}, and {zoom}. An example
     * for an OpenWeatherMap URL would be: http://tile.openweathermap.org/map/precipitation/{zoom}/{x}/{y}.png
     *
     */
    public TransparentTileOWM(String tileType)
    {
        this.tileType = tileType;
        setOpacity(50);
    }

    /**
     * Sets the desired opacity of map {@link Tile}s, as a percentage where 0% is invisible and 100% is completely opaque.
     * @param opacity The desired opacity of map {@link Tile}s (as a percentage between 0 and 100, inclusive)
     */
    public void setOpacity(int opacity)
    {
        int alpha = (int)Math.round(opacity * 2.55);    // 2.55 = 255 * 0.01
        opacityPaint.setAlpha(alpha);
    }

    @Override
    public Tile getTile(int x, int y, int zoom)
    {
        URL tileUrl = getTileUrl(x, y, zoom);

        Tile tile = null;
        ByteArrayOutputStream stream = null;

        try
        {
            Bitmap image = BitmapFactory.decodeStream(tileUrl.openConnection().getInputStream());
            image = adjustOpacity(image);

            stream = new ByteArrayOutputStream();
            image.compress(Bitmap.CompressFormat.PNG, 100, stream);

            byte[] byteArray = stream.toByteArray();

            tile = new Tile(256, 256, byteArray);
        }
        catch(IOException e)
        {
            e.printStackTrace();
        }
        finally
        {
            if(stream != null)
            {
                try
                {
                    stream.close();
                }
                catch(IOException e) {}
            }
        }

        return tile;
    }

    /**
     * Helper method that returns the {@link URL} of the tile image for the given x/y/zoom location.
     *
     * This method assumes the URL string provided in the constructor contains three placeholders for the x-
     * and y-positions as well as the zoom level of the desired tile; {x}, {y}, and
     * {zoom}. An example for an OpenWeatherMap URL would be:
     * http://tile.openweathermap.org/map/precipitation/{zoom}/{x}/{y}.png


     *
     * @param x The x-position of the tile
     * @param y The y-position of the tile
     * @param zoom The zoom level of the tile
     *
     * @return The {@link URL} of the desired tile image
     */
    private URL getTileUrl(int x, int y, int zoom)
    {
        String tileUrl = String.format(OWM_TILE_URL, tileType, zoom, x, y);
        try
        {
            return new URL(tileUrl);
        }
        catch(MalformedURLException e)
        {
            throw new AssertionError(e);
        }
    }

    /**
     * Helper method that adjusts the given {@link Bitmap}'s opacity to the opacity previously set via
     * {@link #setOpacity(int)}. Stolen from Elysium's comment at StackOverflow.
     *
     * @param bitmap The {@link Bitmap} whose opacity to adjust
     * @return A new {@link Bitmap} with an adjusted opacity
     *
     * @see htp://stackoverflow.com/questions/14322236/making-tileoverlays-transparent#comment19934097_14329560
     */
    private Bitmap adjustOpacity(Bitmap bitmap)
    {
        Bitmap adjustedBitmap = Bitmap.createBitmap(256, 256, Bitmap.Config.ARGB_8888);

        Canvas canvas = new Canvas(adjustedBitmap);
        canvas.drawBitmap(bitmap, 0, 0, opacityPaint);

        return adjustedBitmap;
    }

}
现在运行代码并使用此新提供程序,我们有:

翻译自: https://www.javacodegeeks.com/2015/04/android-google-map-add-weather-data.html
android


 1万+
1万+

 被折叠的 条评论
为什么被折叠?
被折叠的 条评论
为什么被折叠?
 到【灌水乐园】发言


