


flutter
在Flutter Firebase身份验证的这篇文章中,我们将了解如何使用Firebase的flutter插件向我们的Firebase应用程序验证用户身份。
如果您不熟悉抖动,建议您先阅读此内容,然后再继续。 它将为您提供有关抖动的基本概念,并帮助您完成本教程。
https://ayusch.com/getting-started-with-flutter-app-development/
我们将创建一个具有登录屏幕和主页的基本应用程序。 它可以让用户登录和注销应用程序。 我们还将具有让用户注册到我们的Firebase应用程序的功能。
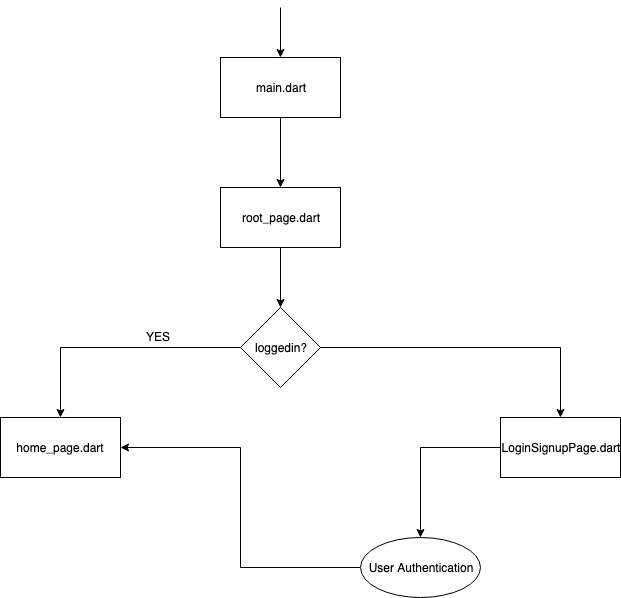
这是应用程序的基本流程:
所以,让我们开始吧!
创建Flutter应用程序
转到Android Studio并通过单击“新建”->“ Flutter项目”并遵循该向导,创建一个Flutter应用程序。
删除默认计数器应用程序的代码,并添加以下行:
 import 'package:flutter/material.dart' ;
 import 'package:flutter_firebase_auth/root_page.dart' ;
 import 'LoginSignupPage.dart' ;
 import 'authentication.dart' ;
 void main() => runApp(MyApp());
 MyApp class extends StatelessWidget {

  // This widget is the root of your application.

  @override

  Widget build(BuildContext context) {

    return MaterialApp(

      title: 'Flutter Authentication AndroidVille' ,

      theme: ThemeData(

        primarySwatch: Colors.blue,

      ),

      home: RootPage(

        auth: new Auth(),

      ),

    );

  }
 }
我们将很快创建RootPage。
注意:请记住不要使用AndroidX工件。 Firebase的flutter插件包含一些AndroidX不支持的注释。 在升级之前,不要使用AndroidX。
添加依赖项
我们需要在android / flutter中添加一些依赖关系,以便Flutter使用Firebase身份验证。
首先,将此添加到您的项目级别的build.gradle文件。 对于扑扑的项目,这可以在android / build.gradle中找到
classpath 'com.google.gms:google-services:4.3.2'接下来,我们需要将google-services插件应用于应用程序级别build.gradle 。 这可以在android / app / build.gradle中找到。 将此行添加到文件末尾。
apply plugin: 'com.google.gms.google-services'最后,我们需要为flutter添加firebase插件。 打开pubspec.yaml并在依赖项下添加以下行:
firebase_auth: ^ 0.6 . 6
创建Flutter Firebase身份验证服务
接下来,我们需要为flutter的firebase登录系统创建身份验证服务。 所有页面(或android中的活动)都将使用它与Firebase进行通信。
创建一个新的dart文件,名称为: authentication.dart
我们将首先添加一个抽象的BaseAuth类,该类将由Auth类实现。 这包含登录,注册,获取用户信息和注销用户的基本方法。
 import 'dart:async' ;
 import 'package:firebase_auth/firebase_auth.dart' ;
 abstract class BaseAuth {

  Future<String> signIn(String email, String password);

  Future<String> signUp(String email, String password);

  Future<FirebaseUser> getCurrentUser();

  Future< void > signOut();
 }
在同一文件中,创建一个名为Auth的类,并实现BaseAuth类。 覆盖所有方法,如下所示:
 import 'dart:async' ;
 import 'package:firebase_auth/firebase_auth.dart' ;
 abstract class BaseAuth {

  Future<String> signIn(String email, String password);

  Future<String> signUp(String email, String password);

  Future<FirebaseUser> getCurrentUser();

  Future< void > signOut();
 }
 Auth class implements BaseAuth {

  final FirebaseAuth _firebaseAuth = FirebaseAuth.instance;
  Future<String> signIn(String email, String password) async {

    FirebaseUser user = await _firebaseAuth.signInWithEmailAndPassword(email: email, password: password);

    return user.uid;

  }

  Future<String> signUp(String email, String password) async {

    FirebaseUser user = await _firebaseAuth.createUserWithEmailAndPassword(email: email, password: password);

    return user.uid;

  }

  Future<FirebaseUser> getCurrentUser() async {

    FirebaseUser user = await _firebaseAuth.currentUser();

    return user;

  }

  Future< void > signOut() async {

    return _firebaseAuth.signOut();

  }
 }
我们在这里所做的是创建一个全局的Firebase实例,并使用它来为用户执行登录/注销。
创建根页面
我们需要创建一个根目录来标识用户是否已登录。 如果用户已登录,我们会将其定向到主页,否则将向他显示登录/注册屏幕。
创建一个root_page.dart ,如下所示:
 import 'package:flutter/material.dart' ;
 import 'authentication.dart' ;
 import 'LoginSignupPage.dart' ;
 import 'home_page.dart' ;
 RootPage class extends StatefulWidget {

  RootPage({ this .auth});
  final BaseAuth auth;
  @override

  State<StatefulWidget> createState() => new _RootPageState();
 }
 enum AuthStatus {

  NOT_DETERMINED,

  LOGGED_OUT,

  LOGGED_IN,
 }
 _RootPageState class extends State<RootPage> {

  AuthStatus authStatus = AuthStatus.NOT_DETERMINED;

  String _userId = "" ;
  @override

  void initState() {

    super .initState();

    widget.auth.getCurrentUser().then((user) {

      setState(() {

        if (user != null ) {

          _userId = user?.uid;

        }

        authStatus =

            user?.uid == null ? AuthStatus.LOGGED_OUT : AuthStatus.LOGGED_IN; ? AuthStatus.LOGGED_OUT : AuthStatus.LOGGED_IN;

      });

    });

  }

  void _onLoggedIn() {

    widget.auth.getCurrentUser().then((user) {

      setState(() {

        _userId = user.uid.toString();

      });

    });

    setState(() {

      authStatus = AuthStatus.LOGGED_IN;

    });

  }

  void _onSignedOut() {

    setState(() {

      authStatus = AuthStatus.LOGGED_OUT;

      _userId = "" ;

    });

  }

  Widget progressScreenWidget() {

    return Scaffold(

      body: Container(

        alignment: Alignment.center,

        child: CircularProgressIndicator(),

      ),

    );

  }

  @override

  Widget build(BuildContext context) {

    switch (authStatus) {

      case AuthStatus.NOT_DETERMINED:

        return progressScreenWidget();

        break ;

      case AuthStatus.LOGGED_OUT:

        return new LoginSignupPage(

          auth: widget.auth,

          onSignedIn: _onLoggedIn,

        );

        break ;

      case AuthStatus.LOGGED_IN:

        if (_userId.length > 0 && _userId != null ) {

          return new HomePage(

            userId: _userId,

            auth: widget.auth,

            onSignedOut: _onSignedOut,

          );

        } else

          return progressScreenWidget();

        break ;

      default :

        return progressScreenWidget();

    }

  }
 }
这里要注意的主要是构建方法。 对于不同的用户状态,我们返回不同的小部件。 我们将很快创建LoginSignupPage和HomePage 。
为了显示进度条,我们使用Flutter提供的默认CircularProgressIndicator 。
另外,请注意,我们在构造函数中传递了auth对象。 这是从main.dart传递的
创建LoginSignupPage
这是最重要的部分,我们将创建一个登录/注册表单。 我们将基于formMode区分这些形式。
我们总共有6个小部件:
- 电子邮件字段。
- 密码字段。
- 登录按钮
- 在登录和注册表格之间切换的按钮。
- 进度条
- 错误消息小部件。
这是LoginSignupPage的代码:
 import 'package:flutter/material.dart' ;
 import 'package:firebase_auth/firebase_auth.dart' ;
 import 'authentication.dart' ;
 class LoginSignupPage extends StatefulWidget {

  .auth, LoginSignupPage({ this .auth, this .onSignedIn});
  final BaseAuth auth;

  final VoidCallback onSignedIn;
  @override

  State<StatefulWidget> createState() => new _LoginSignupPageState();
 }
 enum FormMode { LOGIN, SIGNUP }
 class _LoginSignupPageState extends State<LoginSignupPage> { _LoginSignupPageState State<LoginSignupPage> {

  final _formKey = new GlobalKey<FormState>();
  String _email;

  String _password;

  String _errorMessage = "" ;
  // this will be used to identify the form to show

  FormMode _formMode = FormMode.LOGIN;

  bool _isIos = false ;

  bool _isLoading = false ;
  @override

  Widget build(BuildContext context) {

    return new Scaffold(

      appBar: new AppBar(

        title: new Text( "Flutter login demo" ),

      ),

      body: Column(

        children: <Widget>[

          formWidget(),

          loginButtonWidget(),

          secondaryButton(),

          errorWidget(),

          progressWidget()

        ],

      ),

    );

  }

  Widget progressWidget() {

    if (_isLoading) {

      return Center(child: CircularProgressIndicator());

    }

    return Container(

      height: 0.0 ,

      width: 0.0 ,

    );

  }

  Widget formWidget() {

    return Form(

      key: _formKey,

      child: Column(

        children: <Widget>[

          _emailWidget(),

          _passwordWidget(),

        ],

      ),

    );

  }

  Widget _emailWidget() {

    return Padding(

      padding: const EdgeInsets.fromLTRB( 0.0 , 100.0 , 0.0 , 0.0 ),

      child: TextFormField(

        maxLines: 1 ,

        keyboardType: TextInputType.emailAddress,

        autofocus: false ,

        decoration: new InputDecoration(

            hintText: 'Enter Email' ,

            icon: new Icon(

              Icons.mail,

              color: Colors.grey,

            )),

        validator: (value) => value.isEmpty ? 'Email cannot be empty' : null ,

        onSaved: (value) => _email = value.trim(),

      ),

    );

  }

  Widget _passwordWidget() {

    return Padding(

      padding: const EdgeInsets.fromLTRB( 0.0 , 15.0 , 0.0 , 0.0 ),

      child: new TextFormField(

        maxLines: 1 ,

        obscureText: true ,

        autofocus: false ,

        decoration: new InputDecoration(

            hintText: 'Password' ,

            icon: new Icon(

              Icons.lock,

              color: Colors.grey,

            )),

        validator: (value) => value.isEmpty ? 'Password cannot be empty' : null ,

        onSaved: (value) => _password = value.trim(),

      ),

    );

  }

  Widget loginButtonWidget() {

    return new Padding(

        padding: EdgeInsets.fromLTRB( 0.0 , 45.0 , 0.0 , 0.0 ),

        child: new MaterialButton(

          elevation: 5.0 ,

          minWidth: 200.0 ,

          height: 42.0 ,

          color: Colors.blue,

          child: _formMode == FormMode.LOGIN

              ? new Text( 'Login' ,

                  style: new TextStyle(fontSize: 20.0 , color: Colors.white))

              : new Text( 'Create account' ,

                  style: new TextStyle(fontSize: 20.0 , color: Colors.white)),

          onPressed: _validateAndSubmit,

        ));

  }

  Widget secondaryButton() {

    return new FlatButton(

      child: _formMode == FormMode.LOGIN

          ? new Text( 'Create an account' ,

              style: new TextStyle(fontSize: 18.0 , fontWeight: FontWeight.w300))

          : new Text( 'Have an account? Sign in' ,

              style:

                  new TextStyle(fontSize: 18.0 , fontWeight: FontWeight.w300)),

      onPressed: _formMode == FormMode.LOGIN ? showSignupForm : showLoginForm,

    );

  }

  void showSignupForm() {

    _formKey.currentState.reset();

    _errorMessage = "" ;

    setState(() {

      _formMode = FormMode.SIGNUP;

    });

  }

  void showLoginForm() {

    _formKey.currentState.reset();

    _errorMessage = "" ;

    setState(() {

      _formMode = FormMode.LOGIN;

    });

  }

  Widget errorWidget() {

    if (_errorMessage.length > 0 && _errorMessage != null ) {

      return new Text(

        _errorMessage,

        style: TextStyle(

            fontSize: 13.0 ,

            color: Colors.red,

            height: 1.0 ,

            fontWeight: FontWeight.w300),

      );

    } else {

      return new Container(

        height: 0.0 ,

      );

    }

  }

  bool _validateAndSave() {

    final form = _formKey.currentState;

    if (form.validate()) {

      form.save();

      return true ;

    }

    return false ;

  }

  _validateAndSubmit() async {

    setState(() {

      _errorMessage = "" ;

      _isLoading = true ;

    });

    if (_validateAndSave()) {

      String userId = "" ;

      try {

        if (_formMode == FormMode.LOGIN) {

          userId = await widget.auth.signIn(_email, _password);

        } else {

          userId = await widget.auth.signUp(_email, _password);

        }

        setState(() {

          _isLoading = false ;

        });

        if (userId.length > 0 && userId != null ) {

          widget.onSignedIn();

        }

      } catch (e) {

        setState(() {

          _isLoading = false ;

          if (_isIos) {

            _errorMessage = e.details;

          } else

            _errorMessage = e.message;

        });

      }

    } else {

      setState(() {

        _isLoading = false ;

      });

    }

  }
 }
注意方法validateAndSubmit() ,当按下登录按钮时将调用该方法。 首先,我们将加载的初始状态设置为true和空错误。
同样,我建议您查阅此文章知道的setState方法做。
之后,我们验证表单,然后在formMode的基础上,登录用户或注册用户。 在这两种情况下,我们都将获得userId。
最后,我们在小部件上调用onSignedIn方法。 此方法是VoidCallback ,由根页在LoginSignupPage的构造函数中提供。
最终,根页面调用它的onLoggedIn方法,该方法设置userId并最终调用setState() 。 这将导致重建,我们进入主屏幕。
这样就完成了LoginSignupPage 。 现在,是时候在我们的主页中添加注销功能。
要完成此Flutter firebase身份验证教程,我们必须添加注销功能。 注销仅表示设置空用户ID并重定向到LoginSignupPage。
这是HomePage的代码:
 import 'package:flutter/material.dart' ;
 import 'authentication.dart' ;
 class HomePage extends StatefulWidget {

  HomePage({Key key, this .auth, this .userId, this .onSignedOut})

      : super (key: key);
  final BaseAuth auth;

  final VoidCallback onSignedOut;

  final String userId;
  @override

  State<StatefulWidget> createState() => new _HomePageState();
 }
 _HomePageState class extends State<HomePage> {
  _signOut() async {

    try {

      await widget.auth.signOut();

      widget.onSignedOut();

    } catch (e) {

      print(e);

    }

  }

  @override

  Widget build(BuildContext context) {

    return new Scaffold(

      appBar: new AppBar(

        title: new Text( 'Flutter login demo' ),

        actions: <Widget>[

          new FlatButton(

              child: new Text( 'Logout' ,

                  style: new TextStyle(fontSize: 17.0 , color: Colors.white)),

              onPressed: _signOut)

        ],

      ),

      body: Center(

        child: Text( "hello" ),

      ),

    );

  }
 }
我们将退出按钮保留在应用程序栏中。 当用户点击,我们调用由root_page提供的onSignedOut方法。
根页面简单地设置用户LoggedOut和用户id空字符串authState。
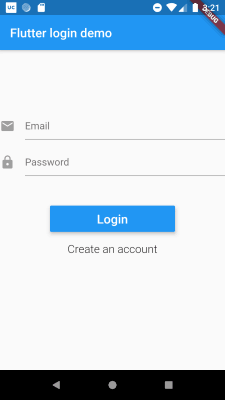
最终结果如下所示:
结论
希望您觉得本文有用。 如果您愿意,请在下面的评论部分中告诉我,我很乐意写更多这样的概念文章。
您可以在以下位置找到本文的完整代码: https : //github.com/Ayusch/Flutter-Firebase-Authentication
如果您有任何疑问,请在下面的评论中告诉我,我们将竭诚为您服务!
翻译自: https://www.javacodegeeks.com/2019/09/flutter-firebase-authentication-tutorial.html
flutter


 2705
2705


 被折叠的 条评论
为什么被折叠?
被折叠的 条评论
为什么被折叠?
 到【灌水乐园】发言


