


 了解如何在Photoshop中使用自动化过程批量处理图像,包括裁剪和调整大小,以创建一致的缩略图。此教程涵盖了从设置裁剪工具、记录操作到批处理文件夹的完整流程。
photoshop 裁剪
If you are executing the same simple sequence of operations in PhotoShop on two or three images, it’s usually fastest to do so manually. But the moment that you repeat the steps more than a few times, it is easiest to record the operation as an automated process.
如果要在PhotoShop中对两个或三个图像执行相同的简单操作序列,通常手动执行速度最快。 但是,当您重复执行多次以上步骤时,将操作记录为自动化过程是最容易的。
Applying an automated sequence of operations to a set of images is known as “batch processing”. Batch processing is typically used to create a series of thumbnails for a gallery, or interchangeable banner images, or headshots for the profile page of a board of directors. In this tutorial we’re using the first example, but in all cases, the final images need to be the same size and aspect ratio.
将自动操作序列应用于一组图像称为“批处理”。 批处理通常用于为画廊创建一系列缩略图,可互换的横幅图像或为董事会资料页面创建头像。 在本教程中,我们使用第一个示例,但是在所有情况下,最终图像都必须具有相同的大小和纵横比。
For a real-world example, you would want your source images to be as high a resolution as possible, and in a lossless format, in order to preserve the highest quality possible during our workflow.
对于现实世界的示例,您希望源图像具有尽可能高的分辨率并且采用无损格式,以便在我们的工作流程中保持最高质量。
In PhotoShop we wish to execute two steps:
在PhotoShop中,我们希望执行两个步骤:
- Crop an image to the width and height that will be shared by all thumbnails. 将图像裁剪为所有缩略图将共享的宽度和高度。
- Export the image in a web-ready format. 以网络就绪格式导出图像。
This sequence will then be “replayed” on all of our images to generate all the thumbnails we need.
然后,将在所有图像上“重播”此序列,以生成我们需要的所有缩略图。
For this example you can use any random assortment of images: the more images and the greater variation in height, width and format, the better. You’ll need at least three, placed in a folder named source. You’ll also want another folder location with a distinct name, such as destination.
对于此示例,您可以使用图像的任意随机组合:图像越多,高度,宽度和格式的差异越大,效果越好。 您至少需要三个,放在名为source的文件夹中。 您还需要另一个具有不同名称的文件夹位置,例如destination 。
The first step in batch processing is to record the sequence of actions that you wish to perform on every image. Think of this as a recorded rehearsal.
批处理的第一步是记录希望对每个图像执行的操作序列。 将此视为记录的彩排。
Before you begin, make sure you have PhotoShop set up correctly: it is particularly important to ensure that you have set PhotoShop’s preferences to measure everything in pixels.
在开始之前,请确保正确设置了PhotoShop :确保已设置PhotoShop的首选项以像素为单位进行度量特别重要。
第1步:设置裁剪工具并打开排练图像 (Step 1: Set up the crop tool and open your rehearsal image)
To ensure that we always crop our images to the same aspect ratio and generate thumbnails that are the right size, choose the crop tool (C on your keyboard) and insert an appropriate width and height measurements for the final image in the Property bar. I’d suggest a square image, 150px × 150px. You may as well set the resolution to 72 pixels per inch at the same time.

为确保始终将图像裁剪为相同的宽高比并生成正确尺寸的缩略图,请选择裁剪工具(键盘上的C ),然后在属性栏中为最终图像插入适当的宽度和高度测量值。 我建议使用150px×150px的正方形图片。 您也可以同时将分辨率设置为每英寸72像素。
In order to be prepared for the next step, open one of your images from the source folder: it doesn’t particularly matter which one.
为了为下一步做准备,请从源文件夹中打开一个图像:哪个图像并不重要。
步骤2:开始新动作。 (Step 2: Start a new action.)
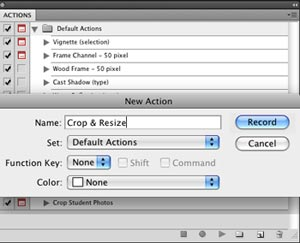 (If you can’t see the
动作”窗口,请从PhotoShop菜单栏中选择“ 窗口/动作 ”,然后单击右下角的“新建动作”按钮)。 您的操作可以被赋予任何唯一的名称,并且可以与任何设置或功能键相关联。 要记住的重要一点是,一旦按下“ 记录” ,您所执行的 每个 动作都会被记录下来。 您可以随后编辑该操作中采取的步骤,但是最好尽可能“干净”地记录您的过程。 请花时间进行下一步。
步骤3:裁剪图片 (Step 3: Crop your image)
 Use the crop tool to select a portion of your image; press
Enter执行裁切。 请注意,由于第一步中我们在属性栏中添加了尺寸,因此裁剪字幕仅限于正方形。 裁剪完成后, 选框区域内的所有内容都将调整为我们指定的尺寸。 也就是说,您可以根据需要将裁切区域设为大或小,但裁切结果的大小始终始终为150px×150px 。
步骤4:停止记录您的动作。 (Step 4: Stop recording your action.)
A fairly common mistake is to continue working after this point, forgetting that the action is still recording. Stop the recording of the action by pressing the square Stop button to the left of the Record button at the bottom of the Actions window. Do not save the image; we won’t export images at this time.
一个普遍的错误是在此之后继续工作,而忘记了该动作仍在记录中。 通过按“ 动作”窗口底部“ 记录”按钮左侧的方形“ 停止”按钮, 停止 记录 动作 。 不要保存图像; 我们目前不会导出图像。
步骤6:批处理您的图像文件夹 (Step 6: Batch process your folder of images)
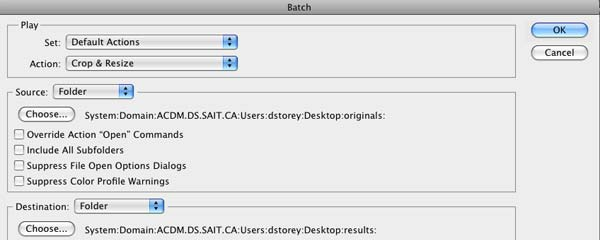 With your action recorded, you can now replay this action on your folder of images. In the PhotoShop menu bar, go to
文件/自动/批处理...
PhotoShop automatically assumes that we want to run the action we just recorded. Choose the source folder containing our original images as our source. Choose Folder as the Destination and locate the other folder you made.
PhotoShop会自动假定我们要运行刚刚记录的操作。 选择包含我们原始图像的源文件夹作为我们的源。 选择“ 文件夹”作为目的地,然后找到您创建的其他文件夹。
As soon as you press OK, the batch process will run. PhotoShop will go through the images, execute the cropping process on each, and save the results in the same format (if JPEGs, you will be prompted for compression quality).
按下OK后,批处理过程将运行。 PhotoShop将检查图像,对每个图像执行裁剪过程,然后将结果以相同格式保存(如果为JPEG,则将提示您提供压缩质量)。
步骤7:检查您的输出图像 (Step 7: Inspect your output images)
You will find that the cropped-and-resized version of the image you rehearsed on is just right, but the other images may look “off”. That is because PhotoShop is assuming everything about the crop process, including the position of the top left corner and the size of the crop area, which was set up in the original action we recorded. Let’s assume that we want control over the position and size of the crop before we execute it.
您会发现,经过排练的图像的裁切和调整大小版本恰到好处,但其他图像可能看起来“关闭”。 这是因为PhotoShop假设了有关裁剪过程的所有内容,包括左上角的位置和裁剪区域的大小,这是在我们记录的原始操作中设置的。 假设我们要在执行之前控制作物的位置和大小。
第8步:在“裁剪”上单击“切换对话框”框 (Step 8: Click the “toggle dialog” box on for the Crop)
 Click in the empty grey square next to the Crop step in the action. This tells PhotoShop “wait for my permission before completing this step”.
步骤9:重新运行批处理过程 (Step 9: Re-run the batch process)
This time, PhotoShop will ask you to approve the position and size of the crop area before proceeding. It will save over the previous versions of the thumbnail files.
这次,PhotoShop将要求您批准裁剪区域的位置和大小,然后再继续。 它将保存缩略图文件的先前版本。
重要笔记 (Important Notes)
If you would prefer not to be prompted for the exported image quality of the thumbnails each time, you can add an Export step to the action. Click on the Crop step of the action and press the Record button again, saving an image into the destination folder (I suggest using File / Save for Web; it doesn’t matter what image you use), then stop recording the action. Before you run the batch process, ensure that “Overide Action “Save As” Commands” is turned on in the Batch dialog box. This will save your destination image using the export settings you used in Save for web. The downside of adding this step is that all images will be exported with the same settings, potentially wasting file space and/or image quality.
如果您不想每次都不提示输入缩略图的导出图像质量,则可以在操作中添加“ 导出”步骤。 单击操作的“ 裁剪”步骤,然后再次按“ 记录”按钮,将图像保存到目标文件夹中(我建议使用File / Save for Web ;无论使用什么图像都没有关系),然后停止记录操作。 你运行该批处理过程之前,请确保“超越控制行动‘另存为’命令”在批处理对话框打开 。 这将使用在“ 保存为网络”中使用的导出设置来保存目标图像。 添加此步骤的缺点是所有图像都将使用相同的设置导出,可能会浪费文件空间和/或图像质量。
- A batch process can consist of as many steps as you like, and be as complex as you wish. 批处理过程可以包含任意多个步骤,并且可以任意复杂。
You can also use File / Automate / Fit Image in PhotoShop to generate thumbnails; the difference is that Fit Image takes whatever side is largest in the targeted image (width or height) and resizes it to the dimension provided. This is useful if you want to preserve the original aspect ratio of the image and have the thumbnails all the same width or height, for example.
您还可以在PhotoShop中使用“ 文件” /“自动” /“适合图像”来生成缩略图。 不同之处在于,“ 适合图像”采用目标图像中最大的一面(宽度或高度)并将其调整为提供的尺寸。 例如,如果要保留图像的原始宽高比并使缩略图的宽度或高度都相同,这将很有用。
For the same reasons as we used Batch Processing – to make a repeated process easier and more consistent - we write functions in PHP or JavaScript.
出于与使用批处理相同的原因-为了简化重复过程并使之更加一致-我们使用PHP或JavaScript编写函数 。
photoshop 裁剪


 被折叠的 条评论
为什么被折叠?
被折叠的 条评论
为什么被折叠?
 到【灌水乐园】发言


