


测试驱动开发是一种编程实践,已由地球上每个开发人员社区宣讲和推广。 但这是开发人员在学习新框架时经常忽略的例程。 从第一天开始编写单元测试,将帮助您编写更好的代码,轻松发现错误并维护更好的开发工作流程。
Angular中的测试驱动开发
Angular是一个完善的前端开发平台,拥有自己的测试工具集。 在本教程中,我们将使用以下工具:
- 茉莉花框架 。 Jasmine是流行JavaScript行为驱动测试框架。 使用Jasmine,您可以编写更具表现力和直接性的测试。 这是一个入门示例。
it('should have a defined component', () => {
        expect(component).toBeDefined();
});- 业力测试赛跑者 。 Karma是一种工具,可让您在多个浏览器上测试应用程序。 Karma具有适用于Chrome,Firefox,Safari和其他许多浏览器的插件。 但是我更喜欢使用无头浏览器进行测试。 无头浏览器缺少GUI,这样一来,您就可以将测试结果保留在终端中。 在本教程中,我们将配置Karma以使其与Chrome以及可选的无头版Chrome一起运行。
- 角度测试实用程序 。 Angular测试实用程序为您提供了一个库来为您的应用程序创建测试环境。
@angular/core/testingfakeAsync@angular/core/testing包的一部分包括TestBed和ComponentFixtures类的类以及async和fakeAsync类的帮助器函数。 如果您想编写测试来揭示您的组件如何与自己的模板,服务和其他组件交互,则必须熟悉这些实用程序。
在本教程中,我们将不介绍使用量角器的功能测试。 量角器是一种流行的端到端测试框架,它使用实际的浏览器与应用程序的UI交互。
在本教程中,我们更加关注测试组件和组件的逻辑。 但是,我们将编写一些测试,以演示如何使用Jasmine框架进行基本的UI交互。
我们的目标
本教程的目的是在测试驱动的开发环境中为Pastebin应用程序创建前端。 在本教程中,我们将遵循流行的TDD咒语,即“红色/绿色/重构”。 我们将编写最初失败的测试(红色),然后对我们的应用程序代码进行测试以使它们通过(绿色)。 当代码开始发臭时,我们将对其进行重构,这意味着它变得肿且丑陋。
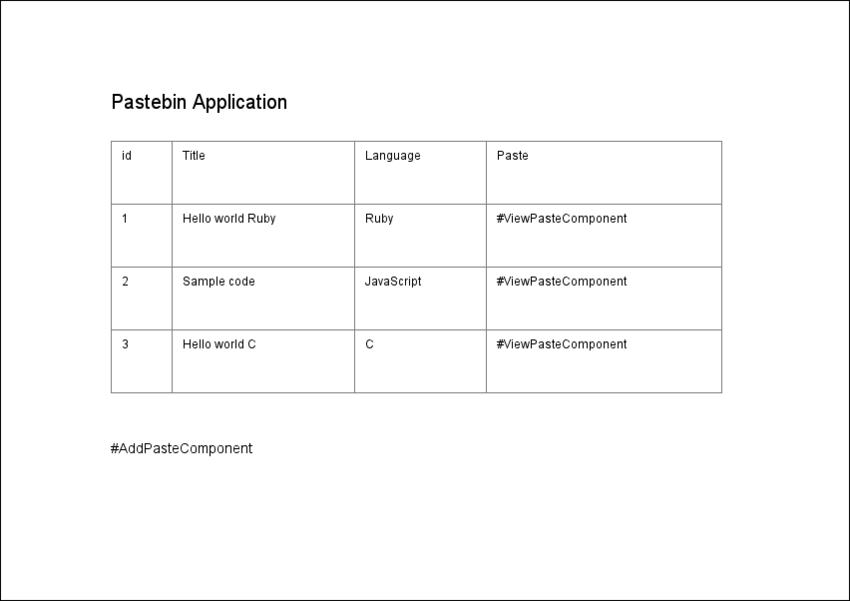
我们将为组件,组件模板,服务和Pastebin类编写测试。 下图说明了Pastebin应用程序的结构。 变灰的项目将在本教程的第二部分中讨论。

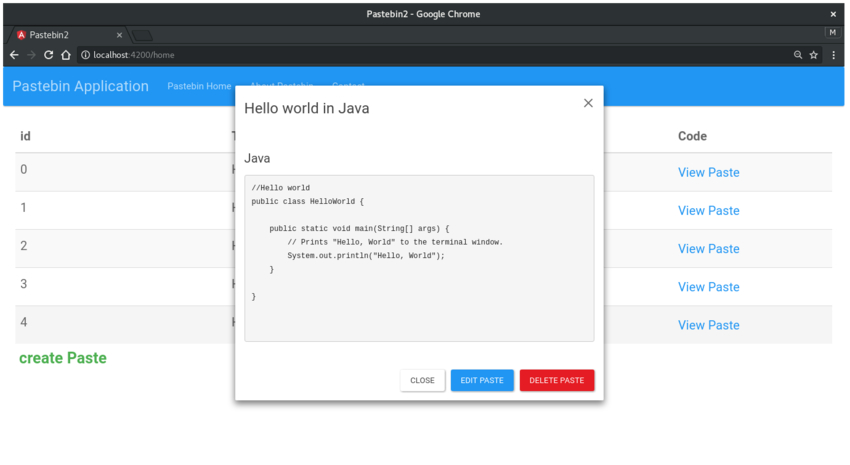
在本系列的第一部分中,我们将仅专注于设置测试环境并编写组件的基本测试。 Angular是基于组件的框架; 因此,花一些时间熟悉编写组件测试是一个好主意。 在本系列的第二部分中,我们将为组件,具有输入的组件,路由的组件和服务编写更复杂的测试。 在本系列的最后,我们将拥有一个功能齐全的Pastebin应用程序,如下所示。

在本教程中,您将学习如何:
- 配置茉莉花和业力
- 创建一个代表单个粘贴的Pastebin类
- 创建一个准系统PastebinService
- 创建两个组件,Pastebin和AddPaste
- 编写单元测试
该教程的完整代码可在Github上找到。
https://github.com/blizzerand/pastebin-angular如果您在本教程的任何阶段都不确定,请克隆仓库,并随时检查代码。 让我们开始吧!
配置茉莉花和业力
Angular的开发人员使我们可以轻松地设置测试环境。 首先,我们需要先安装Angular。 我更喜欢使用Angular-CLI。 这是一个多合一的解决方案,负责创建,生成,构建和测试Angular项目。
ng new Pastebin这是Angular-CLI创建的目录结构。
由于我们的兴趣更多地放在Angular中的测试方面,因此我们需要注意两种类型的文件。
karma.conf.js是Karma测试运行程序的配置文件,也是我们在Angular中编写单元测试所需的唯一配置文件。 默认情况下,Chrome是Karma用来捕获测试的默认浏览器启动器。 我们将创建一个用于运行无头Chrome的自定义启动器,并将其添加到browsers数组中。
/*karma.conf.js*/
browsers: ['Chrome','ChromeNoSandboxHeadless'],

customLaunchers: {
 ChromeNoSandboxHeadless: {
    base: 'Chrome',
    flags: [
      '--no-sandbox',
      // See https://chromium.googlesource.com/chromium/src/+/lkgr/headless/README.md
      '--headless',
      '--disable-gpu',
      // Without a remote debugging port, Google Chrome exits immediately.
      ' --remote-debugging-port=9222',
    ],
  },
}, 我们需要寻找的另一种文件类型是以.spec.ts结尾的.spec.ts 。 按照惯例,用Jasmine编写的测试称为规范。 所有测试规范都应位于应用程序的src/app/目录中,因为这是Karma寻找测试规范的地方。 如果创建新的组件或服务,则将测试规范放在该组件或服务的代码所在的目录中是很重要的。
ng new命令已经为我们的app.component.ts创建了一个app.component.spec.ts文件。 随时打开它,并仔细查看Angular中的Jasmine测试。 即使代码没有任何意义,也可以。 我们将暂时保持AppComponent的状态,并在本教程的稍后部分使用它来承载路由。
创建Pastebin类
我们需要一个Pastebin类在组件和测试中对Pastebin进行建模。 您可以使用Angular-CLI创建一个。
ng generate class Pastebin将以下逻辑添加到Pastebin.ts:
export class Pastebin {

    id: number;
    title: string;
	language: string;
	paste: string;

	constructor(values: Object = {}) {
        Object.assign(this, values);
  }

}

 export const Languages = ["Ruby","Java", "JavaScript", "C", "Cpp"];
我们定义了一个Pastebin类,该类的每个实例将具有以下属性:
-
id -
title -
language -
paste
为测试套件创建另一个名为pastebin.spec.ts文件。
/* pastebin.spec.ts */

//import the Pastebin class
import { Pastebin } from './pastebin';

describe('Pastebin', () => {
    it('should create an instance of Pastebin',() => {
        expect(new Pastebin()).toBeTruthy();
	});
}) 该测试套件以describe块开始,这是一个接受两个参数的全局Jasmine函数。 第一个参数是测试套件的标题,第二个参数是其实际实现。 使用带有两个参数的it函数定义规范,类似于describe块的参数。
多个规格( it块)可以嵌套在测试套件中( describe块)。 但是,请确保测试套件标题的命名方式明确,易读,因为它们旨在用作读者的文档。
Jasmine使用expect功能实现的expect用于确定规范是否应该通过或失败。 expect函数采用一个称为实际值的参数。 然后将其与另一个采用期望值的函数链接在一起。 这些函数称为匹配器函数,在本教程中,我们将大量使用诸如toBeTruthy() , toBeDefined() , toBe()和toContain()类的匹配器函数。
expect(new Pastebin()).toBeTruthy();因此,使用此代码,我们创建了Pastebin类的新实例,并期望它是真实的。 让我们添加另一个规范来确认Pastebin模型是否按预期工作。
it('should accept values', () => {
	let pastebin = new Pastebin();
	pastebin = {
		id: 111,
		title: "Hello world",
		language: "Ruby",
		paste: 'print "Hello"',
	}
	expect(pastebin.id).toEqual(111);
	expect(pastebin.language).toEqual("Ruby");
	expect(pastebin.paste).toEqual('print "Hello"');
});
我们已经实例化了Pastebin类,并为我们的测试规范添加了一些期望。 运行ng test以验证所有测试均为绿色。
创建裸骨头服务
使用以下命令生成服务。
ng generate service pastebin PastebinService将托管用于向服务器发送HTTP请求的逻辑; 但是,我们没有正在构建的应用程序的服务器API。 因此,我们将使用称为InMemoryWebApiModule的模块来模拟服务器通信。
设置Angular-in-Memory-Web-API
通过npm安装angular-in-memory-web-api :
npm install angular-in-memory-web-api --save使用此版本更新AppModule。
/* app.module.ts */

import { BrowserModule } from '@angular/platform-browser';
import { NgModule } from '@angular/core';

//Components
import { AppComponent } from './app.component';

//Service for Pastebin

import { PastebinService } from "./pastebin.service";

//Modules used in this tutorial
import { HttpModule }    from '@angular/http';

//In memory Web api to simulate an http server
import { InMemoryWebApiModule } from 'angular-in-memory-web-api';
import { InMemoryDataService }  from './in-memory-data.service';


@NgModule({
  declarations: [
    AppComponent,
  ],

  imports: [
    BrowserModule,
    HttpModule,
    InMemoryWebApiModule.forRoot(InMemoryDataService),
  ],
  providers: [PastebinService],
  bootstrap: [AppComponent]
})
export class AppModule { } 创建InMemoryDataService实现InMemoryDbService 。
/*in-memory-data.service.ts*/
import { InMemoryDbService } from 'angular-in-memory-web-api';
import { Pastebin } from './pastebin';
export class InMemoryDataService implements InMemoryDbService {
  createDb() {
    const pastebin:Pastebin[] = [
      { id: 0,  title: "Hello world Ruby", language: "Ruby", paste: 'puts "Hello World"' },
      {id: 1, title: "Hello world C", language: "C", paste: 'printf("Hello world");'},
      {id: 2, title: "Hello world CPP", language: "C++", paste: 'cout<<"Hello world";'},
      {id: 3, title: "Hello world Javascript", language: "JavaScript", paste: 'console.log("Hello world")'}

    ];
    return {pastebin};
  }
}
在这里, pastebin是一个示例粘贴数组,当我们执行HTTP操作(如http.get或http.post时,将返回或更新这些示例粘贴。
/*pastebin.service.ts */
import { Injectable } from '@angular/core';
import { Pastebin } from './pastebin';
import { Http, Headers } from '@angular/http';
import 'rxjs/add/operator/toPromise';

@Injectable()
export class PastebinService {

// The project uses InMemoryWebApi to handle the Server API.
// Here "api/pastebin" simulates a Server API url
  private pastebinUrl = "api/pastebin";
  private headers  = new Headers({'Content-Type': "application/json"});
  constructor(private https: Http) { }

// getPastebin() performs http.get() and returns a promise
  public getPastebin():Promise<any> {
 	return this.http.get(this.pastebinUrl)
 	   .toPromise()
       .then(response => response.json().data)
 	   .catch(this.handleError);

 		}

  private handleError(error: any): Promise<any> {
 	 console.error('An error occurred', error);
  	 return Promise.reject(error.message || error);
 }
} getPastebin()方法发出HTTP.get请求并返回一个承诺,该承诺将解析为服务器返回的Pastebin对象数组。
如果在运行规范时收到HTTP 错误的No提供程序,则需要将HTTPModule导入相关的规范文件。
组件入门
组件是Angular应用程序中UI的最基本构建块。 Angular应用程序是Angular组件树。
— Angular文档
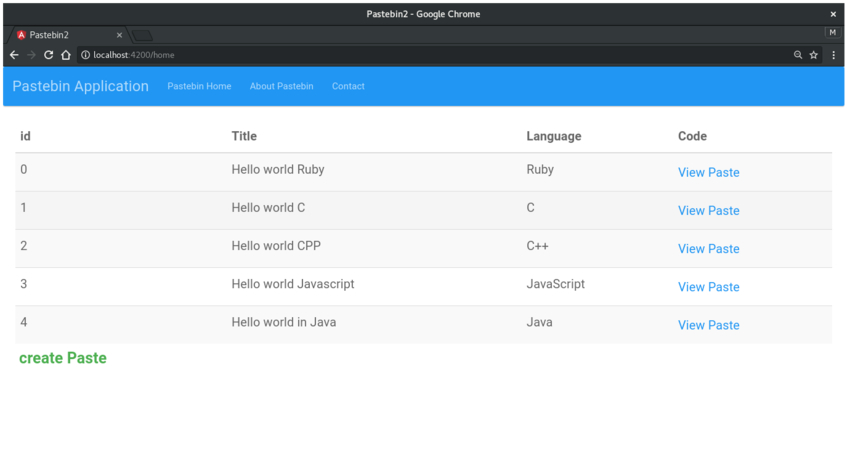
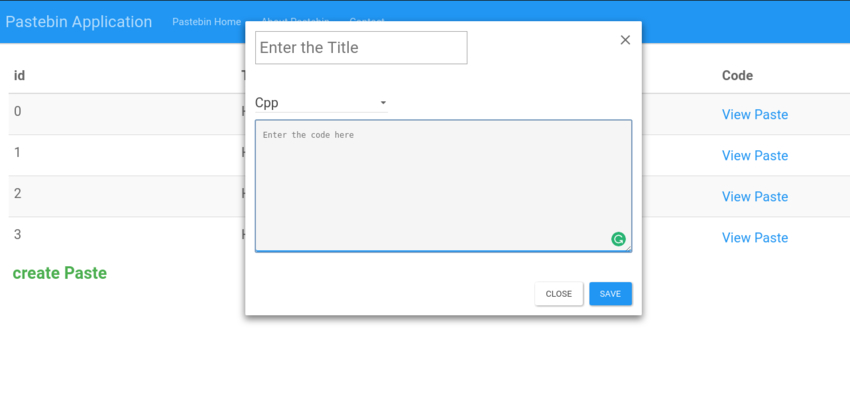
正如在概述部分前面强调的,我们将致力于在本教程中两个组成部分: PastebinComponent和AddPasteComponent 。 Pastebin组件由一个表结构组成,该表结构列出了从服务器检索到的所有粘贴。 AddPaste组件包含用于创建新粘贴的逻辑。
设计和测试Pastebin组件
继续并使用Angular-CLI生成组件。
ng g component --spec=false Pastebin --spec=false选项告诉Angular-CLI不要创建规范文件。 这是因为我们要从头开始编写组件的单元测试。 在pastebin-component文件夹内创建一个pastebin.component.spec.ts文件。
这是pastebin.component.spec.ts的代码。
import { TestBed, ComponentFixture, async } from '@angular/core/testing';
import { DebugElement }    from '@angular/core';
import { PastebinComponent } from './pastebin.component';
import { By }              from '@angular/platform-browser';
import { Pastebin, Languages } from '../pastebin';

//Modules used for testing
import { HttpModule }    from '@angular/http';

describe('PastebinComponent', () => {

//Typescript declarations.
  let comp: PastebinComponent;
  let fixture: ComponentFixture<PastebinComponent>;
  let de: DebugElement;
  let element: HTMLElement;
  let mockPaste: Pastebin[];

  // beforeEach is called once before every `it` block in a test.
  // Use this to configure to the component, inject services etc.

  beforeEach(()=> {

    TestBed.configureTestingModule({
        declarations: [ PastebinComponent ], // declare the test component
        imports: [ HttpModule],
    });
    fixture = TestBed.createComponent(PastebinComponent);
    comp = fixture.componentInstance;
    de = fixture.debugElement.query(By.css('.pastebin'));
    element  = de.nativeElement;

  });
})
这里有很多事情。 让我们分解一下,一次拿一件。 在describe块中,我们声明了一些变量,然后使用了beforeEach函数。 beforeEach()是Jasmine提供的全局函数,顾名思义,该函数在describe它的describe块中的每个规范之前被调用一次。
TestBed.configureTestingModule({
    declarations: [ PastebinComponent ], // declare the test component
    imports: [ HttpModule],
}); TestBed类是Angular测试实用程序的一部分,它创建类似于@NgModule类的测试模块。 此外,您可以使用configureTestingModule方法配置TestBed 。 例如,您可以为项目创建一个模拟实际Angular应用程序的测试环境,然后可以从应用程序模块中提取组件并将其重新连接到该测试模块。
 fixture = TestBed.createComponent(PastebinComponent);
    comp = fixture.componentInstance;
    de = fixture.debugElement.query(By.css('div'));
element = de.nativeElement; 从Angular文档中 :
createComponent方法返回ComponentFixture,它是围绕所创建的组件的测试环境上的句柄。 固定装置提供对组件实例本身和DebugElement访问,DebugElement是组件DOM元素上的句柄。
如上所述,我们已经创建了PastebinComponent的固定装置,然后使用该固定装置来创建组件的实例。 现在,我们可以通过调用comp.property_name来访问测试中组件的属性和方法。 由于该固定装置还提供对debugElement访问,因此我们现在可以查询DOM元素和选择器。
我们的代码有一个我们尚未想到的问题。 我们的组件具有一个外部模板和一个CSS文件。 从文件系统中读取和读取它们是异步活动,这与其余所有代码都是同步的不同。
Angular为您提供了一个名为async()的函数,该函数负责处理所有异步内容。 异步的作用是跟踪其中的所有异步任务,同时向我们隐藏异步执行的复杂性。 因此,我们现在有两个beforeEach函数,一个异步beforeEach()和一个同步beforeEach() 。
/* pastebin.component.spec.ts */

 // beforeEach is called once before every `it` block in a test.
 // Use this to configure to the component, inject services etc.

  beforeEach(async(() => { //async before is used for compiling external templates which is any async activity
  TestBed.configureTestingModule({
    declarations: [ PastebinComponent ], // declare the test component
    imports: [ HttpModule],
  })
  .compileComponents();  // compile template and css
}));

  beforeEach(()=> { //And here is the synchronous async function

    fixture = TestBed.createComponent(PastebinComponent);
    comp = fixture.componentInstance;
    de = fixture.debugElement.query(By.css('.pastebin'));
    element  = de.nativeElement;
  });
我们尚未编写任何测试规范。 但是,最好事先创建规格概述。 下图描绘了Pastebin组件的粗略设计。
我们需要编写具有以下期望的测试。
- Pastebin组件应该存在。
- 组件的title属性应显示在模板中。
- 该模板应具有一个HTML表以显示现有的粘贴。
-
pastebinService被注入到组件中,并且可以访问其方法。 - 在调用
onInit()之前,onInit()显示任何粘贴。 - 在解决我们服务中的承诺之前,不会显示粘贴。
前三个测试很容易实现。
it('should have a Component',()=> {
    expect(comp).toBeTruthy();
  });

  it('should have a title', () => {
    comp.title = 'Pastebin Application';
    fixture.detectChanges();
    expect(element.textContent).toContain(comp.title);
  })

 it('should have a table to display the pastes', () => {
    expect(element.innerHTML).toContain("thead");
    expect(element.innerHTML).toContain("tbody");
  })
在测试环境中,Angular不会自动将组件的属性与模板元素绑定。 每次要将组件属性与模板绑定时,必须显式调用fixture.detectChanges() 。 运行测试应该会给您一个错误,因为我们尚未在组件内部声明title属性。
title: string = "Pastebin Application";不要忘记使用基本表结构更新模板。
<div class = "pastebin">
    <h2> {{title}}</h2>
  <table  id="table" class="table table-hover table-striped">
	<thead>
	  <tr>
		  <th> id </th>
		  <th> Title </th>
		  <th> Language </th>
		  <th> Code </th>
	  </tr>
	</thead>

	<tbody>
	</tbody>

  </table>
</div> 至于其余的情况,我们需要注入Pastebinservice并编写处理组件-服务交互的测试。 真实的服务可能会调用远程服务器,以原始格式注入它将是一项艰巨而艰巨的任务。
相反,我们应该编写测试,重点关注组件是否按预期与服务交互。 我们将添加监视pastebinService及其getPastebin()方法的规范。
首先,将PastebinService导入我们的测试套件。
import { PastebinService } from '../pastebin.service'; 接下来,将其添加到TestBed.configureTestingModule()内的providers数组中。
TestBed.configureTestingModule({
    declarations:[ CreateSnippetComponent],
    providers: [ PastebinService ],
}); 下面的代码创建了一个Jasmine间谍程序,该程序旨在跟踪对getPastebin()方法的所有调用,并返回一个立即解析为mockPaste 。
//The real PastebinService is injected into the component
let  pastebinService = fixture.debugElement.injector.get(PastebinService);
    mockPaste = [
      { id:1, title: "Hello world", language: "Ruby", paste: "puts 'Hello'" }];

    spy = spyOn(pastebinService, 'getPastebin')
.and.returnValue(Promise.resolve(mockPaste)); 间谍不关心实际服务的实现细节,而是getPastebin()对实际getPastebin()方法的任何调用。 此外,我们的测试将忽略埋在getPastebin()中的所有远程调用。 我们将在本教程的第二部分中为Angular服务编写隔离的单元测试。
将以下测试添加到pastebin.component.spec.ts 。
it('should not show the pastebin before OnInit', () => {
    this.tbody = element.querySelector("tbody");

   //Try this without the 'replace(\s\s+/g,'')' method and see what happens
   expect(this.tbody.innerText.replace(/\s\s+/g, '')).toBe("", "tbody should be empty");
    expect(spy.calls.any()).toBe(false, "Spy shouldn't be yet called");
  });

  it('should still not show pastebin after component initialized', () => {
    fixture.detectChanges();
   // getPastebin service is async, but the test is not.
    expect(this.tbody.innerText.replace(/\s\s+/g, '')).toBe("", 'tbody should still be empty');
    expect(spy.calls.any()).toBe(true, 'getPastebin should be called');
  });

  it('should show the pastebin after getPastebin promise resolves', async() => {
    fixture.detectChanges();
    fixture.whenStable().then( () => {
        fixture.detectChanges();
        expect(comp.pastebin).toEqual(jasmine.objectContaining(mockPaste));
        expect(element.innerText.replace(/\s\s+/g, ' ')).toContain(mockPaste[0].title);
    });
  })
前两个测试是同步测试。 第一个规范检查div元素的innerText是否保持空,只要未初始化该组件。 Jasmine的matcher函数的第二个参数是可选的,并且在测试失败时显示。 当规格中有多个Expect语句时,这将很有帮助。
在第二个规范中,组件被初始化(因为调用了fixture.detectChanges() ),并且还期望间谍被调用,但不应更新模板。 即使间谍返回了已解决的承诺, mockPaste仍不可用。 除非测试是异步测试,否则它不可用。
第三个测试使用前面讨论的async()函数在异步测试区域中运行测试。 async()用于使同步测试异步。 当所有未完成的异步活动得到补充后,将调用fixture.whenStable() ,然后调用第二轮fixture.detectChanges() ,以使用新值更新DOM。 最终测试中的期望确保了我们的DOM已使用mockPaste值进行了更新。
为了使测试通过,我们需要使用以下代码更新pastebin.component.ts 。
/*pastebin.component.ts*/

import { Component, OnInit } from '@angular/core';
import { Pastebin } from '../pastebin';
import { PastebinService } from '../pastebin.service';

@Component({
  selector: 'app-pastebin',
  templateUrl: './pastebin.component.html',
  styleUrls: ['./pastebin.component.css']
})
export class PastebinComponent implements OnInit {

  title: string = "Pastebin Application";
  pastebin: any = [];

  constructor(public pastebinServ: PastebinService) { }


 //loadPastebin() is called on init
  ngOnInit() {
      this.loadPastebin();
  }

  public loadPastebin() {
     //invokes pastebin service's getPastebin() method and stores the response in `pastebin` property
  	 this.pastebinServ.getPastebin().then(pastebin => this.pastebin = pastebin);

  }
}
模板也需要更新。
<!--- pastebin.component.html -->
<div class = "pastebin">
    <h2> {{title}}</h2>
<table  id="table" class="table table-hover table-striped">
  <thead>
	<tr>
		<th> id </th>
		<th> Title </th>
		<th> Language </th>
		<th> Code </th>
	</tr>
  </thead>
  <tbody>
	<tr *ngFor="let paste of pastebin">
		<td> {{paste.id}} </td>
		<td> {{paste.title}} </td>
		<td> {{paste.language}} </td>
		<td> View code </td>

	</tr>
  </tbody>
   <!--- <app-add-paste (addPasteSuccess)= 'onAddPaste($event)'> </app-add-paste> -->
</table>
</div>
添加新的粘贴
使用Angular-CLI生成AddPaste组件。 下图描述了AddPaste组件的设计。

组件的逻辑应通过以下规格。
- AddPaste组件的模板应具有一个名为Create Paste的按钮。
- 单击“ 创建粘贴”按钮应显示一个ID为“ source-modal”的模式框。
- click动作还应该将组件的
showModal属性更新为true。 (showModal是一个布尔属性,在显示模态时将变为true,而在关闭模态时将变为false。) - 按下保存按钮应调用
addPaste()服务的addPaste()方法。 - 单击关闭按钮应从DOM中删除ID“源模式”,并将
showModal属性更新为false。
我们为您制定了前三个测试。 看看是否可以让测试自己通过。
describe('AddPasteComponent', () => {

  let component: AddPasteComponent;
  let fixture: ComponentFixture<AddPasteComponent>;
  let de: DebugElement;
  let element: HTMLElement;
  let spy: jasmine.Spy;
  let pastebinService: PastebinService;

  beforeEach(async(() => {
    TestBed.configureTestingModule({
      declarations: [ AddPasteComponent ],
      imports: [ HttpModule, FormsModule ],
      providers: [ PastebinService ],
    })
    .compileComponents();
  }));

  beforeEach(() => {
    //initialization
    fixture = TestBed.createComponent(AddPasteComponent);
    pastebinService = fixture.debugElement.injector.get(PastebinService);
    component = fixture.componentInstance;
    de = fixture.debugElement.query(By.css('.add-paste'));
    element = de.nativeElement;
    spy = spyOn(pastebinService, 'addPaste').and.callThrough();
    //ask fixture to detect changes
    fixture.detectChanges();
  });

  it('should be created', () => {
    expect(component).toBeTruthy();
  });

  it('should display the `create Paste` button', () => {
     //There should a create button in the template
      expect(element.innerText).toContain("create Paste");
  });

  it('should not display the modal unless the button is clicked', () => {
      //source-model is an id for the modal. It shouldn't show up unless create button is clicked
      expect(element.innerHTML).not.toContain("source-modal");
  })

  it("should display the modal when 'create Paste' is clicked", () => {
      let createPasteButton = fixture.debugElement.query(By.css("button"));
      //triggerEventHandler simulates a click event on the button object
      createPasteButton.triggerEventHandler("click",null);
      fixture.detectChanges();
      expect(element.innerHTML).toContain("source-modal");
      expect(component.showModal).toBeTruthy("showModal should be true");
  })
}) DebugElement.triggerEventHandler()是这里唯一的新东西。 它用于触发在其上被调用的按钮元素上的单击事件。 第二个参数是事件对象,由于组件的click()不需要一个,因此我们将其保留为空。
摘要
一天就这样。 在第一篇文章中,我们了解到:
- 如何设置和配置Jasmine和Karma
- 如何编写类的基本测试
- 如何设计和编写组件的单元测试
- 如何创建基本服务
- 如何在我们的项目中使用Angular测试实用程序
在下一个教程中,我们将创建新组件,使用输入和输出,服务和路由编写更多测试组件。 请继续关注本系列的第二部分。 通过评论分享您的想法。
翻译自: https://code.tutsplus.com/tutorials/testing-components-in-angular-using-jasmine--cms-29165


 1964
1964

 被折叠的 条评论
为什么被折叠?
被折叠的 条评论
为什么被折叠?
 到【灌水乐园】发言


