


在本教程系列的第1部分中,我介绍了动态页面模板的基本概念,并创建了一个标准页面模板作为将来工作的基础。 基于二十七岁父主题的WordPress子主题用于实现页面模板。
在本教程中,您将学习有关动态页面模板以及如何在自己的WordPress项目中使用它们的更多详细信息。
我还将逐步向您展示如何从第一个教程中扩展页面模板,并将其转变为您第一个可以使用的动态页面模板!
动态页面模板:更灵活的方法
那么我们如何使页面模板更加灵活,又为什么仍然有用呢?
假设您有一个投资组合页面模板,该模板输出单个投资组合项目的库。 每个项目的大小都是固定的,每行只能容纳这么多。
当然,我们可以添加另一个页面模板来显示不同大小的投资组合。 但是,如果我们想展示小型,中型或大型投资组合,该怎么办? 为此,我们将需要三个单独的页面模板,每个模板具有不同的项目组合大小。
通过添加一个下拉控件来选择投资组合的大小(即小,中或大),可以立即使之更加灵活。 这对于用户来说更加方便,因为页面模板框不会因不必要的选择而混乱。
对于仅维护一个页面模板而不是三个页面模板的开发人员来说,这也更有意义。 这遵循了“ 不要重复自己 (DRY)”软件开发原则。
所有页面模板都应该是动态的吗?
值得注意的是,并非每个页面模板都一定会从动态中受益。 如果您有一个页面模板仅做一件事情,一件事情,那么就可以了。 在这种情况下,向页面模板添加自定义控件和额外的逻辑是没有意义的。
但是,正如您将在本教程结束时看到的那样,更加灵活将使许多页面模板受益匪浅。
动态页面模板的另一个有用示例是联系表单。 可以添加许多自定义控件,以使此页面模板具有高度的灵活性。
例如,不是输出一组固定的表单字段,而是可以添加页面模板控件以允许您省略某些字段。 还是可以选择显示验证码字段以防止提交垃圾邮件表格? 您可以通过多种方式自定义联系表单。
在本教程系列的第3部分中,我将创建一个动态表单页面模板。 但是首先让我们开始创建通用动态页面模板。
我们的第一个动态页面模板
首先,我们将创建一个基本的动态页面模板,以演示所有组件如何组合在一起。 自定义控件将添加到页面编辑器,稍后将用于控制页面模板输出。
我们不久将添加的自定义页面模板控件是:
- 文本框
- 文字区
- 复选框
- 单选按钮
- 下拉选择框
理想情况下,应将控件直接添加到页面模板下拉框的下方,以使其与页面模板相关联。
但是,WordPress对此不提供任何挂钩,因此(暂时)您必须将自定义页面模板控件添加到单独的自定义元盒中。 在本教程系列的第三部分中,我将向您展示如何解决此问题。
钩子是WordPress开发的基础。 它们使开发人员无需依靠编辑核心文件即可扩展代码库,这通常被认为是一个坏主意。 这是因为每当执行WordPress更新时,所有自定义代码都将被清除(这很可能会定期发生)。
要在页面编辑器屏幕上显示我们的元框,请将load-post.php和load-post-new.php钩子添加到我们在第1部分中创建的子主题init()方法中。
<?php
add_action( 'load-post.php', array( $this, 'page_template_meta_box' ) );
add_action( 'load-post-new.php', array( $this, 'page_template_meta_box' ) );
add_action( 'save_post', array( $this, 'save_page_template_meta' ), 10, 2 );
}
无论您是创建新页面还是编辑现有页面,我们都使用两个WordPress挂钩来确保元框显示在页面编辑器中。 还有一个save_post钩子,用于处理后元数据的保存,我将在稍后介绍。
添加以下四个类方法来创建,显示和保存元框数据。
/* Add meta box hook. */
public function page_template_meta_box() {
  add_action( 'add_meta_boxes', array( $this, 'add_page_template_meta_box' ) );
}
/* Register meta box. */
public function add_page_template_meta_box() {
add_meta_box(
'page-template-meta-box',
esc_html__( 'Page Template Meta Box', 'twenty-seventeen-child' ),
array( $this, 'display_page_template_meta_box' ),
'page',
'side',
'default'
);
}/* Render meta box on the page editor. */
public function display_page_template_meta_box($object) {
wp_nonce_field( basename( __FILE__ ), 'page_template_meta_box_nonce' );
}我不会在这里对WordPress的元数据框进行过多的介绍,因为它可能是一个完整的教程,但是请注意以下有关我在上面添加的代码的要点:
-
page_template_meta_box()和add_page_template_meta_box()类方法使用WordPress注册元框。 - 在
add_page_template_meta_box(),'page'参数指定此元框仅显示在WordPress管理员的“ page”帖子类型编辑器中。 -
display_page_template_meta_box()类方法呈现元框并设置随机数以使表单控件更安全。
如果一切顺利,现在应该在页面编辑器上显示一个元框,如下所示。

不过,目前它有点空了,因此让我们添加一些控件。
添加自定义控件
如果您从上面回想起,我们将在文本框中添加一个文本框,文本区域,复选框,单选按钮和选择框控件。 首先将以下代码添加到现时函数下面的display_page_template_meta_box()方法中。
<?php
$text = get_post_meta( $object->ID, 'page_template_text', true );
$textarea = get_post_meta( $object->ID, 'page_template_textarea', true );
$checkbox = get_post_meta( $object->ID, 'page_template_chk', true );
$radio = get_post_meta( $object->ID, 'page_template_radio', true );
$select = get_post_meta( $object->ID, 'page_template_select', true );这将检索我们的元框控件的当前值,并将它们存储在局部变量中。 现在,在其后直接添加以下HTML,以呈现元框控件。
?>
<div>
<p>
<label for="page-template-text"><?php _e( "Text Control", 'twenty-seventeen-child' ); ?></label><br>
<input class="widefat" type="text" name="page-template-text" id="page-template-text" value="<?php echo esc_attr( $text ); ?>" />
</p>
<p>
<label for="page-template-textarea"><?php _e( "Textarea Control", 'twenty-seventeen-child' ); ?></label><br>
<textarea rows="5" class="widefat" name="page-template-textarea" id="page-template-textarea"><?php echo esc_attr( $textarea ); ?></textarea>
</p>
<p>
<input type="checkbox" name="page-template-chk" id="page-template-chk" value="1" <?php checked($checkbox, true); ?> /> <label for="page-template-chk"><?php _e( "Checkbox Control", 'twenty-seventeen-child' ); ?></label><br>
</p>
<p>
<label for="page-template-align"><?php _e( "Radio Button Control", 'twenty-seventeen-child' ); ?></label><br>
<input type="radio" name="page-template-align" id="rdo-left" value="left" <?php checked( $radio, 'left' ); ?> ><label for="rdo-left"><?php _e( 'Left', 'twenty-seventeen-child' ); ?></label><br>
<input type="radio" name="page-template-align" id="rdo-right" value="right" <?php checked( $radio, 'right' ); ?> ><label for="rdo-right"><?php _e( 'Right', 'twenty-seventeen-child' ); ?></label><br>
<input type="radio" name="page-template-align" id="rdo-center" value="center" <?php checked( $radio, 'center' ); ?> ><label for="rdo-center"><?php _e( 'Center', 'twenty-seventeen-child' ); ?></label><br>
</p>
<p>
<label for="page-template-select">Dropdown</label>
<select name="page-template-select" class="widefat">
<option value='one' <?php selected( 'one', $select ); ?>><?php _e( 'One', 'twenty-seventeen-child' ); ?></option>
<option value='two' <?php selected( 'two', $select ); ?>><?php _e( 'Two', 'twenty-seventeen-child' ); ?></option>
<option value='three' <?php selected( 'three', $select ); ?>><?php _e( 'Three', 'twenty-seventeen-child' ); ?></option>
<option value='four' <?php selected( 'four', $select ); ?>><?php _e( 'Four', 'twenty-seventeen-child' ); ?></option>
</select>
</p>
</div><?php每个控件都包含在一个段落标签中,并且其当前值通过我们之前创建的局部变量进行更新。 这样可以确保meta框控件始终显示正确的设置。
但是,除非我们将当前的元框控件数据保存到WordPress数据库中,否则不会发生这种情况。
早一点,每次页面编辑器更新时,我都注册了一个钩子来执行类方法。 让我们现在将该方法添加到我们的子主题类中。
<?php
/* Save meta box data. */
public function save_page_template_meta( $post_id, $post ) {
if ( ! ( isset( $_POST[ 'page_template_meta_box_nonce' ] ) && wp_verify_nonce( $_POST[ 'page_template_meta_box_nonce' ], basename( __FILE__ ) ) ) ) {
return $post_id;
}
if ( ! current_user_can( 'edit_post', $post_id ) ) {
return $post_id;
}
if( 'page' != $post->post_type ) {
return $post_id;
}
$page_template_text_value = isset( $_POST[ 'page-template-text' ] ) ? $_POST[ 'page-template-text' ] : '';
update_post_meta( $post_id, 'page_template_text', $page_template_text_value );
$page_template_textarea_value = isset( $_POST[ 'page-template-textarea' ] ) ? $_POST[ 'page-template-textarea' ] : '';
update_post_meta( $post_id, 'page_template_textarea', $page_template_textarea_value );
$page_template_chk_value = isset( $_POST[ 'page-template-chk' ] ) ? $_POST[ 'page-template-chk' ] : '';
update_post_meta( $post_id, 'page_template_chk', $page_template_chk_value );
$page_template_radio_value = isset( $_POST[ 'page-template-align' ] ) ? $_POST[ 'page-template-align' ] : '';
update_post_meta( $post_id, 'page_template_radio', $page_template_radio_value );
$page_template_select_value = isset( $_POST[ 'page-template-select' ]) ? $_POST[ 'page-template-select' ] : '';
update_post_meta( $post_id, 'page_template_select', $page_template_select_value );
} save_page_template_meta()类方法处理保存元框控件数据。 仅当随机数通过验证时,它才会保存元框数据,当前用户可以编辑帖子,而我们位于页面编辑器管理屏幕上。
如果满足这些条件,则我们提取存储在全局$_POST变量中的每个控件的数据。 每次提交表单时都会设置此变量。
最后,将元框控件数据作为当前页面的元数据保存到WordPress数据库中。
添加自定义页面模板控件后,我们的元框应如下所示。
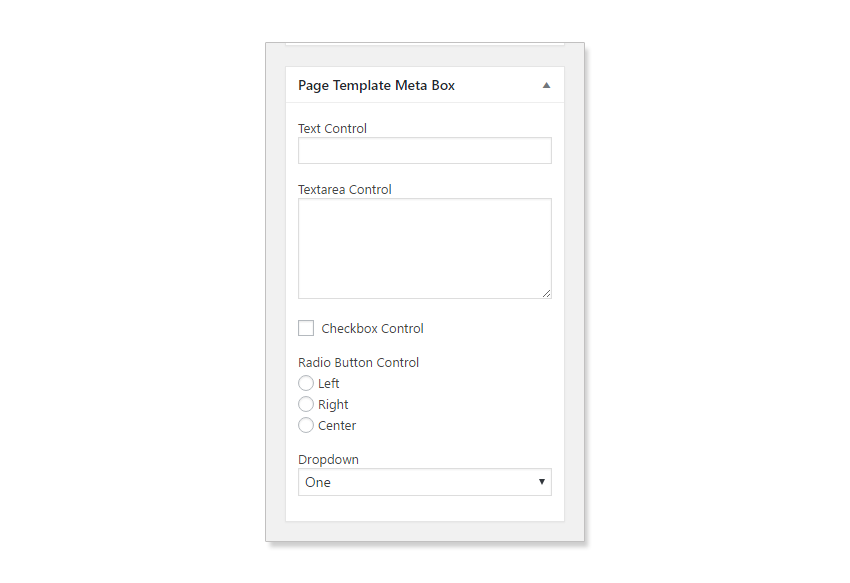
为文本框和文本区域输入一些文本,然后选择复选框,单选按钮和选择框。 点击更新以保存您的更改,当页面编辑器重新加载时,您的元框控件应显示您刚刚输入的数据。

子主题functions.php文件的完整源代码如下所示。
<?php
/**
* Twenty Seventeen child theme class.
*
* DPT = D[ynamic] P[age] T[emplates].
*/
class DPT_Twenty_Seventeen_Child {
/**
* Register hooks.
*/
public function init() {
add_action( 'wp_enqueue_scripts', array( $this, 'enqueue_parent_theme_styles' ) );
add_action( 'load-post.php', array( $this, 'page_template_meta_box' ) );
add_action( 'load-post-new.php', array( $this, 'page_template_meta_box' ) );
add_action( 'save_post', array( $this, 'save_page_template_meta' ), 10, 2 );
}
/* Enqueue parent theme styles. */
public function enqueue_parent_theme_styles() {
wp_enqueue_style( 'twenty-seventeen-css', get_template_directory_uri() . '/style.css' );
}
/* Add meta box hook. */
public function page_template_meta_box() {
add_action( 'add_meta_boxes', array( $this, 'add_page_template_meta_box' ) );
}
/* Register meta box. */
public function add_page_template_meta_box() {
  add_meta_box(
    'page-template-meta-box',
	esc_html__( 'Page Template Meta Box', 'twenty-seventeen-child' ),
	array( $this, 'display_page_template_meta_box' ),
	'page',
	'side',
	'default'
  );
}
/* Render meta box on the page editor. */
public function display_page_template_meta_box( $object ) {
wp_nonce_field( basename( __FILE__ ), 'page_template_meta_box_nonce' );
$text = get_post_meta( $object->ID, 'page_template_text', true );
$textarea = get_post_meta( $object->ID, 'page_template_textarea', true );
$checkbox = get_post_meta( $object->ID, 'page_template_chk', true );
$radio = get_post_meta( $object->ID, 'page_template_radio', true );
$select = get_post_meta( $object->ID, 'page_template_select', true );
?>
<div>
<p>
<label for="page-template-text"><?php _e( "Text Control", 'twenty-seventeen-child' ); ?></label><br>
<input class="widefat" type="text" name="page-template-text" id="page-template-text" value="<?php echo esc_attr( $text ); ?>" />
</p>
<p>
<label for="page-template-textarea"><?php _e( "Textarea Control", 'twenty-seventeen-child' ); ?></label><br>
<textarea rows="5" class="widefat" name="page-template-textarea" id="page-template-textarea"><?php echo esc_attr( $textarea ); ?></textarea>
</p>
<p>
<input type="checkbox" name="page-template-chk" id="page-template-chk" value="1" <?php checked($checkbox, true); ?> /> <label for="page-template-chk"><?php _e( "Checkbox Control", 'twenty-seventeen-child' ); ?></label><br>
</p>
<p>
<label for="page-template-align"><?php _e( "Radio Button Control", 'twenty-seventeen-child' ); ?></label><br>
<input type="radio" name="page-template-align" id="rdo-left" value="left" <?php checked( $radio, 'left' ); ?> ><label for="rdo-left"><?php _e( 'Left', 'twenty-seventeen-child' ); ?></label><br>
<input type="radio" name="page-template-align" id="rdo-right" value="right" <?php checked( $radio, 'right' ); ?> ><label for="rdo-right"><?php _e( 'Right', 'twenty-seventeen-child' ); ?></label><br>
<input type="radio" name="page-template-align" id="rdo-center" value="center" <?php checked( $radio, 'center' ); ?> ><label for="rdo-center"><?php _e( 'Center', 'twenty-seventeen-child' ); ?></label><br>
</p>
<p>
<label for="page-template-select">Dropdown</label>
<select name="page-template-select" class="widefat">
<option value='one' <?php selected( 'one', $select ); ?>><?php _e( 'One', 'twenty-seventeen-child' ); ?></option>
<option value='two' <?php selected( 'two', $select ); ?>><?php _e( 'Two', 'twenty-seventeen-child' ); ?></option>
<option value='three' <?php selected( 'three', $select ); ?>><?php _e( 'Three', 'twenty-seventeen-child' ); ?></option>
<option value='four' <?php selected( 'four', $select ); ?>><?php _e( 'Four', 'twenty-seventeen-child' ); ?></option>
</select>
</p>
</div><?php
}
/* Save meta box data. */
public function save_page_template_meta( $post_id, $post ) {
if ( ! ( isset( $_POST[ 'page_template_meta_box_nonce' ] ) && wp_verify_nonce( $_POST[ 'page_template_meta_box_nonce' ], basename( __FILE__ ) ) ) ) {
return $post_id;
}
if ( ! current_user_can( 'edit_post', $post_id ) ) {
return $post_id;
}
if( 'page' != $post->post_type ) {
return $post_id;
}
$page_template_text_value = isset( $_POST[ 'page-template-text' ] ) ? $_POST[ 'page-template-text' ] : '';
update_post_meta( $post_id, 'page_template_text', $page_template_text_value );
$page_template_textarea_value = isset( $_POST[ 'page-template-textarea' ] ) ? $_POST[ 'page-template-textarea' ] : '';
update_post_meta( $post_id, 'page_template_textarea', $page_template_textarea_value );
$page_template_chk_value = isset( $_POST[ 'page-template-chk' ] ) ? $_POST[ 'page-template-chk' ] : '';
update_post_meta( $post_id, 'page_template_chk', $page_template_chk_value );
$page_template_radio_value = isset( $_POST[ 'page-template-align' ] ) ? $_POST[ 'page-template-align' ] : '';
update_post_meta( $post_id, 'page_template_radio', $page_template_radio_value );
$page_template_select_value = isset( $_POST[ 'page-template-select' ]) ? $_POST[ 'page-template-select' ] : '';
update_post_meta( $post_id, 'page_template_select', $page_template_select_value );
}
}
$ts_child_theme = new DPT_Twenty_Seventeen_Child();
$ts_child_theme->init(); 最后一个难题是使用前端页面模板中的元框控件数据。 打开我们在第1部分中创建的test-page-template.php文件,并用此更新的代码替换内容。
<?php
/**
 * Template Name: Test Page Template
 *
 * @package WordPress
 * @subpackage Twenty_Seventeen
 * @since 1.0
 */

get_header(); ?>

<div class="wrap">
    <div id="primary" class="content-area">
		<main id="main" class="site-main" role="main">

			<?php
			while ( have_posts() ) : the_post();

				$text = get_post_meta( get_the_ID(), 'page_template_text', true );
				$textarea = get_post_meta( get_the_ID(), 'page_template_textarea', true );
				$checkbox = get_post_meta( get_the_ID(), 'page_template_chk', true );
				$radio = get_post_meta( get_the_ID(), 'page_template_radio', true );
				$select = get_post_meta( get_the_ID(), 'page_template_select', true );

				echo "<p>Text Box: " . $text . "</p>";
				echo "<p>Text Area: " . $textarea . "</p>";
				echo "<p>Checkbox: " . $checkbox . "</p>";
				echo "<p>Radio Buttons: " . $radio . "</p>";
				echo "<p>Dropdown: " . $select . "</p>";

				echo "<h2>Sitemap</h2>";
				echo "<ul>" . wp_list_pages( array( 'title_li' => '' ) ) . "</ul>";

			endwhile; // End of the loop.
			?>

		</main><!-- #main -->
	</div><!-- #primary -->
</div><!-- .wrap -->

<?php get_footer();
确保“测试页面模板”是当前选择的页面模板,然后在前端查看页面。
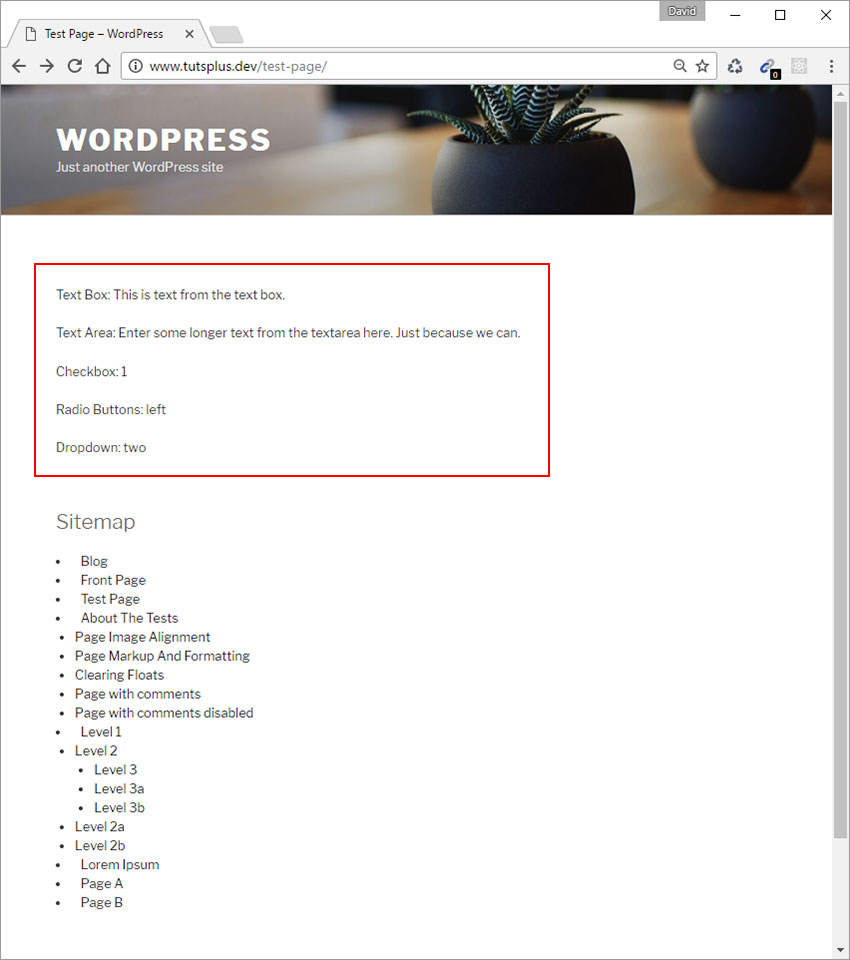
如您所见,页面模板现在包括刚刚为页面编辑器上的元框控件设置的值。 这是本教程其余部分的核心,因为我们将基于此基本示例并创建可在您自己的WordPress项目中使用的完全正常工作的动态页面模板的各种示例。
结论
在本教程中,我们介绍了如何构建可运行的动态页面模板。 目前,即使它可以正常工作,我们的基本页面模板也不是非常有用。
在本教程系列的第三个也是最后一部分中,我将向您展示如何从头到尾构建各种动态页面模板,您可以在自己的WordPress项目中使用(并扩展)这些模板。
如果您有任何疑问,请在下面的评论中给我留言。 我很想听听您对本教程的看法。
翻译自: https://code.tutsplus.com/tutorials/dynamic-page-templates-in-wordpress-part-2--cms-28393


 515
515

 被折叠的 条评论
为什么被折叠?
被折叠的 条评论
为什么被折叠?
 到【灌水乐园】发言


