


您是否曾经想过,当您使用Google搜索网络时,那些指向应用程序的神秘链接会如何出现在搜索结果中? 应用程序开发人员如何确保其应用程序显示在此处?
在本教程中,我将演示如何为您的应用程序实现这种效果。
1.什么是应用程序索引?
Google App Indexing(现已更名为Firebase App Indexing)使本地应用程序像普通网页一样可以在Google搜索结果中列出。 当从适当的设备的浏览器提交相关的搜索查询时,将显示与常规网页条目一起出现的应用程序条目。 该功能目前在Android和iOS平台上受支持。
开发人员为何需要它?
App Indexing可最大程度地提高开发人员的成功机会,因为它同时执行两项重要任务。
首先,它改善和增强了移动用户体验。 如果找到与搜索查询相关的应用程序,则用户可以选择安装该应用程序或直接启动该应用程序(如果该应用程序已安装在设备上),而无需离开浏览器。 因此,用户将对这种应用程序产生积极的第一印象,他们将下意识地认识到该应用程序设法在正确的上下文中显示的事实,并为他们提供了多个可供考虑的选项。
其次,它可以帮助开发人员直接通过Google的搜索引擎推广其应用。 开发人员可以利用此机制直接将流量吸引到他们的应用程序,并大大增加下载数量。
从技术上讲怎么可能?
App Indexing通过一种相当简单但巧妙的方式在应用程序与其网站之间建立关系(即恰当地称为“网站关联”)来发挥其魔力。 工作流程包括以下几个步骤:
- 添加意图过滤器以支持URL和Google搜索
- 将网站与应用程序关联
- 添加App Indexing API代码
2.让我们建造它
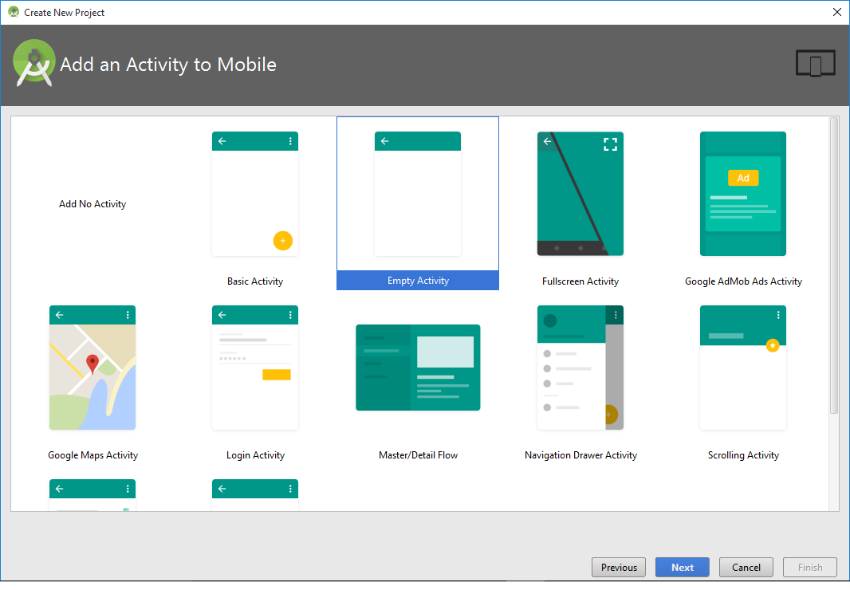
现在,我们对工作流程有了一个概念,我们将继续执行每个步骤,最后,在Android Studio上测试我们的实现。 因此,我们将在Android Studio IDE上创建一个新的Android项目。 您需要在计算机上安装Android Studio 2.0或更高版本。 创建一个活动为空的新Android项目。 我使用MyApp作为新的Android项目的名称。
第1步
我们将首先添加一个意图过滤器以支持URL和Google搜索。 意图是Android应用程序组件之间的通信代理,使用意图过滤器是将隐式意图引入应用程序的标准方法。
应用程序中的隐式意图使其能够请求操作系统评估所有匹配的注册组件(可能在其他已安装的应用程序中)并选择其中之一,从而可以使用系统上安装的其他应用程序执行某些任务。 相反,显式意图直接指定目标应用程序组件,以便仅调用指定的组件来执行操作。 您可以在Android开发者网站上的Intent和Intent过滤器上阅读更多内容。
现在,我们将开始创建一个意图过滤器。
- 打开AndroidManifest.xml文件。
- 用光标选择一个
<activity>元素。 - 选择处于打开状态时,右键单击,然后从弹出菜单中选择“ 生成 ”。
- 从辅助弹出菜单中进一步选择URL 。

您会看到Android Studio向您的AndroidManifest.xml文件添加了一些其他代码。 您可以更改所生成代码的<data>元素的属性以适合您的要求。 就我而言,我提供了与演示网站相关的值。
确保为http和https方案提供必要的值。
<?xml version="1.0" encoding="utf-8"?>
<manifest xmlns:android="http://schemas.android.com/apk/res/android"
    package="com.mycompany.myapp">

    <application
        android:allowBackup="true"
        android:icon="@mipmap/ic_launcher"
        android:label="@string/app_name"
        android:supportsRtl="true"
        android:theme="@style/AppTheme">
        <activity android:name=".MainActivity">
            <intent-filter>
                <action android:name="android.intent.action.MAIN" />

                <category android:name="android.intent.category.LAUNCHER" />
            </intent-filter><!-- ATTENTION: This intent was auto-generated. Follow instructions at
  https://g.co/AppIndexing/AndroidStudio to publish your URLs. -->
            <intent-filter>
                <action android:name="android.intent.action.VIEW" />

                <category android:name="android.intent.category.DEFAULT" />
                <category android:name="android.intent.category.BROWSABLE" />
                <!-- ATTENTION: This data URL was auto-generated. We recommend that you use the HTTP scheme.
                  TODO: Change the host or pathPrefix as necessary. -->

                <data
                    android:host="sites.google.com"
                    android:pathPrefix="/site/appindexingex/home/main"
                    android:scheme="http" />
                <data
                    android:host="sites.google.com"
                    android:pathPrefix="/site/appindexingex/home/main"
                    android:scheme="https" />
            </intent-filter>
        </activity><!-- ATTENTION: This was auto-generated to add Google Play services to your project for
     App Indexing.  See https://g.co/AppIndexing/AndroidStudio for more information. -->
        <meta-data
            android:name="com.google.android.gms.version"
            android:value="@integer/google_play_services_version" />
    </application>

</manifest>
第2步
现在,我们需要将网站与我们的应用程序关联。
您需要使用Google Search Console验证要与您的应用程序关联的Web URL。 只需使用您的Google帐户登录到Search Console,您就会发现易于遵循的有关验证网址的说明。
您还可以在Firebase应用程序索引指南中找到有关如何定义关联网站的结构以匹配应用程序结构的详细说明。 但是,由于我们仅使用Android Studio测试该应用程序,因此我们无需在本教程中探索这些详细信息。
为了进行测试,我们需要的是由Google验证的实时网址。 您在步骤1中为<data>元素提供的属性必须对应于此经过验证的Web URL,该URL必须具有完整的功能。
第三步
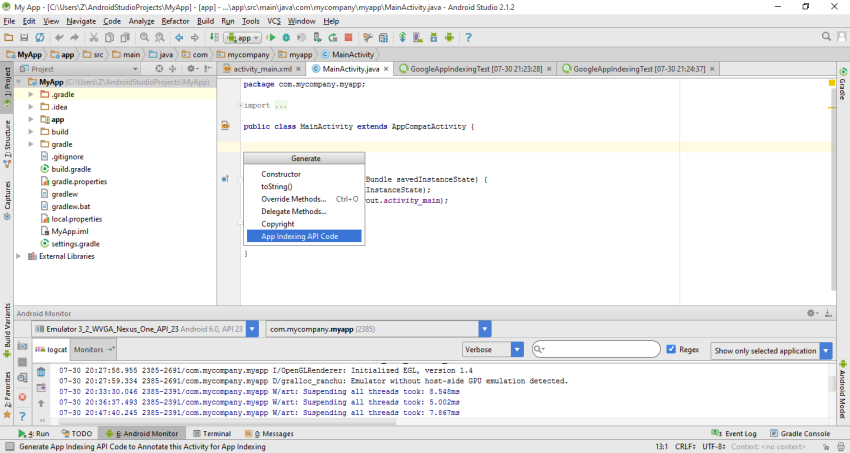
最后,我们将添加App Indexing API代码。 Android Studio提供了自动执行此操作的方法:
- 打开您的Android项目的MainActivity.java文件。
- 用光标选择单词
onCreate。 - 选择处于打开状态时,右键单击,然后从弹出菜单中选择“ 生成 ”。
- 从辅助弹出菜单中进一步选择“ App Indexing API代码” 。
您将看到由Android Studio添加到您的MainActivity.java文件的自动生成的代码。 确保编辑Uri.parse()函数的链接,以便它们将正确指向与您的应用程序关联的URL。
package com.mycompany.myapp;

import android.net.Uri;
import android.support.v7.app.AppCompatActivity;
import android.os.Bundle;

import com.google.android.gms.appindexing.Action;
import com.google.android.gms.appindexing.AppIndex;
import com.google.android.gms.common.api.GoogleApiClient;

public class MainActivity extends AppCompatActivity {

    /**
     * ATTENTION: This was auto-generated to implement the App Indexing API.
     * See https://g.co/AppIndexing/AndroidStudio for more information.
     */
    private GoogleApiClient client;

    @Override
    protected void onCreate(Bundle savedInstanceState) {
        super.onCreate(savedInstanceState);
        setContentView(R.layout.activity_main);
        // ATTENTION: This was auto-generated to implement the App Indexing API.
        // See https://g.co/AppIndexing/AndroidStudio for more information.
        client = new GoogleApiClient.Builder(this).addApi(AppIndex.API).build();
    }

    @Override
    public void onStart() {
        super.onStart();

        // ATTENTION: This was auto-generated to implement the App Indexing API.
        // See https://g.co/AppIndexing/AndroidStudio for more information.
        client.connect();
        Action viewAction = Action.newAction(
                Action.TYPE_VIEW, // TODO: choose an action type.
                "Main Page", // TODO: Define a title for the content shown.
                // TODO: If you have web page content that matches this app activity's content,
                // make sure this auto-generated web page URL is correct.
                // Otherwise, set the URL to null.


                Uri.parse("http://sites.google.com/site/appindexingex/home/main"),
                // TODO: Make sure this auto-generated app URL is correct.
                Uri.parse("android-app://com.mycompany.myapp/http/sites.google.com/site/appindexingex/home/main")
        );
        AppIndex.AppIndexApi.start(client, viewAction);
    }

    @Override
    public void onStop() {
        super.onStop();

        // ATTENTION: This was auto-generated to implement the App Indexing API.
        // See https://g.co/AppIndexing/AndroidStudio for more information.
        Action viewAction = Action.newAction(
                Action.TYPE_VIEW, // TODO: choose an action type.
                "Main Page", // TODO: Define a title for the content shown.
                // TODO: If you have web page content that matches this app activity's content,
                // make sure this auto-generated web page URL is correct.
                // Otherwise, set the URL to null.


                Uri.parse("http://sites.google.com/site/appindexingex/home/main"),
                // TODO: Make sure this auto-generated app URL is correct.
                Uri.parse("android-app://com.mycompany.myapp/http/sites.google.com/site/appindexingex/home/main")
        );
        AppIndex.AppIndexApi.end(client, viewAction);
        client.disconnect();
    }
}
3.测试
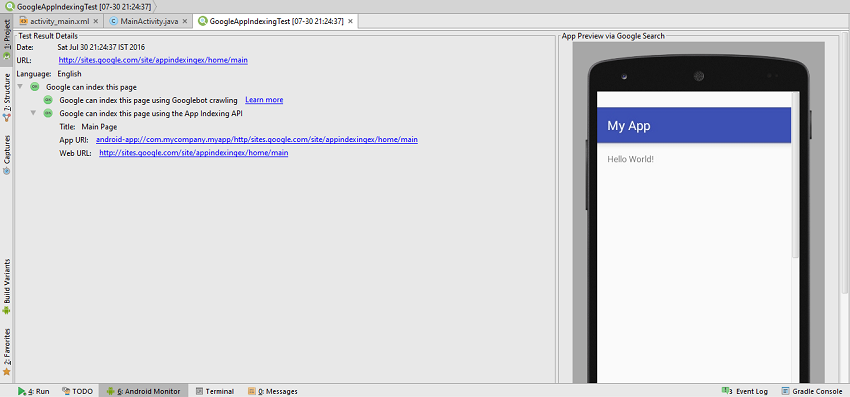
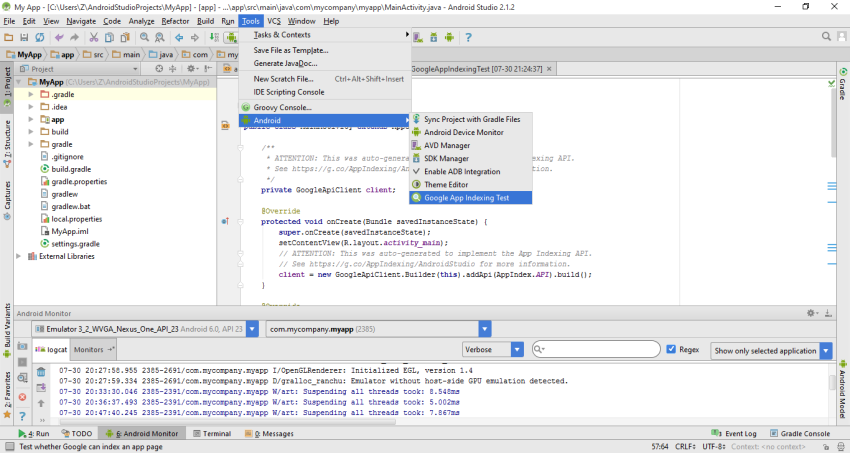
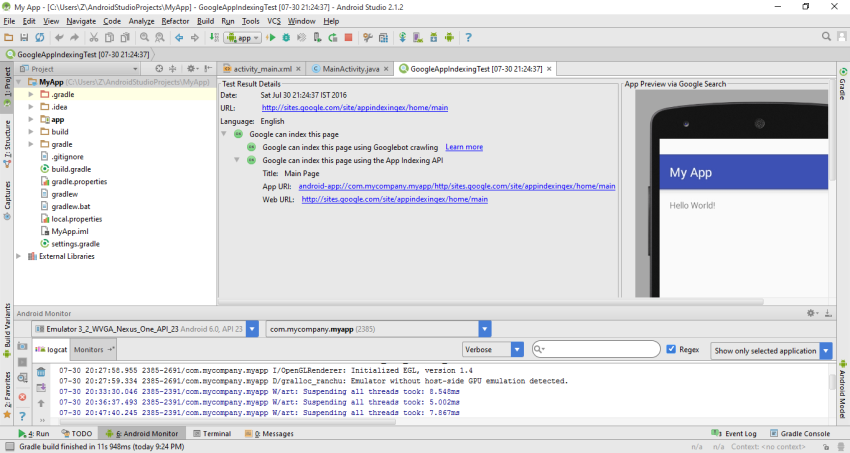
现在,我们将在Android Studio上测试我们的工作,以确保我们的App Indexing实现正确运行。 首先,请确保您已连接到Internet。 然后,在Android Studio上,选择“ 工具”>“ Android”>“ Google App索引测试”。
一段时间后,将出现类似于以下屏幕的画面。 通过的测试结果可确保您将App Indexing在您的应用程序中正常工作。
结论
App Indexing是一项有用的功能,可让您的应用吸引更多下载,它肯定会帮助您将更广泛的用户群定位为开发人员。 在本教程中,我们仅检查App Indexing实现是否正常工作,而不检查用户对实现实现的功能的感知程度。 您可以通过在Firebase , Google网站管理员和Android Studio App Indexing帮助网站中找到更多信息来进入下一个级别。
翻译自: https://code.tutsplus.com/tutorials/optimize-your-mobile-application-for-google--cms-26780


 3383
3383

 被折叠的 条评论
为什么被折叠?
被折叠的 条评论
为什么被折叠?
 到【灌水乐园】发言


