


在本教程中,我将向您展示如何使用TypeScript语言在NativeScript中构建天气应用。
在本系列的上一篇文章中,我们使用纯JavaScript创建了一个笔记应用程序。 这次,我们将使用TypeScript。 首先,让我们找出为什么TypeScript是构建NativeScript应用程序的好选择。
1.为什么使用TypeScript?
TypeScript是NativeScript中的一等公民。 核心NativeScript团队使用它来构建NativeScript框架本身。 为什么要使用TypeScript开发NativeScript应用程序的原因有两个:
- TypeScript编译为JavaScript。 编译器运行时,它将捕获您的代码中可能存在的所有错误,以便您可以立即对它们进行操作,而无需等待NativeScript编译器完成。 这对您作为开发人员来说意味着更高的生产力。
- 使用TypeScript,您可以使用ES6功能,例如类,模块,箭头功能,模板文字等 。 这意味着您可以使用更多工具来组织和编写更好的代码。
如果我在说服您方面做得很差,或者您想进一步了解TypeScript为什么适合使用NativeScript进行开发,则可以查看使用TypeScript构建更好的NativeScript应用程序 。
2.工具
为了充分利用TypeScript提供的功能,我建议您使用Visual Studio Code文本编辑器。 它具有IntelliSense功能,可在您编写TypeScript代码时提供智能自动完成功能,它与Git集成,并且还具有调试功能。
最重要的是,还有一个NativeScript插件 ,可以在开发NativeScript应用程序时提高您的工作效率。 我发现有用的一项功能是模拟器集成。 这使您可以直接从文本编辑器运行模拟器,并从文本编辑器本身调试应用程序。 Visual Studio Code是免费的,并且可在所有主要平台(Windows,Linux,OS X)上使用。
但是,如果您不想放任文本编辑器的便利,还可以安装扩展程序,以更好地使用TypeScript进行编码。 对于Atom,有一个atom-typescript插件 。 对于Sublime Text,有TypeScript Sublime插件 。
3.应用概述
我们将要创建的应用程序是天气应用程序。 它将具有以下页面:
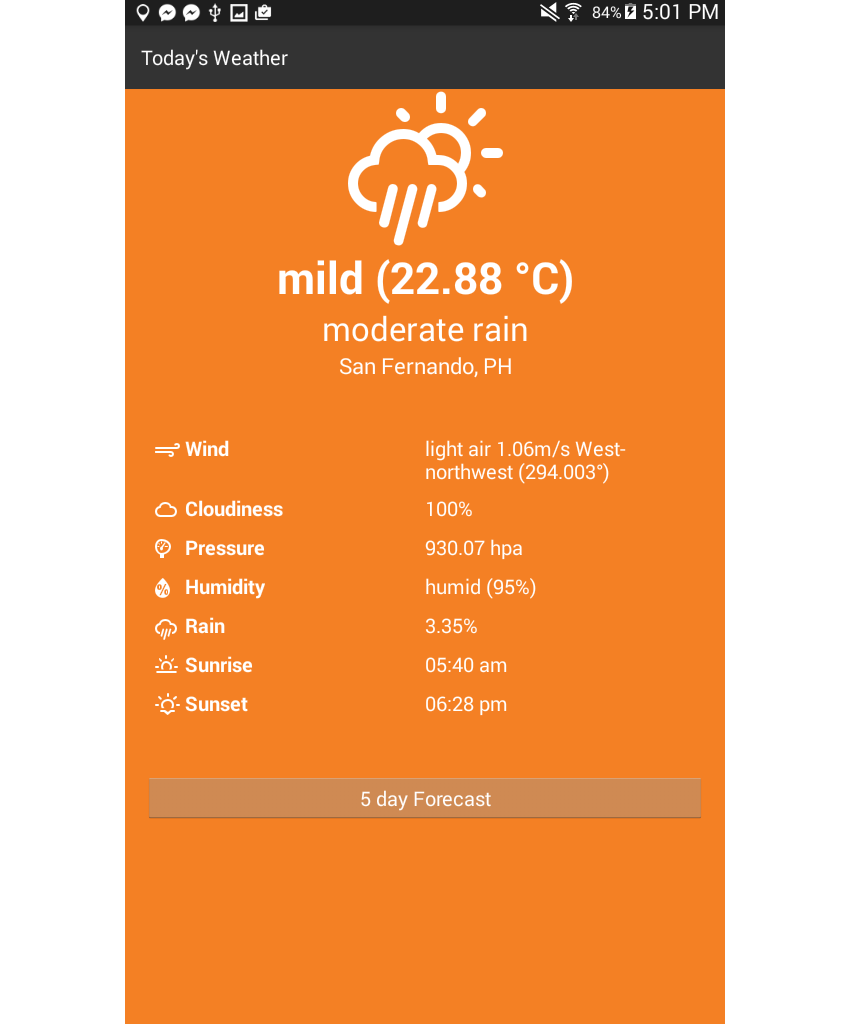
- 主页显示当前天气以及一些相关信息,例如温度,气压和湿度。
- 预报页面显示了未来五天的五天天气预报。
这是主页的外观:
这是预测页面:

您可以在其GitHub repo上找到此应用程序的完整源代码。
4. OpenWeatherMap
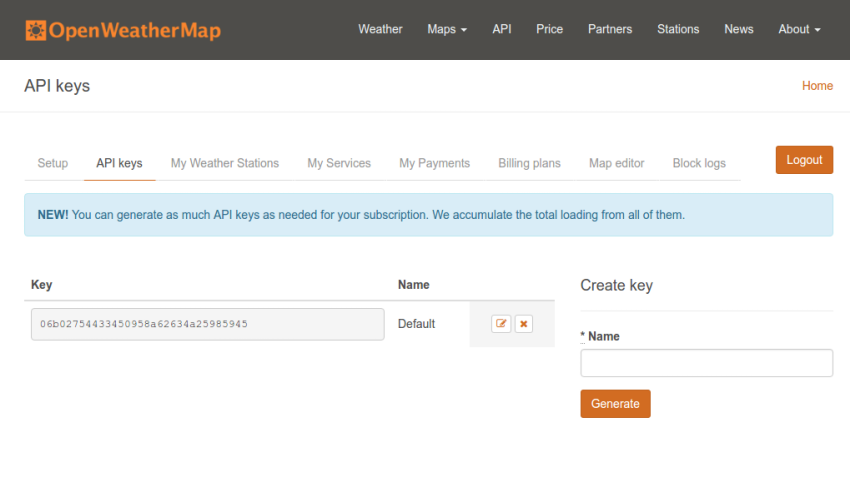
天气数据将来自OpenWeatherMap API ,与其他任何API一样,您需要注册一个API密钥才能使用它。 继续并注册一个帐户 ,我将等待。 登录后,进入“ API密钥”页面 ,复制密钥字段的值,并将其保存在安全的地方。 一旦开始创建应用程序,您以后将需要它。
5.创建应用
现在您已经知道了应用程序的外观,是时候开始实际创建它了。 首先创建一个使用TypeScript模板的新NativeScript项目:
tns create weatherApp --template typescript 完成后,导航到app文件夹并创建以下文件夹和文件。 为了方便起见,您还可以下载或克隆GitHub存储库,然后从app文件夹复制文件。
- common
    + constants.ts
    + navigation.ts
    + requestor.ts
    + utilities.ts
- fonts
- pages
    + forecast
        * forecast.css
        * forecast.ts
        * forecast.xml
        * forecast-view-model.ts
    + main
        * main.css
        * main.ts
        * main.xml
        * main-view-model.ts
- stores
    + location.ts
- app.css
- app.ts 我们将永远只在app目录中工作,因此,每次我引用文件路径或文件夹时,都假定app目录是根目录。
安装依赖项
该应用程序需要几个依赖项: NativeScript Geolocation Module和Moment 。 您可以使用以下命令安装Geolocation模块:
tns plugin add nativescript-geolocation并使用以下命令安装Moment:
npm install moment 地理位置模块用于确定用户的当前位置。 Moment允许轻松格式化Unix时间戳,稍后我们将从API中获得该格式。
通用模块
在查看应用程序每个页面的代码之前,我们先来看一下将在整个应用程序中使用的自定义模块。
常数
常数模块( common/constants.ts )包含整个应用程序中使用的所有常数值:诸如OpenWeatherMap API的基本URL,您之前获得的API密钥,将要使用的端点的路径,天气图标的字符代码以及风向。
export const WEATHER_URL = 'http://api.openweathermap.org/data/2.5/';
export const WEATHER_APIKEY = 'YOUR OPENWEATHERMAP API KEY';
export const CURRENT_WEATHER_PATH = 'weather/';
export const WEATHER_FORECAST_PATH = 'forecast/daily/';

export const WEATHER_ICONS = {
  day: {
    'clear': 0xf00d,
    'clouds': 0xf002,
    'drizzle': 0xf009,
    'rain': 0xf008,
    'thunderstorm': 0x010,
    'snow': 0xf00a,
    'mist': 0xf0b6
  },
  night: {
    'clear': 0xf02e,
    'clouds': 0xf086,
    'drizzle': 0xf029,
    'rain': 0xf028,
    'thunderstorm': 0xf02d,
    'snow': 0xf02a,
    'mist': 0xf04a
  },
  neutral: {
    'temperature': 0xf055,
    'wind': 0xf050,
    'cloud': 0xf041,
    'pressure': 0xf079,
    'humidity': 0xf07a,
    'rain': 0xf019,
    'sunrise': 0xf046,
    'sunset': 0xf052
  }
};

export const WIND_DIRECTIONS = [
  "North", "North-northeast", "Northeast",
  "East-northeast", "East", "East-southeast", "Southeast",
  "South-southeast", "South", "South-southwest", "Southwest",
  "West-southwest", "West", "West-northwest", "Northwest", "North-northwest"
];
实用工具
实用程序模块包括各种实用程序功能:诸如将度数转换为方向,确定风速的描述性文本,将开尔文转换为摄氏以及将字符代码转换为字符之类的事情。 您将在稍后的页面中看到如何使用所有这些功能。
import constants = require('./constants');

export function degreeToDirection(num) {
  var val= Math.floor((num / 22.5) + .5);
  return constants.WIND_DIRECTIONS[(val % 16)];
}

export function describeWindSpeed(speed) {
  if(speed < 0.3) {
    return 'calm';
  } else if(speed >= 0.3 && speed < 1.6) {
    return 'light air';
  } else if (speed >= 1.6 && speed < 3.4) {
    return 'light breeze';
  } else if (speed >= 3.4 && speed < 5.5) {
    return 'gentle breeze';
  } else if (speed >= 5.5 && speed < 8) {
    return 'moderate breeze';
  } else if(speed >= 8 && speed < 10.8) {
    return 'fresh breeze';
  } else if(speed >= 10.8 && speed < 13.9) {
    return 'strong breeze';
  } else if(speed >= 13.9 && speed < 17.2) {
    return 'moderate gale';
  } else if (speed >= 17.2 && speed < 20.8) {
    return 'gale';
  } else if (speed >= 20.8 && speed < 24.5) {
    return 'strong gale';
  } else if (speed >= 24.5 && speed < 28.5) {
    return 'storm';
  } else if (speed >= 28.5 && speed < 32.7) {
    return 'violent storm';
  } else if (speed >= 32.7 && speed < 42) {
    return 'hurricane force';
  }
  return 'super typhoon';
}

export function describeHumidity(humidity) {
  if (humidity >= 0 && humidity <= 40) {
    return 'very dry';
  } else if (humidity >= 40 && humidity <= 70) {
    return 'dry';
  } else if (humidity >= 85 && humidity <= 95) {
    return 'humid';
  }
  return 'very humid';
}

export function describeTemperature(temp) {
  var celsius = convertKelvinToCelsius(temp);
  if (celsius >= 0 && celsius < 7) {
    return 'very cold';
  } else if (celsius >= 8 && celsius < 13) {
    return 'cold';
  } else if (celsius >= 13 && celsius < 18) {
    return 'cool';
  } else if (celsius >= 18 && celsius < 23) {
    return 'mild';
  } else if (celsius >= 23 && celsius < 28) {
    return 'warm';
  } else if (celsius >= 28 && celsius < 32) {
    return 'hot';
  }
  return 'very hot';
}

export function convertKelvinToCelsius(celsius) {
  return celsius - 273.15;
}

export function getTimeOfDay() {
  var hour = (new Date()).getHours();
  var time_of_day = 'night';
  if(hour >= 5 && hour <= 18){
    time_of_day = 'day';
  }
  return time_of_day;
}

export function getIcons(icon_names) {
  var icons = icon_names.map((name) => {
    return {
      'name': name,
      'icon': String.fromCharCode(constants.WEATHER_ICONS.neutral[name])
    };
  });
  return icons;
}
导航
导航模块是一个自定义帮助程序模块,它使我们可以轻松地在应用程序的所有页面之间导航。 打开common/navigation.ts文件并添加以下内容:
import frame = require('ui/frame');

export function getStartPage() {
  return 'pages/main/main';
}

export function goToForecastPage() {
  frame.topmost().navigate('pages/forecast/forecast');
}

export function goToMainPage() {
  frame.topmost().goBack();
}
这使用“ 框架”模块导航到应用程序的其他页面。 getStartPage()方法仅返回应用主页面的位置。 顾名思义, goToForecastPage()允许用户导航到预测页面。
在NativeScript中导航时,需要参考当前位置。 这就是为什么您首先需要调用topmost()函数以获取当前页面或最上面的页面,然后再调用navigate()函数以转到另一页面的原因。 此函数接受您要转到的页面的路径。
请求者
Requestor模块执行对OpenWeatherMap API的实际请求。 如NativeScript简介一文中提到的,NativeScript使用JavaScript虚拟机来运行JavaScript代码。 这意味着我们还可以使用浏览器中可用的功能。
其中之一就是fetch ,它允许我们向远程服务器发出HTTP请求。 该参数是您要发出请求的URL。 它返回一个承诺,因此我们使用then()等待原始响应。 注意使用“原始”一词; fetch函数返回带有标头和其他低层信息的响应-这就是为什么我们需要调用json()函数以获取实际的JSON数据。 这将返回另一个promise,因此我们then()使用then()一次来获取实际对象。
export function get(url){
  return fetch(
    url
  ).then(function(response){
    return response.json();
  }).then(function(json){
    return json;
  });
} 另外,您可以使用Http模块 ,这是在NativeScript中发出HTTP请求的更可靠的方法。
位置商店
位置存储充当位置信息的存储。 这使我们可以从导入此模块的任何文件中更新并获取当前位置。
export var location;

export function saveLocation(loc) {
  location = loc;
}

export function getLocation() {
  return location;
}
主页
现在是时候查看应用程序每个页面的代码了。 但是在执行此操作之前,请先打开入口点文件( app.ts )。 这使用导航模块来获取应用程序的起始页面:
import application = require("application");
import navigation = require('./common/navigation');
application.mainModule = navigation.getStartPage();
application.start(); 接下来,让我们分解pages/main/main.xml文件。
每次用户导航到该特定页面时, navigatingTo事件用于在TypeScript文件中执行类似名称的函数。 CSS类也是根据TypeScript文件动态确定的。
<Page xmlns="http://schemas.nativescript.org/tns.xsd" navigatingTo="navigatingTo" class="{{ background_class }}">
...
</Page> ScrollView组件用于包装所有内容,以便在内容超出屏幕大小可以显示的范围时自动生成垂直滚动条。
并且由于我们要从远程服务器加载数据,因此ActivityIndicator组件用于显示平台的默认加载动画。 这要求您提供一个busy属性,该属性接受一个布尔值,该布尔值控制是否启动动画。 默认情况下,此参数设置为true并且仅在应用程序完成向服务器的请求后才更新为false 。
visibility属性还用于确保组件在不进行动画处理时不占用任何空间。
<StackLayout>
  <ScrollView>
    <ActivityIndicator busy="{{ is_loading }}" visibility="{{ is_loading ? 'visible' : 'collapsed' }}" />
    <StackLayout visibility="{{ !is_loading ? 'visible' : 'collapsed' }}">
      ...
    </StackLayout>
  </ScrollView>
</StackLayout>
对于主要内容,我们在顶部有当前天气的一般概述,在下面有详细信息。 总体概览显示一个图标,代表当前天气,当前温度,天气描述和地点。
<Label text="{{ icon }}" class="icon" />
<Label text="{{ temperature }}" class="temperature" />
<Label text="{{ weather }}" class="weather" textWrap="true"/>
<Label text="{{ place }}" class="place" textWrap="true"/> 有关详细信息,有很多有关当前天气的信息,您可以通过查看text属性来猜测。 每个图标还带有自己的图标。
在我之前显示的屏幕快照中,您看到它在两个页面上都使用两列布局。 这就是为什么我们使用GridLayout的原因。 但是从下面的代码中可以看到,我们还在每行的第一列中使用了GridLayout 。
您可能会问为什么我们要这样做,而不是仅仅创建一个三列的布局,而第一列为图标,第二列为weather属性,第三列为值。 这是完全可以理解的,它将使代码更加简洁。
但是问题在于,NativeScript 2.1版目前不允许其GridLayout使用百分比单位。 这意味着我们不能为图标使用10%的内容,而其他两列则各占45%。
我们下面使用的布局通过使用GridLayout来包装icon和weather属性来解决该问题,其中Icon占用30像素,而weather属性占用包含文本所需的空间。 注意在GridLayout上也使用row和col属性。
<GridLayout columns="*,*" rows="auto,auto,auto,auto,auto,auto,auto" cssClass="details">

  <GridLayout columns="30,auto" rows="auto" row="0" col="0">
    <Label text="{{ wind_icon }}" class="small-icon" row="0" col="0" />
    <Label text="Wind" textWrap="true" row="0" col="1" class="label" />
  </GridLayout>
  <Label text="{{ wind }}" textWrap="true" row="0" col="1" />

  <GridLayout columns="30,auto" rows="auto" row="1" col="0">
    <Label text="{{ cloud_icon }}" class="small-icon" row="0" col="0" />
    <Label text="Cloudiness" textWrap="true" row="1" col="1" class="label" />
  </GridLayout>
  <Label text="{{ clouds }}" textWrap="true" row="1" col="1" />

  <GridLayout columns="30,auto" rows="auto" row="2" col="0">
    <Label text="{{ pressure_icon }}" class="small-icon" row="0" col="0" />
    <Label text="Pressure" textWrap="true" row="2" col="1" class="label" />
  </GridLayout>
  <Label text="{{ pressure }}" textWrap="true" row="2" col="1" />

  <GridLayout columns="30,auto" rows="auto" row="3" col="0">
    <Label text="{{ humidity_icon }}" class="small-icon" row="0" col="0" />
    <Label text="Humidity" textWrap="true" row="3" col="1" class="label" />
  </GridLayout>
  <Label text="{{ humidity }}" textWrap="true" row="3" col="1" />

  <GridLayout columns="30,auto" rows="auto" row="4" col="0">
    <Label text="{{ rain_icon }}" class="small-icon" row="0" col="0" />
    <Label text="Rain" textWrap="true" row="4" col="1" class="label" />
  </GridLayout>
  <Label text="{{ rain }}" textWrap="true" row="4" col="1" />

  <GridLayout columns="30,auto" rows="auto" row="5" col="0">
    <Label text="{{ sunrise_icon }}" class="small-icon" row="0" col="0" />
    <Label text="Sunrise" textWrap="true" row="5" col="1" class="label" />
  </GridLayout>
  <Label text="{{ sunrise }}" textWrap="true" row="5" col="1" />

  <GridLayout columns="30,auto" rows="auto" row="6" col="0">
    <Label text="{{ sunset_icon }}" class="small-icon" row="0" col="0" />
    <Label text="Sunset" textWrap="true" row="6" col="1" class="label" />
  </GridLayout>
  <Label text="{{ sunset }}" textWrap="true" row="6" col="1" />

</GridLayout>
主页的最后标记是指向预测页面的按钮:
<Button text="5 day Forecast" tap="goToForecastPage" />主页JavaScript
打开pages/main/main.ts文件并添加以下代码:
import { EventData } from "data/observable";
import { Page } from "ui/page";
import { MainViewModel } from "./main-view-model";
import navigation = require('../../common/navigation');

export function navigatingTo(args: EventData) {
  var page = <Page>args.object;
  page.bindingContext = new MainViewModel();
}

export function goToForecastPage () {
  navigation.goToForecastPage();
}
在上面的代码中,我们导入了两个内置的NativeScript模块,主视图模型和导航。
EventData对象是使用对象解构 (TypeScript提供的ES6功能)提取的。 我们将EventData作为参数传递给navigatingTo函数,以便可以访问导航到该页面的任何页面传递的任何数据。
它具有object属性,基本上是触发事件的任何组件。 在这种情况下,我们知道它是在Page组件上触发的,这就是为什么我们使用<Page>作为类型断言的原因 。 之后,我们将主视图模型绑定到页面。 这将允许我们在类中添加或更新属性,并且该属性将立即反映在页面上。
在主视图模型( pages/main/main-view-model.ts )中,首先导入我们将要使用的所有模块:
import observable = require("data/observable");
import requestor = require("../../common/requestor");
import constants = require("../../common/constants");
import geolocation = require("nativescript-geolocation");
import moment = require('moment');
import utilities = require('../../common/utilities');
import locationStore = require('../../stores/locationStore');
通过扩展Observable模块创建视图模型,该模块使该类中的所有属性都是可观察的。 这意味着,每次在此类中对其进行更改时,UI中每个属性的所有引用都会更新。
export class MainViewModel extends observable.Observable {

  constructor() {
    ...
  }

}
在构造函数中,检查是否启用了地理定位。 如果未启用,则尝试通过调用enableLocationRequest()函数来启用它。 这会触发应用程序要求用户启用地理位置。
super(); //call the constructor method of the parent class
//check if geolocation is not enabled
if (!geolocation.isEnabled()) {
  geolocation.enableLocationRequest(); //try to enable geolocation
}
接下来,确定是白天还是晚上,并根据结果设置页面背景。 然后在页面中设置图标。
var time_of_day = utilities.getTimeOfDay();
this.set('background_class', time_of_day);
this.setIcons();
之后,尝试确定当前位置。 请注意,如果用户不允许地理定位,则该应用程序将根本无法运行,因为天气取决于用户的位置。 该应用将尝试在10秒内确定用户的位置。 如果这样做失败,则会向用户显示错误消息。
var location = geolocation.getCurrentLocation({timeout: 10000}).
  then(
    (loc) => {
      if (loc) {
        ...
      }
    },
    (e) => {
      //failed to get location
      alert(e.message);
    }
); 如果位置请求成功,则使用locationStore将其保存。 这样,我们以后便可以访问其他页面上的位置,而无需再次请求。
locationStore.saveLocation(loc);供参考,这是在NativeScript中请求位置时可能会得到的示例响应。 您可以查看NativeScript的位置文档 ,以了解有关以下每个属性的更多信息。
{
   "latitude":51.50853,
   "longitude":-0.12574,
   "altitude":0,
   "horizontalAccuracy":37.5,
   "verticalAccuracy":37.5,
   "speed":0,
   "direction":0,
   "timestamp":"2016-08-08T02:25:45.252Z",
   "android":{

   }
}我们可以使用模板文字构造完整的API请求URL,并使用Requestor模块发出请求。
this.set('is_loading', true); //show the loader animation
var url = `${constants.WEATHER_URL}${constants.CURRENT_WEATHER_PATH}?lat=${loc.latitude}&lon=${loc.longitude}&apikey=${constants.WEATHER_APIKEY}`;
requestor.get(url).then((res) => {
  ...
});
响应返回后,提取并设置其格式,然后将结果值设置为该类的属性。 并且由于该类是可观察的,因此这将自动更新应用程序的UI。
this.set('is_loading', false); //stop loader animation
var weather = res.weather[0].main.toLowerCase();
var weather_description = res.weather[0].description;

var temperature = res.main.temp;
var icon = constants.WEATHER_ICONS[time_of_day][weather];

var rain = '0';
if(res.rain){
  rain = res.rain['3h'];
}

this.set('icon', String.fromCharCode(icon));
this.set('temperature', `${utilities.describeTemperature(Math.floor(temperature))} (${utilities.convertKelvinToCelsius(temperature).toFixed(2)} °C)`);
this.set('weather', weather_description);
this.set('place', `${res.name}, ${res.sys.country}`);
this.set('wind', `${utilities.describeWindSpeed(res.wind.speed)} ${res.wind.speed}m/s ${utilities.degreeToDirection(res.wind.deg)} (${res.wind.deg}°)`);
this.set('clouds', `${res.clouds.all}%`);
this.set('pressure', `${res.main.pressure} hpa`);
this.set('humidity', `${utilities.describeHumidity(res.main.humidity)} (${res.main.humidity}%)`);
this.set('rain', `${rain}%`);
this.set('sunrise', moment.unix(res.sys.sunrise).format('hh:mm a'));
this.set('sunset', moment.unix(res.sys.sunset).format('hh:mm a'));
供您参考,以下是API可能返回的示例响应:
{
   "coord":{
      "lon":-0.13,
      "lat":51.51
   },
   "weather":[
      {
         "id":803,
         "main":"Clouds",
         "description":"broken clouds",
         "icon":"04d"
      }
   ],
   "base":"cmc stations",
   "main":{
      "temp":291.44,
      "pressure":1031.7,
      "humidity":82,
      "temp_min":290.37,
      "temp_max":292.25
   },
   "wind":{
      "speed":0.3,
      "deg":45,
      "gust":1
   },
   "rain":{
      "3h":0.075
   },
   "clouds":{
      "all":68
   },
   "dt":1470545747,
   "sys":{
      "type":3,
      "id":1462694692,
      "message":0.0043,
      "country":"GB",
      "sunrise":1470544455,
      "sunset":1470598626
   },
   "id":2643743,
   "name":"London",
   "cod":200
} 您可以在文档中找到有关当前天气数据的每个属性的详细信息。
最后。 有setIcons()函数,用于设置页面中使用的所有图标:
setIcons() {
  var icons = utilities.getIcons([
    'temperature', 'wind', 'cloud',
    'pressure', 'humidity', 'rain',
    'sunrise', 'sunset'
  ]);
  icons.forEach((item) => {
    this.set(`${item.name}_icon`, item.icon);
  });
}
主页样式和图标
这是主页的样式:
.temperature {
  font-size: 40px;
  font-weight: bold;
  text-align: center;
}

.weather {
  font-size: 30px;
  text-align: center;
}

.place {
  font-size: 20px;
  text-align: center;
}

.icon {
  font-family: 'weathericons';
  font-size: 100px;
  text-align: center;
}

.small-icon {
  font-family: 'weathericons';
  font-size: 18px;
  margin-right: 5px;
}

.details {
  margin-top: 20px;
  padding: 30px;
  font-size: 18px;
}

.label {
  font-weight: bold;
}

.details Label {
  padding: 5px 0;
}

Button {
  margin: 20px;
} 请注意,使用weathericons作为icon和small-icon类的font-family 。 这就是我们在NativeScript中使用图标字体的方式 。 如果您在网页上喜欢诸如Font Awesome之类的图标字体,则可以在NativeScript应用程序中以相同的方式使用它们。
首先,下载要使用的图标字体。 对于此应用程序,使用Weather Icons字体 。 解压缩zip存档,并在解压缩的文件夹内进入font目录。 将.ttf文件复制到应用程序的fonts目录中,并将其重命名为weathericons.ttf 。 文件名是您每次要使用特定字体图标时用作font-family值的名称。 除此之外,还必须添加font-size来控制图标的大小。
预测页面
现在,让我们看一下预测页面的标记( pages/forecast/forecast.xml )。 标头中有一个“后退”按钮,允许用户返回主页。 请注意,我们使用的是NavigationButton ,而不是通用的Button组件,它等效于iOS后退按钮和Android导航按钮的NativeScript。
<Page xmlns="http://schemas.nativescript.org/tns.xsd" navigatingTo="navigatingTo" class="{{ background_class }}">
  <Page.actionBar>
    <ActionBar title="5-day Forecast" class="header">
      <NavigationButton text="Back" android.systemIcon="ic_menu_back" tap="goToMainPage" />
    </ActionBar>
  </Page.actionBar>
  ...
</Page> 对于主要内容,将使用Repeater组件而不是通常的ListView 。 这两个组件都可以用于生成列表,但是ListView带有更多的花哨功能。 例如,当列表超过屏幕大小时,它将自动生成垂直滚动条。 内置无限滚动功能 。
在这种情况下,使用Repeater组件是因为没有真正需要的功能。 我们需要的只是一个简单的清单。
<StackLayout>
  <ScrollView>
    <ActivityIndicator busy="{{ is_loading }}" visibility="{{ is_loading ? 'visible' : 'collapsed' }}" />
    <Repeater items="{{ forecast }}">
      <Repeater.itemTemplate>
       ...
      </Repeater.itemTemplate>
    </Repeater>
  </ScrollView>
</StackLayout> 在每个Repeater.itemTemplate内部是一个GridLayout ,其中包含两列,一列用于常规天气信息,一列用于详细信息。
第一列是StackLayout其中包含日期,天气图标和天气描述。 第二列也是一个StackLayout其中包含四个GridLayouts ,其中将包含四个天气属性(温度,风速,阴天和气压)。
第一个GridLayout具有三列,分别包含图标,白天温度和夜间温度。 其他三行只有两列,分别是图标和天气属性的值。
<GridLayout class="item" columns="*,*" rows="auto">
  <StackLayout class="day-weather" row="0" col="0">
    <Label text="{{ day }}" class="date" />
    <Label text="{{ icon }}" class="icon" />
    <Label text="{{ description }}" textWrap="true" />
  </StackLayout>

  <StackLayout class="details" row="0" col="1">
    <GridLayout columns="30,auto,auto" rows="auto" row="0" col="0">
      <Label text="{{ $parents['Page'].temperature_icon }}" class="small-icon" row="0" col="0" />
      <Label text="{{ temperature.day }}" class="temp day-temp" row="0" col="1" />
      <Label text="{{ temperature.night }}" class="temp night-temp" row="0" col="2" />
    </GridLayout>

    <GridLayout columns="30,auto" rows="auto" row="1" col="0">
      <Label text="{{ $parents['Page'].wind_icon }}" class="small-icon" row="0" col="0" />
      <Label text="{{ wind }}" row="0" col="1" />
    </GridLayout>

    <GridLayout columns="30,auto" rows="auto" row="2" col="0">
      <Label text="{{ $parents['Page'].cloud_icon }}" class="small-icon" row="0" col="0" />
      <Label text="{{ clouds }}" row="0" col="1" />
    </GridLayout>

    <GridLayout columns="30,auto" rows="auto" row="3" col="0">
      <Label text="{{ $parents['Page'].pressure_icon }}" class="small-icon" row="0" col="0" />
      <Label text="{{ pressure }}" row="0" col="1" />
    </GridLayout>

  </StackLayout>
</GridLayout> 注意$parents['Page'] 。 使用Repeater或ListView组件时,您将无权访问为列表指定使用的数组之外的数据-除非您明确指定可用数据的父组件。 这就是$parents['Page']传入的地方。 $parents是NativeScript中的一个特殊变量,允许您访问特定组件上的可用数据。 在这种情况下,我们指定Page访问每个天气属性的图标。
<GridLayout columns="30,auto" rows="auto" row="1" col="0">
  <Label text="{{ $parents['Page'].wind_icon }}" class="small-icon" row="0" col="0" />
  <Label text="{{ wind }}" row="0" col="1" />
</GridLayout>
预测网页JavaScript
预测页面的代码与主页的代码几乎相同。 唯一的区别是导航功能是用于返回主页的,而我们将ForecastViewModel用作视图模型。
import { EventData } from "data/observable";
import { Page } from "ui/page";
import { ForecastViewModel } from "./forecast-view-model";
import navigation = require('../../common/navigation');

export function navigatingTo(args: EventData) {
  var page = <Page>args.object;
  page.bindingContext = new ForecastViewModel();
}

export function goToMainPage() {
  navigation.goToMainPage();
}
这是视图模型的代码( pages/forecast/forecast-view-model.ts ):
import observable = require("data/observable");
import requestor = require("../../common/requestor");
import constants = require("../../common/constants");
import moment = require('moment');
import utilities = require('../../common/utilities');
import locationStore = require('../../stores/locationStore');

export class ForecastViewModel extends observable.Observable {

  constructor() {
    super();
    var location = locationStore.getLocation();
    var url = `${constants.WEATHER_URL}${constants.WEATHER_FORECAST_PATH}?cnt=6&lat=${location.latitude}&lon=${location.longitude}&apikey=${constants.WEATHER_APIKEY}`;

    var time_of_day = utilities.getTimeOfDay();
    this.set('is_loading', true);
    this.set('background_class', time_of_day);
    this.setIcons();

    requestor.get(url).then((response) => {
      this.set('is_loading', false);
      var forecast = this.getForecast(response);
      this.set('forecast', forecast);
    });
  }

  private getForecast(response) {
    var forecast = [];
    var list = response.list.splice(1); //remove first item from array of forecasts
    //format and push all the necessary data into a new array
    list.forEach((item) => {
      forecast.push({
        day: moment.unix(item.dt).format('MMM DD (ddd)'),
        icon: String.fromCharCode(constants.WEATHER_ICONS['day'][item.weather[0].main.toLowerCase()]),
        temperature: {
          day: `${utilities.describeTemperature(item.temp.day)}`,
          night: `${utilities.describeTemperature(item.temp.night)}`
        },
        wind: `${item.speed}m/s`,
        clouds: `${item.clouds}%`,
        pressure: `${item.pressure} hpa`,
        description: item.weather[0].description
      })
    });

    return forecast;
  }

  private setIcons() {
    var icons = utilities.getIcons(['temperature', 'wind', 'cloud', 'pressure']);
    icons.forEach((item) => {
      this.set(`${item.name}_icon`, item.icon);
    });
  }

} 在构造函数内部,我们从位置存储中获取当前位置,并为16天天气预报构建URL端点。 但是,我们只需要5天而不是16天,因此我们为count( cnt )指定6。 我们使用6,因为时区取决于服务器,而不取决于指定的位置。 这意味着API可能会返回前一天或当天的天气。 这就是为什么要多花1天作为填充时间的原因。
var location = locationStore.getLocation();
var url = `${constants.WEATHER_URL}${constants.WEATHER_FORECAST_PATH}?cnt=6&lat=${location.latitude}&lon=${location.longitude}&apikey=${constants.WEATHER_APIKEY}`; 接下来,发出请求并通过调用getForecast()函数使用API响应更新UI:
requestor.get(url).then((response) => {
  this.set('is_loading', false);
  var forecast = this.getForecast(response);
  this.set('forecast', forecast);
});
这是16天的预测终点返回的示例响应。 请注意,为了使示例更简洁,我将count设置为1,这就是为什么list属性仅包含一个对象的原因。
{
   "city":{
      "id":2643743,
      "name":"London",
      "coord":{
         "lon":-0.12574,
         "lat":51.50853
      },
      "country":"GB",
      "population":0
   },
   "cod":"200",
   "message":0.0347,
   "cnt":1,
   "list":[
      {
         "dt":1470571200,
         "temp":{
            "day":24.69,
            "min":17.37,
            "max":24.69,
            "night":17.37,
            "eve":23.29,
            "morn":19.02
         },
         "pressure":1029.77,
         "humidity":0,
         "weather":[
            {
               "id":500,
               "main":"Rain",
               "description":"light rain",
               "icon":"10d"
            }
         ],
         "speed":8.27,
         "deg":253,
         "clouds":0
      }
   ]
}
预测页面样式
以下是预测页面的样式( pages/forecast/forecast.css ):
Page {
  font-size: 15px;
}

.item {
  padding: 20px 10px;
}

.day-weather {
  text-align: center;
}

.details {
  horizontal-align: left;
}

.date {
  font-size: 20px;
}

.icon {
  font-family: 'weathericons';
  font-size: 30px;
}

.temp {
  padding: 3px;
  text-align: center;
  font-size: 15px;
}

.day-temp {
  background-color: #d0c110;
}

.night-temp {
  background-color: #505050;
}

.small-icon {
  font-family: 'weathericons';
  margin-right: 5px;
  text-align: center;
}
全球应用程式样式
打开app.css文件并添加以下样式:
.header {
  background-color: #333;
  color: #fff;
}

.day {
  background-color: #f48024;
  color: #fff;
}

.night {
  background-color: #924da3;
  color: #fff;
}6.更改默认应用程序图标
您可以通过转到App_Resources文件夹来更改默认的应用程序图标。 在那里,您可以看到一个Android和iOS文件夹。 对于Android,您可以替换以下每个文件夹中的图像文件以更改图标:
-
drawable-hdpi -
drawable-ldpi -
drawable-mdpi
对于iOS,您要替换的是Assets.xcassets/AppIcon.appiconset文件夹中的图像。
如果您想轻松地为Android和iOS创建图标,请查看MakeAppIcon 。 只需选择一个图像文件作为图标,它就会为Android和iOS自动生成不同的大小。 然后,您可以将它们移动到上述文件夹中。 只要确保您拥有正确的尺寸,并且名称与它们替换的图像相同即可。
7.运行应用
通过执行以下tns命令,您可以照常在设备或仿真器上运行该应用程序:
tns run {platform}
tns livesync {platform} --watch
现在,我们使用TypeScript的唯一区别是,在每个任务的开始还有一个附加步骤,将TypeScript文件编译为JavaScript。 TypeScript强大的类型检查功能可充当安全网,以在NativeScript甚至编译应用程序之前捕获一些错误。
结论
在本教程中,您学习了如何使用TypeScript语言使用NativeScript构建应用程序。 具体来说,您学习了以下概念:
我将为您提供一些资源,以继续使用NativeScript开发出色的应用程序的过程:
翻译自: https://code.tutsplus.com/tutorials/create-a-weather-app-with-typescript-and-nativescript--cms-27027


 1万+
1万+

 被折叠的 条评论
为什么被折叠?
被折叠的 条评论
为什么被折叠?
 到【灌水乐园】发言


