


在本教程中,我将创建一个小型Rails应用程序。 我将向您展示如何创建一个rake任务,以将一些场所从Foursquare导入到我们的数据库中。 然后,我们将在Elasticsearch上为其编制索引。 此外,每个场所的位置都将被索引,以便我们能够按距离搜索。
耙任务导入Foursquare场地
瑞克任务只是我们可以手动运行的ruby脚本,如果需要执行一些后台任务(例如维护),我们可以定期执行它。 在我们的情况下,我们将手动运行它。 我们将需要一个新的Rails应用程序和一些模型以将要从Foursquare导入的场地保存到我们的数据库中。 首先创建一个新的Rails应用程序,然后在控制台中输入:
$ rails new elasticsearch-rails-geolocation
我将使用Rails生成器创建两个模型:场所和类别。 要创建Venue模型,请在您的终端中输入:
$ rails g model venue name:string address:string country:string latitude:float longitude:float
键入以下命令以生成类别模型:
$ rails g model category name:string venue:references
从场所到类别的关系是多对多的。 例如,如果我们导入一家意大利餐厅,它可能具有“意大利”和“餐厅”类别,但是其他场所也可以具有相同的类别。 要定义从场所到类别的多对多关系,我们使用has_and_belongs_to_many活动记录方法,因为我们没有属于该关系的任何其他属性。 我们的模型现在看起来像这样:
class Venue < ActiveRecord::Base
  has_and_belongs_to_many :categories
end

class Category < ActiveRecord::Base
  has_and_belongs_to_many :venues
end
现在,我们仍然需要为该关系创建“联接”表。 它将存储关系的“ venue_id,category_id”列表。 要生成此表,请在终端中运行以下命令:
$ rails generate migration CreateJoinTableVenueCategory venue category
如果查看生成的迁移,则可以验证是否为该关系创建了正确的表:
class CreateJoinTableVenueCategory < ActiveRecord::Migration
  def change
    create_join_table :venues, :categories do |t|
      # t.index [:venue_id, :category_id]
      # t.index [:category_id, :venue_id]
    end
  end
end 要在数据库中实际创建表,请不要忘记在终端中执行命令bin/rake db:migrate来运行迁移。
要从foursquare导入场地,我们需要创建一个新的Rake任务。 Rails也有一个用于任务的生成器,因此只需在您的终端中输入:
$ rails g task import venues
如果打开在lib / tasks / import.rake中创建的新文件,则可以看到它包含一个没有实现的任务。
namespace :import do
  desc "TODO"
  task venues: :environment do
  end
end
为了完成任务,我将使用两个宝石。 宝石'foursquare2'用于连接Foursquare。 第二个宝石是“ geocoder”,用于将传递给任务的城市名称转换为地理坐标的参数。 将这两个gem添加到您的Gemfile中:
gem 'foursquare2'
gem 'geocoder'
在终端的rails项目文件夹中运行bundle install ,以安装gem。
为了执行此任务,我检查了foursquare2的文档以及官方的Foursquare文档 。 Foursquare不接受对其API的匿名调用,因此我们需要创建一个开发人员帐户并注册该应用程序,以获取需要连接的client_id和client_secret密钥 。 对于此样本,我对Venue Search API端点感兴趣,因此我们可以为样本提供一些真实数据。 从API获得数据后,我们将其保存到数据库中。 最终的实现如下所示:
namespace :import do
  desc "Import venues from foursquare"
  task :venues, [:near] => :environment do |t, args|

    client = Foursquare2::Client.new(
      client_id: 'your_foursquare_client_id',
      client_secret: 'your_foursquare_client_secret',
      api_version: '20160325')

    result = client.search_venues(near: args[:near].to_s, query: 'restaurants', intent: 'browse')
    result.venues.each do |v|
        venue_object = Venue.new(name: v.name, address: v.location.address, country: v.location.country, latitude: v.location.lat, longitude: v.location.lng)

        v.categories.each do |c|
          venue_object.categories << Category.find_or_create_by(name: c.shortName)
        end

        venue_object.save

        puts "'#{venue_object.name}' - imported"
    end
  end
end
添加Foursquare API密钥后,要从“伦敦”导入一些场所,请在终端中运行以下命令: bin/rake import:venues[london]
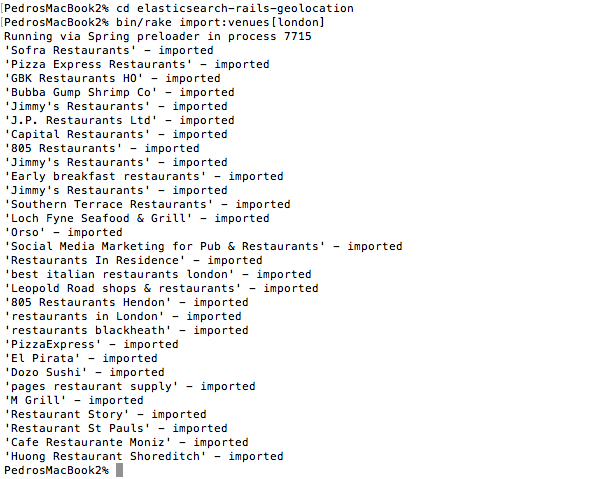
如果愿意,您可以尝试使用城市,或者也可以从多个地方导入数据。 如您所见,我们的rake任务仅将其发送到Foursquare,然后将结果保存到我们的数据库中。
使用Chewy在Foursquare中索引场地
至此,我们有了导入器和数据模型,但仍然需要在Elasticsearch上索引场所。 然后,我们需要使用搜索表单创建一个视图,该视图使您可以输入感兴趣的地址来寻找场所。
让我们开始将gem'chewy'添加到Gemfile并运行bundle install 。
根据文档 ,创建文件app / chewy / venues_index.rb来定义Elasticsearch如何索引每个Venue。 使用chewy,我们不需要注释我们的模型,因此Elasticsearch的索引与模型完全隔离。
class VenuesIndex < Chewy::Index
  define_type Venue do
    field :country
    field :name
    field :address
    field :location, type: 'geo_point', value: ->{ {lat: latitude, lon: longitude} }
    field :categories, value: ->(venue) { venue.categories.map(&:name) } # passing array values to index
  end
end 如您所见,在类VenuesIndex ,我表示我想将字段country,name和address索引为字符串。 然后,为了能够按地理位置搜索,我需要指出纬度和经度构成了geo_point ,这是Elasticsearch上的地理位置。 我们要为每个场所建立索引的最后一件事是类别列表。
通过输入您的终端bin/rake chewy:reset来运行rake任务,以索引数据库中我们拥有的所有场所。 您可以根据需要使用相同的命令在Elasticsearch中重新索引数据库。
现在,我们将数据存储在SQLite数据库中,并在Elasticsearch中建立了索引,但我们尚未创建任何视图。 让我们生成我们的Venues控制器,仅使用“显示”操作。
让我们从修改routes.rb文件开始:
Rails.application.routes.draw do
  root 'venues#show'
  get 'search', to: 'venues#show'
end现在,创建视图app / views / venues / show.html.erb ,在这里我只是添加一个表单以输入要查找场所的位置。 如果搜索结果可用,我还将呈现场所列表:
<h1>Search venues</h1>

<% if @total_count %>
    <h3><%= @total_count %> venues found near <%= params[:term] %></h3>
<% end %>

<%= form_for :term, url: search_path, method: :get do |form| %>
	<p>
		Venues near
    <%= text_field_tag :term, params[:term] %>
    <%= submit_tag "Search", name: nil %>
	</p>
<% end %>

<hr/>

<div id='search-results'>
	<% @venues.each do |venue| %>
	  <div>
	    <h3><%= venue.name %></h3>
	    <% if venue.address %>
	      <p>Address: <%= venue.address %></p>
	    <% end %>
			<p>Distance: <%= number_to_human(venue.distance(@location), precision: 2, units: {unit: 'km'}) %></p>
		</div>
	<% end %>
</div>
如您所见,我正在显示从搜索表单中输入的位置到每个地点的距离。 为了计算和显示距离,请将“ distance”方法添加到您的Venue类中:
class Venue < ActiveRecord::Base
  has_and_belongs_to_many :categories

  def distance location
    Geocoder::Calculations.distance_between([latitude, longitude], [location['lat'], location['lng']])
  end
end 现在,我们需要生成VenuesController,因此在您的终端$ rails g controller venues show键入。 这是完整的实现:
class VenuesController < ApplicationController
def show
if params[:term].nil?
@venues = []
else
@location = address_to_geolocation params[:term]
scope = search_by_location
@total_count = scope.total_count
@venues = scope.load
end
end
private
def address_to_geolocation term
res = Geocoder.search(term)
res.first.geometry['location'] # lat / lng
end
def search_by_location
VenuesIndex
.filter {match_all}
.filter(geo_distance: {
distance: "2km",
location: {lat: @location['lat'], lon: @location['lng']}
})
.order(_geo_distance: {
location: {lat: @location['lat'], lon: @location['lng']}
})
end
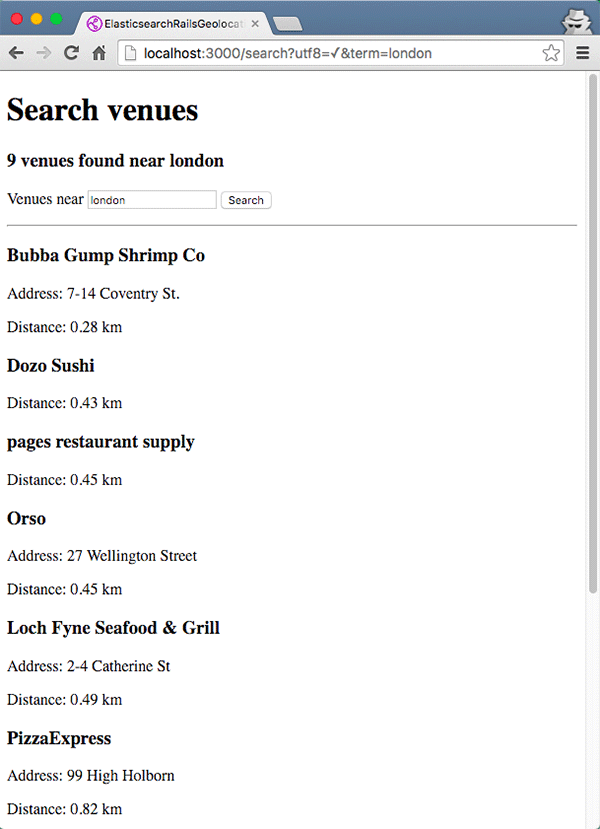
end 如您所见,我们只有“显示”操作。 搜索位置存储在params[:term] ,如果该值可用,我们会将地址转换为地理位置。 在方法“ search_by_location”中,我只是查询Elasticsearch以匹配距搜索距离和顺序2公里之内的任何地点,并以最近的地点进行排序。
您可能会想,“如果进行地理搜索,为什么默认情况下为什么不按距离对结果进行排序?” Elasticsearch将地理位置过滤器视为一个过滤器,仅此而已。 您还可以在其他字段上执行搜索,因此我们可以搜索某个位置附近的“比萨餐厅”。 也许有一家意大利餐厅,菜单上的菜单上有四个披萨,但附近有一个大披萨店。 默认情况下,Elasticsearch考虑搜索的相关性。
如果执行搜索,我可以看到场所列表:
按类别过滤场地
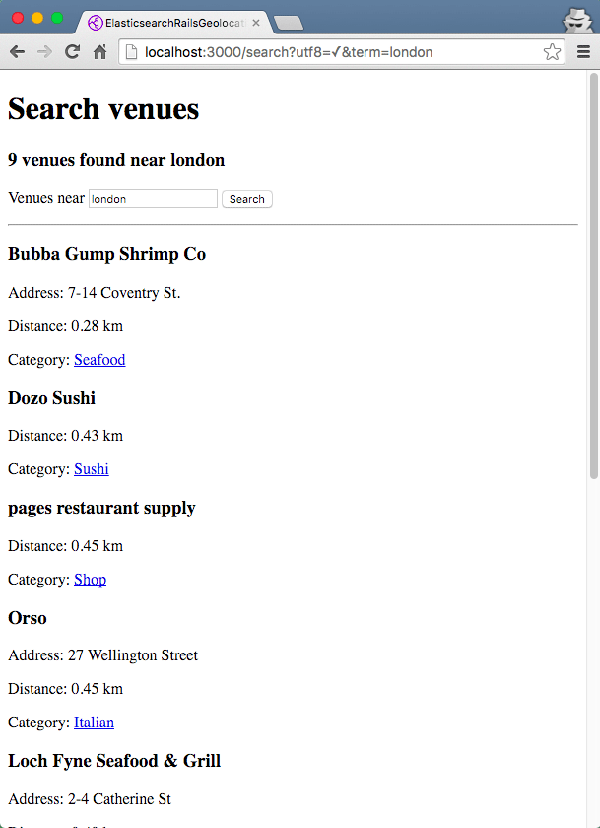
我们还存储了每个场所的类别,但是我们现在不显示它或按类别过滤,所以让我们从显示它开始。 编辑views / venues / show.html.erb,然后在搜索结果列表中显示类别,并带有按该类别过滤的链接。 我们还需要传递位置,因此我们可以按位置和类别进行搜索:
<p>Category:
  <% venue.categories.each do |c| %>
    <%= link_to c.name, search_path(term: params[:term], category: c.name) %>
  <% end %>
</p>
如果刷新搜索页面,则可以看到正在显示的类别:
现在我们需要实现控制器,并且有一个新的可选“ category”参数。 另外,查询索引时,需要检查是否设置了“类别”参数,然后按距离搜索后按类别进行过滤。
class VenuesController < ApplicationController
  def show
    if params[:term].nil?
      @venues = []
    else
      @location = address_to_geolocation params[:term]
      @category = params[:category]

      scope = search_by_location
      @total_count = scope.total_count
      @venues = scope.load
    end
  end

  private
    def address_to_geolocation term
      res = Geocoder.search(term)
      res.first.geometry['location'] # lat / lng
    end

    def search_by_location
      scope = VenuesIndex
        .filter {match_all}
        .filter(geo_distance: {
          distance: "2km",
          location: {lat: @location['lat'], lon: @location['lng']}
        })
        .order(_geo_distance: {
            location: {lat: @location['lat'], lon: @location['lng']}
          })

      if @category
        scope = scope.merge(VenuesIndex.filter(match: {categories: @category}))
      end

      return scope
    end
end
另外,在标题中,我添加了一个链接以返回到“未过滤的结果”。
<h1>Search venues</h1>
<% if @total_count %>
<% if @category %>
<h3><%= "#{@total_count} #{@category} found near #{params[:term]}" %></h3>
<%= link_to 'All venues', search_path(term: params[:term]) %>
<% else %>
<h3><%= @total_count %> venues found near <%= params[:term] %></h3>
<% end %>
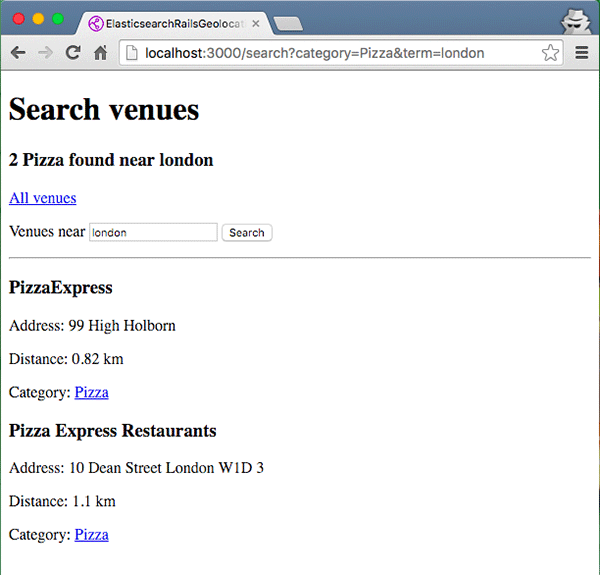
<% end%>现在,如果我在执行搜索后单击一个类别,您可以看到结果正在被该类别过滤。
结论
如您所见,有许多不同的宝石可以将您的数据索引到Elasticsearch并执行不同的搜索查询。 根据您的需求,您可能更喜欢使用不同的gem,并且当您需要执行复杂的查询时,可能需要了解Elasticsearch API并进行较低级别的查询,这是大多数gem所允许的。 如果您想实现全文搜索并且可能只是自动建议,则可能不需要了解太多有关Elasticsearch的细节。
翻译自: https://code.tutsplus.com/tutorials/geospatial-search-in-rails-using-elasticsearch--cms-22921


 3181
3181

 被折叠的 条评论
为什么被折叠?
被折叠的 条评论
为什么被折叠?
 到【灌水乐园】发言


