


 本文介绍如何使用 Linux 中的 traceroute 命令来诊断网络问题,包括检查网络服务和路由信息。教程覆盖了 traceroute 的基本用法、各种选项及实际应用示例。
The network is an important part of the system administration. Because without a network the server has nothing to do. While administrating Linux servers troubleshooting network is very important. When a network problem occurs in a Linux server first step is checking network services and the route information. Network services can be checked with systemctl or similar commands. Network routes can be checked with different tools but the most popular and straightforward tool is traceroute . We will look at usage examples of traceroute in this tutorial.
网络是系统管理的重要组成部分。 因为没有网络,服务器无关。 在管理Linux服务器时,对网络进行故障排除非常重要。 当Linux服务器中出现网络问题时,第一步是检查网络服务和路由信息。 可以使用systemctl或类似命令检查网络服务。 可以使用其他工具检查网络路由,但是最流行和最直接的工具是traceroute 。 我们将在本教程中查看traceroute的用法示例。
关于traceroute命令 (About traceroute Command)
Networking is a stand-alone profession done by its professionals. But some simple tools need to know by system administrators. Traceroute mainly uses ICMP packets. ICMP is a protocol mainly developed for network troubleshooting and information sharing. ICMP packets are transmitted between network-capable devices to share information about network traffic. ICMP packets have TTL value. TTL is time to live where holds information about hop count. Generally, all network devices are one hop and as an example when ICMP packets send to poftut.com
网络是由其专业人员完成的独立工作。 但是系统管理员需要了解一些简单的工具。 Traceroute主要使用ICMP数据包。 ICMP是主要为网络故障排除和信息共享而开发的协议。 ICMP数据包在具有网络功能的设备之间传输,以共享有关网络流量的信息。 ICMP数据包具有TTL值。 TTL是生存时间,用于保存有关跳数的信息。 通常,所有网络设备都是一跳,以ICMP数据包发送到poftut.com
traceroute命令语法 (traceroute Command Syntax)
The syntax of the traceroute is like below.
traceroute的语法如下。
traceroute OPTIONS HOST PACKET_LENGTH
traceroute命令帮助 (traceroute Command Help)
Help about traceroute commands can get like below.
关于traceroute命令的帮助如下。
$ traceroute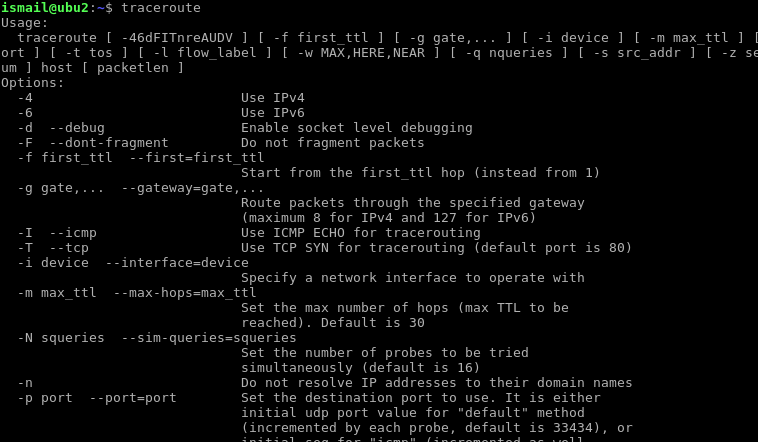
查找到主机的路由,IP地址,网站(Find Route To The Host, IP Address, Website)
As we stated before traceroute will find the route to the given destination like host, IP address, website, etc. In this example, we will route to the site named but the destination can be an IP address or hostname in a local area network.
正如我们在traceroute之前所述,将找到到给定目标的路由,例如主机,IP地址,网站等。在此示例中,我们将路由到命名的站点,但目标可以是局域网中的IP地址或主机名。
$ traceroute poftut.com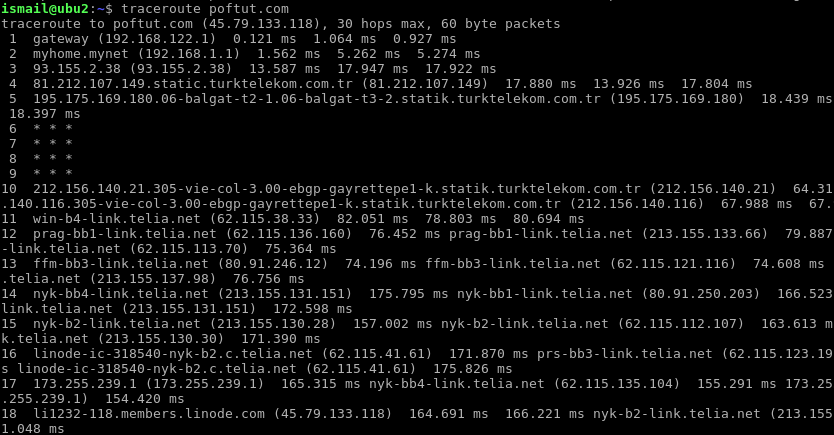
This example provides information about the route. There are 18 hops to the destination. Which is shown in the first column. In the second column, the hop names are provided. and in the other columns, the operation metrics are provided. If we look to the example we see that * * * lines. Those are used to inform that these hops do not provide information about themselves.
本示例提供有关路线的信息。 到目的地有18跳。 在第一列中显示。 在第二列中,提供了跃点名称。 在其他列中,提供了操作指标。 如果查看示例,则会看到* * *行。 这些用于通知这些跃点不提供有关其自身的信息。
显示IP地址不解析主机名(Show IP Address Do Not Resolve Host Name)
In the previous example, the hosts are expressed with their hostnames. Hostnames give more clues about the host. But the disadvantage of the hostname is that it should be resolved. As we know all operation is done with IP addresses but the IP addresses are expressed with their hostnames by using DNS. This will slow the trace operation. The -n option can be used to disable hostname resolution.
在前面的示例中,主机以其主机名表示。 主机名提供了有关主机的更多线索。 但是主机名的缺点是应该解析它。 众所周知,所有操作都是通过IP地址完成的,但是IP地址是通过使用DNS的主机名来表示的。 这将减慢跟踪操作。 -n选项可用于禁用主机名解析。
$ traceroute -n poftut.com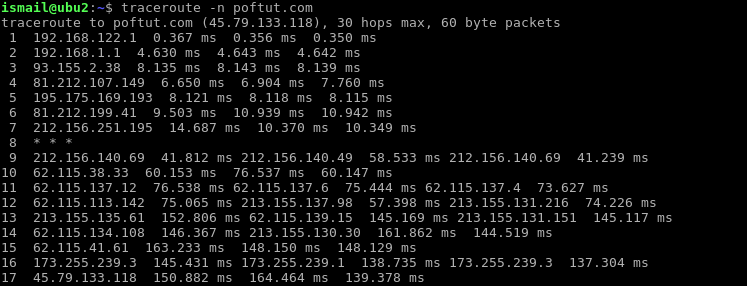
设定回应时间(Set Response Time)
By tracing the path the ICMP packet transmission will occur. We will send the ICMP packet to the destination hop and we will wait for the answer. Sometimes this answer can come back late or never came back. This will slow our network trace operation. We can set time for the response and make our network trace operation faster. In the example, we set a timeout for the trace 1 second with -w option.
通过跟踪路径,将发生ICMP数据包传输。 我们将把ICMP数据包发送到目标跃点,我们将等待答案。 有时,这个答案可能会迟到或永远不会回来。 这将减慢我们的网络跟踪操作。 我们可以设置响应时间,并使我们的网络跟踪操作更快。 在示例中,我们使用-w选项为跟踪设置了1秒超时。
$ traceroute -n -w 1 poftut.com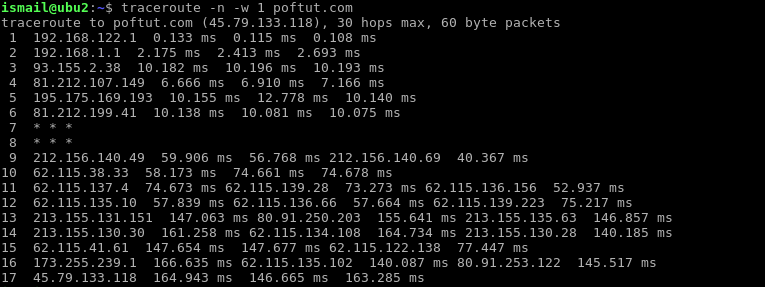
设置每跳查询数(Set Number Of Queries Per-Hop)
We send ICMP packets to the hop and this hop sends back responses. We call this round trip as a query. Traceroute by default makes 3 queries for each hop. This is a changeable property. This can be changed with -q parameter. In the following example, we set the query count as 1 for each hop.
我们将ICMP数据包发送到该跃点,并且此跃点发送回响应。 我们将此往返称为查询。 默认情况下,Traceroute对每个跃点进行3个查询。 这是一个可变属性。 可以使用-q参数更改。 在以下示例中,我们将每个跃点的查询计数设置为1。
$ traceroute -n -q 1 poftut.com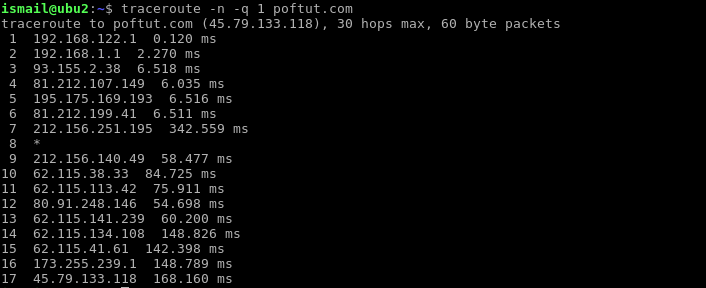
为ICMP设置TTL( Set TTL For ICMP)
We have previously talked about the TTL value. By default, this TTL value is set as 30. This means that we can only reach up to 30 hops. Because in each hop this TTL value is incremented and after hop number 30 the TTL will be 0 and the packet will not be transmitted to the next hop. In this example, we will set TTL number 8 which will only reach the first 8 hops.
我们之前已经讨论过TTL值。 默认情况下,此TTL值设置为30。这意味着我们最多只能达到30个跃点。 因为在每个跃点中,此TTL值都会增加,并且在跃点编号30之后,TTL将为0,并且不会将数据包传输到下一个跃点。 在此示例中,我们将设置TTL数字8,仅到达前8个跃点。
$ traceroute -m 8 poftut.com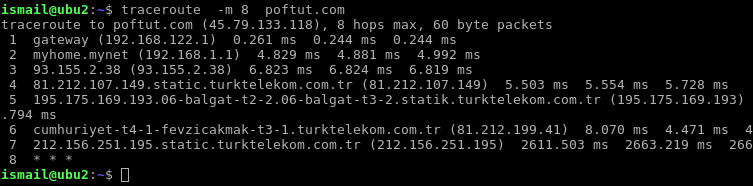
设定TTL计数 (Set TTL Count)
By default, the traceroute command will show all hops starting from 1 to the last hop. In some situations, we only need only some part of the hops starting from the n’th hop. This can be set with the -f option. In this example, we will start from hop number 10.
缺省情况下,traceroute命令将显示从1到最后一跳的所有跳。 在某些情况下,我们仅需要从第n个跃点开始的跃点的一部分。 可以使用-f选项设置。 在此示例中,我们将从第10跳开始。
$ traceroute -f 10 poftut.com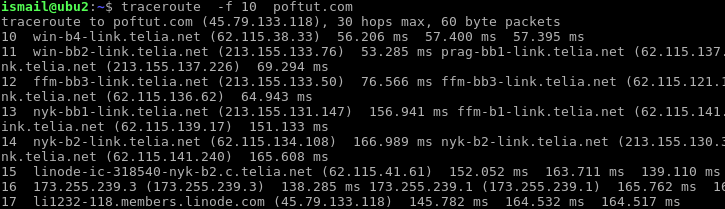
打印自治系统(AS)号 (Print Autonomous System (AS) Numbers)
The Internet is a very big public network. There are a lot of parties that provide connections for each other in a mesh topology. These parties are generally ISP’s or big companies and those are called in internet terminology as Autonomous Systems. All AS’s have their unique identifiers called AS numbers. While hoping in different AS’s their AS numbers can be printed with -A option.
互联网是一个非常大的公共网络。 在网格拓扑中,有很多参与方彼此提供连接。 这些参与方通常是ISP或大公司,在互联网术语中称为“自治系统”。 所有AS都有其唯一的标识符,称为AS号。 当希望输入不同的AS时,可以使用-A选项打印其AS编号。
$ traceroute -A poftut.com
We can see the AS numbers like [AS9121] after the IP address of hop.
跳的IP地址后面可以看到[AS9121]类的AS号。
指定源接口 (Specify Source Interface)
In enterprise environments, Linux systems generally have multiple interfaces for high availability. Multiple interfaces mean multiple paths to the destination. Linux has default routes which mean primary interfaces for out of network destinations. This is used by default but we can specify another interface with the -i option. But first, we will list available interfaces with the ip command.
在企业环境中,Linux系统通常具有多个接口以实现高可用性。 多个接口意味着到达目的地的多个路径。 Linux具有默认路由,这意味着用于网络外目标的主要接口。 默认情况下使用它,但是我们可以使用-i选项指定另一个接口。 但是首先,我们将使用ip命令列出可用的接口。
$ ip link
Now we will specify the network device name. But keep in mind that these options require root privileges which can be provided with sudo command.
现在,我们将指定网络设备名称。 但是请记住,这些选项需要root特权,可以通过sudo命令提供。
$ sudo traceroute -i ens3 poftut.com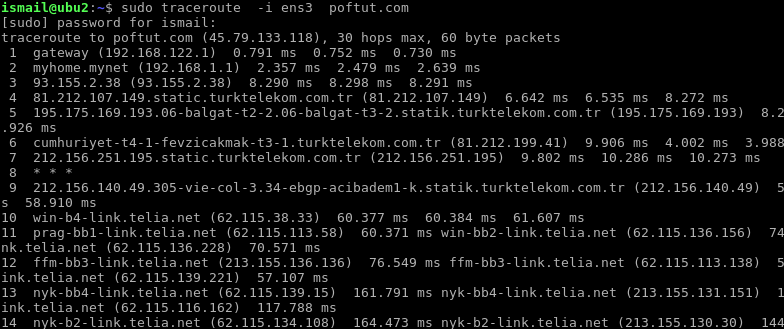
指定网关(Specify Gateway)
IP packets are firstly redirected to the host where it’s specified in the network configuration of the source system. This first hop/host is called a gateway. By default, this gateway is used by traceroute. We can change this gateway information with the -g option. In this example, we will set IP address 192.168.122.1 as gateway address.
IP数据包首先被重定向到源系统的网络配置中指定的主机。 此第一跳/主机称为网关。 默认情况下,traceroute使用此网关。 我们可以使用-g选项更改此网关信息。 在此示例中,我们将IP地址192.168.122.1设置为网关地址。
$ sudo traceroute -g 192.168.122.1 poftut.com翻译自: https://www.poftut.com/linux-traceroute-command-tutorial-examples/


 被折叠的 条评论
为什么被折叠?
被折叠的 条评论
为什么被折叠?
 到【灌水乐园】发言


