


 本文介绍了如何使用Spring Boot创建WebSocket服务器,实现双向实时通信。首先介绍了WebSocket的优势,然后通过Spring Initializr创建项目,添加WebSocket依赖。接着创建WebSocketHandler处理文本和二进制消息,并在WebSocket配置中注册处理程序。此外,还展示了如何创建JavaScript客户端测试服务器,并提供了一个简单的测试页面。最后,简要提到了使用Spark Framework创建WebSocket服务器和Nexmo的WebSocket应用示例。
w ^ebSocket is a protocol which enables communication between the server and the browser. It has an advantage over RESTful HTTP because communications are both bi-directional and real-time. This allows for the server to notify the client at any time instead of the client polling on a regular interval for updates.
In this series of posts, I'm going to show you three different ways to create a WebSocket server in Java using Spring Boot, the Spark Framework, and the Java AP一世 for WebSockets.
Prerequisites
You will be using Gradle to manage your dependencies and run your application.
此外,您需要确保已安装JDK的副本。 在本教程中,我将使用JDK 8。
WebSockets with Spring Boot
小号pring Boot allows you to create production-grade Spring applications inside of a runnable JAR.
Create the Project
You can use Spring Initializr to bootstrap your application and select the packages that you need.
对于此示例,您将需要Websocket依赖性。 我还将使用Gradle,因此您将需要对其进行更改以生成Gradle项目。
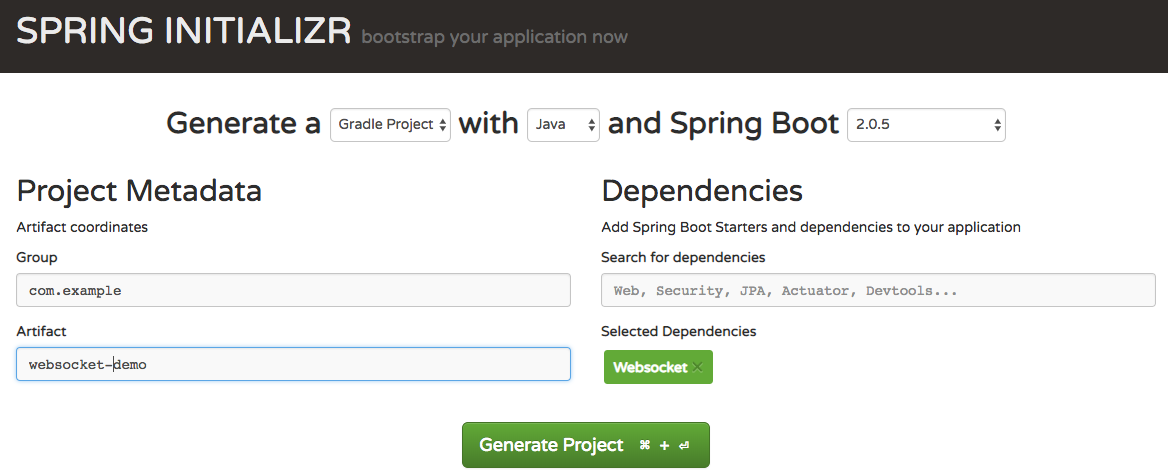
单击生成项目按钮将下载一个zip文件。 将其解压缩到您选择的目录中。
Create the WebSocket Handler
WebSocket消息可以是文本,也可以是二进制。 您将创建一个可以处理这两个消息的处理程序。
创建一个名为WebSocketHandler延伸AbstractWebSocketHandler在里面com.example.demo包。AbstractWebSocketHandler需要您实现两种方法,handleTextMessage和handleBinaryMessage收到新的文本或二进制消息时调用。
出于演示目的,您将创建一个回显服务器,该服务器将把收到的消息回显给发件人。
添加以下实现:
@Override
protected void handleTextMessage(WebSocketSession session, TextMessage message) throws IOException {
    System.out.println("New Text Message Received");
    session.sendMessage(message);
}

@Override
protected void handleBinaryMessage(WebSocketSession session, BinaryMessage message) throws IOException {
    System.out.println("New Binary Message Received");
    session.sendMessage(message);
}
Register the WebSocket Handler
为了使用WebSocketHandler,它必须在Spring的WebSocketHandlerRegistry。 以下将完成两件事:
- 它将注册WebSocketHandler在/插座路径。它将允许所有浏览器客户端将消息发送到服务器。 不需要它们具有特定来源。
创建一个名为WebSocket配置实施WebSocket配置器界面com.example.websocketdemo包。
注释WebSocket配置与@组态和@EnableWebSocket注释。
WebSocket配置器需要您实施registerWebSocketHandlers方法。
添加以下实现进行注册WebSocketHandler:
@Override
public void registerWebSocketHandlers(WebSocketHandlerRegistry registry) {
    registry.addHandler(new WebSocketHandler(), "/socket").setAllowedOrigins("*");
}
由于除了文本消息外,您还将处理二进制消息,因此最好设置最大二进制消息大小。 这是存储在服务器容器上的值。 您可以通过注入新的服务器容器工厂作为您的一部分来覆盖此值WebSocket配置。
添加以下代码以注入新的ServletServerContainerFactoryBean在WebSocket配置以上registerWebSocketHandlers您之前添加的方法:
@Bean
public ServletServerContainerFactoryBean createWebSocketContainer() {
    ServletServerContainerFactoryBean container = new ServletServerContainerFactoryBean();
    container.setMaxBinaryMessageBufferSize(1024000);
    return container;
}
这将允许上传最大1 MB的图像。
Create a Client to Test Your Application
您将需要创建一个客户端来测试您的WebSocket服务器。 您将需要测试同时发送文本消息和二进制消息。 这可以用JavaScript完成。
将以下内容添加到index.html在里面src / main / resources / static夹:
<html>
<head>
    <style>
        #messages {
            text-align: left;
            width: 50%;
            padding: 1em;
            border: 1px solid black;
        }
    </style>
    <title>Sample WebSocket Client</title>
</head>
<body>
<div class="container">
    <div id="messages" class="messages"></div>
    <div class="input-fields">
        <p>Type a message and hit send:</p>
        <input id="message"/>
        <button id="send">Send</button>

        <p>Select an image and hit send:</p>
        <input type="file" id="file" accept="image/*"/>

        <button id="sendImage">Send Image</button>
    </div>
</div>
</body>
<script>
    const messageWindow = document.getElementById("messages");

    const sendButton = document.getElementById("send");
    const messageInput = document.getElementById("message");

    const fileInput = document.getElementById("file");
    const sendImageButton = document.getElementById("sendImage");

    const socket = new WebSocket("ws://localhost:8080/socket");
    socket.binaryType = "arraybuffer";

    socket.onopen = function (event) {
        addMessageToWindow("Connected");
    };

    socket.onmessage = function (event) {
        if (event.data instanceof ArrayBuffer) {
            addMessageToWindow('Got Image:');
            addImageToWindow(event.data);
        } else {
            addMessageToWindow(`Got Message: ${event.data}`);
        }
    };

    sendButton.onclick = function (event) {
        sendMessage(messageInput.value);
        messageInput.value = "";
    };

    sendImageButton.onclick = function (event) {
        let file = fileInput.files[0];
        sendMessage(file);
        fileInput.value = null;
    };

    function sendMessage(message) {
        socket.send(message);
        addMessageToWindow("Sent Message: " + message);
    }

    function addMessageToWindow(message) {
        messageWindow.innerHTML += `<div>${message}</div>`
    }

    function addImageToWindow(image) {
        let url = URL.createObjectURL(new Blob([image]));
        messageWindow.innerHTML += `<img src="${url}"/>`
    }
</script>
</html>
Start the Application
WebSocket服务器现已完成。 使用启动您的应用程序gradle bootRun应用程序目录中的命令。
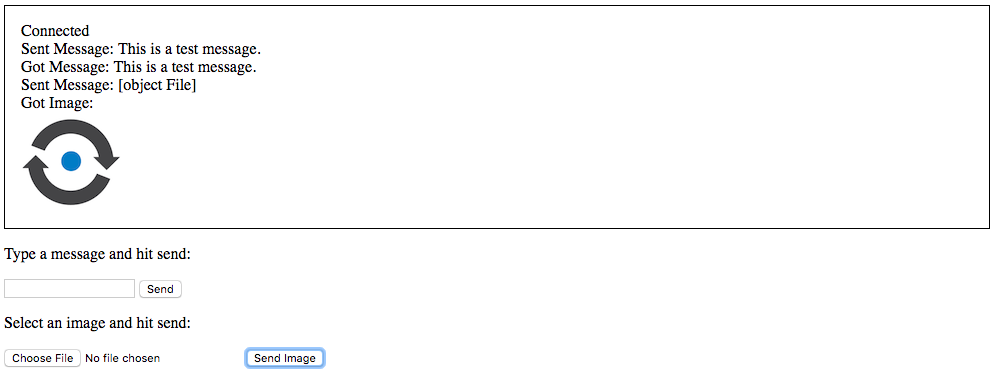
You can access your application at http://localhost:8080 where you will be greeted with the following page:

“已连接”消息表明JavaScript客户端能够建立连接。
通过在输入字段中键入并单击发送按钮来尝试发送文本消息。 另外,请尝试上传图片。 在这两种情况下,您都应该看到相同的消息,并且回显了图像。
Conclusion
In this tutorial you learned how to create a WebSocket server using Spring Boot which can receive both binary and text messages. The finished code for this tutorial can be found on the nexmo-community/websocket-spring-boot repository.
Have you tried out the Spark Framework? You might want to see how to Create a WebSocket server using the Spark Framework.
Did you know that you can use WebSocket as an endpoint in a Nexmo Call Control Object? Look at this example on Streaming Calls to a Browser with Voice WebSockets.
Interested in reading more about WebSockets? Check out this post on What are WebSockets? How Can They Enhance Digital Solutions?


 5487
5487

 被折叠的 条评论
为什么被折叠?
被折叠的 条评论
为什么被折叠?
 到【灌水乐园】发言


