


w ^ebSocket is a protocol which enables communication between the server and the browser. It has an advantage over RESTful HTTP because communications are both bi-directional and real-time. This allows for the server to notify the client at any time instead of the client polling on a regular interval for updates.
In this series of posts, I'm going to show you three different ways to create a WebSocket server in Java using Spring Boot, the Spark Framework, and the Java AP一世 for WebSockets.
Prerequisites
You will be using Gradle to manage your dependencies and run your application.
此外,您需要确保已安装JDK的副本。 在本教程中,我将使用JDK 8。
The Java API for WebSockets
Introduced in Java EE 7, the Java AP一世 for WebSockets, or JSR 356 is a specification that Java developers can use in order to integrate WebSockets into their applications.
It allows developers to write their WebSocket-based application completely independent of their container's implementation. For this guide you will be using Tomcat. However, because you will be using JSR 356, any other web container which supports Java EE 7 should work.
Create the Project
您将使用Gradle初始化新的Java应用程序。 您可以使用以下命令为您的项目创建目录,导航到该目录并初始化应用程序:
mkdir websocket-java-api
cd websocket-java-api
gradle init --type=java-application
Add the Java WebSocket API Dependency
将以下依赖项添加到依存关系的块build.gradle:
compile 'javax.websocket:javax.websocket-api:1.1'
Create the WebSocket Endpoint
WebSocket消息可以是文本,也可以是二进制。 您将创建一个可以处理这两种消息的端点。
的@ServerEndpoint批注用于装饰类并将其声明为WebSocket端点。 您可以为其提供一个参数,该参数表示端点发布的路径。
创建一个名为WebSocket端点并用@ServerEndpoint(“ / socket”):
import javax.websocket.server.ServerEndpoint;

@ServerEndpoint("/socket")
public class WebSocketEndpoint {

}
每个事件WebSocket端点句柄由注释定义。 您可以使用@OnMessage标记标记方法以接收二进制或文本事件。
出于演示目的,您将创建一个回显服务器,该服务器将把收到的消息回显给发件人。
为了测试二进制消息,您将向WebSocket服务器发送图像。 默认最大大小取决于容器,但是您可以使用maxMessageSize参数指定要支持的消息量。
添加以下方法:
@OnMessage
public String handleTextMessage(String message) {
    System.out.println("New Text Message Received");
    return message;
}

@OnMessage(maxMessageSize = 1024000)
public byte[] handleBinaryMessage(byte[] buffer) {
    System.out.println("New Binary Message Received");
    return buffer;
}
Note that the method signature determines which type of message the method will handle. See the OnMessage annotation documentation for a list of supported method signatures.
Create a Client to Test Your Application
您将需要创建一个客户端来测试您的WebSocket服务器。 您将需要测试同时发送文本消息和二进制消息。 这可以用JavaScript完成。
创建网络应用里面的文件夹src / main夹。
将以下内容添加到index.html在里面src / main / webapp夹:
<html>
<head>
    <style>
        #messages {
            text-align: left;
            width: 50%;
            padding: 1em;
            border: 1px solid black;
        }
    </style>
    <title>Sample WebSocket Client</title>
</head>
<body>
<div class="container">
    <div id="messages" class="messages"></div>
    <div class="input-fields">
        <p>Type a message and hit send:</p>
        <input id="message"/>
        <button id="send">Send</button>

        <p>Select an image and hit send:</p>
        <input type="file" id="file" accept="image/*"/>

        <button id="sendImage">Send Image</button>
    </div>
</div>
</body>
<script>
    const messageWindow = document.getElementById("messages");

    const sendButton = document.getElementById("send");
    const messageInput = document.getElementById("message");

    const fileInput = document.getElementById("file");
    const sendImageButton = document.getElementById("sendImage");

    const socket = new WebSocket("ws://localhost:8080/socket");
    socket.binaryType = "arraybuffer";

    socket.onopen = function (event) {
        addMessageToWindow("Connected");
    };

    socket.onmessage = function (event) {
        if (event.data instanceof ArrayBuffer) {
            addMessageToWindow('Got Image:');
            addImageToWindow(event.data);
        } else {
            addMessageToWindow(`Got Message: ${event.data}`);
        }
    };

    sendButton.onclick = function (event) {
        sendMessage(messageInput.value);
        messageInput.value = "";
    };

    sendImageButton.onclick = function (event) {
        let file = fileInput.files[0];
        sendMessage(file);
        fileInput.value = null;
    };

    function sendMessage(message) {
        socket.send(message);
        addMessageToWindow("Sent Message: " + message);
    }

    function addMessageToWindow(message) {
        messageWindow.innerHTML += `<div>${message}</div>`
    }

    function addImageToWindow(image) {
        let url = URL.createObjectURL(new Blob([image]));
        messageWindow.innerHTML += `<img src="${url}"/>`
    }
</script>
</html>
Embed and Configure Tomcat
Unlike Creating a WebSocket Server with Spring Boot, or Creating a WebSocket Server with the Spark Framework, there is initially no embedded server to run your application.
The Gretty plugin for Gradle can be used to embed a variety of containers.
首先,将Gretty插件应用于build.gradle文件添加到您的外挂程式块:
id "org.gretty" version "2.2.0"
其次,您将需要配置Gretty以将Tomcat用作servlet容器,并将上下文路径设置为/为了简单起见。
将以下块添加到build.gradle:
gretty {
    servletContainer = 'tomcat8'
    contextPath = '/'
}
注意,默认情况下,Gretty将使用Jetty作为servlet容器。 该指南也将在Jetty中运行,但这是Spring Boot和Spark框架嵌入的容器,我想展示一些不同的东西。
Start the Application
WebSocket服务器现已完成。 使用启动您的应用程序gradle appRun应用程序目录中的命令。
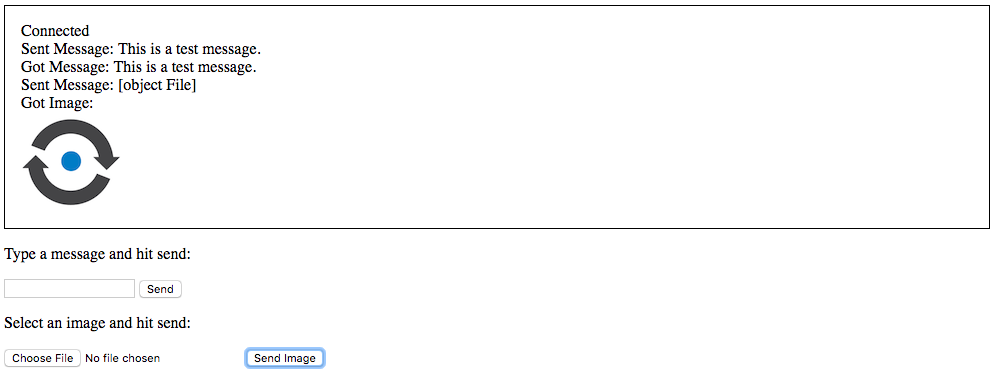
You can access your application at http://localhost:8080 where you will be greeted with the following page:

“已连接”消息表明JavaScript客户端能够建立连接。
通过在输入字段中键入并单击发送按钮来尝试发送文本消息。 另外,请尝试上传图片。 在这两种情况下,您都应该看到相同的消息,并且回显了图像。
Conclusion
In this tutorial you learned how to create a WebSocket server using JSR 356 which can receive both binary and text messages and run on any JSR 356 compliant container. Try removing the servletContainer setting and running in Jetty, or use the Gradle WAR plugin to generate a WAR file and deploy it on a different container.
The finished code for this tutorial can be found on the nexmo-community/websocket-java-api repository.
Did you know that you can use WebSocket as an endpoint in a Nexmo Call Control Object? Check out this post on Real Time Call Transcription with IBM Watson to learn how to use the Nexmo Voice API, WebSockets, and IBM Watson to perform real-time call transcription.
Interested in reading more about WebSockets? Check out this post on What are WebSockets? How Can They Enhance Digital Solutions?


 208
208

 被折叠的 条评论
为什么被折叠?
被折叠的 条评论
为什么被折叠?
 到【灌水乐园】发言


