

In this homework, we will go through basic linear algebra, NumPy, and image manipulation using Python to get everyone on the same page for the prerequisite skills for this class.
在这篇家庭作业中,我们将使用Python学习基本的线性代数、NumPy和图像处理,让每个人都能在同一页上学习这门课的必备技能。
imageManip.py
import math

import numpy as np
from PIL import Image
import skimage.io
import skimage.color
#pip install scikit-image


def load(image_path):
    """从文件路径加载图像。
    提示: 查找 `skimage.io.imread()` 函数。
    参数:
        image_path: 图像文件的路径。
    返回:
        out: 形状为 (image_height, image_width, 3) 的 numpy 数组。
    """
    out = None
    ### YOUR CODE HERE
    out = skimage.io.imread(image_path)
    # 让我们将图像的像素值转换到正确的范围内。
    out = out.astype(np.float64) / 255
    return out
    ### END YOUR CODE


def crop_image(image, start_row, start_col, num_rows, num_cols):
    """根据指定的边界裁剪图像。

    参数:
        image: 形状为 (image_height, image_width, 3) 的 numpy 数组。
        start_row (int): 我们要包含在裁剪图像中的起始行索引。
        start_col (int): 我们要包含在裁剪图像中的起始列索引。
        num_rows (int): 我们希望裁剪图像中的行数。
        num_cols (int): 我们希望裁剪图像中的列数。

    返回:
        out: 形状为 (num_rows, num_cols, 3) 的 numpy 数组。
    """

    out = None

    ### YOUR CODE HERE
    out = image[start_row:start_row+num_rows, start_col:start_col+num_cols, :]
    ### END YOUR CODE

    return out


def dim_image(image):
    """根据每个像素转换图像,使用以下公式:

                        x_n = 0.5*x_p^2
    其中 x_n 是新值,x_p 是原始值。
    参数:
        image: 形状为 (image_height, image_width, 3) 的 numpy 数组。
    返回:
        out: 形状为 (image_height, image_width, 3) 的 numpy 数组。
    """

    out = None
    ### YOUR CODE HERE
    out = 0.5 * image ** 2
    ### END YOUR CODE
    return out


def resize_image(input_image, output_rows, output_cols):
    """使用最近邻方法调整图像大小。

    Args:
        input_image (np.ndarray): 存储为数组的 RGB 图像,形状为 `(input_rows, input_cols, 3)`。
        output_rows (int): 我们期望的输出图像中的行数。
        output_cols (int): 我们期望的输出图像中的列数。

    Returns:
        np.ndarray: 调整大小后的图像,形状为 `(output_rows, output_cols, 3)`。
    """
    input_rows, input_cols, channels = input_image.shape
    assert channels == 3

    # 1. 创建调整大小后的输出图像
    output_image = np.zeros(shape=(output_rows, output_cols, 3))

    # 2. 使用来自 `input_image` 的值填充 `output_image` 数组
    #    > 这应该需要两个嵌套的 for 循环!

    ### YOUR CODE HERE
    row_scale_factor = input_rows / output_rows
    col_scale_factor = input_cols / output_cols
    for i in range(output_rows):
        for j in range(output_cols):
            input_i = int(i * row_scale_factor)
            input_j = int(j * col_scale_factor)
            output_image[i, j, :] = input_image[input_i, input_j, :]
    ### END YOUR CODE

    # 3. 返回输出图像
    return output_image


def rotate2d(point, theta):
    """旋转一个二维坐标点一定的角度 theta。

    Args:
        point (np.ndarray): 包含两个值的一维 NumPy 数组:x 和 y 坐标。
        theta (float): 旋转角度,单位为弧度。

    Returns:
        np.ndarray: 一维 NumPy 数组,包含旋转后的 x 和 y 坐标值。
    """
    assert point.shape == (2,)  # 断言确保输入数组的形状是 (2,)
    assert isinstance(theta, float)  # 断言确保角度参数是一个浮点数

    # 从输入数组中提取 x 和 y 坐标
    x, y = point

    # 使用旋转矩阵计算旋转后的坐标
    x_rotated = x * np.cos(theta) - y * np.sin(theta)
    y_rotated = x * np.sin(theta) + y * np.cos(theta)

    return np.array([x_rotated, y_rotated])


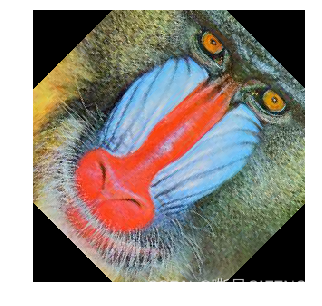
def rotate_image(input_image, theta):
    """旋转图像一定的角度 theta。

    Args:
        input_image (np.ndarray): 存储为数组的 RGB 图像,形状为 `(input_rows, input_cols, 3)`。
        theta (float): 图像旋转的角度,单位为弧度。

    Returns:
        (np.ndarray): 旋转后的图像,与输入图像具有相同的形状。
    """
    input_rows, input_cols, channels = input_image.shape
    assert channels == 3  # 断言确保输入图像是 RGB 格式的

    # 1. 创建一个与输入图像具有相同形状的输出图像
    output_image = np.zeros_like(input_image)

    # 2. 计算输入图像的中心点
    center_i = input_rows // 2
    center_j = input_cols // 2

    # 3. 遍历每个像素,填充输出图像
    for i in range(input_rows):
        for j in range(input_cols):
            # 计算这个输出像素的输入坐标
            input_i = int((i - center_i) * np.cos(theta) - (j - center_j) * np.sin(theta) + center_i)
            input_j = int((i - center_i) * np.sin(theta) + (j - center_j) * np.cos(theta) + center_j)

            # 检查计算得到的输入坐标是否在边界内
            if 0 <= input_i < input_rows and 0 <= input_j < input_cols:
                output_image[i, j, :] = input_image[input_i, input_j, :]

    # 4. 返回输出图像
    return output_image
linalg.py
import numpy as np


def dot_product(a, b):
    """
    实现两个向量 a 和 b 的点积。

    (可选)虽然你可以使用 for 循环来解决这个问题,但我们建议你查找 `np.dot()` 并使用它来代替。

    参数:
        a: 形状为 (x, n) 的 numpy 数组
        b: 形状为 (n, x) 的 numpy 数组

    返回:
        out: 形状为 (x, x) 的 numpy 数组(如果 x = 1 则为标量)
    """
    ### YOUR CODE HERE ###
    out = np.dot(a, b)
    ### END YOUR CODE ###
    return out


def complicated_matrix_function(M, a, b):
    """实现 (a * b) * (M * a.T)。
    (可选)使用你上面编写的 `dot_product(a, b)` 函数作为辅助函数。
    参数:
        M: 形状为 (x, n) 的 numpy 矩阵。
        a: 形状为 (1, n) 的 numpy 数组。
        b: 形状为 (n, 1) 的 numpy 数组。
    返回:
        out: 形状为 (x, 1) 的 numpy 矩阵。
    """
    ### YOUR CODE HERE
    ab = dot_product(a, b)
    MaT = np.dot(M, a.T)
    out = np.dot(MaT, ab)
    ### END YOUR CODE
    return out


# 欧几里德距离
def euclidean_distance_native(u, v):
    """计算两个向量之间的欧氏距离,表示为 Python 列表。

    参数:
        u (List[float]): 一个向量,表示为一系列浮点数的列表。
        v (List[float]): 一个向量,表示为一系列浮点数的列表。

    返回:
        float: `u` 和 `v` 之间的欧氏距离。
    """
    # 首先进行一些检查:
    assert isinstance(u, list)
    assert isinstance(v, list)
    assert len(u) == len(v)

    # 计算距离!
    # 注意:
    #  1) 尝试将此问题分解: 首先,我们要获得输入数组中相应元素的差值。然后,我们要计算这些差值的平方。
    #     最后,我们要对平方进行求和并对求和进行平方根。

    # 计算差值的平方和
    square_sum = sum((a - b) ** 2 for a, b in zip(u, v))
    # 求平方根
    distance = square_sum ** 0.5

    return distance


def euclidean_distance_numpy(u, v):
    """计算两个向量之间的欧几里德距离,向量以 NumPy 数组表示。

    参数:
        u (np.ndarray): 一个向量,以 NumPy 数组表示。
        v (np.ndarray): 一个向量,以 NumPy 数组表示。

    返回:
        float: `u` 和 `v` 之间的欧几里德距离。
    """
    # 首先,进行一些检查:
    assert isinstance(u, np.ndarray)
    assert isinstance(v, np.ndarray)
    assert u.shape == v.shape

    # 计算距离!
    # 注意:
    #  1) 你不应该需要任何循环
    #  2) 一些你可以通过搜索得到的有用函数:
    #         np.sqrt(), np.sum()
    #  3) 尝试分解这个问题: 首先,我们想要获取
    #     输入数组中对应元素的差值。然后,我们想要对这些差值进行平方。
    #     最后,我们想要对平方值进行求和并取平方根。

    # 计算差值的平方和
    square_diff = (u - v) ** 2
    # 对差值的平方进行求和
    square_sum = np.sum(square_diff)
    # 求平方根
    distance = np.sqrt(square_sum)

    return distance


# 特征值分解
def eigen_decomp(M):
    """实现特征值分解。

    (可选): 你可能会发现 `np.linalg.eig` 函数很有用。

    参数:
        M: 形状为 (m, m) 的 numpy 矩阵

    返回:
        w: 形状为 (m,) 的 numpy 数组,其中 v[:,i] 是对应于特征值 w[i] 的特征向量。
        v: 每列都是一个特征向量的矩阵。
    """

    ### YOUR CODE HERE
    w, v = np.linalg.eig(M)
    return w, v
    ### END YOUR CODE


#特征向量
def get_eigen_values_and_vectors(M, k):
    """返回矩阵 M 的前 k 个特征值和对应的特征向量。这里的“前 k”指的是特征值的绝对值最大的 k 个(查阅 np.argsort 获取如何执行此操作的提示)。

    (可选): 作为辅助函数,可以使用你上面编写的 eigen_decomp(M) 函数。

    Args:
        M: 形状为 (m, m) 的 numpy 矩阵。
        k: 要返回的特征值和对应向量的数量。

    Returns:
        eigenvalues: 长度为 k 的列表,包含前 k 个特征值
        eigenvectors: 长度为 k 的列表,包含形状为 (m,) 的前 k 个特征向量
    """

    ### YOUR CODE HERE
    eigenvalues, eigenvectors = eigen_decomp(M)
    idx = np.argsort(np.abs(eigenvalues))[::-1][:k]
    eigenvalues = [eigenvalues[i] for i in idx]
    eigenvectors = [eigenvectors[:, i] for i in idx]
    return eigenvalues, eigenvectors
    ### END YOUR CODE


 1408
1408


 被折叠的 条评论
为什么被折叠?


