


上一期简单介绍了一下Kotlin在AndroidStudio里如何配置,这一期主要介绍几个非常有趣并且实用的功能,同样依然是抛砖引玉。代码接上一期。
类扩展
关于这个功能,我们举一个简单的例子:平时我们在Android中用java代码实现一个功能,把一个View从他的ParentView中移除,代码是什么样的呢
这里统一用Kotlin语法来写,没什么不同,只是语法不一样而已
fab.setOnClickListener {
            view -> if (view.parent != null){
                (view.parent as ViewGroup).removeView(view)
            }
        }
或者
fab.setOnClickListener(object: View.OnClickListener{
            override fun onClick(view: View?) {
                if (view!!.parent != null) {
                    (view.parent as ViewGroup).removeView(view)
                }
            }
        })
首先判断view.parent是否为null,如果不为null,调用parent.removeView方法,当然这里边有一个强转(ViewParent–>ViewGroup)
那我们如果使用类扩展怎么做呢?
右键,新建Kotlin File/Class,选择File,File name填写ViewExtension,点击OK,在这里需要注意的一点,Kotlin不同于Java,Java是基于Class的,所以每一个java文件都必须包含在一个class或者interface等等,Kotlin则不同,它是基于package的,所以你可以这么写:
package com.yxc.kotlinstart

import android.view.View
import android.view.ViewGroup

/**
 * ViewExtension
 * Created by robin on 16/3/15.
 * @author yangxc
 */

fun View.removeFromParent(){
    if(this.parent!=null){
        (this.parent as ViewGroup).removeView(this)
    }
}
然后我们就可以在代码里直接用了,like this:
fab.setOnClickListener { view -> view.removeFromParent()}有的同学会说,我可以搞一个工具类来封装这个方法啊。
当然没问题,这里只是举一个例子,认识这种特性而已。类似Obj-C里的category,非常好用。
Kotlin扩展包
大家想一下,平时在Android开发中,如果页面有很多控件元素,那么我们需要怎么办?大量的findViewById,亦或是使用注入框架@Inject注解?现在我们又多了一种新的选择,孰优孰劣只能看大家各自的品味了,这种方法就是Kotlin扩展包里的一个功能。
下边是创建项目时自动生成的layout文件:
activity_main.xml
<?xml version="1.0" encoding="utf-8"?>
<android.support.design.widget.CoordinatorLayout
        xmlns:android="http://schemas.android.com/apk/res/android"
        xmlns:app="http://schemas.android.com/apk/res-auto"
        xmlns:tools="http://schemas.android.com/tools"
        android:layout_width="match_parent"
        android:layout_height="match_parent"
        android:fitsSystemWindows="true"
        tools:context=".MainActivity">

    <android.support.design.widget.AppBarLayout
            android:layout_height="wrap_content"
            android:layout_width="match_parent"
            android:theme="@style/AppTheme.AppBarOverlay">

        <android.support.v7.widget.Toolbar
                android:id="@+id/toolbar"
                android:layout_width="match_parent"
                android:layout_height="?attr/actionBarSize"
                android:background="?attr/colorPrimary"
                app:popupTheme="@style/AppTheme.PopupOverlay"/>

    </android.support.design.widget.AppBarLayout>

    <include layout="@layout/content_main"/>

    <android.support.design.widget.FloatingActionButton
            android:id="@+id/fab"
            android:layout_width="wrap_content"
            android:layout_height="wrap_content"
            android:layout_gravity="bottom|end"
            android:layout_margin="@dimen/fab_margin"
            android:src="@android:drawable/ic_dialog_email"/>

</android.support.design.widget.CoordinatorLayout>
content_main.xml,这个里边我新建了一个Button,给TextView添加了id属性
<?xml version="1.0" encoding="utf-8"?>
<RelativeLayout
        xmlns:android="http://schemas.android.com/apk/res/android"
        xmlns:tools="http://schemas.android.com/tools"
        xmlns:app="http://schemas.android.com/apk/res-auto"
        android:layout_width="match_parent"
        android:layout_height="match_parent"
        android:paddingLeft="@dimen/activity_horizontal_margin"
        android:paddingRight="@dimen/activity_horizontal_margin"
        android:paddingTop="@dimen/activity_vertical_margin"
        android:paddingBottom="@dimen/activity_vertical_margin"
        app:layout_behavior="@string/appbar_scrolling_view_behavior"
        tools:showIn="@layout/activity_main"
        tools:context=".MainActivity">

    <TextView
            android:text="Hello World!"
            android:id="@+id/tv_hello"
            android:layout_width="wrap_content"
            android:layout_height="wrap_content"/>

    <Button
            android:layout_width="wrap_content"
            android:layout_height="wrap_content"
            android:text="Button"
            android:id="@+id/btn_1"/>
</RelativeLayout>
OK,布局文件贴出来了,那我们在Activity中怎么写呢?你的控件在layout中的id是什么就直接写什么,不信?看图:
FloatingActionButton在布局里的id是fab
在MainActivity.kt文件(也就是MainActivity类)中,直接敲fab
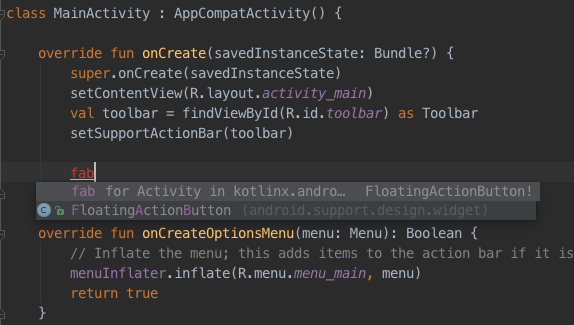
等到这个提示出来之后,直接回车。你会发现在import里多了一句
import kotlinx.android.synthetic.main.activity_main.*
同样的我们直接敲tv_hello,然后回车,还会多一句
import kotlinx.android.synthetic.main.content_main.*
这两个import进来之后,在这两个布局中定义的所有的带id属性的控件,都可以直接使用其id来当做对象的引用。
当然,如果你在两个布局文件中使用了同一个ID,那么IDE会直接报错。
另外需要注意一点,想使用这个功能需要在build.gradle中添加两个配置:
apply plugin: 'com.android.application'
apply plugin: 'kotlin-android'
apply plugin: 'kotlin-android-extensions'  //添加这个
buildscript {
ext.kotlin_version = '1.0.0'
repositories {
mavenCentral()
}
dependencies {
classpath "org.jetbrains.kotlin:kotlin-gradle-plugin:$kotlin_version"
classpath "org.jetbrains.kotlin:kotlin-android-extensions:$kotlin_version" //还有这个
}
}怎么样?有没有勾起你对Kotlin的兴趣?


 677
677

 被折叠的 条评论
为什么被折叠?
被折叠的 条评论
为什么被折叠?
 到【灌水乐园】发言


