


hadoop 运行示例程序
H2O-运行示例应用程序 (H2O - Running Sample Application)
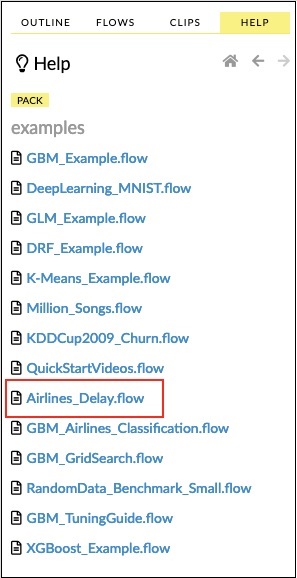
Click on the Airlines Delay Flow link in the list of samples as shown in the screenshot below −
单击样本列表中的Airlines Delay Flow链接,如以下屏幕截图所示-
After you confirm, the new notebook would be loaded.
确认后,将加载新笔记本。
清除所有输出 (Clearing All Outputs)
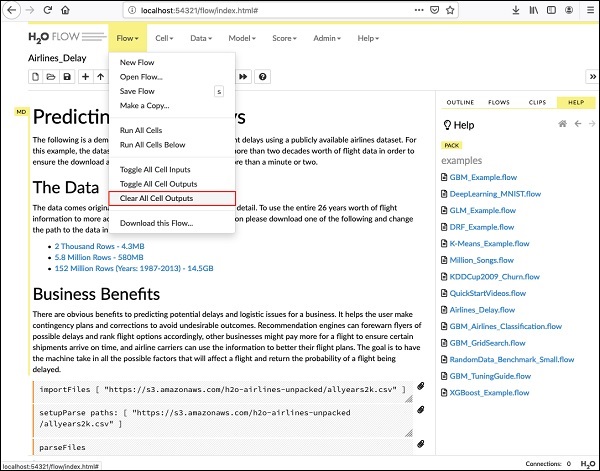
Before we explain the code statements in the notebook, let us clear all the outputs and then run the notebook gradually. To clear all outputs, select the following menu option −
在解释笔记本中的代码语句之前,让我们清除所有输出,然后逐步运行笔记本。 要清除所有输出,请选择以下菜单选项-
Flow / Clear All Cell Contents
This is shown in the following screenshot −
这显示在以下屏幕截图中-
Once all outputs are cleared, we will run each cell in the notebook individually and examine its output.
清除所有输出后,我们将分别运行笔记本中的每个单元并检查其输出。
运行第一个单元 (Running the First Cell)
Click the first cell. A red flag appears on the left indicating that the cell is selected. This is as shown in the screenshot below −
单击第一个单元格。 左侧会出现一个红色标记,指示已选中该单元格。 如下面的屏幕截图所示-

The contents of this cell are just the program comment written in MarkDown (MD) language. The content describes what the loaded application does. To run the cell, click the Run icon as shown in the screenshot below −
该单元格的内容只是用MarkDown(MD)语言编写的程序注释。 内容描述了已加载的应用程序的功能。 要运行单元格,请单击“运行”图标,如下面的屏幕截图所示-

You will not see any output underneath the cell as there is no executable code in the current cell. The cursor now moves automatically to the next cell, which is ready to execute.
您将不会在该单元格下方看到任何输出,因为当前单元格中没有可执行代码。 光标现在自动移动到下一个可以执行的单元格。
汇入资料 (Importing Data)
The next cell contains the following Python statement −
下一个单元格包含以下Python语句-
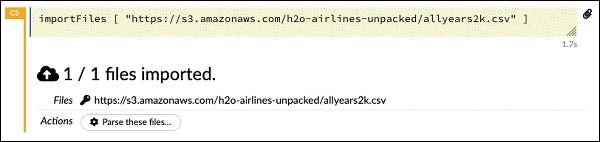
importFiles ["https://s3.amazonaws.com/h2o-airlines-unpacked/allyears2k.csv"]
The statement imports the allyears2k.csv file from Amazon AWS into the system. When you run the cell, it imports the file and gives you the following output.
该语句从Amazon AWS导入allyears2k.csv文件到系统中。 运行单元时,它将导入文件并提供以下输出。
设置数据解析器 (Setting Up Data Parser)
Now, we need to parse the data and make it suitable for our ML algorithm. This is done using the following command −
现在,我们需要解析数据,使其适合我们的ML算法。 这是使用以下命令完成的-
setupParse paths: [ "https://s3.amazonaws.com/h2o-airlines-unpacked/allyears2k.csv" ]
Upon execution of the above statement, a setup configuration dialog appears. The dialog allows you several settings for parsing the file. This is as shown in the screenshot below −
执行上述语句后,将出现一个设置配置对话框。 该对话框允许您使用多种设置来解析文件。 如下面的屏幕截图所示-

In this dialog, you can select the desired parser from the given drop-down list and set other parameters such as the field separator, etc.
在此对话框中,您可以从给定的下拉列表中选择所需的解析器,并设置其他参数,例如字段分隔符等。
解析数据 (Parsing Data)
The next statement, which actually parses the datafile using the above configuration, is a long one and is as shown here −
下一条实际上使用上述配置解析数据文件的语句很长,如下所示:
parseFiles
paths: ["https://s3.amazonaws.com/h2o-airlines-unpacked/allyears2k.csv"]
destination_frame: "allyears2k.hex"
parse_type: "CSV"
separator: 44
number_columns: 31
single_quotes: false
column_names: ["Year","Month","DayofMonth","DayOfWeek","DepTime","CRSDepTime",
   "ArrTime","CRSArrTime","UniqueCarrier","FlightNum","TailNum",
   "ActualElapsedTime","CRSElapsedTime","AirTime","ArrDelay","DepDelay",
   "Origin","Dest","Distance","TaxiIn","TaxiOut","Cancelled","CancellationCode",
   "Diverted","CarrierDelay","WeatherDelay","NASDelay","SecurityDelay",
   "LateAircraftDelay","IsArrDelayed","IsDepDelayed"]
column_types: ["Enum","Enum","Enum","Enum","Numeric","Numeric","Numeric"
   ,"Numeric","Enum","Enum","Enum","Numeric","Numeric","Numeric","Numeric",
   "Numeric","Enum","Enum","Numeric","Numeric","Numeric","Enum","Enum",
   "Numeric","Numeric","Numeric","Numeric","Numeric","Numeric","Enum","Enum"]
delete_on_done: true
check_header: 1
chunk_size: 4194304
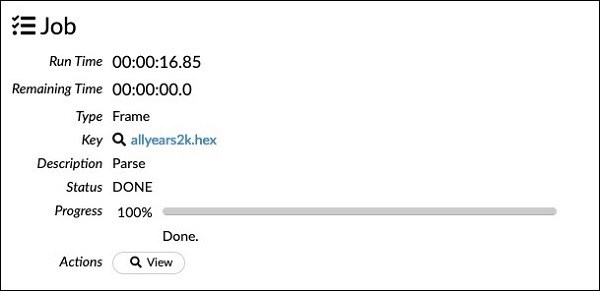
Observe that the parameters you have set up in the configuration box are listed in the above code. Now, run this cell. After a while, the parsing completes and you will see the following output −
请注意,以上代码中列出了您在配置框中设置的参数。 现在,运行此单元格。 一段时间后,解析完成,您将看到以下输出-
检查数据框 (Examining Dataframe)
After the processing, it generates a dataframe, which can be examined using the following statement −
处理之后,它将生成一个数据帧,可以使用以下语句对其进行检查-
getFrameSummary "allyears2k.hex"
Upon execution of the above statement, you will see the following output −
执行以上语句后,您将看到以下输出-
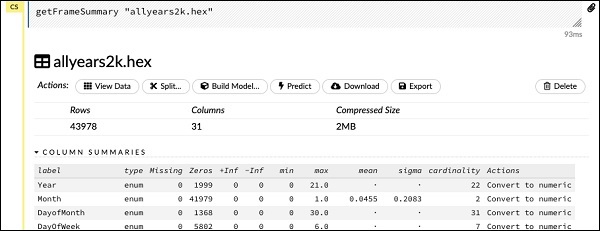
Now, your data is ready to be fed into a Machine Learning algorithm.
现在,您的数据已准备好输入到机器学习算法中。
The next statement is a program comment that says we will be using the regression model and specifies the preset regularization and the lambda values.
下一条语句是程序注释,该注释表明我们将使用回归模型并指定预设正则化和lambda值。
建立模型 (Building the Model)
Next, comes the most important statement and that is building the model itself. This is specified in the following statement −
接下来,是最重要的声明,那就是构建模型本身。 这在以下语句中指定-
buildModel 'glm', {
   "model_id":"glm_model","training_frame":"allyears2k.hex",
   "ignored_columns":[
      "DayofMonth","DepTime","CRSDepTime","ArrTime","CRSArrTime","TailNum",
      "ActualElapsedTime","CRSElapsedTime","AirTime","ArrDelay","DepDelay",
      "TaxiIn","TaxiOut","Cancelled","CancellationCode","Diverted","CarrierDelay",
      "WeatherDelay","NASDelay","SecurityDelay","LateAircraftDelay","IsArrDelayed"],
   "ignore_const_cols":true,"response_column":"IsDepDelayed","family":"binomial",
   "solver":"IRLSM","alpha":[0.5],"lambda":[0.00001],"lambda_search":false,
   "standardize":true,"non_negative":false,"score_each_iteration":false,
   "max_iterations":-1,"link":"family_default","intercept":true,
   "objective_epsilon":0.00001,"beta_epsilon":0.0001,"gradient_epsilon":0.0001,
   "prior":-1,"max_active_predictors":-1
}
We use glm, which is a Generalized Linear Model suite with family type set to binomial. You can see these highlighted in the above statement. In our case, the expected output is binary and that is why we use the binomial type. You may examine the other parameters by yourself; for example, look at alpha and lambda that we had specified earlier. Refer to the GLM model documentation for the explanation of all the parameters.
我们使用glm,这是一个通用线性模型套件,其族类型设置为二项式。 您可以在上面的语句中看到突出显示的内容。 在我们的例子中,期望的输出是二进制的,这就是为什么我们使用二项式的原因。 您可以自己检查其他参数。 例如,查看我们之前指定的alpha和lambda。 有关所有参数的说明,请参阅GLM模型文档。
Now, run this statement. Upon execution, the following output will be generated −
现在,运行此语句。 执行后,将生成以下输出-
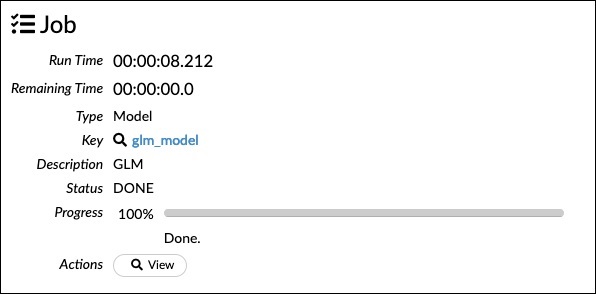
Certainly, the execution time would be different on your machine. Now, comes the most interesting part of this sample code.
当然,您的计算机上的执行时间会有所不同。 现在,这个示例代码中最有趣的部分出现了。
检查输出 (Examining Output)
We simply output the model that we have built using the following statement −
我们只需使用以下语句输出已构建的模型-
getModel "glm_model"
Note the glm_model is the model ID that we specified as model_id parameter while building the model in the previous statement. This gives us a huge output detailing the results with several varying parameters. A partial output of the report is shown in the screenshot below −
请注意,glm_model是我们在上一条语句中构建模型时指定为model_id参数的模型ID。 这为我们提供了巨大的输出,其中详细说明了具有多个可变参数的结果。 该报告的部分输出显示在下面的屏幕截图中-
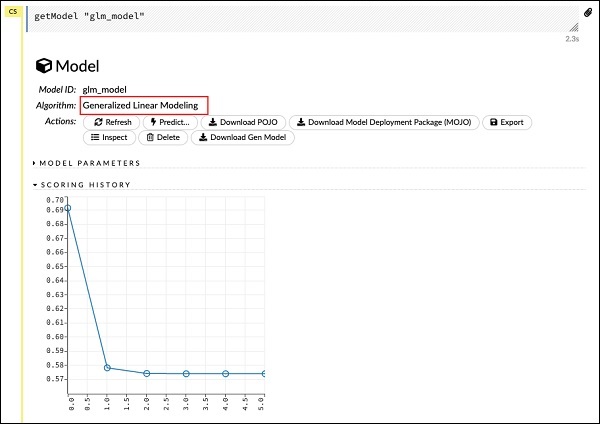
As you can see in the output, it says that this is the result of running the Generalized Linear Modeling algorithm on your dataset.
正如您在输出中看到的那样,它表示这是在数据集上运行通用线性建模算法的结果。
Right above the SCORING HISTORY, you see the MODEL PARAMETERS tag, expand it and you will see the list of all parameters that are used while building the model. This is shown in the screenshot below.
在“评分历史记录”的正上方,您会看到“模型参数”标签,将其展开,您将看到构建模型时使用的所有参数的列表。 如下面的屏幕快照所示。
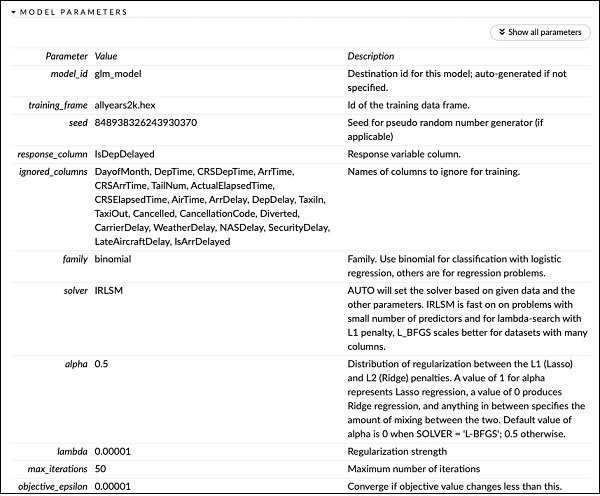
Likewise, each tag provides a detailed output of a specific type. Expand the various tags yourself to study the outputs of different kinds.
同样,每个标签都提供特定类型的详细输出。 自己扩展各种标签,以研究不同种类的输出。
建立另一个模型 (Building Another Model)
Next, we will build a Deep Learning model on our dataframe. The next statement in the sample code is just a program comment. The following statement is actually a model building command. It is as shown here −
接下来,我们将在数据框架上构建深度学习模型。 示例代码中的下一条语句只是程序注释。 以下语句实际上是模型构建命令。 如下所示-
buildModel 'deeplearning', {
   "model_id":"deeplearning_model","training_frame":"allyear
   s2k.hex","ignored_columns":[
      "DepTime","CRSDepTime","ArrTime","CRSArrTime","FlightNum","TailNum",
      "ActualElapsedTime","CRSElapsedTime","AirTime","ArrDelay","DepDelay",
      "TaxiIn","TaxiOut","Cancelled","CancellationCode","Diverted",
      "CarrierDelay","WeatherDelay","NASDelay","SecurityDelay",
      "LateAircraftDelay","IsArrDelayed"],
   "ignore_const_cols":true,"res   ponse_column":"IsDepDelayed",
   "activation":"Rectifier","hidden":[200,200],"epochs":"100",
   "variable_importances":false,"balance_classes":false,
   "checkpoint":"","use_all_factor_levels":true,
   "train_samples_per_iteration":-2,"adaptive_rate":true,
   "input_dropout_ratio":0,"l1":0,"l2":0,"loss":"Automatic","score_interval":5,
   "score_training_samples":10000,"score_duty_cycle":0.1,"autoencoder":false,
   "overwrite_with_best_model":true,"target_ratio_comm_to_comp":0.02,
   "seed":6765686131094811000,"rho":0.99,"epsilon":1e-8,"max_w2":"Infinity",
   "initial_weight_distribution":"UniformAdaptive","classification_stop":0,
   "diagnostics":true,"fast_mode":true,"force_load_balance":true,
   "single_node_mode":false,"shuffle_training_data":false,"missing_values_handling":
   "MeanImputation","quiet_mode":false,"sparse":false,"col_major":false,
   "average_activation":0,"sparsity_beta":0,"max_categorical_features":2147483647,
   "reproducible":false,"export_weights_and_biases":false
}
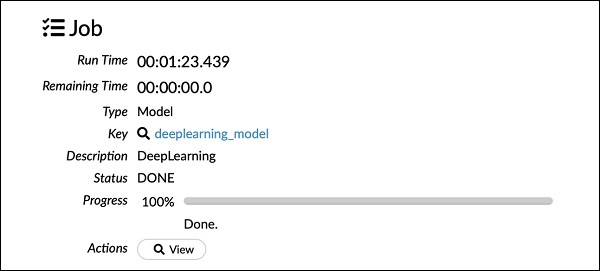
As you can see in the above code, we specify deeplearning for building the model with several parameters set to the appropriate values as specified in the documentation of deeplearning model. When you run this statement, it will take longer time than the GLM model building. You will see the following output when the model building completes, albeit with different timings.
如您在上面的代码中看到的,我们指定了深度学习来构建模型,其中多个参数设置为深度学习模型文档中指定的适当值。 当您运行此语句时,将花费比GLM模型构建更长的时间。 尽管建立模型的时间不同,但您将在模型构建完成时看到以下输出。
检查深度学习模型输出 (Examining Deep Learning Model Output)
This generates the kind of output, which can be examined using the following statement as in the earlier case.
这将生成一种输出,可以像以前的情况一样使用以下语句检查该输出。
getModel "deeplearning_model"
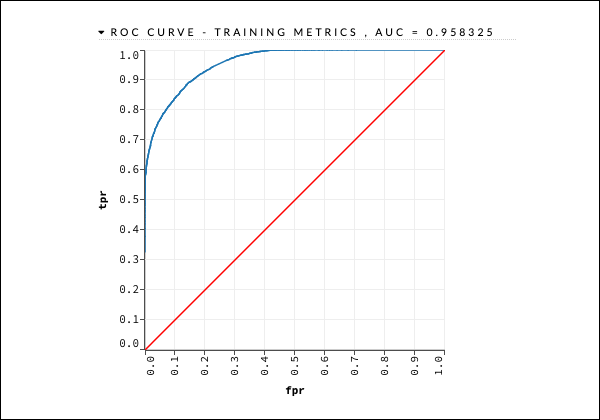
We will consider the ROC curve output as shown below for quick reference.
我们将考虑如下所示的ROC曲线输出,以供快速参考。
Like in the earlier case, expand the various tabs and study the different outputs.
与之前的情况一样,展开各个选项卡并研究不同的输出。
保存模型 (Saving the Model)
After you have studied the output of different models, you decide to use one of those in your production environment. H20 allows you to save this model as a POJO (Plain Old Java Object).
在研究了不同模型的输出之后,您决定在生产环境中使用其中之一。 H20允许您将此模型另存为POJO(普通的旧Java对象)。
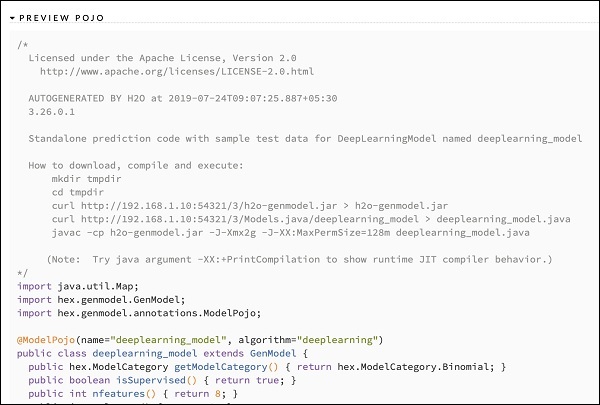
Expand the last tag PREVIEW POJO in the output and you will see the Java code for your fine-tuned model. Use this in your production environment.
在输出中扩展最后一个标签PREVIEW POJO,您将看到微调模型的Java代码。 在生产环境中使用它。
Next, we will learn about a very exciting feature of H2O. We will learn how to use AutoML to test and rank various algorithms based on their performance.
接下来,我们将学习H2O的一个非常令人兴奋的功能。 我们将学习如何使用AutoML来根据性能对各种算法进行测试和排名。
翻译自: https://www.tutorialspoint.com/h2o/h2o_running_sample_application.htm
hadoop 运行示例程序


 2万+
2万+


 被折叠的 条评论
为什么被折叠?
被折叠的 条评论
为什么被折叠?
 到【灌水乐园】发言


