


maven ja打包
也许与我使用WebSphere Application Server的悠久历史有关,但是只要有机会将servlet运行时嵌入到可执行JAR文件中,我就会发现自己更喜欢WebSphere Liberty概要文件。 在此WebSphere Liberty概要文件教程中,我想演示如何使用现有的Java Web应用程序,将其部署到WebSphere Liberty服务器并将整个组件打包到可运行的JAR文件中是多么容易。

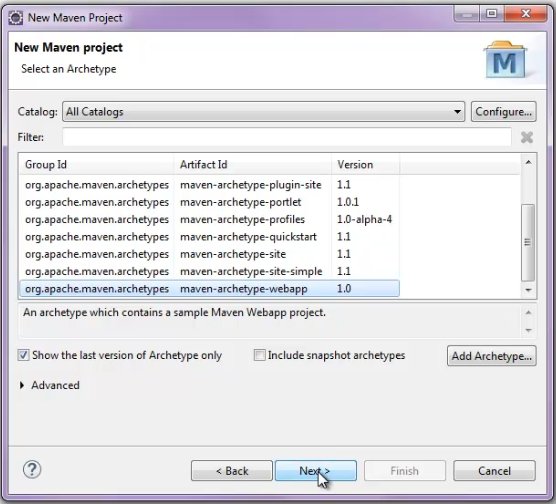
图1.在Eclipse中创建一个简单的Maven Webapp。
部署到WebSphere Liberty的Web应用程序
第一步 该过程实际上是要部署Java Web应用程序。 我使用Eclipse的New Maven Project向导创建了一个简单的Web应用程序,仅使用一个不起眼的JSP来发布日期。 这不是复杂的RESTful Web服务 ,也不是Spring Boot MVC应用程序,但是由于本WebSphere Liberty教程专注于创建嵌入式JAR,而不是Web应用程序开发的基础知识,因此不必这样做。
<html>
 <body>
  <h2> Hello WebSphere Liberty Profile World! </h2>
  If this prints the date, the executable JAR file is working!
  <%= new java.util.Date() %>
 </body>
</html>
生成的应用程序还包含一个web.xml文件,现代Java Web应用程序不需要该文件,但是Maven生成了一个简单的文件以实现向后兼容。
<!DOCTYPE web-app PUBLIC
"-//Sun Microsystems, Inc.//DTD Web Application 2.3//EN"
"http://java.sun.com/dtd/web-app_2_3.dtd"  >
<web-app>
<display-name> Embedded WebSphere Liberty Example </display-name>
</web-app> 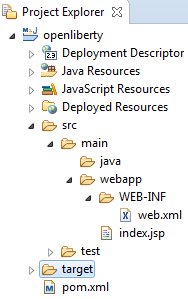
WebSphere Liberty概要文件示例项目的结构。
Open Liberty Maven插件
创建JSP和部署描述符后,将WebSphere Liberty嵌入可执行JAR内的过程中要解决的最后一件事是POM文件。 Maven POM具有三个重要部分,值得注意:
- Eclipse产生的序言
- maven-war-plugin的配置
- liberty-maven-plugin的配置
Maven序言
Eclipse生成的Maven POM文件的一部分指定该应用程序将被打包为可部署的war 。 POM的这一部分还指示artifactId为openliberty ,版本为example ,这意味着生成的Web应用程序存档将命名为openliberty-example.war 。 最初由Eclipse Maven工具生成的POM文件如下:
<project xmlns="http://maven.apache.org/POM/4.0.0"
xmlns:xsi="http://www.w3.org/2001/XMLSchema-instance"
xsi:schemaLocation="http://maven.apache.org/POM/4.0.0
http://maven.apache.org/maven-v4_0_0.xsd" >

 <modelVersion> 4.0.0 </modelVersion>
  <groupId> com.mcnz.liberty.tutorial </groupId>
  <artifactId> openliberty </artifactId>
  <packaging> war </packaging>
  <version> example </version>
  <name> embedded WebSphere liberty example </name>

</project>
Maven WAR插件
需要Maven war插件来打包应用程序。
从历史上看,WAR文件需要一个web.xml文件,但是这种必需性随着Servlet 3.0 API的发布而过期。 但是,如果web.xml文件不存在,则除非将failOnMissingWebXml配置属性设置为false,否则Maven WAR插件将发出吠叫。 由于我的应用程序确实包含部署描述符,因此我可以省略此设置,但我想将其留给所有人是因为有人试图在嵌入式WebSphere Liberty概要文件上部署现代Web应用程序,并且没有意识到此可选设置。 第一个插件的配置如下所示,该配置出现在Maven POM文件中, 名称标签之后,结束项目标签之前:
<build>
 <plugins>
  <plugin>

   <artifactId> maven-war-plugin </artifactId>
   <version> 3.2.2 </version>
   <configuration>
    <failOnMissingWebXml> false </failOnMissingWebXml>
   </configuration>

  </plugin>
 </plugins>
</build>
配置Open Liberty Maven插件
到目前为止,在本教程中,我一直在谈论WebSphere Liberty。 但是这里将使用的插件是Open Liberty可用的插件。 Open Liberty是WebSphere Liberty服务器的开源版本,可以在不围绕IBM旗舰WebSphere Liberty概要文件产品提供许可要求的情况下使用。
Open Liberty插件条目如下所示,该条目紧接在maven-war-plugin的结束标记之后:
<plugin>
  <groupId> net.wasdev.wlp.maven.plugins </groupId>
  <artifactId> liberty-maven-plugin </artifactId>
  <version> 2.4.2 </version>
  <configuration>
    <assemblyArtifact>
      <groupId> io.openliberty </groupId>
      <artifactId> openliberty-runtime </artifactId>
      <version> 18.0.0.2 </version>
      <type> zip </type>
    </assemblyArtifact>
    <packageFile> target/embedded-liberty.jar </packageFile>
    <include> runnable </include>
    <looseApplication> false </looseApplication>
    <installAppPackages> project </installAppPackages>
  </configuration>
 <executions>
  <execution>
   <id> install-liberty </id>
   <phase> prepare-package </phase>
   <goals>
    <goal> install-server </goal>
    <goal> create-server </goal>
    <goal> install-feature </goal>
   </goals>
  </execution>
  <execution>
   <id> embed-liberty </id>
   <phase> package </phase>
   <goals>
    <goal> install-apps </goal>
    <goal> package-server </goal>
   </goals>
  </execution>
 </executions>
</plugin>
Open Liberty Maven插件的配置有很多特色,但重点是:
- Open Liberty概要文件的版本18.0.0.2将被嵌入
- 可执行JAR将被命名为Embedded-liberty.jar
- 在准备打包和打包阶段执行的Maven目标将下载Open Liberty服务器,部署Java Web应用程序,并将服务器和部署的应用程序打包在可执行JAR中。
可执行的Open Liberty JAR文件
配置了Maven POM之后,只需运行maven package命令即可创建可执行的Open Liberty JAR文件:
C:\webphsere\embedded\openliberty> mvn clean install
[INFO] ------------------------------------------------------------------------
[INFO] BUILD SUCCESS: OPEN LIBERTY JAR EXAMPLE
[INFO] Total time: 25.016 s
[INFO] Finished at: 2018-07-06T14:22:21-04:00
[INFO] ------------------------------------------------------------------------
运行嵌入式Open Liberty JAR文件
要运行嵌入了Open Liberty的可执行JAR文件,只需移至\ target文件夹,在其中创建了Embedded-liberty.jar文件并发出java -jar命令。
C:\webphsere\embedded\openliberty> java -jar embedded-liberty.jar
 (default_host): http://localhost:9080/openliberty-example/
Application openliberty-example started in 0.458 seconds.
The server installed the following: [jsp-2.3, servlet-3.1, el-3.0].
The server defaultServer is ready to run a smarter planet.
当通过分配的URL从浏览器访问嵌入式Open Liberty服务器时,将打开一个网页,其中显示了作为应用程序一部分创建的JSP的当前日期以及Hello World消息。

运行嵌入式Open Liberty服务器。
这就是全部。 只要正确配置了POM,并且您的应用程序是有效的Java EE Web应用程序,将其部署到嵌入式WebSphere Liberty或嵌入式Open Liberty服务器上都是相对轻松的工作。
适用于嵌入式Liberty服务器的完整Maven POM
<projectxmlns="http://maven.apache.org/POM/4.0.0"
xmlns:xsi="http://www.w3.org/2001/XMLSchema-instance"
xsi:schemaLocation="http://maven.apache.org/POM/4.0.0 http://maven.apache.org/maven-v4_0_0.xsd" >
  <modelVersion>4.0.0</modelVersion>
  <groupId>com.mcnz.liberty.tutorial</groupId>
  <artifactId>openliberty</artifactId>
  <packaging>war</packaging>
  <version>example</version>
  <name>embedded WebSphere liberty</name>

  <build>
    <plugins>
      <plugin>

       <artifactId>maven-war-plugin</artifactId>
       <version>3.2.2</version>
       <configuration>
         <failOnMissingWebXml>false</failOnMissingWebXml>
       </configuration>

      </plugin>

      <plugin>
        <groupId>net.wasdev.wlp.maven.plugins</groupId>
        <artifactId>liberty-maven-plugin</artifactId>
        <version>2.4.2</version>
        <configuration>
          <assemblyArtifact>
            <groupId>io.openliberty</groupId>
            <artifactId>openliberty-runtime</artifactId>
            <version>18.0.0.2</version>
            <type>zip</type>
          </assemblyArtifact>
          <packageFile>target/embedded-liberty.jar</packageFile>
          <include>runnable</include>
          <looseApplication>false</looseApplication>
          <installAppPackages>project</installAppPackages>
        </configuration>
        <executions>
          <execution>
            <id>install-liberty</id>
            <phase>prepare-package</phase>
            <goals>
              <goal>install-server</goal>
              <goal>create-server</goal>
              <goal>install-feature</goal>
            </goals>
          </execution>
          <execution>
            <id>embed-liberty</id>
            <phase>package</phase>
            <goals>
              <goal>install-apps</goal>
              <goal>package-server</goal>
            </goals>
         </execution>
       </executions>
     </plugin>

   </plugins>
 </build>

</project>maven ja打包


 297
297

 被折叠的 条评论
为什么被折叠?
被折叠的 条评论
为什么被折叠?
 到【灌水乐园】发言


