


巴巴运动网-整合hibernate4+spring4(2)
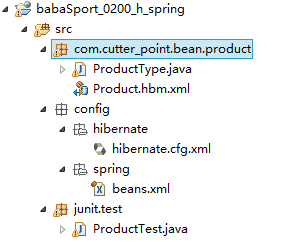
1、项目图解
2、首先我们引入相应的jar包
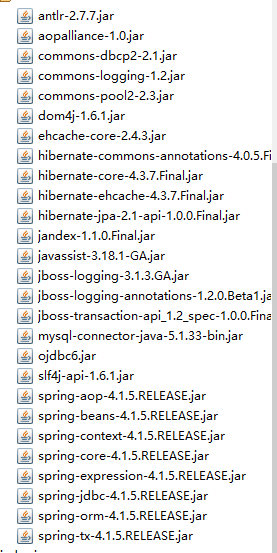
这里用的是oracle 11g,所以我们使用的数据库连接jar包是ojdbc6,
实际上ojdbc5和6的差别就是支持的数据版本的问题,只要你安装了相应的数据库,对应的版本里面就有相应的数据库jar包,不行百度绝壁有!!!
3、我们配置一下数据库中相应的实体对象
ProductType.java
/**

 * 功能:这是产品类别的

 * 文件:ProductType.java

 * 时间:2015年5月12日10:16:21

 * 作者:cutter_point

 */

package com.cutter_point.bean.product;


publicclassProductType

{

    private Integer typeid;


    public Integer getTypeid()

    {

        returntypeid;

    }


    publicvoid setTypeid(Integertypeid)

    {

        this.typeid = typeid;

    }

}
Product.hbm.xml
<?xml version="1.0"?>

<!DOCTYPE hibernate-mapping PUBLIC

        "-//Hibernate/Hibernate Mapping DTD 3.0//EN"

        "http://www.hibernate.org/dtd/hibernate-mapping-3.0.dtd">


<hibernate-mapping package="com.cutter_point.bean.product">

    <class name="ProductType" table="ProductType">

        <id name="typeid"column="typeid">

            <generator class="sequence" />

        </id>

    </class>

</hibernate-mapping>
4、我们配置一下spring的配置文件beans.xml
<?xml version="1.0"encoding="UTF-8"?>

<beans xmlns="http://www.springframework.org/schema/beans"

    xmlns:xsi="http://www.w3.org/2001/XMLSchema-instance"

    xmlns:context="http://www.springframework.org/schema/context"

    xmlns:aop="http://www.springframework.org/schema/aop"

    xmlns:tx="http://www.springframework.org/schema/tx"

    xsi:schemaLocation="http://www.springframework.org/schema/beanshttp://www.springframework.org/schema/beans/spring-beans-4.1.xsd

       http://www.springframework.org/schema/contexthttp://www.springframework.org/schema/context/spring-context-4.1.xsd

       http://www.springframework.org/schema/aophttp://www.springframework.org/schema/aop/spring-aop-4.1.xsd

       http://www.springframework.org/schema/txhttp://www.springframework.org/schema/tx/spring-tx-4.1.xsd">


    <!-- 扫描带有spring特殊机制的类,这是把这些包下面所有的类都添加到spring中进行管理 -->

    <context:component-scan base-package="com.cutter_point" />


    <!-- 属性遍历器 -->

    <!-- <context:property-placeholderlocation="classpath:jdbc.properties" /> -->

    <!-- 连接数据库属性配置,destroy-method="close"就是说在这个bean被摧毁的情况下可以调用这个bean默认的close方法-->

    <bean id="myDataSource" class="org.apache.commons.dbcp2.BasicDataSource"destroy-method="close">

        <property name="driverClassName" value="oracle.jdbc.driver.OracleDriver"/>

        <property name="url"value="jdbc:oracle:thin:@localhost:1522:orcl"/>

        <property name="username"value="账号"/>

        <property name="password"value="密码"/>

        <!-- 连接池启动时的初始值 -->

        <property name="initialSize" value="1"/>

        <!-- 连接池的最大值  dbcp2里面似乎没有-->

        <!-- <property name="maxActive"value="500"/> -->

        <!-- 最大空闲值.当经过一个高峰时间后,连接池可以慢慢将已经用不到的连接慢慢释放一部分,一直减少到maxIdle为止 -->

        <property name="maxIdle" value="2"/>

        <!--  最小空闲值.当空闲的连接数少于阀值时,连接池就会预申请去一些连接,以免洪峰来时来不及申请 -->

        <property name="minIdle" value="1"/>

    </bean>


    <!-- hibernate二级缓存的配置 -->

    <bean id="sessionFactory" class="org.springframework.orm.hibernate4.LocalSessionFactoryBean">

    <!-- configuration elided for brevity -->

        <property name="dataSource" ref="myDataSource" />

        <property name="mappingResources">

            <list>  <!-- 映射文件 -->

                <value>com/cutter_point/bean/product/Product.hbm.xml</value>

            </list>

        </property>

        <property name="hibernateProperties">   <!-- 用来配置hibernate的属性配置 -->

            <value>

                org.hibernate.dialect.OracleDialect

                hibernate.hbm2ddl.auto=update  <!--其他取值 create、create-drop、update、validate none-->

                hibernate.show_sql=true

                hibernate.format_sql=true

                <!-- 开启二级缓存功能 -->

                hibernate.cache.use_second_level_cache= true

                hibernate.cache.use_query_cache= false

                hibernate.cache.region.factory_class= org.hibernate.cache.ehcache.EhCacheRegionFactory

                <!-- hibernate3的二级缓存配置 -->

                <!-- <propertyname="hibernate.cache.provider_class">org.hibernate.cache.EhCacheProvider</property>-->

            </value>

        </property>

    </bean>


    <!-- 事务管理器,吧上面配置的bean注入到这个里面 -->

    <bean id="txManager" class="org.springframework.orm.hibernate4.HibernateTransactionManager">

        <property name="sessionFactory" ref="sessionFactory" />

    </bean>


    <!-- 我们采用注解的方式来使用这个事务,首先我们开启事务 -->

    <tx:annotation-driven transaction-manager="transactionManager" />


</beans>
5、接下来我们测试一下hibernate+spring是否配置成功
/**

 * 功能:这是产品类别的单元测试

 * 文件:ProductTest.java

 * 时间:2015年5月12日10:27:24

 * 作者:cutter_point

 */

package junit.test;


import javax.sql.DataSource;


import org.hibernate.HibernateException;

import org.hibernate.Session;

import org.hibernate.SessionFactory;

import org.hibernate.cfg.Configuration;

import org.junit.BeforeClass;

import org.junit.Test;

importorg.springframework.context.ApplicationContext;

importorg.springframework.context.support.ClassPathXmlApplicationContext;


importcom.cutter_point.bean.product.ProductType;


public class ProductTest

{


    @BeforeClass

    publicstatic void setUpBeforeClass() throws Exception

    {

    }


    @Test

    publicvoid test()

    {

        ProductTypept = new ProductType(); //new一个对象

        pt.setTypeid(78);   //设置id号码

        Configurationcfg = new Configuration();    //得到Configuration

       SessionFactorysf =cfg.configure("/config/hibernate/hibernate.cfg.xml").buildSessionFactory();    //取得session工厂

        Sessionsession = sf.openSession();

        session.beginTransaction();

        session.save(pt);

        session.getTransaction().commit();

        session.close();

        sf.close();

    }


    @Test

    publicvoid testSpring()

    {

        //测试spring是否可以运作

        ApplicationContextcxt = new ClassPathXmlApplicationContext("config/spring/beans.xml");

        DataSourcedatasource = (DataSource)cxt.getBean("myDataSource");    //取出一个对象

        System.out.println(datasource); //判断是不是为空,

    }


}
6、总结

这个spring里面配置了数据源是用的org.apache.commons.dbcp2.BasicDataSource
这个jar包是,当然你们可以用其他的,我这里只是一个举例,如果你报一个神秘version5.1的错误的话,请换一个数据源jar包,比如commons-dbcp.jar
这个里面就把org.apache.commons.dbcp2.BasicDataSource改为org.apache.commons.dbcp.BasicDataSource
这个其实就是版本问题,其他的地方应该是不用改了!!!!


 2108
2108

 被折叠的 条评论
为什么被折叠?
被折叠的 条评论
为什么被折叠?
 到【灌水乐园】发言


