


<div class="article_manage clearfix">
<div class="article_l">
<span class="link_categories">
标签:
<a href="http://www.csdn.net/tag/Coordinate" target="_blank" onclick="_gaq.push(['_trackEvent','function', 'onclick', 'blog_articles_tag']);">Coordinate</a><a href="http://www.csdn.net/tag/Layout" target="_blank" onclick="_gaq.push(['_trackEvent','function', 'onclick', 'blog_articles_tag']);">Layout</a><a href="http://www.csdn.net/tag/%e5%b8%83%e5%b1%80" target="_blank" onclick="_gaq.push(['_trackEvent','function', 'onclick', 'blog_articles_tag']);">布局</a>
</span>
</div>
<div class="article_r">
<span class="link_postdate">2016-06-01 13:03</span>
<span class="link_view" title="阅读次数">6721人阅读</span>
<span class="link_comments" title="评论次数"> <a href="#comments" onclick="_gaq.push(['_trackEvent','function', 'onclick', 'blog_articles_pinglun'])">评论</a>(12)</span>
<span class="link_collect tracking-ad" data-mod="popu_171" style="display: none; visibility: hidden;"> <a href="javascript:void(0);" onclick="javascript:collectArticle('CoordinatorLayout的使用如此简单','51554608');return false;" title="收藏">收藏</a></span>
<span class="link_report"> <a href="#report" onclick="javascript:report(51554608,2);return false;" title="举报">举报</a></span>
</div>
</div>
<div class="embody" style="display:none" id="embody">
<span class="embody_t">本文章已收录于:</span>
<div class="embody_c" id="lib" value="{"err":0,"msg":"ok","data":[]}"></div>
</div>
<style type="text/css">
.embody{
padding:10px 10px 10px;
margin:0 -20px;
border-bottom:solid 1px #ededed;
}
.embody_b{
margin:0 ;
padding:10px 0;
}
.embody .embody_t,.embody .embody_c{
display: inline-block;
margin-right:10px;
}
.embody_t{
font-size: 12px;
color:#999;
}
.embody_c{
font-size: 12px;
}
.embody_c img,.embody_c em{
display: inline-block;
vertical-align: middle;
}
.embody_c img{
width:30px;
height:30px;
}
.embody_c em{
margin: 0 20px 0 10px;
color:#333;
font-style: normal;
}
</style>
<script type="text/javascript">
$(function () {
try
{
var lib = eval("("+$("#lib").attr("value")+")");
var html = "";
if (lib.err == 0) {
$.each(lib.data, function (i) {
var obj = lib.data[i];
//html += '<img src="' + obj.logo + '"/>' + obj.name + " ";
html += ' <a href="' + obj.url + '" target="_blank">';
html += ' <img src="' + obj.logo + '">';
html += ' <em><b>' + obj.name + '</b></em>';
html += ' </a>';
});
if (html != "") {
setTimeout(function () {
$("#lib").html(html);
$("#embody").show();
}, 100);
}
}
} catch (err)
{ }
});
</script>
<script type="text/javascript" src="http://static.blog.csdn.net/scripts/category.js"></script>
<div class="bog_copyright">
<p class="copyright_p">版权声明:本文为博主原创文章,未经博主允许不得转载。</p>
</div>
我的简书同步发布:CoordinatorLayout的使用如此简单
曾在网上找了一些关于CoordinatorLayout的教程,大部分文章都是把CoordinatorLayout、AppbarLayout、CollapsingToolbarLayout 以及Toolbar等一起使用来介绍,这让我不知不觉在心中认为把这几个布局要一起使用,而且只是用于那种场景中。其实CoordinatorLayout的功能并不是局限于与AppBarLayout一起使用,它的功能强大着呢,本文主要对CoordinatorLayout的使用进行介绍,后面再写一篇文章将AppBarLayout和CollapsingToolBarLayout整合CoordinatorLayout一起。那么到底CoordinatorLayout有多好用,请往下感受吧~
CoordinatorLayout能做什么
在学习CoordinatorLayout之前,很有必要了解CoordinatorLayout能帮我们做什么,从名字上可以看出,就是帮我们协调子View的。怎么个协调法呢?就是它根据我们的定制,帮助我们协调各个子View的布局。我们先看一组动画图~
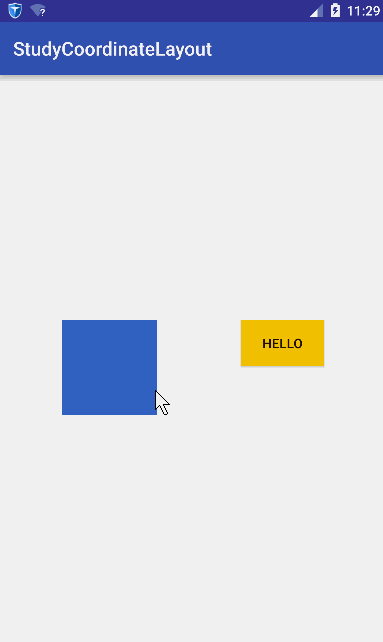
稍微解释一下这个动画,蓝色的矩形是我们一个普通View,黄色的Hello是一个Button。我们水平拖动蓝色矩形时,黄色Button查着与蓝色矩形相反方向移动;竖直移动蓝色矩形时,黄色也跟着竖直。简而言之:它们在竖直方向同步移动,在水平方向相反。
这个效果如果让你不用CoordinatorLayout去实现,应该没有任何问题,但是代码的耦合度应该非常大,你的代码必须要持有2个View的引用,然后在onTouchEvent里面做各种判断。如果我们想要实现的功能是,有更多的View要根据蓝色的View的移动相应作出响应,那么那就得在蓝色View的onTounchEvent里面针对其他的View处理各种逻辑。这耦合度未免太伤感了~
而CoordinatorLayout既然号称能帮我们协调子View的布局,我们接下来看看CoordinatorLayout如何实现~
CoordinatorLayout使用
CoordinatorLayout的使用核心是Behavior,Behavior就是执行你定制的动作。在讲Behavior之前必须先理解两个概念:Child和Dependency,什么意思呢?Child当然是子View的意思了,是谁的子View呢,当然是CoordinatorLayout的子View;其实Child是指要执行动作的CoordinatorLayout的子View。而Dependency是指Child依赖的View。比如上面的gif图中,蓝色的View就是Dependency,黄色的View就是Child,因为黄色的View的动作是依赖于蓝色的View。简而言之,就是如过Dependency这个View发生了变化,那么Child这个View就要相应发生变化。发生变化是具体发生什么变化呢?这里就要引入Behavior,Child发生变化的具体执行的代码都是放在Behavior这个类里面。
怎么使用Behavior呢,首先,我们定义一个类,继承CoordinatorLayout.Behavior<T>,其中,泛型参数T是我们要执行动作的View类,也就是Child。然后就是去实现Behavior的两个方法:
/**
* 判断child的布局是否依赖dependency
*/
   @Override
 public boolean layoutDependsOn(CoordinatorLayout parent, T child, View dependency) {
    boolean rs;
    //根据逻辑判断rs的取值
    //返回false表示child不依赖dependency,ture表示依赖
    return rs;
}

/**
* 当dependency发生改变时(位置、宽高等),执行这个函数
* 返回true表示child的位置或者是宽高要发生改变,否则就返回false
*/
@Override
public boolean onDependentViewChanged(CoordinatorLayout parent, T child, View dependency) {
     //child要执行的具体动作
        return true;
}
- 1
- 2
- 3
- 4
- 5
- 6
- 7
- 8
- 9
- 10
- 11
- 12
- 13
- 14
- 15
- 16
- 17
- 18
- 19
- 20

- 1
- 2
- 3
- 4
- 5
- 6
- 7
- 8
- 9
- 10
- 11
- 12
- 13
- 14
- 15
- 16
- 17
- 18
- 19
- 20
有了上面的概念后,我们看看具体怎么去实现吧~
为了响应跟随手指移动的操作,我们定义一个非常简单的View,这个View只响应跟随手指移动,将这个View作为Dependency。由于过于简单,这个View源码不粘贴,我们只需知道这个View的类名叫:TempView。
我们看看Behavior的使用:
package com.hc.studyCoordinatorLayout;

import android.content.Context;
import android.support.design.widget.CoordinatorLayout;
import android.util.AttributeSet;
import android.util.DisplayMetrics;
import android.view.View;
import android.widget.Button;

/**
 * Package com.hc.studyCoordinatorLayout
 * Created by HuaChao on 2016/6/1.
 */
public class MyBehavior extends CoordinatorLayout.Behavior<Button> {
    private int width;

    public MyBehavior(Context context, AttributeSet attrs) {
        super(context, attrs);
        DisplayMetrics display = context.getResources().getDisplayMetrics();
        width = display.widthPixels;
    }

    @Override
    public boolean layoutDependsOn(CoordinatorLayout parent, Button child, View dependency) {
        //如果dependency是TempView的实例,说明它就是我们所需要的Dependency
        return dependency instanceof TempView;
    }

    //每次dependency位置发生变化,都会执行onDependentViewChanged方法
    @Override
    public boolean onDependentViewChanged(CoordinatorLayout parent, Button btn, View dependency) {

        //根据dependency的位置,设置Button的位置

        int top = dependency.getTop();
        int left = dependency.getLeft();

        int x = width - left - btn.getWidth();
        int y = top;

        setPosition(btn, x, y);
        return true;
    }

    private void setPosition(View v, int x, int y) {
        CoordinatorLayout.MarginLayoutParams layoutParams = (CoordinatorLayout.MarginLayoutParams) v.getLayoutParams();
        layoutParams.leftMargin = x;
        layoutParams.topMargin = y;
        v.setLayoutParams(layoutParams);
    }


}
- 1
- 2
- 3
- 4
- 5
- 6
- 7
- 8
- 9
- 10
- 11
- 12
- 13
- 14
- 15
- 16
- 17
- 18
- 19
- 20
- 21
- 22
- 23
- 24
- 25
- 26
- 27
- 28
- 29
- 30
- 31
- 32
- 33
- 34
- 35
- 36
- 37
- 38
- 39
- 40
- 41
- 42
- 43
- 44
- 45
- 46
- 47
- 48
- 49
- 50
- 51
- 52
- 53
- 54
- 1
- 2
- 3
- 4
- 5
- 6
- 7
- 8
- 9
- 10
- 11
- 12
- 13
- 14
- 15
- 16
- 17
- 18
- 19
- 20
- 21
- 22
- 23
- 24
- 25
- 26
- 27
- 28
- 29
- 30
- 31
- 32
- 33
- 34
- 35
- 36
- 37
- 38
- 39
- 40
- 41
- 42
- 43
- 44
- 45
- 46
- 47
- 48
- 49
- 50
- 51
- 52
- 53
- 54
OK,现在我们为Button类指定了Dependency,并且定义好了跟随Dependency一直变化的动作(Behavior),接下来我们就要指定好为哪个具体的Button实例来绑定这些。方法很简单,直接在布局文件指定就好:
<?xml version="1.0" encoding="utf-8"?>
<android.support.design.widget.CoordinatorLayout xmlns:android="http://schemas.android.com/apk/res/android"
    xmlns:app="http://schemas.android.com/apk/res-auto"
    xmlns:tools="http://schemas.android.com/tools"
    android:layout_width="match_parent"
    android:layout_height="match_parent"
    tools:context="com.hc.studyCoordinatorLayout.MainActivity">

    <Button
        android:id="@+id/btn"
        android:layout_width="wrap_content"
        android:layout_height="wrap_content"
        android:layout_marginLeft="300dp"
        android:layout_marginTop="300dp"
        android:background="#FFCC00"
        android:text="Hello"
        app:layout_behavior="com.hc.studyCoordinatorLayout.MyBehavior" />

    <com.hc.studyCoordinatorLayout.TempView
        android:layout_width="100dp"
        android:layout_height="100dp"
        android:layout_marginLeft="300dp"
        android:layout_marginTop="300dp"
        android:background="#3366CC"  />
</android.support.design.widget.CoordinatorLayout>
- 1
- 2
- 3
- 4
- 5
- 6
- 7
- 8
- 9
- 10
- 11
- 12
- 13
- 14
- 15
- 16
- 17
- 18
- 19
- 20
- 21
- 22
- 23
- 24
- 25
- 26
- 1
- 2
- 3
- 4
- 5
- 6
- 7
- 8
- 9
- 10
- 11
- 12
- 13
- 14
- 15
- 16
- 17
- 18
- 19
- 20
- 21
- 22
- 23
- 24
- 25
- 26
是不是很简单呢?我们只需关注Behavior的编写就好了,把Child和Dependency之间的关系完全解耦了~


 5万+
5万+

 被折叠的 条评论
为什么被折叠?
被折叠的 条评论
为什么被折叠?
 到【灌水乐园】发言


