


mybatis简单使用和详解
Java中操作数据库常用的持久层技术和持久层框架:
持久层技术主要有JDBC、JdbcTemplate和DBUtils,持久层框架主要有mybatis和hibernate。
1.JDBC技术:Connection、PreparedStatement、ResultSet。
2.Spring的JdbcTemplate:Spring中对Jdbc的简单封装。
3.Apache的DBUtils:它和Spring的JdbcTemplate很像,也是对Jdbc的简单封装。
以上这些都不是框架(JDBC是规范、Spring的JdbcTemplate和Apache的DBUtils都只是工具类)。
mybatis是一个用Java编写的持久层框架,它使用ORM实现了结果集的封装。与hibernate一样,也是需要拥有两个配置文件:全局配置文件和映射文件,在编写这两个映射文件之前,必须创建mybatis环境(引入jar包或者maven工程导入坐标)。
ORM(Object Relational Mapping)是对象关系映射。简单来说,就是把数据库表和实体类及实体类的属性对应起来,让开发者操作实体类就实现操作数据库表。它封装了jdbc操作的很多细节,使开发者只需要关注sql语句本身,而无需关注注册驱动、创建连接等烦杂过程。
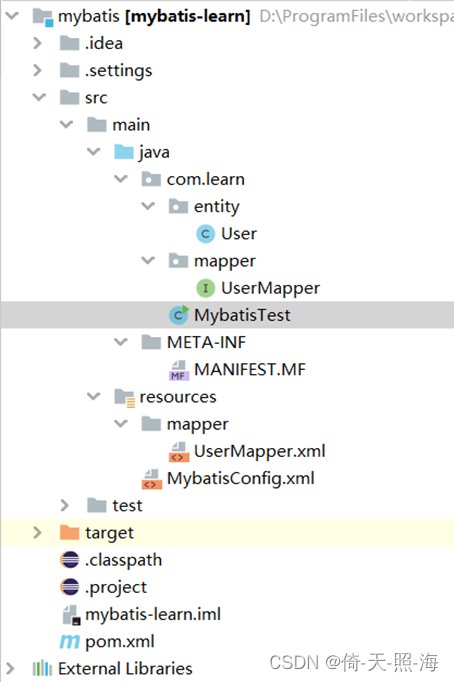
1、mybatis简单使用
前提:安装mysql,创建数据库和数据表。
在windows系统中安装mysql之后,以管理员方式打开cmd窗口,通过net start mysql命令启动mysql服务,通过net stop mysql命令关闭mysql服务。
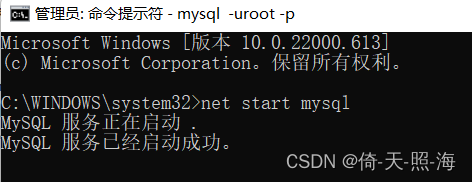
登录mysql:mysql -uroot -p
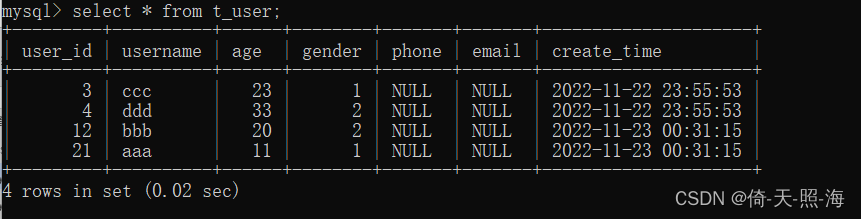
选择数据库(若无,则需要创建):use mytest
查询数据:
目录结构:
1、pom.xml文件引入依赖:
<?xml version="1.0" encoding="UTF-8"?>
<project xmlns="http://maven.apache.org/POM/4.0.0"
         xmlns:xsi="http://www.w3.org/2001/XMLSchema-instance"
         xsi:schemaLocation="http://maven.apache.org/POM/4.0.0 http://maven.apache.org/xsd/maven-4.0.0.xsd">
    <modelVersion>4.0.0</modelVersion>

    <groupId>org.example</groupId>
    <artifactId>mybatis-learn</artifactId>
    <version>1.0-SNAPSHOT</version>

    <dependencies>
        <dependency>
            <groupId>org.mybatis</groupId>
            <artifactId>mybatis</artifactId>
            <version>3.5.4</version>
        </dependency>
        <dependency>
            <groupId>mysql</groupId>
            <artifactId>mysql-connector-java</artifactId>
            <version>8.0.33</version>
        </dependency>
        <dependency>
            <groupId>log4j</groupId>
            <artifactId>log4j</artifactId>
            <version>1.2.17</version>
        </dependency>
        <dependency>
            <groupId>junit</groupId>
            <artifactId>junit</artifactId>
            <version>4.8.2</version>
        </dependency>
        <!--<dependency>
            <groupId>commons-lang</groupId>
            <artifactId>commons-lang</artifactId>
            <version>2.6</version>
        </dependency>-->
        <!-- 使用StringUtils.equalsAny()方法需要引入commons-lang3 -->
        <dependency>
            <groupId>org.apache.commons</groupId>
            <artifactId>commons-lang3</artifactId>
            <version>3.12.0</version>
        </dependency>
    </dependencies>

    <build>
        <plugins>
            <plugin>
                <groupId>org.apache.maven.plugins</groupId>
                <artifactId>maven-compiler-plugin</artifactId>
                <version>3.1</version>
                <configuration>
                    <source>1.8</source>
                    <target>1.8</target>
                </configuration>
            </plugin>
        </plugins>
    </build>
</project>
2、创建实体类
package com.learn.entity;

public class User {

    private Integer id;

    private String username;

    private Integer age;
    // 省略get、set方法
}
3、创建Mapper接口
package com.learn.mapper;

import com.learn.entity.User;

import java.util.List;

/**
 * @Author: 倚天照海
 */
public interface UserMapper {
    void createUser(User user);

    void deleteUserById(Integer userId);

    void updateUserById(User user);

    User queryUserById(Integer userId);

    User queryUserByIdWithResultType(Integer userId);

    String queryNameById(Integer userId);

    List<User> batchQueryByIds(List<Integer> ids);

    List<String> batchQueryNameByIds(List<Integer> ids);
}
4、创建Mapper.xml映射文件
<?xml version="1.0" encoding="UTF-8"?>
<!DOCTYPE mapper PUBLIC "-//mybatis.org//DTD Mapper 3.0//EN" "http://mybatis.org/dtd/mybatis-3-mapper.dtd">
<mapper namespace="com.learn.mapper.UserMapper">
    <!--namespace的值必须是mapper接口的全限定名-->

    <resultMap id="baseResultMap" type="com.learn.entity.User">
        <result property="userId" column="user_id" jdbcType="INTEGER"/>
        <result property="username" column="username" jdbcType="VARCHAR"/>
        <result property="age" column="age" jdbcType="INTEGER"/>
    </resultMap>

    <sql id="columnInfo">
        user_id, username, age
    </sql>

    <insert id="createUser" parameterType="com.learn.entity.User">
        insert into t_user(user_id, username, age)
        values (#{userId}, #{username}, #{age})
    </insert>

    <delete id="deleteUserById">
        delete from t_user where user_id = #{userId}
    </delete>

    <update id="updateUserById" parameterType="com.learn.entity.User">
        update t_user
        <set>
            <if test="username != null">
                username = #{username},
            </if>
            <if test="age != null">
                age = #{age}
            </if>
        </set>
        <where>
            user_id = #{userId}
        </where>
    </update>

    <select id="queryUserById" parameterType="java.lang.Integer" resultMap="baseResultMap">
        select
        <include refid="columnInfo"/>
        from t_user
        <where>
            user_id = #{userId}
        </where>
    </select>
    <!-- 上面queryUserById中结果类型用的是resultMap映射,下面查询结果类型用的是resultType,
     在下面查询语句中需要使用别名将user_id映射到userId属性,否则mybatis查询到user_id字段无法给userId属性赋值。
     由于resultMap中已经做了映射,所以可以不用使用别名,如果表中字段与属性名称不一致,使用resultType必须用别名转换。-->
    <select id="queryUserByIdWithResultType" parameterType="java.lang.Integer" resultType="com.learn.entity.User">
        select
        user_id as userId, username, age
        from t_user
        <where>
            user_id = #{userId}
        </where>
    </select>

    <select id="queryNameById" parameterType="java.lang.Integer" resultType="java.lang.String">
        select username
        from t_user
        <where>
            user_id = #{userId}
        </where>
    </select>

    <!-- batchQueryByIds方法的返回值类型虽然是List<User>,但是resultType或resultMap对应的是List中元素的类型,即User -->
    <select id="batchQueryByIds" resultMap="baseResultMap">
        select
        <include refid="columnInfo"/>
        from t_user
        <where>
            user_id in
            <foreach collection="list" item="item" open="(" separator="," close=")">
                #{item}
            </foreach>
        </where>
    </select>

    <!-- batchQueryNameByIds方法的返回值虽然是List<String>,但是resultType不是List,而是List中元素的类型 -->
    <select id="batchQueryNameByIds" resultType="java.lang.String">
        select username
        from t_user
        <where>
            user_id in
            <foreach collection="list" item="userId" open="(" separator="," close=")">
                #{userId}
            </foreach>
        </where>
    </select>

</mapper>
5、创建mybatis配置文件MybatisConfig.xml
<?xml version="1.0" encoding="UTF-8" ?>  <!--xml文件的一个声明-->
<!DOCTYPE configuration
        PUBLIC "-//mybatis.org//DTD Config 3.0//EN"
        "https://mybatis.org/dtd/mybatis-3-config.dtd"><!--xml文件的约束,来规定当前配置文件中都能使用哪些标签-->
<configuration>
    <!-- 设置别名,在xxMapper.xml文件中使用实体类时可以不用指定类的完全限定名,直接使用首字母小写的类名即可 -->
    <typeAliases>
        <package name="com.learn.entity"/>
    </typeAliases>
    <!--配置环境-->
    <environments default="mysql">
        <!--配置Mysql的环境-->
        <environment id="mysql">
            <!--配置事务的类型-->
            <transactionManager type="JDBC"></transactionManager>
            <!--配置数据源(连接池)-->
            <dataSource type="POOLED">
                <!--配置连接数据库的四个基本信息-->
                <property name="driver" value="com.mysql.cj.jdbc.Driver" />
                <property name="url" value="jdbc:mysql://localhost:3306/mytest" />
                <property name="username" value="root" />
                <property name="password" value="root123" />
            </dataSource>
        </environment>
    </environments>
    <!--配置mapper映射文件-->
    <mappers>
        <mapper resource="mapper/UserMapper.xml" />
<!-- <mapper resource="mapper/*Mapper.xml" /> -->
    </mappers>

</configuration>
6、创建测试类进行增删改查
package com.learn;
import com.learn.entity.User;
import com.learn.mapper.UserMapper;
import org.apache.commons.lang3.StringUtils;
import org.apache.ibatis.io.Resources;
import org.apache.ibatis.session.SqlSession;
import org.apache.ibatis.session.SqlSessionFactory;
import org.apache.ibatis.session.SqlSessionFactoryBuilder;
import org.junit.Assert;
import java.io.IOException;
import java.io.InputStream;
import java.util.Arrays;
import java.util.List;
import java.util.stream.Collectors;
/**
* @author 倚天照海
*/
public class MybatisTest {
public static void main(String[] args) {
MybatisTest t = new MybatisTest();
t.test();
}
private void test() {
//mybatis配置文件
String resource = "MybatisConfig.xml";
InputStream inputStream;
SqlSessionFactory sqlSessionFactory;
SqlSession sqlSession = null;
try {
//根据配置文件获取输入流
inputStream = Resources.getResourceAsStream(resource);
//根据配置文件输入流创建会话工厂
sqlSessionFactory = new SqlSessionFactoryBuilder().build(inputStream);
//根据会话工厂得到sqlsession
sqlSession = sqlSessionFactory.openSession();
UserMapper userMapper = sqlSession.getMapper(UserMapper.class);
// 测试增删改查
testInsertDeleteUpdateQuery(sqlSession, userMapper);
// 测试批量查询
testBatchQuery(sqlSession, userMapper);
} catch (IOException e) {
e.printStackTrace();
} finally {
//关闭会话
if (sqlSession != null) {
sqlSession.close();
}
}
}
private void testInsertDeleteUpdateQuery(SqlSession sqlSession, UserMapper userMapper) {
// 创建用户
createUser(sqlSession, userMapper);
// 查询用户,验证是否创建成功
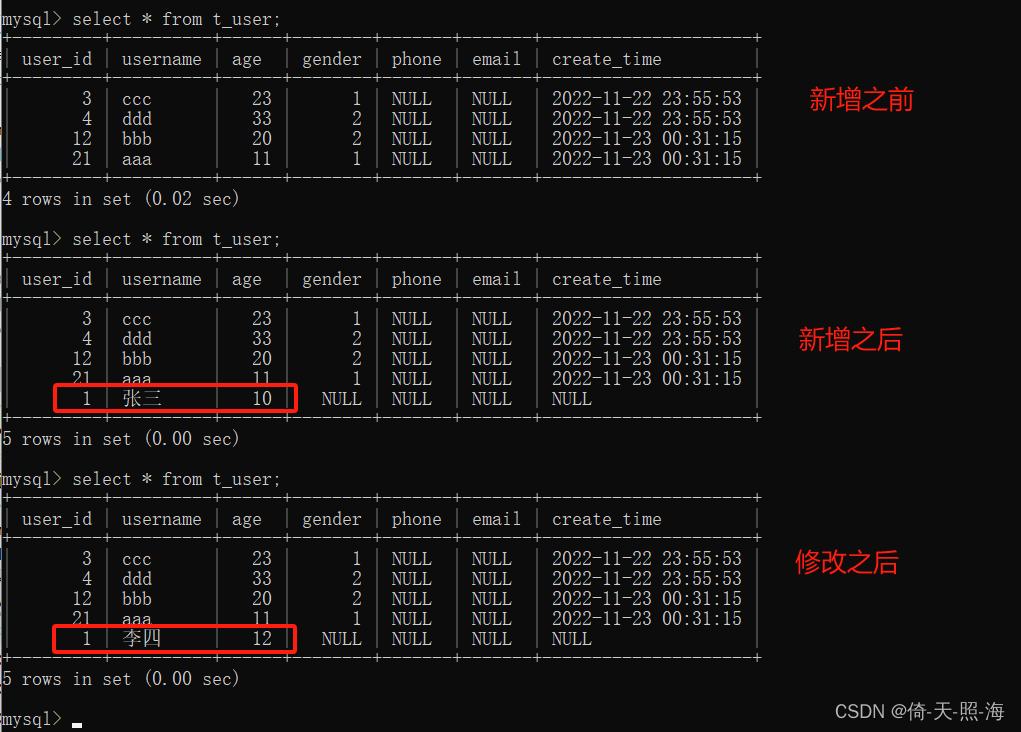
User user1 = queryUserById(userMapper, 1);
Assert.assertEquals("张三", user1.getUsername());
// 根据用户id查询用户名称
String username = userMapper.queryNameById(1);
Assert.assertEquals("张三", username);
// 修改用户
updateUser(sqlSession, userMapper);
// 查询用户,验证是否修改成功
User user2 = queryUserById(userMapper, 1);
Assert.assertEquals("李四", user2.getUsername());
User user3 = userMapper.queryUserByIdWithResultType(1);
Assert.assertEquals(user2.getUsername(), user3.getUsername());
// 删除用户
deleteUser(sqlSession, userMapper, 1);
// 查询用户,验证是否删除成功
User user4 = queryUserById(userMapper, 1);
Assert.assertNull(user4);
}
private User buildUser(Integer id, String name, Integer age) {
User user = new User();
user.setUserId(id);
user.setUsername(name);
user.setAge(age);
return user;
}
private void createUser(SqlSession sqlSession, UserMapper userMapper) {
User user = buildUser(1, "张三", 10);
userMapper.createUser(user);
//提交事务,增删改需要commit,查询无需commit
sqlSession.commit();
}
private void updateUser(SqlSession sqlSession, UserMapper userMapper) {
User user = buildUser(1, "李四", 12);
userMapper.updateUserById(user);
//提交事务,增删改需要commit,查询无需commit
sqlSession.commit();
}
private void deleteUser(SqlSession sqlSession, UserMapper userMapper, Integer userId) {
userMapper.deleteUserById(userId);
sqlSession.commit();
}
private User queryUserById(UserMapper userMapper, Integer userId) {
//方式一:直接通过sqlsession的select方法查询
//User user = sqlSession.selectOne("com.learn.mapper.UserMapper.queryUserById", 1);
//方式二:通过mapper接口的方法查询(推荐使用第二种,该方式底层实际上依然是调用sqlsession的方法)
return userMapper.queryUserById(userId);
}
private void testBatchQuery(SqlSession sqlSession, UserMapper userMapper) {
createUser2(sqlSession, userMapper);
List<User> users = userMapper.batchQueryByIds(Arrays.asList(5, 6));
List<User> result = users.stream()
.filter(user -> StringUtils.equalsAny(user.getUsername(), "王五", "赵六"))
.collect(Collectors.toList());
Assert.assertEquals(2, result.size());
List<String> nameList = userMapper.batchQueryNameByIds(Arrays.asList(5, 6));
Assert.assertEquals(2, nameList.size());
System.out.println(nameList);
deleteUser(sqlSession, userMapper, 5);
deleteUser(sqlSession, userMapper, 6);
}
private void createUser2(SqlSession sqlSession, UserMapper userMapper) {
User user1 = buildUser(5, "王五", 20);
User user2 = buildUser(6, "赵六", 20);
userMapper.createUser(user1);
userMapper.createUser(user2);
//提交事务,增删改需要commit,查询无需commit
sqlSession.commit();
}
}
2、mybatis详解
2.1、mybatis全局配置文件
mybatis的配置文件推荐为命名mybatis-config.xml,其内容包含了会深深影响mybatis行为的设置和属性信息。使用者掌握方面有properties、settings、typeAliases、enveronments、mappers。以下是全配置文件列表:
<?xml version="1.0" encoding="UTF-8" ?>  <!--xml文件的一个声明-->
<!DOCTYPE configuration
        PUBLIC "-//mybatis.org//DTD Config 3.0//EN"
        "https://mybatis.org/dtd/mybatis-3-config.dtd"><!--xml文件的约束,来规定当前配置文件中都能使用哪些标签-->
<!--配置-->
<configuration>
	<!--属性-->
	<properties></properties>
	<!--全局参数设置-->
	<settings></settings>
	<!--类型别名-->
	<typeAliases></typeAliases>
	<!--类型处理器-->
	<typeHandles></typeHandles>
	<!--对象工厂-->
	<objectFactory></objectFactory>
	<!--插件-->
	<plugins></plugins>
	<!--环境信息集合:起步学习只需要关注一下此处配置-->
	<environments>
		<!--单个环境信息-->
	    <environment>
	    	<!--事务-->
	        transactionManager
	        <!--数据源-->
	        dataSource
	    </environment>
	</environments>
	<!--数据库厂商标识-->
	databaseIdProvider
	<!--映射器-->
	<mappers></mappers>
</configuration>
具体各个配置内容如下:
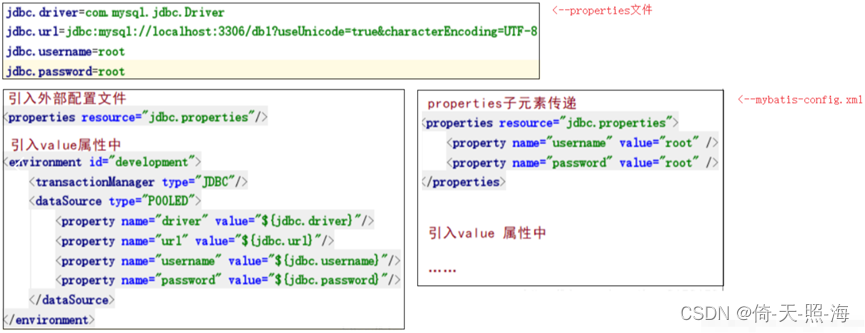
1、properties 标签
开发者可通过properties属性来实现引用配置文件。这些属性都是可外部配置且可动态替换的。
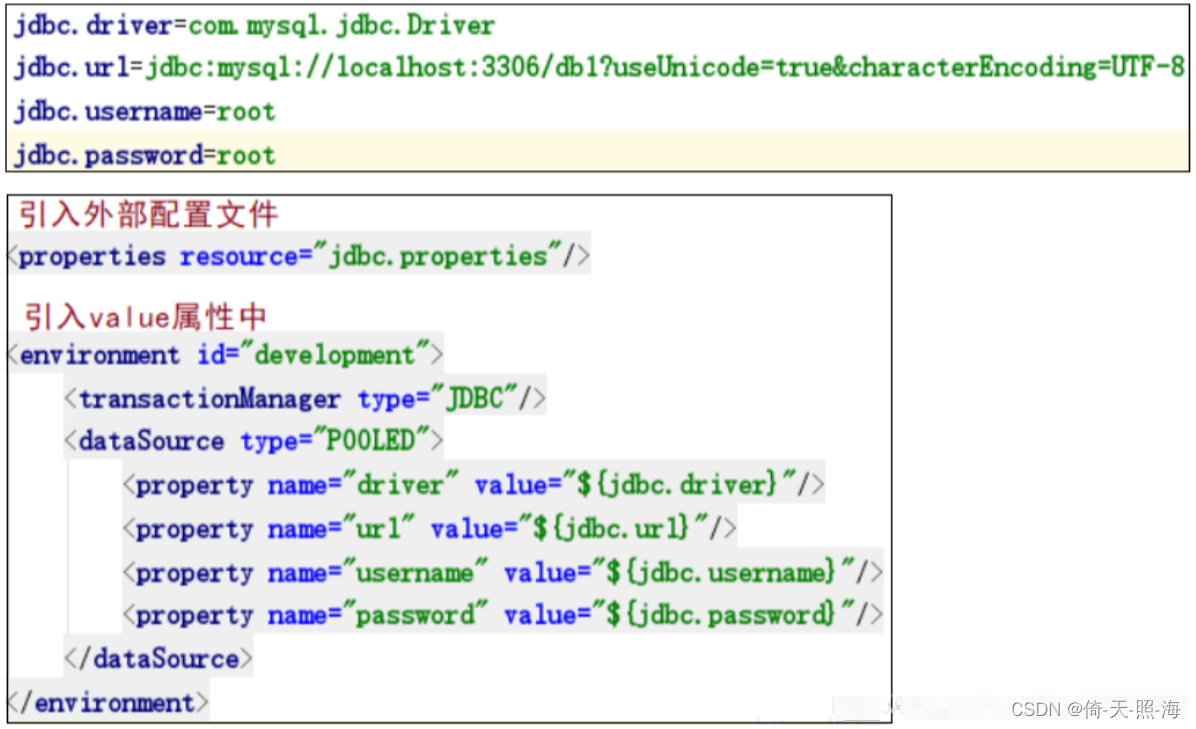
[注]
1.如果两个配置文件有同一个字段,优先使用外部配置文件的
2.可以直接引入外部配置文件,properties子元素中可以增加一些属性配置
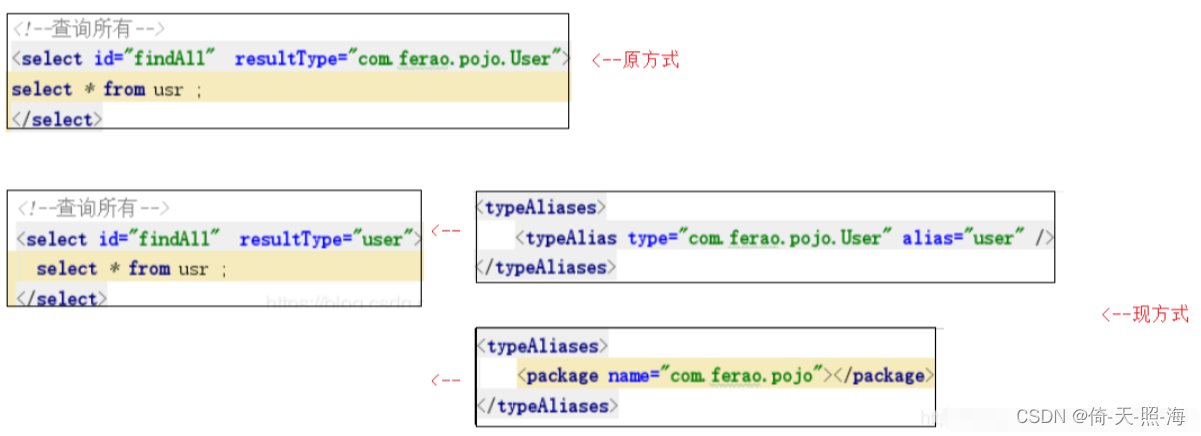
2、typeAliases 标签
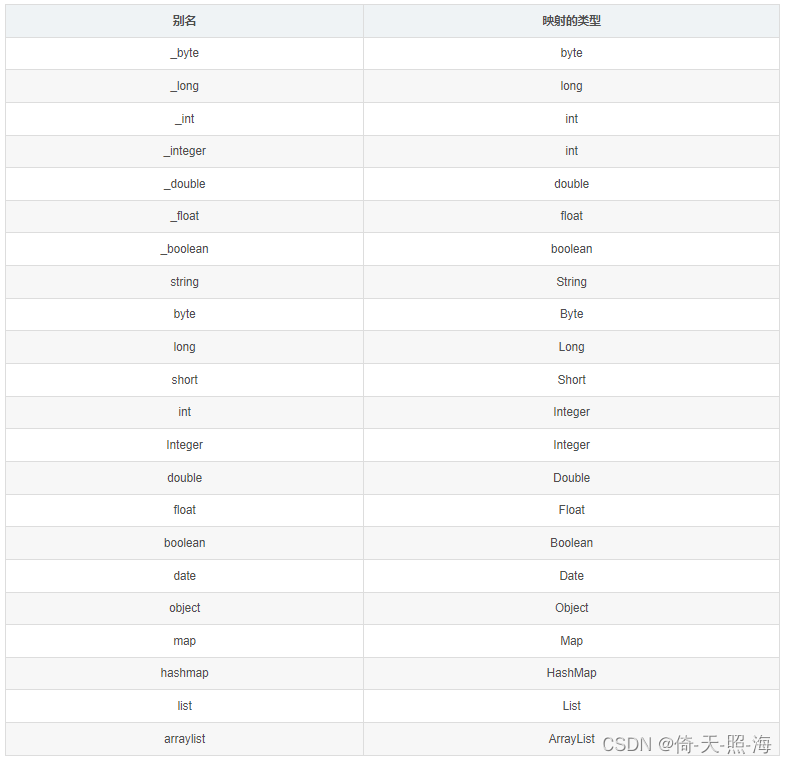
typeAliases类型别名是为java类型设置一个短的名字,存在的意义仅在于用来减少类完全限定名的冗余。java内置内建类型别名它们都不区分大小写,注意对基本类型名称重复采用的特殊命名风格。
[注]
方法二中,每一个在包中的Java bean,在没有注解的情况下,会使用bean的首字母小写的非限定类名来作为它的别名。若有注解,则别名为其注解值。(实体类上使用注解:@Alias(“user”))
3、setting 标签
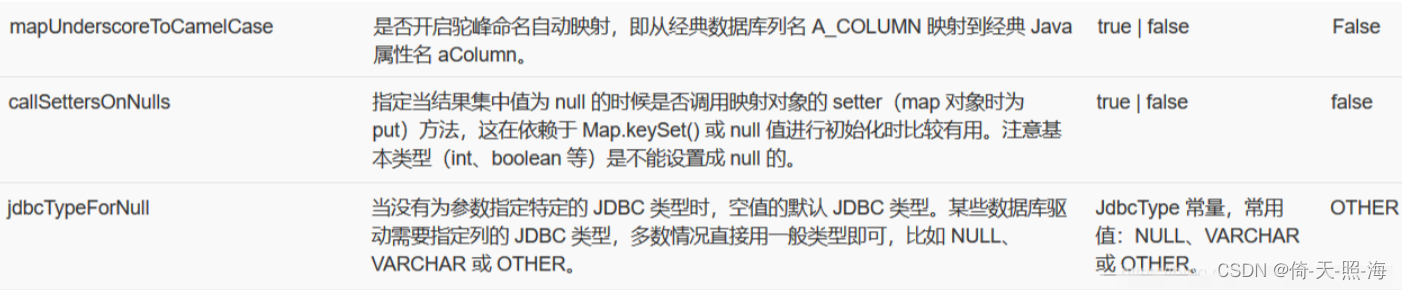
setting设置标签,这是Mybatis中极为重要的调整设置,它们会改变Mybatis的运行时行为。
4、environments标签
首先 看一段示例:
<!-- 配置mybatis的环境信息 -->
<environments default="development">
<environment id="development">
<!-- 配置JDBC事务控制,由mybatis进行管理 -->
<transactionManager type="JDBC"></transactionManager>
<!-- 配置数据源,采用dbcp连接池 -->
<dataSource type="POOLED">
<property name="driver" value="com.mysql.jdbc.Driver"/>
<property name="url" value="jdbc:mysql://localhost:3306/test_1?useUnicode=true&characterEncoding=utf8"/>
<property name="username" value="root"/>
<property name="password" value="root"/>
</dataSource>
</environment>
</environments>
dataSource子标签的type属性表达采用何种连接池方式, 在mybatis中连接池提供了3种方式的配置,在实际开发中都会使用连接池,因为它可以减少我们获取连接所消耗的时间。
①POOLED 方式:采用传统的javax.sql.DataSource规范中的连接池,mybatis中有针对规范的实现。下图中观察出POOLED它是从池中获取一个连接来用
②UNPOOLED 方式:采用传统的获取连接的方式,虽然也实现javax.sql.DataSource接口,但是并没有使用连接池技术。下图中观察出UNPOOLED每次创建一个新的连接来用。
③JNDI 方式:采用服务器提供的JNDI技术实现,来获取DataSource对象,不同的服务器所能拿到DataSource是不一样的,如果不是web或者maven的war工程,是不能使用的。
5、mappers标签
mappers映射器属性,MapperRegistry:注册绑定我们的Mapper文件。有三种方式如下:
<!-- 方式一 -->
<mappers>
	<mapper resource="com/learn/mapper/UserMapper.xml"/>
</mappers>
<!-- 方式二 -->
<!--该方式绑定注册时,接口和它的Mapper配置文件必须同名,且必须在同一个包下-->
<mappers>
	<mapper class="com.learn.mapper.UserMapper" />
</mappers>
<!-- 方式三 -->
<!--该方式注入绑定时,接口和它的Mapper配置文件必须同名,且必须在同一个包下-->
<mappers>
	<package name="com.learn.mapper"></package>
</mappers>
2.2、mybatis映射文件
关于mybatis映射文件,主要从传递参数的方式、parameterType(输入类型)、resultType(输出类型)和resultMap(映射实体类)几个方面讲述。
2.2.1、传递参数的方式
在mapper中传递多个参数的方式有四种:顺序传递法、@Param注解传参法、Map传参法、Java Bean传参法。
方法1:顺序传参法
xxMapper.java:
public User selectUser(String name, int deptId);xxMapper.xml:
<select id="selectUser" resultMap="UserResultMap">
    select * from user
    where user_name = #{0} and dept_id = #{1}
</select>
#{}里面的数字代表传入参数的顺序。这种方法不建议使用,sql层表达不直观,且一旦顺序调整容易出错。
方法2:@Param注解传参法
xxMapper.java:
public User selectUser(@Param("userName") String name, int @Param("deptId") deptId);xxMapper.xml:
<select id="selectUser" resultMap="UserResultMap">
    select * from user
    where user_name = #{userName} and dept_id = #{deptId}
</select>
#{}里面的名称对应的是注解@Param括号里面修饰的名称。这种方法在参数不多的情况还是比较直观的(推荐使用)。
方法3:Map传参法
xxMapper.java:
public User selectUser(Map<String, Object> params);xxMapper.xml:
<select id="selectUser" parameterType="java.util.Map" resultMap="UserResultMap">
    select * from user
    where user_name = #{userName} and dept_id = #{deptId}
</select>
#{}里面的名称对应的是Map里面的key名称。这种方法适合传递多个参数,且参数易变能灵活传递的情况。
方法4:Java Bean传参法
xxMapper.java:
public User selectUser(User user);xxMapper.xml:
<select id="selectUser" parameterType="com.learn.pojo.User" resultMap="UserResultMap">
    select * from user
    where user_name = #{userName} and dept_id = #{deptId}
</select>
#{}里面的名称对应的是User类里面的成员属性。这种方法直观,需要建一个实体类,扩展不容易,需要加属性,但代码可读性强,业务逻辑处理方便,推荐使用。
2.2.2、parameterType(输入类型)
xxMapper.java 可向 xxMapper.xml中输入三种类型:简单类型、pojo对象类型和pojo包装对象类型(即对象中嵌套对象)。
1.简单类型
如java.lang.Integer、java.lang.String等基本类型。
2.pojo对象类型
mybaits使用OGNL表达式解析对象字段的值,#{}或者${}括号中的值为pojo属性名称。
[注]OGNL表达式:object Graphic Navigation Language (对象图导航语言),它是通过对象的取值方法来获取数据。在写法上把gat给省略了。比如:我们获取用户的名称类中的写法:user.getUsername(); OGNL表达式写法:user.username。
那么,mybatis中为什么能直接写username,而不用user呢?因为在parameterType中已经提供了属性所属的类,所以此时不需要写对象名。如下所示:
<select id="selectUser" parameterType="com.learn.pojo.User" resultMap="UserResultMap">
    select * from user
    where user_name = #{userName} and dept_id = #{deptId}
</select>
3.pojo包装对象(对象中嵌套其他对象)
开发中通过pojo传递查询条件,查询条件是综合的查询条件,不仅包括用户查询条件还包括其他的查询条件(比如将用户购买商品消息也作为查询条件),这时可以使用包装对象传递输入pojo类参数中包含pojo。
2.2.3、resultType(输出类型)
可输出的类型有四种:返回一般数据类型(单条)、JavaBean 类型(单条)、List类型(多条)、Map类型。
1.一般数据类型(单条)
比如要根据Id属性获得数据库中的某个字段值,示例:
//**Mapper.java
String getStuNameById(Integer id);
<!--**Mapper.xml-->
<select id="getStuNameById" resultType="string">
	select username from t_student where id = #{id}
</select>
2. JavaBean 类型(单条)
比如根据某个字段获得数据库中的信息,把查询的结果信息封装成某个javaBean类型的数据,示例:
//**Mapper.java
Student getStuById(Integer id);
<!--**Mapper.xml-->
<select id="getStuById" resultType="student">
	select * from t_student where id = #{id}
</select>
3. List类型(多条)
有时候开发者查询的数据不止一条,比如,模糊查询,全表查询等,这时候返回的数据可能不止一条数据,对于多数据的处理可以存放在List集合中,示例:
//**Mapper.java
List<Student> getAllStus();
<!--
**Mapper.xml
注意这里的 resultType 返回值类型是集合内存储数据的类型,不是 'list'
-->
<select id="getAllStus" resultType="student">
	select * from t_student
</select>
如果返回的类型是List<Map<String, Object>>:
//**Mapper.java
List<Map<String, Object>> getAllStuAsMap();
<!-- **Mapper.xml 查询多条-->
<select id="getAllStuAsMap" resultType="map">
	select * from t_student
</select>
4. Map类型
mybatis支持将查询的数据封装成Map,如果查询的结果是一条,开发者可以把查询的数据以(表字段名,对应的值)方式存入到map中,示例:
//**Mapper.java
Map<String, Object> getStuAsMapById(Integer id);
<!--
**Mapper.xml
注意这里的 resultType 返回值类型是 'map'
-->
 <select id="getStuAsMapById" resultType="map">
	select * from t_student where id = #{id}
</select>
如果查询的结果是多条数据,我们也可以把查询的数据以{表中某一字段名, JavaBean}方式来封装成Map,通常是以主键或唯一键作为key,主键或唯一键对应的这条数据作为value。
①mapper(dao)接口:
// 查询所有学生的信息,把数据库中的'id'字段作为key,对应的value封装成Student对象
// @MapKey 中的值表示用数据库中的哪个字段名作 key
@MapKey("id")
Map<Integer, Student> getAllStusAsMap();
②Mapper.xml 映射文件:
<!--注意resultType返回值类型,不再是'map',而是Map的value对应的JavaBean类型-->
<select id="getAllStusAsMap" resultType="student">
	select * from t_student
</select>
2.2.4、resultMap(映射实体类)
实体类属性名和表中字段名不一样时,无法映射到值,输出为Null。这是因为mybatis会根据这些从数据库中查询到的列名,将列名转化为小写(数据库不区分大小写)去对应实体类中查询相应列名的set方法进行赋值,由于找不到setUserName(),所以会返回Null值。
解决方案有两种:
第1种:通过在查询的SQL语句中定义字段名的别名,让字段名的别名和实体类的属性名一致。
<select id="getOrder" parameterType="int" resultType="com.learn.pojo.Order">
       select order_id id, order_no orderno ,order_price price form t_orders where order_id=#{id};
</select>
第2种:通过resultMap 中的<result>来映射字段名和实体类属性名的一一对应关系。
<resultMap type="com.learn.pojo.Order" id="orderResultMap">
    <!–用id属性来映射主键字段–>
    <id property="id" column="order_id">
    <!–用result属性来映射非主键字段,property为实体类属性名,column为表中的字段名–>
 <result property ="orderno" column ="order_no"/>
 <result property="price" column="order_price" />
</reslutMap>

<select id="getOrder" parameterType="int" resultMap="orderResultMap">
 select * from t_orders where order_id=#{id}
</select>
<resultMap>标签的属性内容如下:
<!-- resultMap标签的id属性表示mapper.xml文件中resultMap的唯一标识,在<select>查询标签中会用到,
 type属性表示将数据表映射成哪一个实体类,其值是实体类的完全限定名。-->
<resultMap id="" type="">
    <!-- id标签设置主键时使用(也可不用),用于将表中字段与实体类属性进行映射绑定,
     column属性表示表中字段名,jdbcType属性表示表中字段类型(可有可无),如INTEGER、VARCHAR
     property属性表示实体类中属性名称,javaType表示属性类型(可有可无),如Integer、String-->
    <id column="" jdbcType="" property="" javaType="" />
    <!-- result标签也是用于将表中字段与实体类属性进行映射绑定 -->
    <result column="" jdbcType="" property="" javaType=""/>

    <!-- 一般情况下一对一使用<association>标签,一对多使用<collection>标签 -->
    <!-- association标签表示两张表或两个类的关联关系,property属性表示一个类
    引用另一个类时定义的属性,javaType属性表示被引用类的全限定路径。详见下面示例 -->
    <association property="" javaType="">
        <id column="" jdbcType="" property=""/>
        <result  column="" jdbcType="" property=""/>
    </association>

    <!-- collection标签表示一对多的关联关系,在一个类中引用另一个类,
    被引用的类通常放在List集合中,如 private List<Book> books,
    property属性表示被引用类定义的属性,如books,ofType属性表示被引用类的全限定类名。 -->
    <collection property="" ofType="">
        <id column="" jdbcType="" property="" />
        <result column="" jdbcType="" property="" />
    </collection>
</resultMap>
2.2.5、association和collection标签
一般情况下一对一使用<association>标签,一对多使用<collection>标签
下面是<association>标签的一些属性:
property:映射实体类属性名
column:映射数据表字段名
javaType:映射java类型
jdbcType:映射数据库类型
select:用于加载复杂类型属性的映射语句的ID(它会从column 属性指定的列中检索数据,作为参数传递给目标 select 语句。)
resultMap:不使用嵌套模式,而是将此关联的嵌套结果集映射到一个外部的标签中,然后通过 id 进行引入。
typeHandler:数据库与Java类型匹配处理器,使用这个属性可以覆写类型处理器。
notNullColumn:不为空的列,如果指定了列,只有指定字段不为空时,Mybatis才会创建对象。
columnPrefix:给关联的数据库中的 column 添加一个前缀(如果不添加前缀,当两个表同时有 id 字段,查询结果时一定会产生覆盖,使得两个 id 的值一样)
resultSet:用于加载复杂类型的结果集名字。
foreignColumn:指定外键对应的列名,指定的列将与父类型中 column 的给出的列进行匹配。
autoMapping:自动封装,如果数据库字段和javaBean的字段名一样,可以使用这种方式;(但是不建议采取,如果非要使用此功能,那就在全局配置中加上mapUnderscoreToCamelCase=TRUE,它会使经典数据库字段命名规则翻译成javaBean的经典命名规则,如:a_column翻译成aColumn。)
fetchType:延迟加载,lazy打开延迟加载,eager积极加载。指定属性后,将在映射中忽略全局配置参数lazyLoadingEnabled,使用属性的值。
2.2.5.1、<association>
下面分别是使用<association>标签进行关联查询和嵌套查询的示例。
1、首先定义两个实体类:Book和Publisher
/**
*书籍
*/
@Data
public class Book {
    private String id;
    private String name;
    private String author;
    private Double price;
    //出版社,一本书对应一个出版社
    private Publisher pub;
}


/**
*出版社
*/
@Data
public class Publisher {
    private String id;
    private String name;
    private String phone;
    private String address;
}
2、关联查询
<!--配置关联实体类-->
<resultMap id="bookResultMap" type="com.entity.Book">
    <!--主键属性-->
    <id property="id" column="id" jdbcType="VARCHAR"></id>
    <!--普通属性-->
    <result property="name" column="name" jdbcType="VARCHAR"></result>
    <result property="author" column="author" jdbcType="VARCHAR"></result>
    <result property="price" column="price" jdbcType="VARCHAR"></result>
<!--一对一映射-->
<!-- javaType="com.entity.Publisher"是在Book类中引用Publisher类的完全限定名,
property="pub"是在Book类中引用Publisher类时定义的属性名。-->
    <association property="pub" javaType="com.entity.Publisher">
        <id property="id" column="id" jdbcType="VARCHAR"></id>
        <result property="name" column="name" jdbcType="VARCHAR"></result>
        <result property="phone" column="phone" jdbcType="VARCHAR"></result>
        <result property="address" column="address" jdbcType="VARCHAR"></result>
    </association>
</resultMap>
<!--关联查询-->
<select id="selectAllBook" resultMap="bookResultMap">
    SELECT * FROM book e
    left JOIN publisher d ON e.publisher_id = d.id
</select>
3、嵌套查询
<resultMap id="bookResultMap" type="com.entity.Book">
    <!--主键属性-->
    <id property="id" column="id" jdbcType="VARCHAR"></id>
    <!--普通属性-->
    <result property="name" column="name" jdbcType="VARCHAR"></result>
    <result property="author" column="author" jdbcType="VARCHAR"></result>
<result property="price" column="price" jdbcType="VARCHAR"></result>
<!—association标签的column属性表示关联表的外键,property="pub"是在Book类中引用Publisher类时定义的属性名-->
    <association column="publisher_id" property="pub"
        javaType="com.entity.Publisher" select="selectPublisher"></association>
</resultMap>

<!--出版社映射Map-->
<resultMap id="publisherResultMap" type="com.entity.Publisher">
    <id property="id" column="id" jdbcType="VARCHAR"></id>
    <result property="name" column="name" jdbcType="VARCHAR"></result>
    <result property="phone" column="phone" jdbcType="VARCHAR"></result>
    <result property="address" column="address" jdbcType="VARCHAR"></result>
</resultMap>

<!--书籍查询-->
<select id="selectAllBook" resultMap="bookResultMap">
    select * from book
</select>

<!--嵌套查询-->
<select id="selectPublisher" resultMap="publisherResultMap">
    SELECT * FROM publisher d
    WHERE d.id = #{publisher_id}
</select>
2.2.5.2、<collection>
<collection>和<association>标签属性基本相同,就多了一个ofType属性。ofType表示映射集合的类型(指定一对多的集合里面元素的类型)。
下面分别是使用<collection>标签进行关联查询和嵌套查询的示例。
1、首先定义两个实体类:Book和Publisher
/**
*书籍
*/
@Data
public class Book {
    private String id;
    private String name;
    private String author;
    private Double price;
}

/**
*出版社
*/
@Data
public class Publisher {
    private String id;
    private String name;
    private String phone;
    private String address;
    // 书籍列表,一个出版社对应多本书
    List<Book> bookList;
}
2、关联查询
<resultMap id="publisherResultMap" type="com.entity.Publisher">
    <id property="id" column="id" jdbcType="VARCHAR"></id>
    <result property="name" column="name" jdbcType="VARCHAR"></result>
    <result property="phone" column="phone" jdbcType="VARCHAR"></result>
<result property="address" column="address" jdbcType="VARCHAR"></result>
<!-- property="bookList"是在Publisher类中引用Book类时定义的属性名,ofType="com.entity.Book"是被引用类的全限定名。 -->
    <collection property="bookList" ofType="com.entity.Book">
        <id property="id" column="id" jdbcType="VARCHAR"></id>
        <result property="name" column="name" jdbcType="VARCHAR"></result>
        <result property="author" column="author" jdbcType="VARCHAR"></result>
        <result property="price" column="price" jdbcType="VARCHAR"></result>
    </collection>
</resultMap>

<select id="selectAllPublisher" resultMap="publisherResultMap">
    SELECT * FROM publisher d
    left JOIN book e ON e.publisher_id = d.id
</select>
3、嵌套查询
<resultMap id="publisherResultMap" type="com.entity.Publisher">
    <id property="id" column="id" jdbcType="VARCHAR"></id>
    <result property="name" column="name" jdbcType="VARCHAR"></result>
    <result property="phone" column="phone" jdbcType="VARCHAR"></result>
    <result property="address" column="address" jdbcType="VARCHAR"></result>
    <collection column="id" property="bookList"
        javaType="java.util.ArrayList" ofType="com.entity.Book"
       select="selectBookList"/>
</resultMap>

<resultMap id="bookResultMap" type="com.worldly.config.entity.Employee">
    <id property="id" column="id" jdbcType="VARCHAR"></id>
    <result property="name" column="name" jdbcType="VARCHAR"></result>
    <result property="author" column="author" jdbcType="VARCHAR"></result>
    <result property="price" column="price" jdbcType="VARCHAR"></result>
</resultMap>

<select id="selectAllPublisher" resultMap="publisherResultMap">
    SELECT * FROM publisher d
</select>

<select id="selectBookList" resultMap="bookResultMap">
    SELECT * FROM book e
    WHERE e.publisher_id = #{id}
</select>
2.2.6、jdbcType与javaType对照表
| jdbcType | javaType | jdbcType | javaType |
| CHAR | String | DOUBLE | double |
| VARCHAR | String | BINARY | byte[] |
| LONGVARCHAR | String | VARBINARY | byte[] |
| NUMERIC | java.math.BigDecimal | LONGVARBINARY | byte[] |
| DECIMAL | java.math.BigDecimal | DATE | java.sql.Date |
| BIT | boolean | TIME | java.sql.Time |
| BOOLEAN | boolean | TIMESTAMP | java.sql.Timestamp |
| TINYINT | byte | CLOB | Clob |
| SMALLINT | short | BLOB | Blob |
| INTEGER | INTEGER | ARRAY | Array |
| BIGINT | long | DISTINCT | mapping of underlying type |
| REAL | float | STRUCT | Struct |
| FLOAT | double | REF | Ref |
| DATALINK | java.net.URL |
2.2.7、mybatis动态SQL
mybatis动态SQL是指使用<if>、<where>、<set>、<foreach>等标签拼接的SQL语句。
1、if标签语句示例:
if标签会执行所有的if标签,并进行条件判断,满足的部分进行sql拼接。
<select id="queryUser" parameterType="map" resultType="user">
	  select * from usr where 1=1
	  <if test="id != null" >
	      and id =#{id}
	  </if>
	  <if test="username != null" >
	      and username = #{username}
	  </if>
</select>
2、where标签语句示例:
动态拼接where(并且会智能的去掉第一个语句的and或者or)。
<!-- where 元素只会在至少有一个子元素的条件返回sql子句的情况下,才去插入"where" 子句-->
<select id="queryUser" parameterType="map" resultType="user">
	  select * from usr
		  <where>
			  <if test="id != null" >
			      id =#{id}
			  </if>
			  <if test="username != null" >
			      and username = #{username}
			  </if>
		  </where>
</select>
3、choose,when,otherwise标签语句示例:
不会执行所有的when语句,遇到满足的条件,后面的when语句不会执行,otherwise可以不写。
注意:每个 <choose> 标签内部的 <when> 和 <otherwise> 子元素都是互斥的,只会选择满足条件的第一个子元素。如果需要对多个字段进行选择处理,可以在 SQL 语句中多次使用 <choose> 标签,每个 <choose> 标签对应一个字段的选择逻辑。
<!-- 有时不想应用到所有的条件语句,而只想从中择其一项,针对这种情况,Mybatis提供了choose元素,它有点像java中的switch语句 -->
<select id="queryUser" parameterType="map" resultType="user">
	  select * from usr
	  <where>
	      <choose>
	          <when test="id != null" >
	              id =#{id}
	          </when>
	          <when test="username != null" >
	              and username = #{username}
	          </when>
	          <otherwise>
	              and id= 4
	          </otherwise>
	      </choose>
	  </where>
</select>
4、set 标签语句示例:
用于更新操作(并且会智能的去掉最后一个语句后面的逗号)。
<!-- 这里set元素会动态前置set关键字,同时也会删除掉无关的逗号,因为用了条件语句之后很可能就会生成的sql后面留下这些逗号 -->
<update id="updatePwd">
    update t_user
    <set>
        <if test="name !=null">name=#{name},</if>
        <if test="pwd !=null">pwd=#{pwd},</if>
    </set>
    <where>
        <choose>
            <when test="id!=null">id=#{id}</when>
            <when test="name!=null">name=#{name}</when>
        </choose>
    </where>
</update>
5、foreach 标签语句示例:
collection:表示迭代集合的名称,可以使用@Param注解指定,如下所示,该参数为必选。
item:表示本次迭代获取的元素,若collection为List、Set或者数组,则表示其中的元素; 若collection为map,则代表key-value的value,该参数为必选。
open:表示该语句以什么开始,最常用的是左括号’(’,注意:mybatis会将该字符拼接到整体的sql语句之前,并且只拼接一次,该参数为可选项。
close:表示该语句以什么结束,最常用的是右括号’)’,注意:mybatis会将该字符拼接到整体的sql语句之后,该参数为可选项。
separator:表示在每次迭代后给sql语句追加上separator属性指定的字符,该参数为可选项。
index:在list、Set和数组中,index表示当前迭代的位置,在map中,index代指是元素的key,该参数是可选项。
<!--
第一步:迭代集合,获取对应的item,和外部的(),拼接形成('zhangsan')
第二步:在之前的基础上拼接上逗号分隔符('zhangsan'),
第三步:继续迭代并拼接逗号 ('zhangsan'),('lisi'),
第四步:继续迭代并拼接逗号 ('zhangsan'),('lisi'),('wangwu')
 -->
<foreach collection="list" item="item" separator=",">
	(#{item})
</foreach>

<!--
第一步:拼接open指定的开始字符 (
第二步:迭代集合,拼接对应的item, ('zhangsan'
第三步:拼接separator指定的分隔符 ('zhangsan',
第四步:迭代集合,拼接对应的item, ('zhangsan','lisi'
第五步:拼接separator指定的分隔符('zhangsan','lisi',
第六步:拼接close指定的闭合字符  ('zhangsan','lisi','wangwu')
 -->
<foreach collection="list" item="item" open="(" separator="," close=")">
	#{item}
</foreach>
6、sql片段标签语句示例:
在mapper.xml中有些sql片段,在多个sql语句中都有用,每个都写的话显得代码冗余,可以用到代码片段,将公共部分抽取出来。
注意点:最好基于单表定义sql片段,并且sql片段中不要存在where标签,因为where标签会自动优化sql中的and和or。
<sql id="choose-when-id-name">
    <choose>
        <when test="id!=null">id=#{id}</when>
        <when test="name!=null">name=#{name}</when>
    </choose>
</sql>

<update id="updatePwd">
    update t_user
    <set>
        <if test="name !=null">name=#{name},</if>
        <if test="pwd !=null">pwd=#{pwd},</if>
    </set>
    <where>
       <include refid="choose-when-id-name"></include>
    </where>
</update>
7、trim标签语句示例:
trim标记是一个格式化的标记,可以完成set或者是where标记的功能。
①用 trim 改写上面的 if+where 语句
prefix:前缀
prefixoverride:去掉第一个and或者or。
<select id="selectUserByUsernameAndSex" resultType="user" parameterType="com.java01.entity.User">
    select * from user
    <!-- <where>
            <if test="username != null">
               username=#{username}
            </if>

            <if test="sex != null">
               and sex=#{sex}
            </if>
        </where>  -->
    <trim prefix="where" prefixOverrides="and | or">
        <if test="username != null">
            and username=#{username}
        </if>
        <if test="sex != null">
            and sex=#{sex}
        </if>
    </trim>
</select>
②用 trim 改写上面的 if+set 语句
suffix:后缀
suffixoverride:去掉最后一个逗号(也可以是其他的标记,就像是上面前缀中的and一样)。
<!-- 根据 id 更新 user 表的数据 -->
<update id="updateUserById" parameterType="com.ys.po.User">
    update user u
        <!-- <set>
                <if test="username != null and username != ''">
                    u.username = #{username},
                </if>
                <if test="sex != null and sex != ''">
                    u.sex = #{sex}
                </if>
            </set> -->
    <trim suffix="set" suffixOverrides=",">
        <if test="username != null and username != ''">
            u.username = #{username},
        </if>
        <if test="sex != null and sex != ''">
            u.sex = #{sex},
        </if>
    </trim>
    where id=#{id}
</update>
3、mybatis分页
mybatis分页可以减少数据的处理量,分页的方式有两种:limit分页、PageHelper分页插件。
1、limit分页方式
①编写xxMapper.java:
List<User> getUserByLimit(Map<String,Integer> data);②编写xxMapper.xml:
<select id="getUserByLimit" parameterType="map" resultType="user">
	select * from usr limit #{currIndex},#{pageSize}
</select>
③编写测试service层:
//接口
List<Usr> queryUserBySql(int currPage, int pageSize);

//实现类
public List<Student> queryUserBySql(int currPage, int pageSize) {
	Map<String, Object> data = new HashedMap();
    data.put("currIndex", (currPage-1)*pageSize);
    data.put("pageSize", pageSize);
    return xxMapper.getUserByLimit(data);
}
2、PageHelper分页插件
导入maven坐标(由于使用了sql 解析工具,所以maven也引入了 jsqlparser.jar)
<dependency>
	<groupId>com.github.pagehelper</groupId>
	<artifactId>pagehelper</artifactId>
	<version>4.0.0</version>
</dependency>

<!-- 配置mybatis-config.xml拦截器插件 -->
<plugins>
	<plugin interceptor="com.github.pagehelper.PageHelper">
		<property name="dialect" value="mysql"/>
	</plugin>
</plugins>
[注]配置拦截器时要知道新版拦截器是 com.github.pagehelper.PageInterceptor,而com.github.pagehelper.PageHelper 现在是一个特殊的 dialect 实现类,是分页插件的默认实现类,提供了和以前相同的用法。
设置数据库类型时有 Oracle,Mysql,MariaDB,SQLite,Hsqldb,PostgreSQL 六种数据库。
dialect默认情况下会使用 PageHelper 方式进行分页。
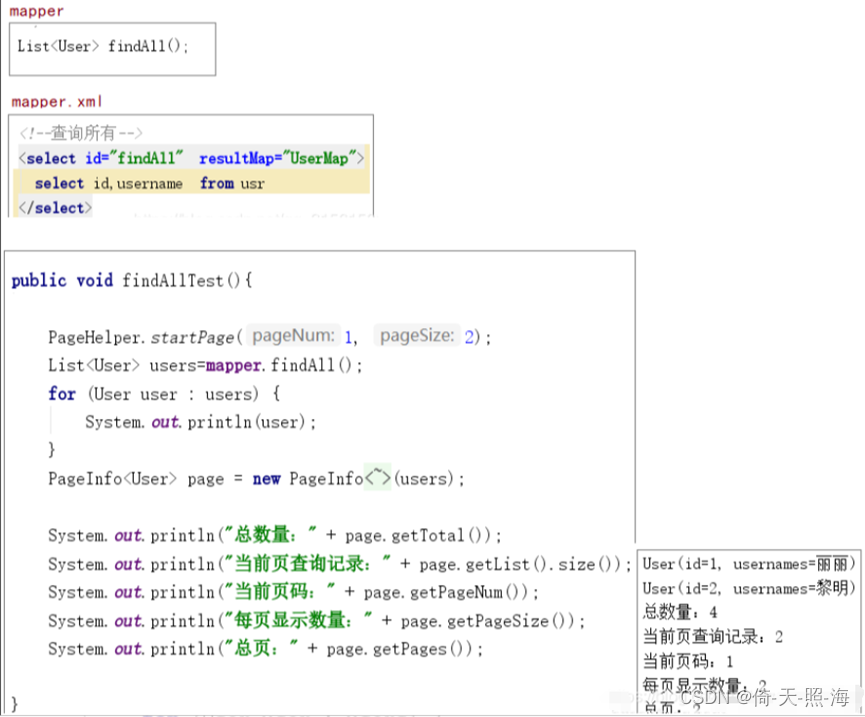
通过 MyBatis PageHelper 进行分页查询实际上非常简单,只需在service(或mapper)方法执行查询前,调用一次 PageHelper.startPage(pageNum,pageSize) 来设置分页查询参数即可,其中pageNum 为记录页数,pageSize 为单页记录数量。此时service(或mapper)方法的查询结果就是分页后的结果了。如果期望获得相关的分页信息,还可以将查询结果封装到PageInfo对象中,以获得总页数、总记录数、当前页数等相关分页信息。
/**
 * 分页查询
 * @param pageNum 记录页数
 * @param pageSize 单页记录数量
 * @return
 */
@ResponseBody
@RequestMapping("/findPage")
public List<User> findPage(@RequestParam int pageNum, @RequestParam int pageSize) {
    // 设置分页查询参数
    PageHelper.startPage(pageNum,pageSize);
    List<User> userList = userService.findAll();

    for(User user : userList) {
        System.out.println("element : " + user);
    }

    // 封装分页查询结果到 PageInfo 对象中以获取相关分页信息
    PageInfo pageInfo = new PageInfo(userList);
    System.out.println("总页数: " + pageInfo.getPages());
    System.out.println("总记录数: " + pageInfo.getTotal());
    System.out.println("当前页数: " + pageInfo.getPageNum());
    System.out.println("当前页面记录数量: " + pageInfo.getSize());

    return pageInfo.getList();
}
[注]
a.只有紧跟在PageHelper.startPage方法后的第一个Mybatis的查询(Select)方法会被分页。
b.对于带有for update的sql,会抛出运行时异常,对于这样的sql建议手动分页,毕竟这样的sql需要重视。
c.分页插件不支持嵌套结果映射,由于嵌套结果方式会导致结果集被折叠,因此分页查询的结果在折叠后总数会减少,所以无法保证分页结果数量正确。
PageHelper.startPage(pageNum,pageSize) 只对其后的第一次SQL查询进行分页。故若需进行分页查询,必须每次在service(或mapper)方法执行SQL查询前调用PageHelper.startPage(pageNum,pageSize) 方法。


 442
442


 被折叠的 条评论
为什么被折叠?
被折叠的 条评论
为什么被折叠?
 到【灌水乐园】发言


