


目录
一、springboot项目中配置application.yml文件。
准备工作
- ca证书一份(用来支持https,需要自行申请)
- 本地打包好的springboot项目jar包
- 阿里云服务器以及域名(暂在本地运行,有需要自行百度购买)
一、springboot项目中配置application.yml文件。
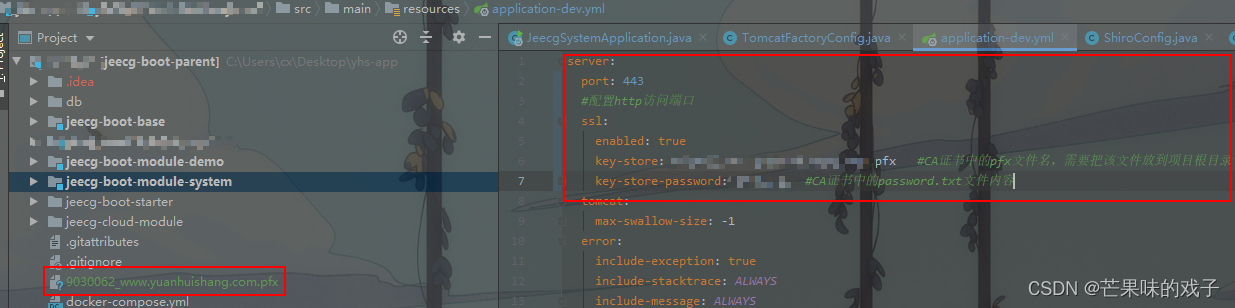
application.yml配置如下:
server:
  port: 443
  ssl:
    enabled: true
    key-store: *******.pfx    #CA证书中的pfx文件名,需要把该文件放到项目根目录
    key-store-password: *******    #CA证书中的password.txt文件内容
二、在springboot的application中配置。
application配置如下:
import lombok.extern.slf4j.Slf4j;
import org.jeecg.common.util.oConvertUtils;
import org.springframework.boot.SpringApplication;
import org.springframework.boot.autoconfigure.SpringBootApplication;
import org.springframework.boot.builder.SpringApplicationBuilder;
import org.springframework.boot.web.embedded.tomcat.TomcatServletWebServerFactory;
import org.springframework.boot.web.servlet.server.ServletWebServerFactory;
import org.springframework.boot.web.servlet.support.SpringBootServletInitializer;
import org.springframework.context.ConfigurableApplicationContext;
import org.springframework.context.annotation.Bean;
import org.springframework.core.env.Environment;
import org.apache.catalina.connector.Connector;
import java.net.InetAddress;
import java.net.UnknownHostException;

/**
* 单体启动类(采用此类启动为单体模式)
*/
@Slf4j
@SpringBootApplication
public class JeecgSystemApplication extends SpringBootServletInitializer {

    @Override
    protected SpringApplicationBuilder configure(SpringApplicationBuilder application) {
        return application.sources(JeecgSystemApplication.class);
    }


    // 配置http
    @Bean
    public ServletWebServerFactory servletContainer() {
        TomcatServletWebServerFactory tomcat = new TomcatServletWebServerFactory();
        tomcat.addAdditionalTomcatConnectors(createStandardConnector()); // 添加http
        return tomcat;
    }

    private Connector createStandardConnector() {
        Connector connector = new Connector("org.apache.coyote.http11.Http11NioProtocol");
        connector.setPort(8080);
        connector.setSecure(false);
        connector.setRedirectPort(443);
        return connector;
    }

}
三、我在运行后会报如下错误。
org.springframework.context.ApplicationContextException: Unable to start web server; nested exception is org.springframework.context.ApplicationContextException: Unable to start ServletWebServerApplicationContext due to multiple ServletWebServerFactory beans : tomcatServletWebServerFactory,webServerFactory
通过debug发现是以前写的方法与此方法冲突,导致系统不知道运行哪一个,找到并注释掉以前那个方法就能成功运行
解决方法:
代码搜索tomcat找到@Bean注解的那个TomcatServletWebServerFactory方法注释掉
四、成功运行
成功运行后网页输入https://本机ip:443/yhs/doc.html即可成功访问到我的springboot项目接口文档页面
总结
本文仅记录本人工作中遇到的难点与个人见解,如有问题请见谅。


 802
802


 被折叠的 条评论
为什么被折叠?
被折叠的 条评论
为什么被折叠?
 到【灌水乐园】发言


