


最近完成了一个新项目的开发, 期间一把辛酸泪,在此记录下一些常见的坑,供自己和以后踩坑的小伙伴参考!
一、toolbar 相关配置
1、配置toolbar的背景颜色和状态栏颜色
在style文件中新建主题进行配置,比如我的:
<style name="IMTheme" parent="Theme.AppCompat.Light.NoActionBar">
<!-- Customize your theme here. -->
<item name="colorPrimary">@color/colorPrimary</item>
<item name="colorPrimaryDark">@color/colorPrimaryDark</item>
<item name="colorAccent">@color/colorAccent</item>
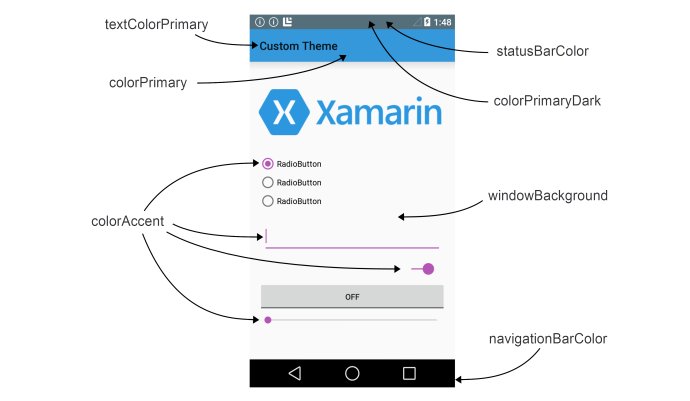
</style>当然,别忘了在Application或者需要的Activity节点上设置这个主题。
关于这些属性,找到了一张不错的图:
2、配置菜单属性
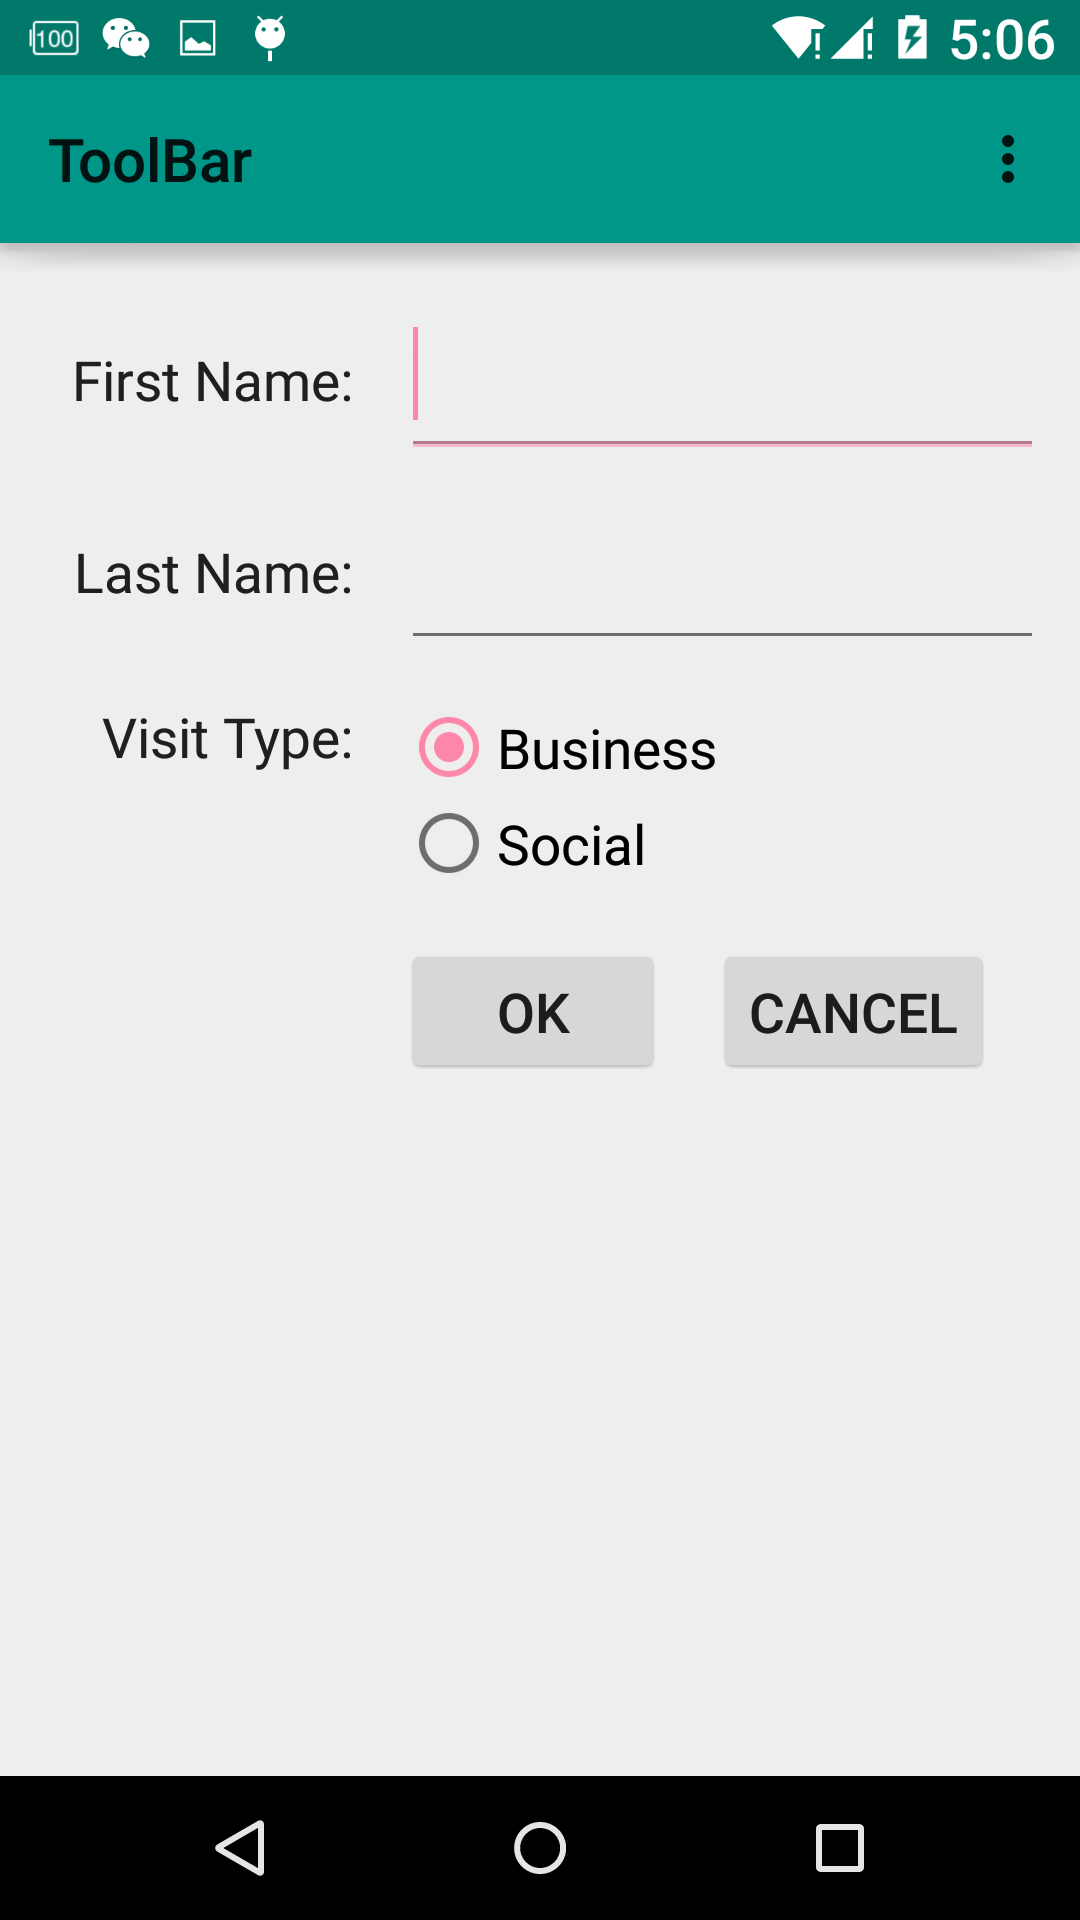
上图中,右上角菜单是黑色的,想将其设置为白色,方法同上:
<style name="ToolbarTheme" parent="@style/ThemeOverlay.AppCompat.ActionBar">
        <item name="actionMenuTextColor">@color/white</item> <!--  敲定颜色-->
        <item name="android:textSize">18sp</item> <!--  搞掂字体大小-->
        <!-- navigation icon color -->
        <item name="colorControlNormal">@color/white</item>
        <!-- color of the menu overflow icon -->
        <item name="android:textColorSecondary">@color/white</item>
    </style>
将主题配置到toolbar上:
app:theme="@style/ToolbarTheme"
3、配置弹出菜单属性
点击上图的右上角,会弹出菜单列表,列表的字体颜色和背景也是可以配置的,其关键在于继承这个主题:
    <style name="Base.Widget.AppCompat.ActionButton.Overflow" parent="RtlUnderlay.Widget.AppCompat.ActionButton.Overflow">
        <item name="android:src">@drawable/abc_ic_menu_moreoverflow_mtrl_alpha</item>
        <item name="android:background">?attr/actionBarItemBackground</item>
        <item name="android:contentDescription">@string/abc_action_menu_overflow_description</item>
        <item name="android:minWidth">@dimen/abc_action_button_min_width_overflow_material</item>
        <item name="android:minHeight">@dimen/abc_action_button_min_height_material</item>
    </style>
然后在toolbar上配置:
app:popupTheme="@style/YourStyle"
二、相册图片的路径
在4.4之后,打开相册,选择图片之后得到的并不是图片的真实路径,我想这一点几乎所有开发者都清楚,但是知道和解决是两码事。我踩的坑在于,该项目是一个混合开发的模式,打开相册,选择图片,得到路径这一系列操作都是用的cordova插件,然后前端直接就返回给我一个路径了。在调试阶段,我的5.1版本的手机,返回的也都是真实的图片路径,没有任何问题,当时心里还不由得赞了一下cordova,路径问题都已经处理好了。等到打了正式包,进行测试的时候悲剧了,我再一看,握草,怎么路径变了!!!至今我也不知道cordova返回的路径为什么变化了,但是,解决方案是很明显的,需要我们自己转化嘛,贴上StackOverflow上大神的代码:
/**
     * Get a file path from a Uri. This will get the the path for Storage Access
     * Framework Documents, as well as the _data field for the MediaStore and
     * other file-based ContentProviders.
     *
     * @param context The context.
     * @param uri The Uri to query.
     * @author paulburke
     */
    public static String getPath(final Context context, final Uri uri) {

        final boolean isKitKat = Build.VERSION.SDK_INT >= Build.VERSION_CODES.KITKAT;

        // DocumentProvider
        if (isKitKat && DocumentsContract.isDocumentUri(context, uri)) {
            // ExternalStorageProvider
            if (isExternalStorageDocument(uri)) {
                final String docId = DocumentsContract.getDocumentId(uri);
                final String[] split = docId.split(":");
                final String type = split[0];

                if ("primary".equalsIgnoreCase(type)) {
                    return Environment.getExternalStorageDirectory() + "/" + split[1];
                }

                // TODO handle non-primary volumes
            }
            // DownloadsProvider
            else if (isDownloadsDocument(uri)) {

                final String id = DocumentsContract.getDocumentId(uri);
                final Uri contentUri = ContentUris.withAppendedId(
                        Uri.parse("content://downloads/public_downloads"), Long.valueOf(id));

                return getDataColumn(context, contentUri, null, null);
            }
            // MediaProvider
            else if (isMediaDocument(uri)) {
                final String docId = DocumentsContract.getDocumentId(uri);
                final String[] split = docId.split(":");
                final String type = split[0];

                Uri contentUri = null;
                if ("image".equals(type)) {
                    contentUri = MediaStore.Images.Media.EXTERNAL_CONTENT_URI;
                } else if ("video".equals(type)) {
                    contentUri = MediaStore.Video.Media.EXTERNAL_CONTENT_URI;
                } else if ("audio".equals(type)) {
                    contentUri = MediaStore.Audio.Media.EXTERNAL_CONTENT_URI;
                }

                final String selection = "_id=?";
                final String[] selectionArgs = new String[] {
                        split[1]
                };

                return getDataColumn(context, contentUri, selection, selectionArgs);
            }
        }
        // MediaStore (and general)
        else if ("content".equalsIgnoreCase(uri.getScheme())) {

            // Return the remote address
            if (isGooglePhotosUri(uri))
                return uri.getLastPathSegment();

            return getDataColumn(context, uri, null, null);
        }
        // File
        else if ("file".equalsIgnoreCase(uri.getScheme())) {
            return uri.getPath();
        }

        return null;
    }

    /**
     * Get the value of the data column for this Uri. This is useful for
     * MediaStore Uris, and other file-based ContentProviders.
     *
     * @param context The context.
     * @param uri The Uri to query.
     * @param selection (Optional) Filter used in the query.
     * @param selectionArgs (Optional) Selection arguments used in the query.
     * @return The value of the _data column, which is typically a file path.
     */
    public static String getDataColumn(Context context, Uri uri, String selection,
                                       String[] selectionArgs) {

        Cursor cursor = null;
        final String column = "_data";
        final String[] projection = {
                column
        };

        try {
            cursor = context.getContentResolver().query(uri, projection, selection, selectionArgs,
                    null);
            if (cursor != null && cursor.moveToFirst()) {
                final int index = cursor.getColumnIndexOrThrow(column);
                return cursor.getString(index);
            }
        } finally {
            if (cursor != null)
                cursor.close();
        }
        return null;
    }


    /**
     * @param uri The Uri to check.
     * @return Whether the Uri authority is ExternalStorageProvider.
     */
    public static boolean isExternalStorageDocument(Uri uri) {
        return "com.android.externalstorage.documents".equals(uri.getAuthority());
    }

    /**
     * @param uri The Uri to check.
     * @return Whether the Uri authority is DownloadsProvider.
     */
    public static boolean isDownloadsDocument(Uri uri) {
        return "com.android.providers.downloads.documents".equals(uri.getAuthority());
    }

    /**
     * @param uri The Uri to check.
     * @return Whether the Uri authority is MediaProvider.
     */
    public static boolean isMediaDocument(Uri uri) {
        return "com.android.providers.media.documents".equals(uri.getAuthority());
    }

    /**
     * @param uri The Uri to check.
     * @return Whether the Uri authority is Google Photos.
     */
    public static boolean isGooglePhotosUri(Uri uri) {
        return "com.google.android.apps.photos.content".equals(uri.getAuthority());
    }
三、retrofit文件上传
选了图片,接下来肯定就是上传了。我的网络框架用的retrofit,网上也有许多大神讲解其用法。这里就直接讨论其文件上传的用法,首先来看我定义的方法:
 @Multipart
    @POST("call")
    Call<UploadFileInfo> upLoadPhoto(@PartMap Map<String, RequestBody> map,
                        @Part("files\"; filename=\"photo.JPEG")

    @POST("call")
    @Multipart
    Call<UploadFileInfo> upLoadFile(@PartMap Map<String, RequestBody> map
            , @Part MultipartBody.Part file);

    @POST("call")
    @Multipart
    Call<UploadFileInfo> upLoadFiles(@PartMap Map<String, RequestBody> partMap);
很明显,前两种是单文件上传,最后是多文件上传。
而第一种对文件进行了硬编码,显然是不可取的,那么科学的方式自然是后两种。直接上多文件的代码:
private void uploadFiles(List<String> listUrl) {
        Map<String, RequestBody> files = new HashMap<>();
        MediaType imageType = MediaType.parse("image/*");
        MediaType textType = MediaType.parse("text/plain");
        for (String url : listUrl) {
            File file = new File(url);
            RequestBody fileBody = RequestBody.create(imageType, file);
            String fileName = file.getName();
            files.put("files\"; filename=\"" + fileName,fileBody);
        }
        RequestBody textParam = RequestBody.create(textType,"textParam");
        files.put("textParam",textParam);
        Retrofit retrofit = AppClient.getRetrofit(Constants.BASE_URL_YIWEN);
        ApiStores apiStores = retrofit.create(ApiStores.class);
        Call<UploadFileInfo> call = apiStores.upLoadFiles(files);
        call.enqueue(new Callback<UploadFileInfo>() {
            @Override
            public void onResponse(Call<UploadFileInfo> call, Response<UploadFileInfo> response) {

            }

            @Override
            public void onFailure(Call<UploadFileInfo> call, Throwable t) {

            }
        });
    }
四、图片压缩
上传的网络请求本身没有问题了,但是有时会出现图片过大导致上传失败的现象,于是,图片压缩就必不可少了。这里推荐写得挺好的文章:
Android图片压缩(质量压缩和尺寸压缩)
android图片压缩总结
我用到了其中2个方法:
public static Bitmap compressImageFromFile(String srcPath){
        BitmapFactory.Options newOpts = new BitmapFactory.Options();
        newOpts.inJustDecodeBounds = true;//只读边,不读内容
        Bitmap bitmap = BitmapFactory.decodeFile(srcPath, newOpts);

        newOpts.inJustDecodeBounds = false;
        int w = newOpts.outWidth;
        int h = newOpts.outHeight;
        float hh = 800f;//
        float ww = 480f;//
        int be = 1;
        if (w > h && w > ww) {
            be = (int) (newOpts.outWidth / ww);
        } else if (w < h && h > hh) {
            be = (int) (newOpts.outHeight / hh);
        }
        if (be <= 0)
            be = 1;
        newOpts.inSampleSize = be;//设置采样率

        newOpts.inPreferredConfig = Bitmap.Config.ARGB_8888;//该模式是默认的,可不设
        newOpts.inPurgeable = true;// 同时设置才会有效
        newOpts.inInputShareable = true;//。当系统内存不够时候图片自动被回收

        bitmap = BitmapFactory.decodeFile(srcPath, newOpts);
//      return compressBmpFromBmp(bitmap);//原来的方法调用了这个方法企图进行二次压缩
        //其实是无效的,大家尽管尝试
        return bitmap;
    }
    /**
     * Compress by quality,  and generate image to the path specified
     *
     * @param image
     * @param outPath
     * @param maxSize target will be compressed to be smaller than this size.(kb)
     * @throws IOException
     */
    public static void compressAndGenImage(Bitmap image, String outPath, int maxSize) throws IOException {
        ByteArrayOutputStream os = new ByteArrayOutputStream();
        // scale
        int options = 100;
        // Store the bitmap into output stream(no compress)
        image.compress(Bitmap.CompressFormat.JPEG, options, os);
        // Compress by loop
        while ( os.toByteArray().length / 1024 > maxSize) {
            // Clean up os
            os.reset();
            // interval 10
            options -= 10;
            image.compress(Bitmap.CompressFormat.JPEG, options, os);
        }

        // Generate compressed image file
        FileOutputStream fos = new FileOutputStream(outPath);
        fos.write(os.toByteArray());
        fos.flush();
        fos.close();
}最近有发现了一个可能是最接近微信朋友圈的图片压缩算法
五、打包
build.gradle脚本配置好了签名文件,也切换到了release模式,打出来的包还可能不能覆盖老版本的包吗?
在此之前,我觉得不会吧??!!
不过,这次遇见了,其实原因也简单,但是在不知道之前,这个坑却难填。首先,我拿到的源码里面build.gradle中targetSdkVersion是22,那么我就理所当然的就认为上个版本也是,也就这样打包了。经过几番折腾才发现,上个版本的包targetSdkVersion居然是23,这也就难怪了!
这里就推荐一个查看apk基本信息的命令,避免遇到此类坑:
aapt dump badging <file_path.apk>
效果如下:
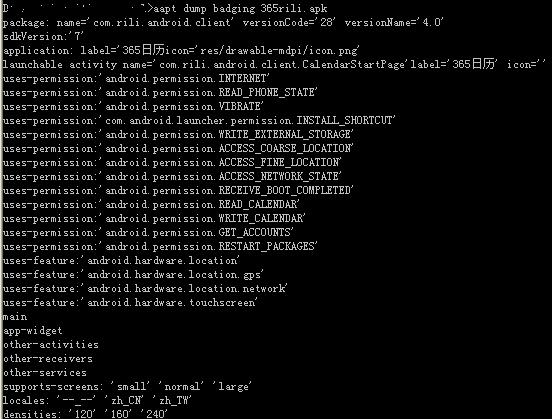
注意使用此命令需要配置环境变量,或者cd 至Android SDK的build-tools目录下进行。
关于此命令更详细的讲解
打包提速
至此,总结就差不多了,通过这段时间的项目开发,认识到了自己某些方面的不足,也见识到了隔壁部门大牛的更加科学、全面的分析和解决问题的方法。
任重道远,风雨兼程!


 726
726

 被折叠的 条评论
为什么被折叠?
被折叠的 条评论
为什么被折叠?
 到【灌水乐园】发言


