


 这是一篇关于Vue.js快速入门的笔记,涵盖了Vue的基础概念、特点、优缺点,以及如何创建第一个Vue程序。文章通过实例详细讲解了内容绑定、事件绑定、显示切换、属性绑定等,还涉及到了Vue网络应用,如使用axios处理HTTP请求。此外,文中还介绍了Vue的综合应用,包括音乐播放器的实现,以及UNI-APP的介绍和基础知识,帮助读者深入理解Vue和跨平台开发。
【Vue】黑马vue快速入门笔记
简介
Vue (读音 /vjuː/,类似于 view) 是一套用于构建[用户界面]的渐进式[JavaScript]框架。与其它大型框架不同的是,Vue 被设计为可以自底向上逐层应用。Vue 的核心库只关注视图层,不仅易于上手,还便于与第三方库或既有项目整合。另一方面,当与现代化的工具链以及各种支持[类库]结合使用时,Vue 也完全能够为复杂的单页应用([SPA])提供驱动。
单页Web应用(single page web application,SPA),就是只有一张Web页面的应用,是加载单个HTML 页面并在用户与应用程序交互时动态更新该页面的Web应用程序。
1. JavaScript框架
2. 简化Dom操作
3. 响应式数据驱动
Vue的特点和优势
vue两大特点:响应式编程、组件化。
vue的优势
轻量级框架、简单易学、双向数据绑定、组件化、数据和结构的分离、虚拟DOM、运行速度快。
vue是单页面应用,使页面局部刷新,不用每次跳转页面都要请求所有数据和dom,这样大大加快了访问速度和提升用户体验。而且他的第三方ui库很多节省开发时间。
轻量级框架
只关注视图层,是一个构建数据的视图集合,大小只有几十kb
Vue.js通过简洁的API提供高效的数据绑定和灵活的组件系统

简单易学
国人开发,中文文档,不存在语言障碍,易于理解和学习

双向数据绑定
也就是所谓的响应式数据绑定。这里的响应式不是@media 媒体查询中的响应式布局,而是指vue.js会自动对页面中某些数据的变化做出同步的响应。
也就是说,vue.js会自动响应数据的变化情况,并且根据用户在代码中预先写好的绑定关系,对所有绑定在一起的数据和视图内容都进行修改。而这种绑定关系,就是以input 标签的v-model属性来声明的,因此你在别的地方可能也会看到有人粗略的称vue.js为声明式渲染的模版引擎。
这也就是vue.js最大的优点,通过MVVM思想实现数据的双向绑定,让开发者不用再操作dom对象,有更多的时间去思考业务逻辑。

组件化
在前端应用,我们是否也可以像编程一样把模块封装呢?这就引入了组件化开发的思想。
Vue.js通过组件,把一个单页应用中的各种模块拆分到一个一个单独的组件(component)中,我们只要先在父级应用中写好各种组件标签(占坑),并且在组件标签中写好要传入组件的参数(就像给函数传入参数一样,这个参数叫做组件的属性),然后再分别写好各种组件的实现(填坑),然后整个应用就算做完了。

视图,数据,结构分离
使数据的更改更为简单,不需要进行逻辑代码的修改,只需要操作数据就能完成相关操作

虚拟DOM
现在的网速越来越快了,很多人家里都是几十甚至上百M的光纤,手机也是4G起步了,按道理一个网页才几百K,而且浏览器本身还会缓存很多资源文件,那么几十M的光纤为什么打开一个之前已经打开过,已经有缓存的页面还是感觉很慢呢?这就是因为浏览器本身处理DOM也是有性能瓶颈的,尤其是在传统开发中,用JQuery或者原生的JavaScript DOM操作函数对DOM进行频繁操作的时候,浏览器要不停的渲染新的DOM树,导致页面看起来非常卡顿。
而Virtual DOM则是虚拟DOM的英文,简单来说,他就是一种可以预先通过JavaScript进行各种计算,把最终的DOM操作计算出来并优化,由于这个DOM操作属于预处理操作,并没有真实的操作DOM,所以叫做虚拟DOM。最后在计算完毕才真正将DOM操作提交,将DOM操作变化反映到DOM树上。

运行速度更快
像比较与react而言,同样都是操作虚拟dom,就性能而言,vue存在很大的优势
vue的缺点
1、Vue 不缺入门教程,可是很缺乏高阶教程与文档。同样的还有书籍。
2、VUE不支持IE8
3、生态环境差不如angular和react
Anglar:现代 Web 开发平台
React:用于构建用户界面的 JavaScript 库
4、社区不大
第一个Vue程序
-
导入开发版本的Vue.js
创建一个
.html文件,然后通过如下方式引入 Vue:<!-- 开发环境版本,包含了有帮助的命令行警告 --> <script src="https://cdn.jsdelivr.net/npm/vue/dist/vue.js"></script> -
创建Vue实例对象,设置el属性和data属性
- el :挂载点
【Vue实例的作用范围】
Vue会管理el选项命中的元素及其内部的后代元素
【是否可以使用其他的选择器】
可以使用其他的选择器,但是建议使用ID选择器
【是否可以设置其他的dom元素】
可以使用其他的双标签,不能使用HTML和BODY
-
data :数据对象
Vue实例需要使用的数据都存在data中
data中可以写复杂类型的数据
渲染复杂类型的数据时,遵守js的语法即可
-
methods : 方法
-
使用简洁的模板语法把数据渲染到页面上
<!DOCTYPE html>
<html lang="en">
<head>
<meta charset="UTF-8">
<meta name="viewport" content="width=device-width,initial-scale=1.0">
<meta http-equiv="X-UA-Compatible" content="ie=edge">
<title>Vue测试001</title>
</head>
<body>
{{ message }}
<div id="app" class="app">
{{ message }} <!-- "{" 插值表达式-->
<span> {{ message }} </span>
<h2> {{ school.name }} {{ school.mobile }} </h2>
<ul>
<li>{{ campus[0] }}</li>
<li>{{ campus[1] }}</li>
</ul>
</div>
<!-- 开发环境版本,包含了有帮助的命令行警告 -->
<script src="https://cdn.jsdelivr.net/npm/vue@2.6.14/dist/vue.js"></script>
<script>
var app = new Vue({
// el:"#app", //在css选择器中“#”是id选择器
//【实际开发使用,避免语义不清晰,只能支持双标签】
//不要把vue挂载到<body>/<HTML>上,挂载在其他的标签上如:div
// el:".app", //在css选择器中"."是class选择器
el:"div", //在css选择器中标签选择器
data:{
message:"Hello!", //基本类型字符串message
school:{ //对象,取对象用"."
name:"CYQAQ",
mobile:"55555"
},
campus:["北京","上海","广州","深圳"] //数组,取数组中元素用索引
}
})
</script>
</body>
</html>
Vue本地应用
- 通过Vue实现常见的网页效果
- 学习Vue指令,以案例巩固知识点
- Vue指令指的是以**v-**开头的一组特殊语法
1.内容绑定,事件绑定
v-text
设置标签/元素的文本值(textContent)
-
默认写法会替换全部内容,使用差值表达式 {{}} 可以替换指定内容
-
内部支持写表达式
<!DOCTYPE html> <html lang="en"> <head> <meta charset="UTF-8"> <meta name="viewport" content="width=device-width,initial-scale=1.0"> <meta http-equiv="X-UA-Compatible" content="ie=edge"> <title>Vue测试002</title> </head> <body> <div id="app"> <h2 v-text="message+'!'">深圳</h2> <!--注意字符串拼接时 “ ’ 的使用--> <h2 v-text="info+'!'">深圳</h2> <!--vue指令不会显示深圳--> <h2>深圳{{ message + "!"}}</h2> <!--若要部分替换,使用{{}}--> <h2 v-text="content"></h2> <!--v-text不会解析html--> </div> <!-- 开发环境版本,包含了有帮助的命令行警告 --> <script src="https://cdn.jsdelivr.net/npm/vue@2.6.14/dist/vue.js"></script> <script> var app = new Vue({ el:"#app", data:{ message:"CYQAQ", info:"dididi", content:"<a href='#'>CYQAQ</a>" } }) </script> </body> </html>
v-html
设置标签/元素的innerHTML
-
内容中有html结构会被解析为标签
-
v-text指令无论内容是什么,只会解析为文本
-
解析文本使用v-text,需要解析html结构使用v-html
<!DOCTYPE html> <html lang="en"> <head> <meta charset="UTF-8"> <meta name="viewport" content="width=device-width,initial-scale=1.0"> <meta http-equiv="X-UA-Compatible" content="ie=edge"> <title>Vue测试003</title> </head> <body> <div id="app"> <p v-html="content"></p> <!--v-html会解析html--> </div> <!-- 开发环境版本,包含了有帮助的命令行警告 --> <script src="https://cdn.jsdelivr.net/npm/vue@2.6.14/dist/vue.js"></script> <script> var app = new Vue({ el:"#app", data:{ //content:"CYQAQ" content:"<a href='https://cn.vuejs.org/v2/guide/'>Vue.js</a>" } }) </script> </body> </html>
v-on基础
为元素绑定事件
-
事件名不需要写on
-
指令可以简写为@
-
绑定的方法定义在methods属性中
-
方法内部通过this关键字可以访问定义在data中数据
<!DOCTYPE html> <html lang="en"> <head> <meta charset="UTF-8"> <meta name="viewport" content="width=device-width,initial-scale=1.0"> <meta http-equiv="X-UA-Compatible" content="ie=edge"> <title>Vue测试003</title> </head> <body> <div id="app"> <!--<input type="button" value="事件绑定" v-on:事件名="方法">--> <input type="button" value="事件绑定" v-on:click="doIt"><!--点击事件--> <input type="button" value="事件绑定" v-on:monseenter="doIt"><!--鼠标移入事件--> <input type="button" value="事件绑定" v-on:dblclick="doIt"><!--双击事件--> <input type="button" value="事件绑定" @dblclick="doIt"> <h2 @click="changeFood">{{ food }}</h2> </div> <!-- 开发环境版本,包含了有帮助的命令行警告 --> <script src="https://cdn.jsdelivr.net/npm/vue@2.6.14/dist/vue.js"></script> <script> var app = new Vue({ el:"#app", data:{ food:"炒蛋" }, methods:{ doIt:function(){//逻辑 alert("做IT"); }, changeFood:function(){ //console.log(this.food); 方法中拿到数据需要用this this.food+="好吃!" } }, }) </script> </body> </html>
计数器应用:
<!DOCTYPE html>
<html lang="en">
<head>
<meta charset="UTF-8">
<meta name="viewport" content="width=device-width,initial-scale=1.0">
<meta http-equiv="X-UA-Compatible" content="ie=edge">
<title>Vue_Counter</title>
<link rel="stylesheet" href="index.css"/>
</head>
<body>
<div id="app" >
<div class="input-num">
<button @click="sub">
-
</button>
<span>{{ num }}</span>
<button @click="add">
+
</button>
</div>
</div>
<!-- 开发环境版本,包含了有帮助的命令行警告 -->
<script src="https://cdn.jsdelivr.net/npm/vue@2.6.14/dist/vue.js"></script>
<script>
var app = new Vue({
el:"#app",
data:{
num:1
},
methods:{
add:function(){
// console.log('add')
if(this.num < 10){
this.num++;
} else {
alert('别点了xd!没了!');
}
},
sub:function(){
// console.log('sub')
if(this.num > 0){
this.num--;
} else {
alert('别点了xd!没了!');
}
}
}
})
</script>
</body>
</html>
[外链图片转存失败,源站可能有防盗链机制,建议将图片保存下来直接上传(img-KLU6EY3H-1640933793544)(F:\Qianduanjichu\notes\counter.png)]
2.显示切换,属性绑定
v-show
根据表达式的真假,切换元素的显示和隐藏(广告/遮罩层)
-
本质是修改元素的display,实现显示隐藏
-
指令后面的内容,最终都会解析为布尔值
-
值为true元素显示,值为false元素隐藏
<!DOCTYPE html> <html lang="en"> <head> <meta charset="UTF-8"> <meta name="viewport" content="width=device-width,initial-scale=1.0"> <meta http-equiv="X-UA-Compatible" content="ie=edge"> <title>Vue_v-show</title> </head> <body> <div id="app"> <input type="button" value="切换显示状态" @click="changeIsShow"><br/> <!--<img src="monkey.gif" v-show="true">--> <img src="monkey.gif" v-show="isShow" alt=""> <input type="button" value="age" @click="addAge"><br/> <img src="monkey.gif" v-show="age >= 18"> </div> <!-- 开发环境版本,包含了有帮助的命令行警告 --> <script src="https://cdn.jsdelivr.net/npm/vue@2.6.14/dist/vue.js"></script> <script> var app = new Vue({ el:"#app", data:{ isShow:false, age:15 }, methods:{ changeIsShow:function(){ this.isShow = !this.isShow; }, addAge:function(){ this.age++; } } }) </script> </body> </html>
v-if
根据表达式的真假,切换元素的显示和隐藏(本质操纵dom元素)
-
操纵dom树对性能消耗较大,频繁切换的元素用v-show,反之用v-if
-
当表达式值为true,元素存在于dom树中,为false,从dom树中移除
<!DOCTYPE html> <html lang="en"> <head> <meta charset="UTF-8"> <meta name="viewport" content="width=device-width,initial-scale=1.0"> <meta http-equiv="X-UA-Compatible" content="ie=edge"> <title>Vue_v-if</title> </head> <body> <div id="app"> <!-- <p v-if="true">我是p标签</p>--> <input type="button" value="切换显示状态" @click="toggleIsShow" alt=""> <p v-if="isShow">啊哈</p> <p v-show="isShow">RUA!</p> <h2 v-if="temperature >= 35">热死!!!</h2> </div> <!-- 开发环境版本,包含了有帮助的命令行警告 --> <script src="https://cdn.jsdelivr.net/npm/vue@2.6.14/dist/vue.js"></script> <script> var app = new Vue({ el:"#app", data:{ isShow:false, temperature:40 }, methods:{ toggleIsShow:function(){ this.isShow = !this.isShow; } } }) </script> </body> </html>
v-bind
**为元素绑定属性 ** (比如:src,title,class)
-
完整的写法是v-bind :属性名=表达式
-
简写可以省略v-bind,只保留 :属性名
-
需要动态的增删class建议使用对象的方式
<!DOCTYPE html> <html lang="en"> <head> <meta charset="UTF-8"> <meta name="viewport" content="width=device-width,initial-scale=1.0"> <meta http-equiv="X-UA-Compatible" content="ie=edge"> <title>Vue_v-bind</title> <style> .active{ border: 1px solid red; } </style> </head> <body> <div id="app"> <!-- <img src="monkey.gif">--> <img v-bind:src="imgSrc" alt=""> <br> <!--下种方式更为常用--> <img :src="imgSrc" alt="" :title="imgTitle+'!!!'" :class="isActive?'active':''" @click="toggleActive"> <br> <!--两种方式: 三元表达式:<img v-bind:class="isActive?'active':''"> 对象形式:<img v-bind:class="{active:isActive}">--> </div> <!-- 开发环境版本,包含了有帮助的命令行警告 --> <script src="https://cdn.jsdelivr.net/npm/vue@2.6.14/dist/vue.js"></script> <script> var app = new Vue({ el:"#app", data:{ imgSrc:"monkey.gif", imgTitle:"程序猿", isActive:false }, methods:{ toggleActive:function(){ this.isActive = !this.isActive; } } }) </script> </body> </html>
图片切换案例:
- 列表数据使用数组保存
- v-bind指令可以设置元素属性,比如src
- v-show和v-if都可以切换元素的显示状态,频繁切换用v-show
<!DOCTYPE html>
<html lang="en">
<head>
<meta charset="UTF-8">
<meta name="viewport" content="width=device-width,initial-scale=1.0">
<meta http-equiv="X-UA-Compatible" content="ie=edge">
<title>Vue_图片切换</title>
<link rel="stylesheet" href="index.css">
</head>
<body>
<div id="mask">
<div class="center">
<h2 class="title">
<img src="logo.png" alt="">这是广告
</h2>
<!--图片-->
<img :src="imgArr[index]" alt="" />
<!--左箭头-->
<a href="javascript:void(0)" v-show="index != 0" @click="prev" class="left">
<img src="prev.png" alt="" />
</a>
<!--右箭头-->
<a href="javascript:void(0)" v-show="index < imgArr.length - 1" @click="next" class="right">
<img src="next.png" alt="" />
</a>
</div>
</div>
<!-- 开发环境版本,包含了有帮助的命令行警告 -->
<script src="https://cdn.jsdelivr.net/npm/vue@2.6.14/dist/vue.js"></script>
<script>
var app = new Vue({
el:"#mask",
data:{
imgArr:[
"00.jpg",
"01.jpg",
"02.jpg",
"03.jpg",
"04.jpg",
"05.jpg",
"06.jpg",
"07.jpg",
"08.jpg",
"09.jpg",
"10.jpg",
],
index:0
},
methods:{
prev:function(){
this.index--;
},
next:function(){
this.index++;
}
}
})
</script>
</body>
</html>
3.列表循环,表单元素绑定
v-for
根据数据生成列表结构
-
数组经常和v-for结合使用
-
语法是**(item,index) in 数据** //item代表每一项,index代表索引
-
item和index可以结合其他指令一起使用
-
数组长度的更新会同步到页面上,是响应式的
<!DOCTYPE html> <html lang="en"> <head> <meta charset="UTF-8"> <meta name="viewport" content="width=device-width,initial-scale=1.0"> <meta http-equiv="X-UA-Compatible" content="ie=edge"> <title>Vue_v-for</title> </head> <body> <div id="app"> <input type="button" value="添加数据" @click="add"> <input type="button" value="移除数据" @click="remove"> <ul> <li v-for="(item,index) in arr" :title="item"> 序号: {{ index }} {{ item }} </li> <li v-for="(item,index) in objArr"> {{ item.name }} </li> </ul> <h2 v-for="item in vegetables" v-bind:title="item.name"> {{ item.name }} </h2> </div> <!-- 开发环境版本,包含了有帮助的命令行警告 --> <script src="https://cdn.jsdelivr.net/npm/vue@2.6.14/dist/vue.js"></script> <script> var app = new Vue({ el:"#app", data:{ arr:["北京","上海","广州","深圳"], objArr:[ { name:"jack" }, { name:"rose" } ], vegetables:[ {name:"西兰花炒蛋"}, {name:"蛋炒西兰花"} ] }, methods:{ add:function(){ this.vegetables.push({name:"花菜炒蛋"}) }, remove:function(){ this.vegetables.shift(); //shift() 方法用于把数组的第一个元素从其中删除,并返回第一个元素的值。 } } }) </script> </body> </html>
v-on补充
传递自定义参数,事件修饰符
-
事件绑定的方法写成函数调用的形式,可以传入自定义参数
-
定义方法时需要定义形参来接收传入的实参
-
事件的后面跟上 . 修饰符 可以对事件进行限制
-
.enter 可以限制触发的按键为回车
-
事件修饰符有很多种:
.stop- 调用event.stopPropagation()。.prevent- 调用event.preventDefault()。.capture- 添加事件侦听器时使用 capture 模式。.self- 只当事件是从侦听器绑定的元素本身触发时才触发回调。.{keyCode | keyAlias}- 只当事件是从特定键触发时才触发回调。.native- 监听组件根元素的原生事件。.once- 只触发一次回调。.left- (2.2.0) 只当点击鼠标左键时触发。.right- (2.2.0) 只当点击鼠标右键时触发。.middle- (2.2.0) 只当点击鼠标中键时触发。.passive- (2.3.0) 以{ passive: true }模式添加侦听器
-
<!DOCTYPE html> <html lang="en"> <head> <meta charset="UTF-8"> <meta name="viewport" content="width=device-width,initial-scale=1.0"> <meta http-equiv="X-UA-Compatible" content="ie=edge"> <title>Vue_v-for</title> </head> <body> <div id="app"> <input type="button" value="点点我" @click="doIt(666,'Lao')"> <input type="text" @keyup.enter="sayHi"> </div> <!-- 开发环境版本,包含了有帮助的命令行警告 --> <script src="https://cdn.jsdelivr.net/npm/vue@2.6.14/dist/vue.js"></script> <script> var app = new Vue({ el:"#app", methods:{ doIt:function(p1,p2){ console.log("做it"); console.log(p1); console.log(p2); }, sayHi:function(){ alert("EAT"); } } }) </script> </body> </html>
v-model
设置表单元素的值(双向数据绑定) 【动态】
-
v-model指令的作用是便捷的设置和获取表单元素的值
-
绑定的数据会和表单元素值相关联
-
绑定的数据⬅➡表单元素的值【双向绑定】
<!DOCTYPE html> <html lang="en"> <head> <meta charset="UTF-8"> <meta name="viewport" content="width=device-width,initial-scale=1.0"> <meta http-equiv="X-UA-Compatible" content="ie=edge"> <title>Vue_v-for</title> </head> <body> <div id="app"> <input type="button" value="修改message" @click="setM"> <input type="text" v-model="message" @keyup.enter="getM"> <h2>{{ message }}</h2> </div> <!-- 开发环境版本,包含了有帮助的命令行警告 --> <script src="https://cdn.jsdelivr.net/npm/vue@2.6.14/dist/vue.js"></script> <script> var app = new Vue({ el:"#app", data:{ message:"妙哇" }, methods:{ getM:function(){ alert(this.message); }, setM:function(){ this.message = "酷哇"; } } }) </script> </body> </html>
记事本案例:
-
新增
- 生成列表结构(v-for 数组)
- 获取用户输入(v-model 双向数据绑定 可以快速的设置和获取表单元素的值)
- 回车,新增数据(事件绑定 v-on同时可以传递自定义的参数 回车限制 .enter 添加数据)
- 通过审查元素快速定位
-
删除
-
点击删除指定内容(v-on:事件绑定 splice:数组删除指令的方法 index:索引)
-
数据改变和数据绑定的元素同步改变
-
事件的自定义参数
-
splice() 方法向/从数组中添加/删除项目,然后返回被删除的项目。
【根据索引删除对应的元素,会直接对数组进行修改。】
arrayObject.splice(index,howmany,item1,.....,itemX) index 必需。整数,规定添加/删除项目的位置,使用负数可从数组结尾处规定位置。 howmany 必需。要删除的项目数量。如果设置为 0,则不会删除项目。 item1, ..., itemX 可选。向数组添加的新项目。
-
-
统计
- 统计信息个数(本质就是数组的长度 v-text length)
- 基于数据的开发方式
- v-text指令的作用:设置文本
-
清空
- 点击清除所有信息(v-on 清空数组)
- 基于数据的开发方式,页面是数据的展示,清空列表直接清空数组,给数组赋空。
-
隐藏
-
没有数据时,隐藏元素(v-show v-if 数组非空)
<!DOCTYPE html> <html lang="en"> <head> <title>Vue_notepad</title> <meta http-equiv="content-type" content="text/html; charset=UTF-8"/> <meta name="robots" content="noindex,nofollow"/> <meta name="googlebot" content="noindex,nofollow"/> <meta name="viewport" content="width=device-width,initial-scale=1"/> <link rel="stylesheet" type="text/css" href="index.css"/> </head> <body> <!--主体区域--> <section id="todoapp"> <!--输入框--> <header class="header"> <h1>记事本</h1> <input v-model="inputValue" @keyup.enter="add" autofocus="autofocus" autocomplete="off" placeholder="请输入任务" class="new-todo"/> </header> <!--列表区域--> <section class="main"> <ul class="todo-list"> <li class="todo" v-for="(item,index) in list"> <div class="view"> <span class="index">{{ index+1 }}.</span> <label>{{ item }}</label> <button class="destroy" @click="remove(index)"></button> </div> </li> </ul> </section> <!--统计和清空--> <footer class="footer" v-show="list.length!=0"> <span class="todo-count" v-if="list.length!=0"> <strong>{{ list.length }}</strong> items left </span> <button class="clear-completed" @click="clear" v-show="list.length!=0"> Clear </button> </footer> </section> <footer class="info"> <p> <a href="https://www.baidu.com/"><img src="black.png" alt="" ></a> </p> </footer> <!-- 开发环境版本,包含了有帮助的命令行警告 --> <script src="https://cdn.jsdelivr.net/npm/vue@2.6.14/dist/vue.js"></script> <script> var app = new Vue({ el:"#todoapp", data:{ list:["IT","EAT","SLEEP"], inputValue:"GOOD GOOD STUDY,DAY DAY UP" }, methods:{ add:function(){ this.list.push(this.inputValue); }, remove:function(index){ console.log("删除"); console.log(index); this.list.splice(index,1); }, clear:function(){ this.list = []; } } }) </script> </body> </html>
-
Vue网络应用
vue结合网络数据开发应用
axios
Axios是一个基于promise的可用在浏览器和node.js中的异步通信框架;【网络请求库】
主要作用是实现AJAX异步通信。
(Axios 是一个基于Promise 用于浏览器和 nodejs 的 HTTP 客户端。简单的理解就是ajax的封装)
因为vue的边界很明确,就是为了处理DOM,所以并不具备通信功能,此时就需要额外使用axios通信框架与服务器交互。
它本身具有以下特征:
- 从浏览器中创建 XMLHttpRequest
- 从 node.js 发出 http 请求
- 支持 Promise API
- 拦截请求和响应
- 转换请求和响应数据
- 取消请求
- 自动转换JSON数据
- 客户端支持防止 CSRF/XSRF
安装
使用 npm安装:
$ npm install axios
使用 bower:
$ bower install axios
或者直接使用 cdn:
<!--axios在线地址-->
<script src="https://unpkg.com/axios/dist/axios.min.js"></script>
使用举例
- axios.get(地址?key=value&key2=value2).then(function(respones)){},function(err){})
- axios.post(地址,{key:value,key2:value2}).then(function(response){},function(err){})
- axios必须先导入才可以使用
- 使用get或post方法即可发送对应的请求
- then方法中的回调函数会在请求成功或失败时触发
- 通过回调函数的形参可以获取响应内容或错误信息
- 文档传送:https://github.com/axios/axios
一些小接口
-
https://autumnfish.cn/api/joke/list
get请求获取随即笑话,参数num
-
https://autumnfish.cn/api/user/reg
post请求获取注册成功或失败,参数username
-
http://wthrcdn.etouch.cn/weather-mini
get请求获取天气信息,参数city
<!DOCTYPE html> <html lang="en"> <head> <meta charset="UTF-8"> <meta name="viewport" content="width=device-width,initial-scale=1.0"> <meta http-equiv="X-UA-Compatible" content="ie=edge"> <title>axios测试</title> </head> <body> <input type="button" value="get请求" class="get"> <input type="button" value="post请求"class="post"> <!--axios在线地址--> <script src="https://unpkg.com/axios/dist/axios.min.js"></script> <script> //接口1 document.querySelector(".get").onclick = function () { axios.get("https://autumnfish.cn/api/joke/list?num=3") .then(function(response){ console.log(response); },function(err){ console.log(err); }) } //接口2 document.querySelector(".post").onclick = function () { axios.post("https://autumnfish.cn/api/user/reg", {username:"jack1111111"} ) .then(function(response){ console.log(response); },function(err){ console.log(err); }) } </script> </body> </html>
axios+vue
-
axios回调函数中的this已经改变,无法访问到data中数据
-
把this保存起来,回调函数中直接使用保存的this即可
-
和本地应用最大的区别就是改变了数据来源
<!DOCTYPE html> <html lang="en"> <head> <meta charset="UTF-8"> <meta name="viewport" content="width=device-width,initial-scale=1.0"> <meta http-equiv="X-UA-Compatible" content="ie=edge"> <title>axios+vue测试</title> </head> <body> <div id="app"> <input type="button" value="获取笑话" @click="getJoke"> <p>{{ joke }}</p> </div> <!--axios在线地址--> <script src="https://unpkg.com/axios/dist/axios.min.js"></script> <!-- 开发环境版本,包含了有帮助的命令行警告 --> <script src="https://cdn.jsdelivr.net/npm/vue/dist/vue.js"></script> <script> var app = new Vue({ el:"#app", data:{ joke:"很好笑的笑话" }, methods:{ getJoke:function(){ //console.log(this.joke); var that = this; axios.get("https://autumnfish.cn/api/joke") .then(function(response){ console.log(response.data); //console.log(this.joke); that.joke = response.data; },function(err){ }) } } }) </script> </body> </html>
天气预报案例:
- 回车查询天气
- 按下回车(v-on .enter)
- 查询数据(axios 接口 v-model)
- 渲染数据(v-for 数组 that)
- 应用的逻辑代码建议和页面分离,使用单独的js文件编写
- axios回调函数中this指向改变了,需要额外的保存一份
- 服务器返回的数据比较复杂时,获取的时候需要注意层级结构
- 点击查询天气
- 点击城市(v-on 自定义参数)
- 查询数据(this.方法())
- 渲染数据
- 自定义参数可以让代码的复用性更高
- methods中定义的方法内部,可以通过this关键字点出其他的方法
<!DOCTYPE html>
<html lang="en">
<head>
<meta charset="UTF-8" />
<meta name="viewport" content="width=device-width, initial-scale=1.0" />
<meta http-equiv="X-UA-Compatible" content="ie=edge" />
<title>天知道</title>
<link rel="stylesheet" href="css/reset.css" />
<link rel="stylesheet" href="css/index.css" />
</head>
<body>
<div class="wrap" id="app">
<div class="search_form">
<div class="logo">
<img src="img/logo.png" alt="logo" />
</div>
<div class="form_group">
<input type="text" v-model="city" @keyup.enter="searchWeather" class="input_txt" placeholder="请输入查询的天气" />
<button class="input_sub" @click="searchWeather">
搜 索
</button>
</div>
<div class="hotkey">
<a href="javascript:;" @click="changeCity('北京')">北京</a>
<a href="javascript:;" @click="changeCity('上海')">上海</a>
<a href="javascript:;" @click="changeCity('广州')">广州</a>
<a href="javascript:;" @click="changeCity('深圳')">深圳</a>
</div>
</div>
<ul class="weather_list">
<li v-for="item in weatherList">
<div class="info_type">
<span class="iconfont">{{ item.type }}</span></div>
<div class="info_temp">
<b>{{ item.low }}</b>
~
<b>{{ item.high }}</b>
</div>
<div class="info_date"><span>{{ item.date }}</span></div>
</li>
</ul>
</div>
<!-- 开发环境版本,包含了有帮助的命令行警告 -->
<script src="https://cdn.jsdelivr.net/npm/vue/dist/vue.js"></script>
<!-- 官网提供的 axios 在线地址 -->
<script src="https://unpkg.com/axios/dist/axios.min.js"></script>
<!-- 自己的js -->
<script src="./js/main.js"></script>
</body>
</html>
var app = new Vue({
el:"#app",
data:{
city:"",
weatherList:[]
},
methods: {
searchWeather:function(){
//console.log('天气查询');
//console.log(this.city);
// 调用接口
// 回调函数中this会改变,要提前保存this
var that = this;
axios.get('http://wthrcdn.etouch.cn/weather_mini?city='+this.city)
.then(function(response){
//console.log(response);
console.log(response.data.data.forecast);
that.weatherList = response.data.data.forecast;
})
.catch(function(err){})
},
changeCity:function(city){
this.city = city;
this.searchWeather();
}
},
})
Vue综合应用
音乐播放器
歌曲搜索
-
按下回车(v-on .enter)
-
查询数据(axios 接口 v-model)
-
渲染数据(v-for 数组 that)
-
歌曲搜索接口:https://autumnfish.cn/serch
用get请求到歌曲搜索结果,参数keywords(查询的关键字)
-
服务器返回的数据比较复杂时,获取的时候需要注意层级结构
-
通过审查元素快速定位到需要操纵的元素
歌曲播放
-
点击播放(v-on 自定义参数)
-
歌曲地址获取(接口 歌曲id)
-
歌曲地址设置(v-bind)
-
歌曲url获取接口: 请求地址:https://autumnfish.cn/song/url
用get请求歌曲url地址,参数:id(歌曲id)
-
歌曲id依赖歌曲搜索的结果,对于不用的数据也需要关注
歌曲封面
-
点击播放(增加逻辑)
-
歌曲封面获取(接口 歌曲id)
-
歌曲封面设置(v-bind)
-
歌曲详情获取:请求地址:https://autumnfish.cn/song/detail
用get请求歌曲详情(包括封面信息),参数:ids(歌曲id)
-
在vue中通过v-bind操纵属性
-
本地无法获取的数据,基本都会有对应的接口
歌曲评论
-
点击播放(增加逻辑)
-
歌曲评论获取(接口 歌曲id)
-
歌曲评论渲染(v-for)
-
热门评论获取:请求地址:https://autumnfish.cn/comment/hot?type=0
用get请求歌曲的热门评论,参数:id(歌曲id,地址中的type固定为0)
-
在vue中通过v-for生成列表
播放动画
- 监听音乐播放(v-on play)
- 监听音乐暂停(v-on pause)
- 操纵类名(v-bind 对象)
- audio标签的play事件会在播放的时候触发
- audio标签的pause事件会在暂停时触发
- 通过对象的方式设置类名,类名生效与否取决于后面值的真假
mv播放
-
mv图表显示(v-if)
-
mv地址获取(接口 mvid)
-
遮罩层(v-show v-on)
-
mv地址设置(v-bind)
-
mv地址获取:请求地址:https://autumnfish.cn/mv/url
用get请求mv的地址,参数:id(mvid,为0表示没有mv)
-
不同的接口需要的数据是不同的,文档的阅读需要仔细
-
页面结构复杂之后,通过审查元素的方式去快速定位相关元素
-
响应式的数据都需要在data中定义
/*
1:歌曲搜索接口
请求地址:https://autumnfish.cn/search
请求方法:get
请求参数:keywords(查询关键字)
响应内容:歌曲搜索结果
2:歌曲url获取接口
请求地址:https://autumnfish.cn/song/url
请求方法:get
请求参数:id(歌曲id)
响应内容:歌曲url地址
3.歌曲详情获取
请求地址:https://autumnfish.cn/song/detail
请求方法:get
请求参数:ids(歌曲id)
响应内容:歌曲详情(包括封面信息)
4.热门评论获取
请求地址:https://autumnfish.cn/comment/hot?type=0
请求方法:get
请求参数:id(歌曲id,地址中的type固定为0)
响应内容:歌曲的热门评论
5.mv地址获取
请求地址:https://autumnfish.cn/mv/url
请求方法:get
请求参数:id(mvid,为0表示没有mv)
响应内容:mv的地址
*/
var app = new Vue({
el: "#player",
data:{
//查询关键字
query:"",
//歌曲数组
musicList:[],
//歌曲地址
musicUrl:"",
//歌曲封面
musicCover:"",
//歌曲评论
hotComments:[],
//动画播放状态
isPlaying:false,
//遮罩层的显示状态
isShow:false,
//mv地址
mvUrl:""
},
methods:{
//歌曲搜索
searchMusic:function(){
var that = this;
axios.get("https://autumnfish.cn/search?keywords="+this.query)
.then(function(response){
//console.log(response);
that.musicList = response.data.result.songs;
console.log(response.data.result.songs);
},function(err){})
},
//歌曲播放
playMusic:function(musicId){
// console.log(musicId);
var that = this;
axios.get("https://autumnfish.cn/song/url?id="+musicId)
.then(function(response){
// console.log(response);
// console.log(response.data.data[0].url);
that.musicUrl = response.data.data[0].url;
},function(err){})
//歌曲详情获取
axios.get("https://autumnfish.cn/song/detail?ids="+musicId)
.then(function(response){
//console.log(response);
console.log(response.data.songs[0].al.picUrl);
that.musicCover = response.data.songs[0].al.picUrl;
},function(err){})
//歌曲评论获取
axios.get("https://autumnfish.cn/comment/hot?type=0&id="+musicId)
.then(function(response){
//console.log(response);
console.log(response.data.hotComments);
that.hotComments = response.data.hotComments;
},function(err){})
},
//播放
play:function(){
// console.log("play");
var that = this;
that.isPlaying = true;
},
//暂停
pause:function(){
// console.log("pause");
var that = this;
this.isPlaying = false;
},
//播放mv
playMV:function(mvid){
var that = this;
axios.get("https://autumnfish.cn/mv/url?id="+mvid)
.then(function(response){
//console.log(response);
console.log(response.data.data.url);
that.isShow = true;
that.mvUrl = response.data.data.url;
},function(err){})
},
//隐藏
hide:function(){
this.isShow = false;
}
}
});
<!DOCTYPE html>
<html lang="en">
<head>
<meta charset="UTF-8">
<meta name="viewport" content="width=device-width,initial-scale=1.0"/>
<meta http-equiv="X-UA-Compatible" content="ie=edge"/>
<title>悦听</title>
<!--样式-->
<link rel="shortcut icon" href="#"/>
<link rel="stylesheet" href="./css/index.css">
</head>
<body>
<div class="wrap">
<!--播放器主体区域-->
<div class="play_wrap" id="player">
<div class="search_bar">
<img src="images/player_title.png" alt=""/>
<!--搜索歌曲-->
<input type="text" autocomplete="off" v-model="query" @keyup.enter="searchMusic" />
</div>
<div class="center_con">
<!--搜索歌曲列表-->
<div class="song_wrapper">
<ul class="song_list">
<li v-for="item in musicList">
<a href="javascript:;" @click="playMusic(item.id)"></a>
<b>{{ item.name }}</b>
<span v-if="item.mvid!=0" @click="playMV(item.mvid)"><i></i></span>
</li>
</ul>
<img src="images/line.png" class="switch_btn" alt="">
</div>
<!--歌曲信息容器-->
<div class="player_con" :class="{playing:isPlaying}">
<img src="images/player_bar.png" class="play_bar"/>
<!--黑胶-->
<img src="images/disc.png" class="disc autoRotate"/>
<img :src="musicCover" class="cover autoRotate" />
</div>
<!--评论容器-->
<div class="comment_wrapper">
<h5 class='title'>热门留言</h5>
<div class='comment_list'>
<dl v-for="item in hotComments">
<dt>
<img :src="item.user.avatarUrl" alt="">
</dt>
<dd class="name">
{{ item.user.nickname }}
</dd>
<dd class="detail">
{{ item.content }}
</dd>
</dl>
</div>
<img src="images/line.png" class="right_line">
</div>
</div>
<div class="audio_con" >
<!--<audio> 标签定义声音,比如音乐或其他音频流-->
<audio ref='audio' @play="play" @pause="pause" :src="musicUrl" controls autoplay loop class="myaudio"></audio>
</div>
<div class="video_con" v-show="isShow" style="display: none;">
<video :src="mvUrl" controls="controls"></video>
<div class="mask" @click="hide"></div>
</div>
</div>
</div>
<!--axios在线地址-->
<script src="https://unpkg.com/axios/dist/axios.min.js"></script>
<!-- 开发环境版本,包含了有帮助的命令行警告 -->
<script src="https://cdn.jsdelivr.net/npm/vue/dist/vue.js"></script>
<script src="./js/main.js"></script>
</body>
</html>
UNI-APP 介绍
什么是UNI-APP
uni-app(uni,读you ni,是统一的意思)是一个使用Vue.js开发所有前端应用的框架,开发者编写一套代码,可发布到iOS、Android、Web(响应式)、以及各种小程序、快应用等多个平台。
uni-app是一款基于vue语法的全端开发框架
Vue.js 是构建 Web 界面的 JavaScript 框架,是一个通过简洁的API提供高效的数据绑定和灵活的组件系统。
有哪些UNI-APP的作品
CSDN、开源中国、昆铁+、宠友帮、极志愿、中华英才网、上铁12306
UNI-APP的社区和规模
- 380万 开发者
- 几十万 应用案例
- 8.5亿 手机端用户
- 数千款 uni-app插件
- 70+ 微信/QQ群
UNI-APP基础
基础知识
uni-app初体验
开发方式
- 使用DCloud公司提供的HBuilderX 来快速开发
- 使用(基于nodejs)脚手架来快速搭建和开发
脚手架搭建项目
1.全局安装(在此之前要先安装nodejs配置好npm)
(ps:国内用npm很卡,需要安装cnpm镜像提速)
npm install -g @vue/cli
或者cnpm install -g @vue/cli
2.创建项目
vue create -p dcloudio/uni-preset-vue my-project
3.启动项目(微信小程序)
npm run dev:mp-weixin
4.微信小程序开发者工具导入项目
使用之前先看看这些东西的用处:
npm: Nodejs下的包管理器。
webpack: 它主要的用途是通过CommonJS的语法把所有浏览器端需要发布的静态资源做相应的准备,比如资源的合并和打包。
vue-cli: 用户生成Vue工程模板。(帮你快速开始一个vue的项目,也就是给你一套vue的结构,包含基础的依赖库,只需要 npm install就可以安装)
vue.js有著名的全家桶系列,包含了vue-router,vuex, vue-resource,再加上构建工具vue-cli,就是一个完整的vue项目的核心构成。
Vue CLI是一个基于 Vue.js 进行快速开发的完整系统,提供:
-通过 @vue/cli 实现的交互式的项目脚手架。
-通过 @vue/cli + @vue/cli-service-global 实现的零配置原型开发。
-一个运行时依赖 (@vue/cli-service),该依赖:
.可升级;
.基于 webpack 构建,并带有合理的默认配置;
.可以通过项目内的配置文件进行配置;
.可以通过插件进行扩展。
-一个丰富的官方插件集合,集成了前端生态中最好的工具。
-一套完全图形化的创建和管理 Vue.js 项目的用户界面。
Vue CLI 致力于将 Vue 生态中的工具基础标准化。它确保了各种构建工具能够基于智能的默认配置即可平稳衔接,这样你可以专注在撰写应用上,而不必花好几天去纠结配置的问题。
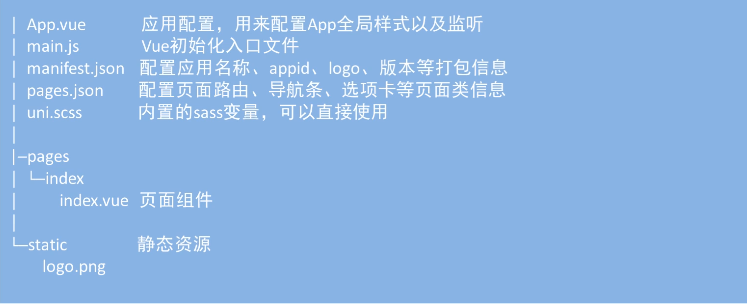
UNI-APP项目
项目目录
官方文档 :
https://uniapp.dcloud.io
懂你找图
技术栈:JavaScript,vue,微信小程序,uni-app
还会用到:uni-ui、uni-api、moment.js、手势封装


 835
835

 被折叠的 条评论
为什么被折叠?
被折叠的 条评论
为什么被折叠?
 到【灌水乐园】发言


