Android自定义Dialog的Match_parent无效问题解决

Android 开发过程中,自定义dialog 用得很多,通常都是通过继承Dialog, 再加载自定义的xml来实现。


//自定义Dialog
public class OrderFilterDialog extends Dialog {

    public OrderFilterDialog(Context context) {
        super(context);
        initView(this);
    }

    public OrderFilterDialog(Context context, int themeResId) {
        super(context, themeResId);
        initView(this);
    }


    public  void initView(Dialog dialog) {
        dialog.requestWindowFeature(Window.FEATURE_NO_TITLE);
        dialog.setContentView(R.layout.dialog_search_order);
        show();
        dialog.setCancelable(false);
        Window window = dialog.getWindow();
        WindowManager.LayoutParams lp = window.getAttributes();
        lp.width = WindowManager.LayoutParams.MATCH_PARENT;
        lp.height = WindowManager.LayoutParams.WRAP_CONTENT;
        lp.gravity = Gravity.TOP;
        window.setAttributes(lp);
        window.setWindowAnimations(R.style.DialogInOutTopAnimation);
    }

}

运行后,发现效果如下,

这里写图片描述

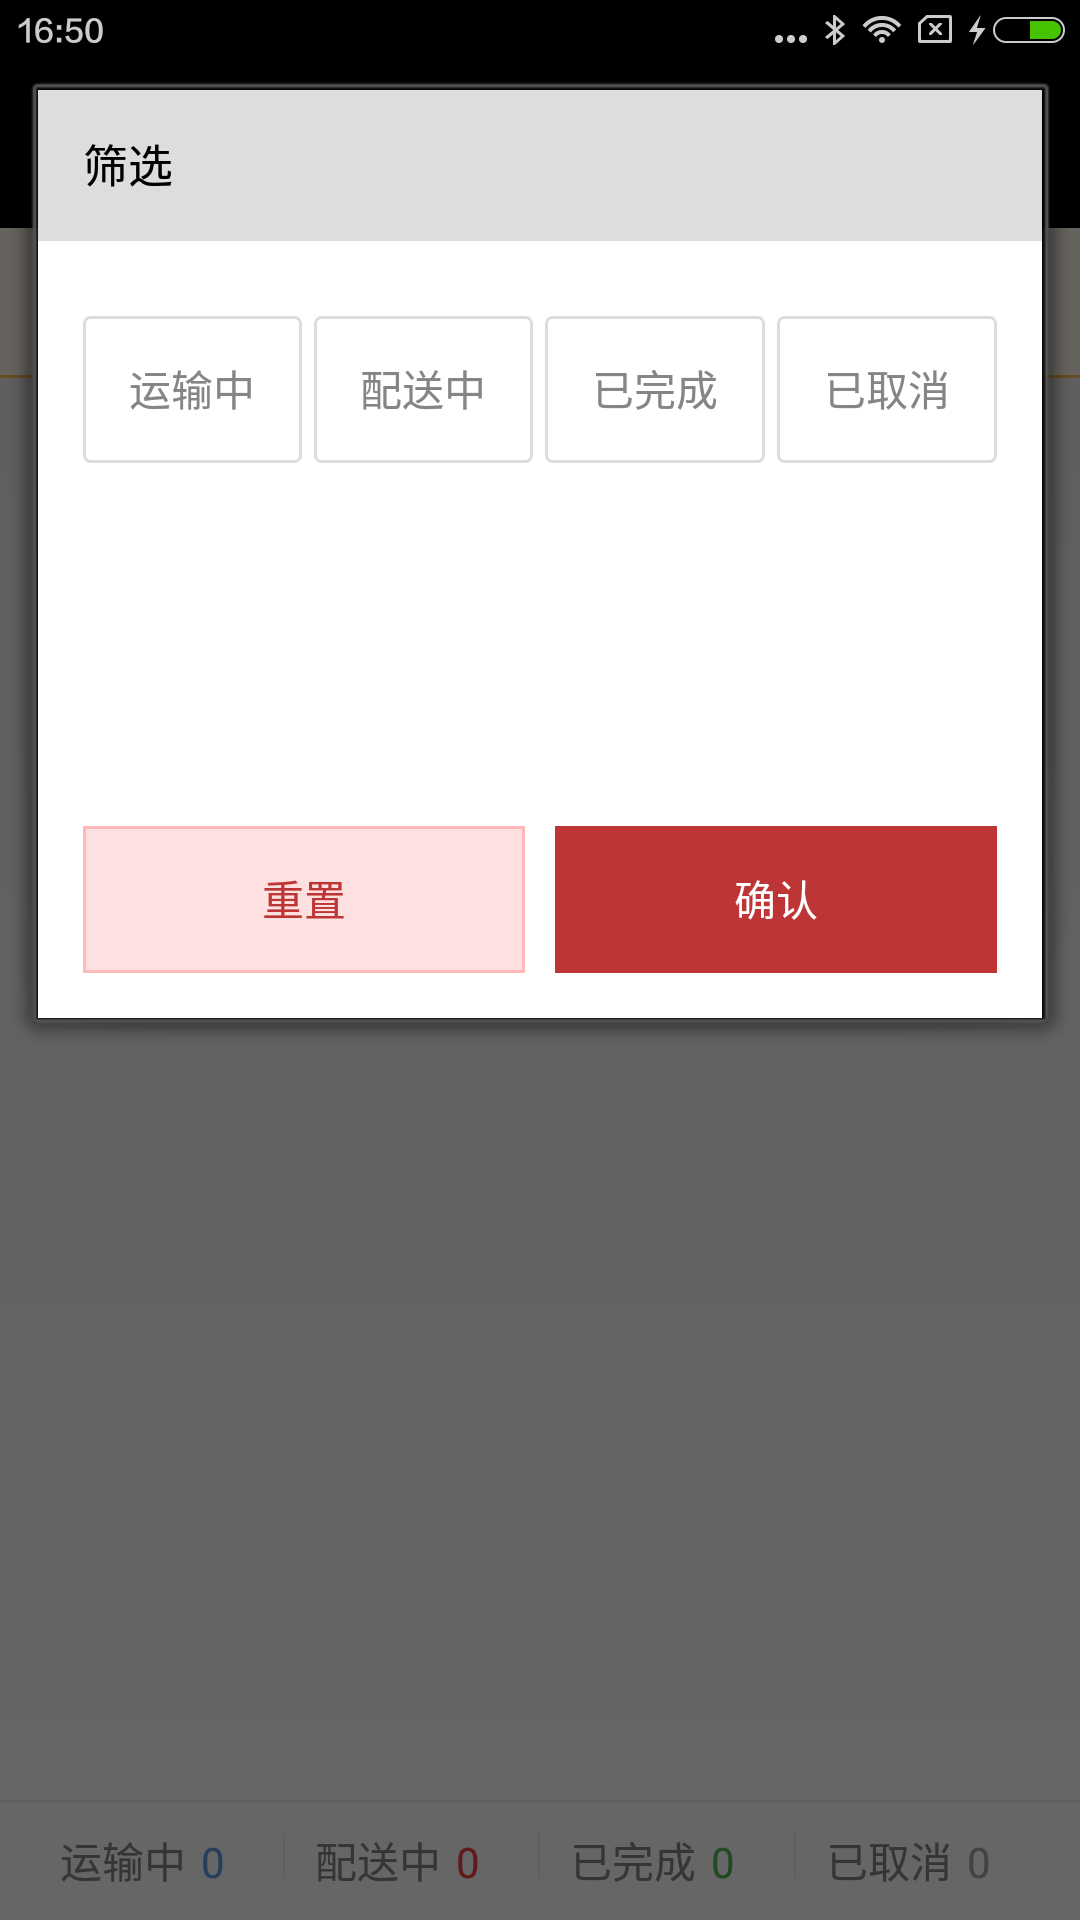
我们发现,match_parent属性根本没有生效。查看Dialog源码才发现,默认Dialog是有一个theme属性的,坑。

Dialog部分代码如下,

/**
140     * Creates a dialog window that uses the default dialog theme.
141     * <p>
142     * The supplied {@code context} is used to obtain the window manager and
143     * base theme used to present the dialog.
144     *
145     * @param context the context in which the dialog should run
146     * @see android.R.styleable#Theme_dialogTheme
147     */
148    public Dialog(@NonNull Context context) {
149        this(context, 0, true);   //默认传入0
150    }
151
152    /**
153     * Creates a dialog window that uses a custom dialog style.
154     * <p>
155     * The supplied {@code context} is used to obtain the window manager and
156     * base theme used to present the dialog.
157     * <p>
158     * The supplied {@code theme} is applied on top of the context's theme. See
159     * <a href="{@docRoot}guide/topics/resources/available-resources.html#stylesandthemes">
160     * Style and Theme Resources</a> for more information about defining and
161     * using styles.
162     *
163     * @param context the context in which the dialog should run
164     * @param themeResId a style resource describing the theme to use for the
165     *              window, or {@code 0} to use the default dialog theme
166     */
167    public Dialog(@NonNull Context context, @StyleRes int themeResId) {
168        this(context, themeResId, true);
169    }
170
171    Dialog(@NonNull Context context, @StyleRes int themeResId, boolean createContextThemeWrapper) {
172        if (createContextThemeWrapper) {
173            if (themeResId == 0) {
174                final TypedValue outValue = new TypedValue();
175                context.getTheme().resolveAttribute(R.attr.dialogTheme, outValue, true);             //若值为0,则默认设置dialogTheme样式
176                themeResId = outValue.resourceId;
177            }
178            mContext = new ContextThemeWrapper(context, themeResId);
179        } else {
180            mContext = context;
181        }
182
183        mWindowManager = (WindowManager) context.getSystemService(Context.WINDOW_SERVICE);
184
185        final Window w = new PhoneWindow(mContext);
186        mWindow = w;
187        w.setCallback(this);
188        w.setOnWindowDismissedCallback(this);
189        w.setWindowManager(mWindowManager, null, null);
190        w.setGravity(Gravity.CENTER);
191
192        mListenersHandler = new ListenersHandler(this);
193    }

其中

if (themeResId == 0) {
final TypedValue outValue = new TypedValue();
context.getTheme().resolveAttribute(R.attr.dialogTheme, outValue, true);
themeResId = outValue.resourceId;
}

从上述代码可以看出,若Dialog没有设置默认样式,系统会自动给你适配为R.attr.dialogTheme样式。
而查看themes.xml后,发现 dialogTheme样式是自带有Padding值的,所以match_parent自然是无效的。

那么,如何实现match_parent呢

(1) 设置padding值为0。

dialog.getWindow().getDecorView().setPadding(0, 0, 0, 0);

(2) 自定义一个Theme,覆盖原生Theme。

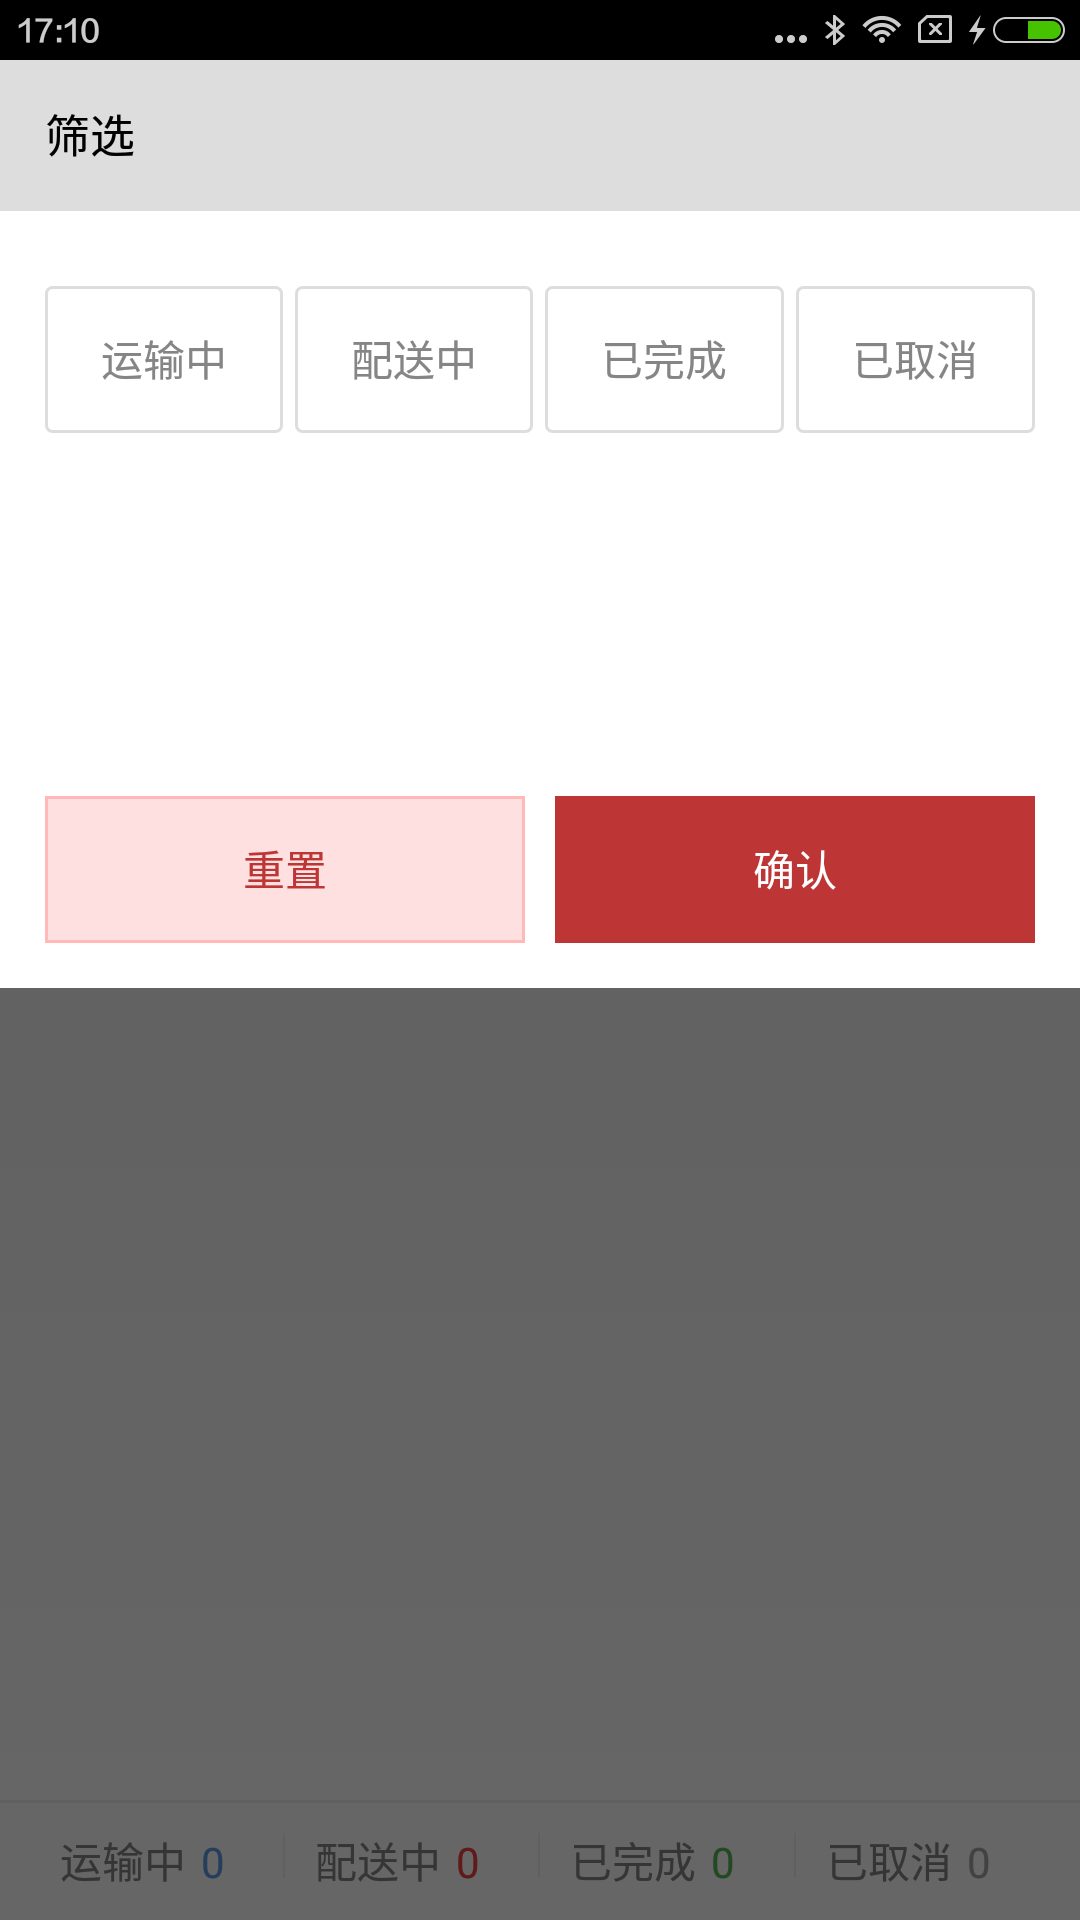
OrderFilterDialog dialog = new OrderFilterDialog(context, R.style.test);

运行效果如下,

这里写图片描述

  • 5
    点赞
  • 8
    收藏
    觉得还不错? 一键收藏
  • 5
    评论
Android中,Dialog是一个常用的UI组件,它可以用来显示一些提示信息或者进行一些简单的交互。Android中提供了一些默认样式的Dialog,但是有时候我们需要自定义Dialog以满足自己的需求。下面是一个简单的自定义Dialog的示例: 1. 创建一个布局文件,例如custom_dialog.xml: ```xml <LinearLayout xmlns:android="http://schemas.android.com/apk/res/android" android:id="@+id/dialog" android:layout_width="match_parent" android:layout_height="wrap_content" android:orientation="vertical" android:padding="16dp"> <TextView android:id="@+id/title" android:layout_width="match_parent" android:layout_height="wrap_content" android:text="Title" android:textSize="20sp" android:textStyle="bold" /> <EditText android:id="@+id/input" android:layout_width="match_parent" android:layout_height="wrap_content" android:hint="Input" /> <Button android:id="@+id/confirm" android:layout_width="match_parent" android:layout_height="wrap_content" android:text="Confirm" /> <Button android:id="@+id/cancel" android:layout_width="match_parent" android:layout_height="wrap_content" android:text="Cancel" /> </LinearLayout> ``` 2. 创建一个自定义Dialog类,例如CustomDialog: ```java public class CustomDialog extends Dialog { private TextView mTitle; private EditText mInput; private Button mConfirm; private Button mCancel; public CustomDialog(Context context) { super(context); setContentView(R.layout.custom_dialog); mTitle = findViewById(R.id.title); mInput = findViewById(R.id.input); mConfirm = findViewById(R.id.confirm); mCancel = findViewById(R.id.cancel); setCancelable(false); setCanceledOnTouchOutside(false); } public void setTitle(String title) { mTitle.setText(title); } public void setInputHint(String hint) { mInput.setHint(hint); } public void setOnConfirmClickListener(View.OnClickListener listener) { mConfirm.setOnClickListener(listener); } public void setOnCancelClickListener(View.OnClickListener listener) { mCancel.setOnClickListener(listener); } public String getInputText() { return mInput.getText().toString(); } } ``` 在自定义Dialog类中,我们首先通过setContentView方法设置Dialog的布局文件,然后通过findViewById方法获取布局文件中的各个控件。接着,我们可以添加一些自定义的方法,例如setTitle、setInputHint、setOnConfirmClickListener等,来设置Dialog的样式和响应事件。最后,我们通过getInputText方法获取输入框中的文本内容。 3. 在Activity中使用自定义Dialog: ```java public class MainActivity extends AppCompatActivity { private CustomDialog mDialog; @Override protected void onCreate(Bundle savedInstanceState) { super.onCreate(savedInstanceState); setContentView(R.layout.activity_main); mDialog = new CustomDialog(this); findViewById(R.id.show_dialog).setOnClickListener(new View.OnClickListener() { @Override public void onClick(View v) { mDialog.setTitle("Custom Dialog"); mDialog.setInputHint("Please input something"); mDialog.setOnConfirmClickListener(new View.OnClickListener() { @Override public void onClick(View v) { String inputText = mDialog.getInputText(); Toast.makeText(MainActivity.this, "Input: " + inputText, Toast.LENGTH_SHORT).show(); mDialog.dismiss(); } }); mDialog.setOnCancelClickListener(new View.OnClickListener() { @Override public void onClick(View v) { mDialog.dismiss(); } }); mDialog.show(); } }); } } ``` 在Activity中,我们首先创建了一个CustomDialog对象,然后在按钮的点击事件中设置Dialog的样式和响应事件,并调用show方法显示Dialog。在确认按钮的点击事件中,我们通过getInputText方法获取输入框中的文本内容,并通过Toast显示出来。最后,我们调用dismiss方法隐藏Dialog

“相关推荐”对你有帮助么?

  • 非常没帮助
  • 没帮助
  • 一般
  • 有帮助
  • 非常有帮助
提交
评论 5
添加红包

请填写红包祝福语或标题

红包个数最小为10个

红包金额最低5元

当前余额3.43前往充值 >
需支付:10.00
成就一亿技术人!
领取后你会自动成为博主和红包主的粉丝 规则
hope_wisdom
发出的红包
实付
使用余额支付
点击重新获取
扫码支付
钱包余额 0

抵扣说明:

1.余额是钱包充值的虚拟货币,按照1:1的比例进行支付金额的抵扣。
2.余额无法直接购买下载,可以购买VIP、付费专栏及课程。

余额充值