


新手搭建hibernate 首次成功。
在这里分享给大家。
1.我这里是一个web project项目,首先把hibernate所用的核心包导入项目WEB-INF下的lib文件夹里,下载hibernate核心包。
2.演示的项目所用数据库为sql server2008。 jdbc驱动包在这里就不多说了,接着往下看。
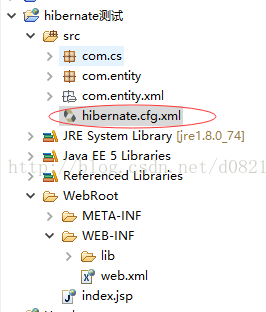
3.上图为hibernate核心配置文件 hibernate.cfg.xml (详细配置如下,针对于sql server数据库配置)
<!DOCTYPE hibernate-configuration PUBLIC
    "-//Hibernate/Hibernate Configuration DTD 3.0//EN"
    "http://hibernate.sourceforge.net/hibernate-configuration-3.0.dtd">

    <hibernate-configuration>
        <session-factory>
            <!-- 驱动 -->
            <property name="hibernate.connection.driver_class">com.microsoft.sqlserver.jdbc.SQLServerDriver</property>
            <!-- 数据库名称 -->
            <property name="hibernate.connection.url">jdbc:sqlserver://localhost:1433;databaseName=HibernateTest</property>
            <!-- 数据库账号 -->
            <property name="hibernate.connection.username">sa</property>
            <!-- 数据库密码 -->
            <property name="hibernate.connection.password">123456</property>
            <!-- hibernate数据库方言 -->
            <property name="hibernate.dialect">org.hibernate.dialect.SQLServerDialect</property>

        </session-factory>
    </hibernate-configuration>
4.新建Users实体类
package com.entity;

public class Users {
    private String id;
    private String username;
    private String password;
    public String getId() {
        return id;
    }
    public void setId(String id) {
        this.id = id;
    }
    public String getUsername() {
        return username;
    }
    public void setUsername(String username) {
        this.username = username;
    }
    public String getPassword() {
        return password;
    }
    public void setPassword(String password) {
        this.password = password;
    }

}
5.提供Users.hbm.xml文件,完成实体类的映射
<?xml version="1.0" encoding="UTF-8"?>
<!DOCTYPE hibernate-mapping PUBLIC
    "-//Hibernate/Hibernate Mapping DTD 3.0//EN"
    "http://hibernate.sourceforge.net/hibernate-mapping-3.0.dtd">

    <hibernate-mapping>
        <class name="com.entity.Users">
            <id name="id">
                <generator class="uuid"></generator>
            </id>
            <property name="username"></property>
            <property name="password"></property>
        </class>
    </hibernate-mapping>
其中property字段标签是将要生成是数据库表中的字段,在这里不用关心各个字段是什么类型的。因为Hibernate会根据上面的实体类中属性的类型来决定将来表中字段的类型。
6.配置hibernate.cfg.xml文件 完成映射
<!DOCTYPE hibernate-configuration PUBLIC
    "-//Hibernate/Hibernate Configuration DTD 3.0//EN"
    "http://hibernate.sourceforge.net/hibernate-configuration-3.0.dtd">

    <hibernate-configuration>
        <session-factory>
            <!-- 驱动 -->
            <property name="hibernate.connection.driver_class">com.microsoft.sqlserver.jdbc.SQLServerDriver</property>
            <!-- 数据库名称 -->
            <property name="hibernate.connection.url">jdbc:sqlserver://localhost:1433;databaseName=HibernateTest</property>
            <!-- 数据库账号 -->
            <property name="hibernate.connection.username">sa</property>
            <!-- 数据库密码 -->
            <property name="hibernate.connection.password">123456</property>
            <!-- hibernate数据库方言 -->
            <property name="hibernate.dialect">org.hibernate.dialect.SQLServerDialect</property>

            <mapping resource="com/entity/xml/User.hbm.xml"></mapping>
        </session-factory>
    </hibernate-configuration>
7.编写测试类main方法 完成自动建表
public static void main(String[] args) {
        //默认读取hibernate.cfg.xml文件
        Configuration cfr = new Configuration().configure();

        SchemaExport export = new SchemaExport(cfr);
        export.create(true, true);
    }
到这里就可以生成Users表了。
--向表中添加数据
package com.cs;
import org.hibernate.Session;
import org.hibernate.SessionFactory;
import org.hibernate.cfg.Configuration;
import org.hibernate.tool.hbm2ddl.SchemaExport;
import com.entity.Users;
public class cs {
    /**
     * @param args
     */
    public static void main(String[] args) {
        Configuration cfr = new Configuration().configure();
        SessionFactory factory=cfr.buildSessionFactory();
        Session session=null;
        SchemaExport export=new SchemaExport(cfr);
        export.create(true, true);
        try {
            session=factory.openSession();
            session.beginTransaction();
            Users u=new Users();
            u.setUsername("测试1");
            u.setPassword("123456");
            Users u1=new Users();
            u1.setUsername("测试2");
            u1.setPassword("654321");
            session.save(u);
            session.save(u1);
            session.getTransaction().commit();
        } catch (Exception e) {
            e.printStackTrace();
            session.getTransaction().rollback();
        }finally{
            if (session!=null) {
                if (session.isOpen()) {
                    session.close();
                }
            }
        }
    }
}


 322
322

 被折叠的 条评论
为什么被折叠?
被折叠的 条评论
为什么被折叠?
 到【灌水乐园】发言


