


 文章详细描述了如何使用PyQt5库在QtDesigner中设计一个包含用户名、密码、性别选择、爱好复选和择偶要求的注册登录表单,并提供了相应的事件处理方法。
Qt Designer 设计页面:

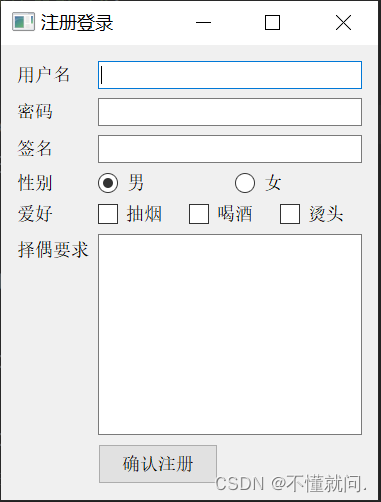
通过 PyQt5 手写
1. 先引入用到的库
from PyQt5.QtWidgets import *
import sys
2. 创建应用,窗口, 设置窗口
# 创建应用
app = QApplication(sys.argv)
# 创建窗口
w = QWidget()

# 设置窗口标题
w.setWindowTitle("注册登录")


# 展示
w.show()
# 等待退出
sys.exit(app.exec())
2. 设置性别和爱好的横向布局
# 横向布局
hSexLayout = QHBoxLayout()
hHobbyLayout = QHBoxLayout()
4. 表单布局
# 表单
form = QFormLayout()
# 用户名
username = QLineEdit()
# 密码
password = QLineEdit()
# 将密码设置为密码属性
password.setEchoMode(password.Password)

# 性别
radioSex1 = QRadioButton("男")
radioSex2 = QRadioButton("女")
# 默认选中男
radioSex1.setChecked(True)
# 单选框添加到横向layout
hSexLayout.addWidget(radioSex1)
hSexLayout.addWidget(radioSex2)

# 爱好 复选框
hobby1 = QCheckBox("抽烟")
hobby2 = QCheckBox("喝酒")
hobby3 = QCheckBox("烫头")
# 复选框添加到横向layout
hHobbyLayout.addWidget(hobby1)
hHobbyLayout.addWidget(hobby2)
hHobbyLayout.addWidget(hobby3)

# 签名
signature = QLineEdit()

# 择偶要求: 多行输入框
choose = QTextEdit()

# 注册按钮
btn = QPushButton("确认注册")
btn.setFixedSize(120, 40)
5. 向表单中添加每一行
# 表单
form.addRow("用户名", username)
form.addRow("密码", password)
form.addRow("签名", signature)
form.addRow("性别", hSexLayout)
form.addRow("爱好", hHobbyLayout)
form.addRow("择偶要求", choose)
form.addRow("", btn)
6. 定义打印信息的方法
def printall():
    print("用户名:", username.text())
    print("密码:", password.text())
    if radioSex1.isChecked():
        print("性别: 男")
    if radioSex2.isChecked():
        print("性别: ", radioSex2.text())

    hobby = []
    if hobby1.isChecked():
        hobby.append(hobby1.text())
        # print("爱好:抽烟")
    if hobby2.isChecked():
        hobby.append(hobby2.text())
        # print("爱好:喝酒")
    if hobby3.isChecked():
        hobby.append(hobby3.text())
        # print("爱好:烫头")
    print(hobby)
    print("个性签名:", signature.text())
    print("择偶要求:", choose.toPlainText())
7. 布局添加容器,点击确认注册调用方法
btn.clicked.connect(printall)

# 布局添加到容器
w.setLayout(form)
完整代码
from PyQt5.QtWidgets import *
import sys

app = QApplication(sys.argv)
w = QWidget()

# 设置窗口标题
w.setWindowTitle("注册登录")

# 横向布局
hSexLayout = QHBoxLayout()
hHobbyLayout = QHBoxLayout()

# 表单
form = QFormLayout()
# 用户名
username = QLineEdit()
# 密码
password = QLineEdit()
# 将密码设置为密码属性
password.setEchoMode(password.Password)

# 性别
radioSex1 = QRadioButton("男")
radioSex2 = QRadioButton("女")
# 默认选中男
radioSex1.setChecked(True)
# 单选框添加到横向layout
hSexLayout.addWidget(radioSex1)
hSexLayout.addWidget(radioSex2)

# 爱好 复选框
hobby1 = QCheckBox("抽烟")
hobby2 = QCheckBox("喝酒")
hobby3 = QCheckBox("烫头")
# 复选框添加到横向layout
hHobbyLayout.addWidget(hobby1)
hHobbyLayout.addWidget(hobby2)
hHobbyLayout.addWidget(hobby3)

# 签名
signature = QLineEdit()

# 择偶要求: 多行输入框
choose = QTextEdit()

# 注册按钮
btn = QPushButton("确认注册")
btn.setFixedSize(120, 40)

# 表单
form.addRow("用户名", username)
form.addRow("密码", password)
form.addRow("签名", signature)
form.addRow("性别", hSexLayout)
form.addRow("爱好", hHobbyLayout)
form.addRow("择偶要求", choose)
form.addRow("", btn)


def printall():
    print("用户名:", username.text())
    print("密码:", password.text())
    if radioSex1.isChecked():
        print("性别: 男")
    if radioSex2.isChecked():
        print("性别: ", radioSex2.text())

    hobby = []
    if hobby1.isChecked():
        hobby.append(hobby1.text())
        # print("爱好:抽烟")
    if hobby2.isChecked():
        hobby.append(hobby2.text())
        # print("爱好:喝酒")
    if hobby3.isChecked():
        hobby.append(hobby3.text())
        # print("爱好:烫头")
    print(hobby)
    print("个性签名:", signature.text())
    print("择偶要求:", choose.toPlainText())


btn.clicked.connect(printall)

# 布局添加到容器
w.setLayout(form)

w.show()
sys.exit(app.exec())
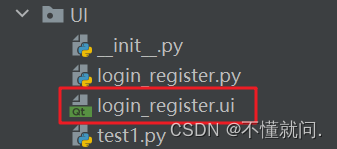
通过Qt Designer设计表单
在UI文件中保存登陆注册的UI, 右键通过外部工具PyUIC生成.py文件
生成登陆注册.py中的内容
from PyQt5 import QtCore, QtGui, QtWidgets


class Ui_Form(object):
    def setupUi(self, Form):
        Form.setObjectName("Form")
        Form.resize(354, 375)
        self.widget = QtWidgets.QWidget(Form)
        self.widget.setGeometry(QtCore.QRect(40, 10, 301, 331))
        self.widget.setObjectName("widget")
        self.formLayout_3 = QtWidgets.QFormLayout(self.widget)
        self.formLayout_3.setContentsMargins(0, 0, 0, 0)
        self.formLayout_3.setObjectName("formLayout_3")
        self.label = QtWidgets.QLabel(self.widget)
        self.label.setObjectName("label")
        self.formLayout_3.setWidget(0, QtWidgets.QFormLayout.LabelRole, self.label)
        self.username = QtWidgets.QLineEdit(self.widget)
        self.username.setInputMask("")
        self.username.setText("")
        self.username.setObjectName("username")
        self.formLayout_3.setWidget(0, QtWidgets.QFormLayout.FieldRole, self.username)
        self.label_2 = QtWidgets.QLabel(self.widget)
        self.label_2.setObjectName("label_2")
        self.formLayout_3.setWidget(1, QtWidgets.QFormLayout.LabelRole, self.label_2)
        self.password = QtWidgets.QLineEdit(self.widget)
        self.password.setInputMask("")
        self.password.setText("")
        self.password.setEchoMode(QtWidgets.QLineEdit.Password)
        self.password.setObjectName("password")
        self.formLayout_3.setWidget(1, QtWidgets.QFormLayout.FieldRole, self.password)
        self.label_3 = QtWidgets.QLabel(self.widget)
        self.label_3.setObjectName("label_3")
        self.formLayout_3.setWidget(2, QtWidgets.QFormLayout.LabelRole, self.label_3)
        self.splitter = QtWidgets.QSplitter(self.widget)
        self.splitter.setOrientation(QtCore.Qt.Horizontal)
        self.splitter.setObjectName("splitter")
        self.widget1 = QtWidgets.QWidget(self.splitter)
        self.widget1.setObjectName("widget1")
        self.sexLayout = QtWidgets.QHBoxLayout(self.widget1)
        self.sexLayout.setContentsMargins(0, 0, 0, 0)
        self.sexLayout.setObjectName("sexLayout")
        self.radio1 = QtWidgets.QRadioButton(self.widget1)
        self.radio1.setEnabled(True)
        self.radio1.setChecked(True)
        self.radio1.setObjectName("radio1")
        self.sexLayout.addWidget(self.radio1)
        self.radio2 = QtWidgets.QRadioButton(self.widget1)
        self.radio2.setObjectName("radio2")
        self.sexLayout.addWidget(self.radio2)
        self.formLayout_3.setWidget(2, QtWidgets.QFormLayout.FieldRole, self.splitter)
        self.label_4 = QtWidgets.QLabel(self.widget)
        self.label_4.setObjectName("label_4")
        self.formLayout_3.setWidget(3, QtWidgets.QFormLayout.LabelRole, self.label_4)
        self.splitter_2 = QtWidgets.QSplitter(self.widget)
        self.splitter_2.setOrientation(QtCore.Qt.Horizontal)
        self.splitter_2.setObjectName("splitter_2")
        self.widget2 = QtWidgets.QWidget(self.splitter_2)
        self.widget2.setObjectName("widget2")
        self.hobbyLayout = QtWidgets.QHBoxLayout(self.widget2)
        self.hobbyLayout.setContentsMargins(0, 0, 0, 0)
        self.hobbyLayout.setObjectName("hobbyLayout")
        self.checkBox_1 = QtWidgets.QCheckBox(self.widget2)
        self.checkBox_1.setObjectName("checkBox_1")
        self.hobbyLayout.addWidget(self.checkBox_1)
        self.checkBox_2 = QtWidgets.QCheckBox(self.widget2)
        self.checkBox_2.setObjectName("checkBox_2")
        self.hobbyLayout.addWidget(self.checkBox_2)
        self.checkBox_3 = QtWidgets.QCheckBox(self.widget2)
        self.checkBox_3.setObjectName("checkBox_3")
        self.hobbyLayout.addWidget(self.checkBox_3)
        self.formLayout_3.setWidget(3, QtWidgets.QFormLayout.FieldRole, self.splitter_2)
        self.label_5 = QtWidgets.QLabel(self.widget)
        self.label_5.setObjectName("label_5")
        self.formLayout_3.setWidget(4, QtWidgets.QFormLayout.LabelRole, self.label_5)
        self.splitter_3 = QtWidgets.QSplitter(self.widget)
        self.splitter_3.setOrientation(QtCore.Qt.Horizontal)
        self.splitter_3.setObjectName("splitter_3")
        self.signature = QtWidgets.QLineEdit(self.splitter_3)
        self.signature.setInputMask("")
        self.signature.setText("")
        self.signature.setObjectName("signature")
        self.formLayout_3.setWidget(4, QtWidgets.QFormLayout.FieldRole, self.splitter_3)
        self.splitter_5 = QtWidgets.QSplitter(self.widget)
        self.splitter_5.setOrientation(QtCore.Qt.Horizontal)
        self.splitter_5.setObjectName("splitter_5")
        self.choose = QtWidgets.QLabel(self.splitter_5)
        self.choose.setObjectName("choose")
        self.splitter_4 = QtWidgets.QSplitter(self.splitter_5)
        self.splitter_4.setOrientation(QtCore.Qt.Horizontal)
        self.splitter_4.setObjectName("splitter_4")
        self.textEdit = QtWidgets.QTextEdit(self.splitter_4)
        self.textEdit.setObjectName("textEdit")
        self.formLayout_3.setWidget(5, QtWidgets.QFormLayout.SpanningRole, self.splitter_5)
        self.pushButton = QtWidgets.QPushButton(self.widget)
        self.pushButton.setObjectName("pushButton")
        self.formLayout_3.setWidget(6, QtWidgets.QFormLayout.FieldRole, self.pushButton)

        self.retranslateUi(Form)
        QtCore.QMetaObject.connectSlotsByName(Form)

    def retranslateUi(self, Form):
        _translate = QtCore.QCoreApplication.translate
        Form.setWindowTitle(_translate("Form", "Form"))
        self.label.setText(_translate("Form", "用户名"))
        self.label_2.setText(_translate("Form", "密  码"))
        self.label_3.setText(_translate("Form", "性  别"))
        self.radio1.setText(_translate("Form", "男"))
        self.radio2.setText(_translate("Form", "女"))
        self.label_4.setText(_translate("Form", "爱  好"))
        self.checkBox_1.setText(_translate("Form", "喝酒"))
        self.checkBox_2.setText(_translate("Form", "烫头"))
        self.checkBox_3.setText(_translate("Form", "抽烟"))
        self.label_5.setText(_translate("Form", "个性签名"))
        self.choose.setText(_translate("Form", "择偶要求"))
        self.pushButton.setText(_translate("Form", "确认注册"))
使用PyQt面向对象开发
注意: 需要引入UI文件中的.py文件中的所有 *
from UI.login_register import *
from PyQt5.QtWidgets import *
import sys
from UI.login_register import *


class login_register(QWidget):
    def __init__(self, parent=None):
        super().__init__(parent)

        # 1. 实例化Ui_Form()
        self.form = Ui_Form()
        # 2. 调用setupUi方法
        self.form.setupUi(self)
        # 调用init_ui方法
        self.init_ui()

    def init_ui(self):
        self.form.pushButton.clicked.connect(self.click)

    def click(self):
        print("姓名:", self.form.username.text())
        print("密码:", self.form.password.text())
        if self.form.radio1.isChecked():
            print("性别:", self.form.radio1.text())
        if self.form.radio2.isChecked():
            print("性别:", self.form.radio2.text())

        if self.form.checkBox_1.isChecked():
            print("爱好1:", self.form.checkBox_1.text())
        if self.form.checkBox_2.isChecked():
            print("爱好2:", self.form.checkBox_2.text())
        if self.form.checkBox_3.isChecked():
            print("爱好3:", self.form.checkBox_3.text())

        print("个性签名:", self.form.signature.text())
        print("择偶要求", self.form.textEdit.toPlainText())


if __name__ == '__main__':
    app = QApplication(sys.argv)
    w = login_register()

    w.show()
    sys.exit(app.exec())
直接运行后看到的结果, 在文章的最上面
这个案例中需要注意:
1. # 将密码设置为密码属性
password.setEchoMode(password.Password)
2. 性别为单选, 爱好为多选, 择偶要求为多行文本
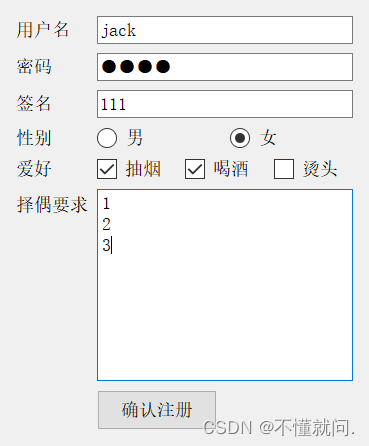
最后效果
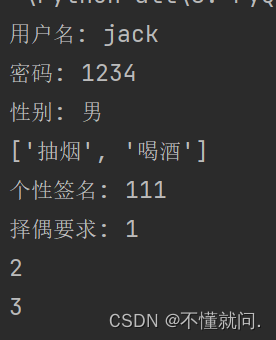
打印结果


 2万+
2万+

 被折叠的 条评论
为什么被折叠?
被折叠的 条评论
为什么被折叠?
 到【灌水乐园】发言


