


一.Kubernetes 是什么?
1.1 Kubernetes 概述。
Kubernetes 是一个可移植、可扩展的开源平台,用于管理容器化的工作负载和服务,可促进声明式配置和自动化。 Kubernetes 拥有一个庞大且快速增长的生态,其服务、支持和工具的使用范围相当广泛。
Kubernetes 这个名字源于希腊语,意为“舵手”或“飞行员”。k8s 这个缩写是因为 k 和 s 之间有八个字符的关系。 Google 在 2014 年开源了 Kubernetes 项目。 Kubernetes 建立在Google 大规模运行生产工作负载十几年经验的基础上, 结合了社区中最优秀的想法和实践。
1.2 应用部署方式演变
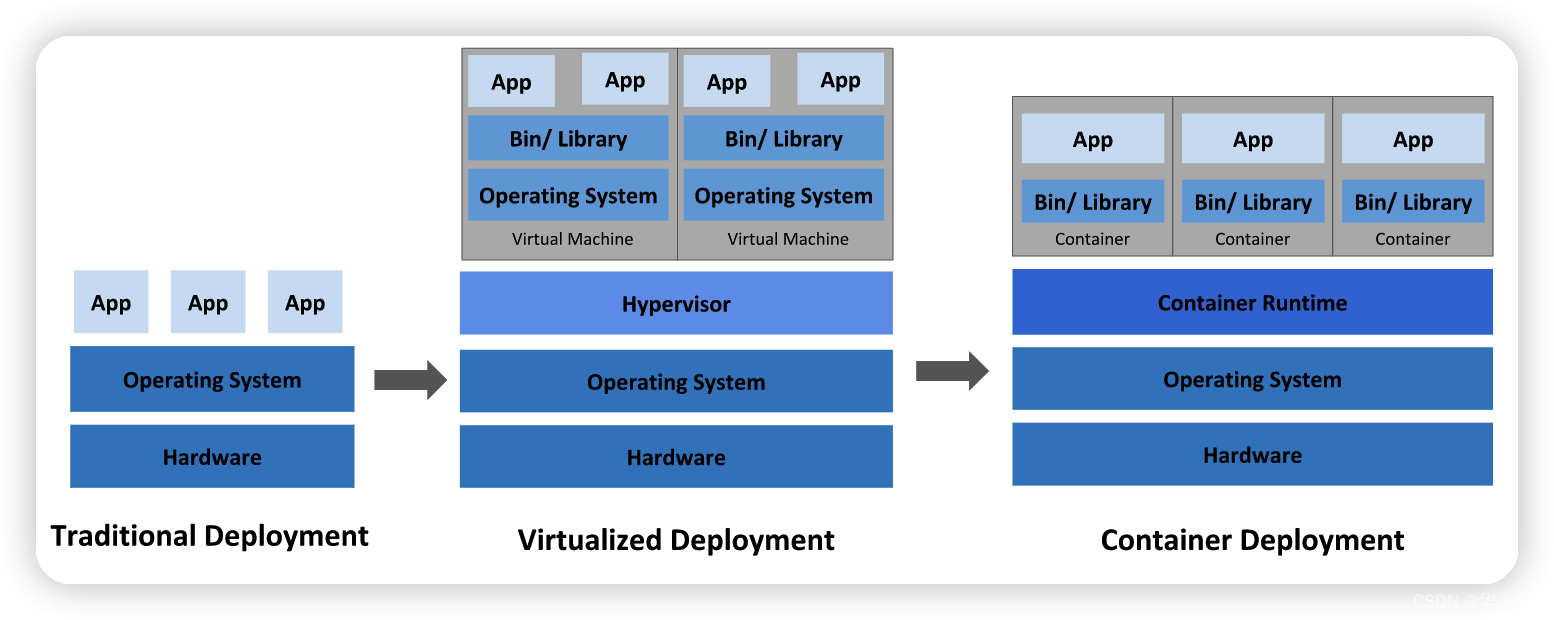
1.2.1 传统部署时代:
早期,各机构是在物理服务器上运行应用程序。 由于无法限制在物理服务器中运行的应用程序资源使用,因此会导致资源分配问题。 例如,如果在物理服务器上运行多个应用程序, 则可能会出现一个应用程序占用大部分资源的情况,而导致其他应用程序的性能下降。 一种解决方案是将每个应用程序都运行在不同的物理服务器上, 但是当某个应用程式资源利用率不高时,剩余资源无法被分配给其他应用程式, 而且维护许多物理服务器的成本很高。
优点:简单,不需要其它技术的参与
缺点:不能为应用程序定义资源使用边界,很难合理地分配计算资源,而且程序之间容易产生影响
1.2.2 虚拟化部署时代:
因此,虚拟化技术被引入了。虚拟化技术允许你在单个物理服务器的 CPU 上运行多台虚拟机(VM)。 虚拟化能使应用程序在不同 VM 之间被彼此隔离,且能提供一定程度的安全性, 因为一个应用程序的信息不能被另一应用程序随意访问。
虚拟化技术能够更好地利用物理服务器的资源,并且因为可轻松地添加或更新应用程序, 而因此可以具有更高的可伸缩性,以及降低硬件成本等等的好处。
每个 VM 是一台完整的计算机,在虚拟化硬件之上运行所有组件,包括其自己的操作系统(OS)。
优点:程序环境不会相互产生影响,提供了一定程度的安全性
缺点:增加了操作系统,浪费了部分资源
1.2.3 容器部署时代:
容器类似于 VM,但是更宽松的隔离特性,使容器之间可以共享操作系统(OS)。 因此,容器比起 VM 被认为是更轻量级的。且与 VM 类似,每个容器都具有自己的文件系统、CPU、内存、进程空间等。 由于它们与基础架构分离,因此可以跨云和 OS 发行版本进行移植。
容器因具有许多优势而变得流行起来。下面列出的是容器的一些好处:
- 敏捷应用程序的创建和部署:与使用 VM 镜像相比,提高了容器镜像创建的简便性和效率。
- 持续开发、集成和部署:通过快速简单的回滚(由于镜像不可变性), 提供可靠且频繁的容器镜像构建和部署。
- 关注开发与运维的分离:在构建、发布时创建应用程序容器镜像,而不是在部署时, 从而将应用程序与基础架构分离。
- 可观察性:不仅可以显示 OS 级别的信息和指标,还可以显示应用程序的运行状况和其他指标信号。
- 跨开发、测试和生产的环境一致性:在笔记本计算机上也可以和在云中运行一样的应用程序。
- 跨云和操作系统发行版本的可移植性:可在 Ubuntu、RHEL、CoreOS、本地、 Google Kubernetes Engine 和其他任何地方运行。
- 以应用程序为中心的管理:提高抽象级别,从在虚拟硬件上运行 OS 到使用逻辑资源在 OS 上运行应用程序。
- 松散耦合、分布式、弹性、解放的微服务:应用程序被分解成较小的独立部分, 并且可以动态部署和管理 - 而不是在一台大型单机上整体运行。
- 资源隔离:可预测的应用程序性能。
- 资源利用:高效率和高密度。
优点:
可以保证每个容器拥有自己的文件系统、CPU、内存、进程空间等
运行应用程序所需要的资源都被容器包装,并和底层基础架构解耦
容器化的应用程序可以跨云服务商、跨Linux操作系统发行版进行部署
缺点:
概念繁多,需要理解的概念和掌握的知识复杂。
1.3 Kubernetes的优点
容器是打包和运行应用程序的好方式。在生产环境中, 你需要管理运行着应用程序的容器,并确保服务不会下线。 例如,如果一个容器发生故障,则你需要启动另一个容器。 如果此行为交由给系统处理,是不是会更容易一些?
这就是 Kubernetes 要来做的事情! Kubernetes 为你提供了一个可弹性运行分布式系统的框架。 Kubernetes 会满足你的扩展要求、故障转移、部署模式等。 例如,Kubernetes 可以轻松管理系统的 Canary 部署。
Kubernetes 为你提供:
-
服务发现和负载均衡
Kubernetes 可以使用 DNS 名称或自己的 IP 地址来曝露容器。 如果进入容器的流量很大, Kubernetes 可以负载均衡并分配网络流量,从而使部署稳定。 -
存储编排
Kubernetes 允许你自动挂载你选择的存储系统,例如本地存储、公共云提供商等。 -
自动部署和回滚
你可以使用 Kubernetes 描述已部署容器的所需状态, 它可以以受控的速率将实际状态更改为期望状态。 例如,你可以自动化 Kubernetes 来为你的部署创建新容器, 删除现有容器并将它们的所有资源用于新容器。 -
自动完成装箱计算
Kubernetes 允许你指定每个容器所需 CPU 和内存(RAM)。 当容器指定了资源请求时,Kubernetes 可以做出更好的决策来为容器分配资源。 -
自我修复
Kubernetes 将重新启动失败的容器、替换容器、杀死不响应用户定义的运行状况检查的容器, 并且在准备好服务之前不将其通告给客户端。 -
密钥与配置管理
Kubernetes 允许你存储和管理敏感信息,例如密码、OAuth 令牌和 ssh 密钥。 你可以在不重建容器镜像的情况下部署和更新密钥和应用程序配置,也无需在堆栈配置中暴露密钥。
1.4 Kubernetes的组件

1.4.1 控制平面组件(Control Plane Components)
控制平面组件会为集群做出全局决策,比如资源的调度。 以及检测和响应集群事件,例如当不满足部署的 replicas 字段时, 要启动新的 pod)。
控制平面组件可以在集群中的任何节点上运行。 然而,为了简单起见,设置脚本通常会在同一个计算机上启动所有控制平面组件, 并且不会在此计算机上运行用户容器。
1.4.2 kube-apiserver
API 服务器是 Kubernetes 控制平面的组件, 该组件负责公开了 Kubernetes API,负责处理接受请求的工作。 API 服务器是 Kubernetes 控制平面的前端。
Kubernetes API 服务器的主要实现是 kube-apiserver。 kube-apiserver 设计上考虑了水平扩缩,也就是说,它可通过部署多个实例来进行扩缩。 你可以运行 kube-apiserver 的多个实例,并在这些实例之间平衡流量。
1.4.3 etcd
etcd 是兼顾一致性与高可用性的键值数据库,可以作为保存 Kubernetes 所有集群数据的后台数据库。Kubernetes 集群的 etcd 数据库通常需要有个备份计划。
1.4.4 kube-scheduler
kube-scheduler 是控制平面的组件, 负责监视新创建的、未指定运行节点(node)的 Pods, 并选择节点来让 Pod 在上面运行。
调度决策考虑的因素包括单个 Pod 及 Pods 集合的资源需求、软硬件及策略约束、 亲和性及反亲和性规范、数据位置、工作负载间的干扰及最后时限。
1.4.5 kube-controller-manager
kube-controller-manager 是控制平面的组件, 负责运行控制器进程。
从逻辑上讲, 每个控制器都是一个单独的进程, 但是为了降低复杂性,它们都被编译到同一个可执行文件,并在同一个进程中运行。
这些控制器包括:
- 节点控制器(Node Controller):负责在节点出现故障时进行通知和响应
- 任务控制器(Job Controller):监测代表一次性任务的 Job 对象,然后创建 Pods 来运行这些任务直至完成
- 端点控制器(Endpoints Controller):填充端点(Endpoints)对象(即加入 Service 与 Pod)
- 服务帐户和令牌控制器(Service Account & Token Controllers):为新的命名空间创建默认帐户和 API 访问令牌
1.4.6 Node 组件
节点组件会在每个节点上运行,负责维护运行的 Pod 并提供 Kubernetes 运行环境。
1.4.6.1 kubelet
kubelet 会在集群中每个节点(node)上运行。 它保证容器(containers)都运行在 Pod 中。
kubelet 接收一组通过各类机制提供给它的 PodSpecs, 确保这些 PodSpecs 中描述的容器处于运行状态且健康。 kubelet 不会管理不是由 Kubernetes 创建的容器。
1.4.6.2 kube-proxy
kube-proxy 是集群中每个节点(node)所上运行的网络代理, 实现 Kubernetes 服务(Service) 概念的一部分。
kube-proxy 维护节点上的一些网络规则, 这些网络规则会允许从集群内部或外部的网络会话与 Pod 进行网络通信。
如果操作系统提供了可用的数据包过滤层,则 kube-proxy 会通过它来实现网络规则。 否则,kube-proxy 仅做流量转发。
1.4.7 容器运行时(Container Runtime)
容器运行环境是负责运行容器的软件。
Kubernetes 支持许多容器运行环境,例如 Docker、 containerd、 CRI-O 以及 Kubernetes CRI (容器运行环境接口) 的其他任何实现。
二.集群搭建前的准备
2.1.环境准备
2.1.1 查看操作系统的版本
[root@e ~]# cat /etc/redhat-release
CentOS Linux release 7.6.1810 (Core)
2.1.2 主机配置
主机名解析(编辑三台主机的hosts文件)
[root@e ~]# cat /etc/hosts
127.0.0.1   localhost localhost.localdomain localhost4 localhost4.localdomain4
::1         localhost localhost.localdomain localhost6 localhost6.localdomain6

192.168.56.101 master
192.168.56.102 node1
192.168.56.103 node2
设置主机名永久生效(每个节点单独设置对应主机名)
[root@master ~]# hostnamectl set-hostname  master
[root@master ~]# hostname
master
[root@master ~]# cat /etc/hostname
master
2.2 集群规划
| 机器名 | 角色 | ip |
|---|---|---|
| master | 主 | 192.168.56.101 |
| node1 | 从 | 192.168.56.102 |
| node2 | 从 | 192.168.56.103 |
2.3 配置免密登录:
2.3.1 生成秘钥(三台机器分别执行)
[root@localhost ~]# ssh-keygen
Generating public/private rsa key pair.
Enter file in which to save the key (/root/.ssh/id_rsa):
Created directory '/root/.ssh'.
Enter passphrase (empty for no passphrase):
Enter same passphrase again:
Your identification has been saved in /root/.ssh/id_rsa.
Your public key has been saved in /root/.ssh/id_rsa.pub.
The key fingerprint is:
SHA256:WK1WjpZAuFNiHQbRk9Z9KXSgDnNQWZX/0Ro3I6a3l9A root@localhost.localdomain
The key's randomart image is:
+---[RSA 2048]----+
|    o*==.=+ooo   |
|    +oB.ooo.+    |
|   . =+.+ oo .  .|
|    o  O *   oo+o|
|     .. S . o o=+|
|       o   . o.E.|
|            . o .|
|             . o |
|              .  |
+----[SHA256]-----+
2.3.2 拷贝秘钥到 node1(三台机器分别执行)
[root@localhost ~]# ssh-copy-id node1
/usr/bin/ssh-copy-id: INFO: Source of key(s) to be installed: "/root/.ssh/id_rsa.pub"
The authenticity of host 'node1 (192.168.56.102)' can't be established.
ECDSA key fingerprint is SHA256:z5vJ1w6HOKaS0Am8kH1uMrEFCZhMKk9U2zARt8HZoEs.
ECDSA key fingerprint is MD5:5c:2d:29:5e:b2:72:a6:4f:ba:9f:0f:65:3e:06:ca:a6.
Are you sure you want to continue connecting (yes/no)? yes
/usr/bin/ssh-copy-id: INFO: attempting to log in with the new key(s), to filter out any that are already installed
/usr/bin/ssh-copy-id: INFO: 1 key(s) remain to be installed -- if you are prompted now it is to install the new keys
root@node1's password:

Number of key(s) added: 1

Now try logging into the machine, with:   "ssh 'node1'"
and check to make sure that only the key(s) you wanted were added.
2.3.3 scp 拷贝秘钥到node1(三台机器分别执行)
[root@localhost ~]# scp -r ~/.ssh/authorized_keys node2:~/.ssh
root@node2's password:
authorized_keys                                                                                          100% 1224   341.7KB/s   00:00
测试配置是否成功:(在任意机器上执行)
[root@localhost ~]# ssh node1
Last login: Mon Jun 20 02:14:32 2022 from master
[root@localhost ~]# ssh master
Last login: Mon Jun 20 02:14:35 2022 from node1
2.4 编写一个集群执行命令的脚本,
将脚本放到/usr/local/bin目录
[root@localhost /]# cd /usr/local/bin
[root@localhost bin]# ll #注意要给脚本添加执行权限
-rwx--x--x 1 root root 607 Jun 20 06:03 xcall.sh
脚本内容:
[root@localhost /]# cat /usr/local/bin/xcall.sh
#!/bin/bash
# 获取控制台指令
cmd=$*
# 判断指令是否为空
if [ ! -n "$cmd" ]
then
        echo "command can not be null !"
        exit
fi

# 获取当前登录用户
user=`whoami`
# 获取/etc/hosts文件内配置的ip对应域名列表 过滤掉 localhost
hostname=($(getent hosts | awk '{print $2}' | grep -v localhost))
#打印下获取到的域名
echo ${hostname[@]}
# 在从机执行指令,这里需要根据你具体的集群情况配置,host与具体主机名一致,同上
for h in ${hostname[@]}
do
        echo "================current host is:$h================="
        echo "--> excute command \"$user@$h $cmd\""
        ssh $user@$h $cmd
done

echo "excute successfully !"
测试下这个脚本:
[root@localhost /]# xcall.sh date
master node1 node2
================current host is:master=================
--> excute command "root@master date"
Mon Jun 20 06:06:51 EDT 2022
================current host is:node1=================
--> excute command "root@node1 date"
Mon Jun 20 06:06:39 EDT 2022
================current host is:node2=================
--> excute command "root@node2 date"
Mon Jun 20 06:06:42 EDT 2022
excute successfully !
2.4 时间同步:参考链接
kubernetes要求集群中的节点时间必须精确一致,这里使用chronyd服务从网络同步时间
企业中建议配置内部的时间同步服务器
同步结果:
[root@e ~]# xcall.sh date
master node1 node2
================current host is:master=================
--> excute command "root@master date"
Tue Jun 21 10:31:41 EDT 2022
================current host is:node1=================
--> excute command "root@node1 date"
Tue Jun 21 10:31:42 EDT 2022
================current host is:node2=================
--> excute command "root@node2 date"
Tue Jun 21 10:31:43 EDT 2022
excute successfully !
2.5 禁用iptable和firewalld服务
kubernetes和docker 在运行的中会产生大量的iptables规则,为了不让系统规则跟它们混淆,直接关闭系统的规则
[root@e ~]# xcall.sh systemctl stop firewalld
master node1 node2
================current host is:master=================
--> excute command "root@master systemctl stop firewalld"
================current host is:node1=================
--> excute command "root@node1 systemctl stop firewalld"
================current host is:node2=================
--> excute command "root@node2 systemctl stop firewalld"
excute successfully !
[root@e ~]# xcall.sh systemctl disable firewalld
master node1 node2
================current host is:master=================
--> excute command "root@master systemctl disable firewalld"
Removed symlink /etc/systemd/system/multi-user.target.wants/firewalld.service.
Removed symlink /etc/systemd/system/dbus-org.fedoraproject.FirewallD1.service.
================current host is:node1=================
--> excute command "root@node1 systemctl disable firewalld"
Removed symlink /etc/systemd/system/multi-user.target.wants/firewalld.service.
Removed symlink /etc/systemd/system/dbus-org.fedoraproject.FirewallD1.service.
================current host is:node2=================
--> excute command "root@node2 systemctl disable firewalld"
Removed symlink /etc/systemd/system/multi-user.target.wants/firewalld.service.
Removed symlink /etc/systemd/system/dbus-org.fedoraproject.FirewallD1.service.
excute successfully !
[root@e ~]# xcall.sh systemctl stop iptables
master node1 node2
================current host is:master=================
--> excute command "root@master systemctl stop iptables"
Failed to stop iptables.service: Unit iptables.service not loaded.
================current host is:node1=================
--> excute command "root@node1 systemctl stop iptables"
Failed to stop iptables.service: Unit iptables.service not loaded.
================current host is:node2=================
--> excute command "root@node2 systemctl stop iptables"
Failed to stop iptables.service: Unit iptables.service not loaded.
excute successfully !
[root@e ~]# xcall.sh systemctl disable iptables
master node1 node2
================current host is:master=================
--> excute command "root@master systemctl disable iptables"
Failed to execute operation: No such file or directory
================current host is:node1=================
--> excute command "root@node1 systemctl disable iptables"
Failed to execute operation: No such file or directory
================current host is:node2=================
--> excute command "root@node2 systemctl disable iptables"
Failed to execute operation: No such file or directory
excute successfully !
2.6 禁用selinux
selinux是linux系统下的一个安全服务,如果不关闭它,在安装集群中会产生各种各样的奇葩问题
修改配置文件 /etc/selinux/config,然后重启系统
[root@localhost ~]# cat /etc/selinux/config

# This file controls the state of SELinux on the system.
# SELINUX= can take one of these three values:
#     enforcing - SELinux security policy is enforced.
#     permissive - SELinux prints warnings instead of enforcing.
#     disabled - No SELinux policy is loaded.
#修改这里
SELINUX=disabled

# SELINUXTYPE= can take one of three values:
#     targeted - Targeted processes are protected,
#     minimum - Modification of targeted policy. Only selected processes are protected.
#     mls - Multi Level Security protection.
SELINUXTYPE=targeted
2.6 禁用swap分区
swap分区指的是虚拟内存分区,它的作用是物理内存使用完,之后将磁盘空间虚拟成内存来使用,启用swap设备会对系统的性能产生非常负面的影响,因此kubernetes要求每个节点都要禁用swap设备,但是如果因为某些原因确实不能关闭swap分区,就需要在集群安装过程中通过明确的参数进行配置说明
修改配置文件:/etc/fstab 注释掉 /dev/mapper/centos-swap swap
[root@localhost ~]# cat /etc/fstab

#
# /etc/fstab
# Created by anaconda on Sat Apr  9 07:32:34 2022
#
# Accessible filesystems, by reference, are maintained under '/dev/disk'
# See man pages fstab(5), findfs(8), mount(8) and/or blkid(8) for more info
#
/dev/mapper/centos-root /                       xfs     defaults        0 0
UUID=003c3148-0556-4195-82a3-17976a7f9cd8 /boot                   xfs     defaults        0 0
#注释掉下面这行
#/dev/mapper/centos-swap swap                    swap    defaults        0 0
2.7 修改linux的内核参数(各个节点都需要新增)
[root@localhost ~]# cat /etc/sysctl.d/kubernetes.conf

# 修改linux的内核采纳数,添加网桥过滤和地址转发功能
# 编辑/etc/sysctl.d/kubernetes.conf文件,添加如下配置:
net.bridge.bridge-nf-call-ip6tables = 1
net.bridge.bridge-nf-call-iptables = 1
net.ipv4.ip_forward = 1
新增完后用scp拷贝到各个节点
[root@localhost ~]# scp /etc/sysctl.d/kubernetes.conf root@node1:/etc/sysctl.d/kubernetes.conf
kubernetes.conf                                                                                               100%  248   107.0KB/s   00:00
[root@localhost ~]#
2.8 配置ipvs功能
在Kubernetes中Service有两种带来模型,一种是基于iptables的,一种是基于ipvs的两者比较的话,ipvs的性能明显要高一些,但是如果要使用它,需要手动载入ipvs模块
[root@e ~]# xcall.sh yum install ipset ipvsadm -y
master node1 node2
================current host is:node2=================
--> excute command "root@node2 yum install ipset ipvsadm -y"
Installed:
  ipvsadm.x86_64 0:1.27-8.el7

Updated:
  ipset.x86_64 0:7.1-1.el7

Dependency Updated:
  ipset-libs.x86_64 0:7.1-1.el7

Complete! #节点看到这里就是安装成功了
excute successfully !
新增脚本/etc/sysconfig/modules/ipvs.modules
[root@e ~]# cat /etc/sysconfig/modules/ipvs.modules
modprobe -- ip_vs
modprobe -- ip_vs_rr
modprobe -- ip_vs_wrr
modprobe -- ip_vs_sh
modprobe -- nf_conntrack_ipv4
同步到其他节点
[root@e ~]# scp /etc/sysconfig/modules/ipvs.modules root@node1:/etc/sysconfig/modules/ipvs.modules
ipvs.modules                                                                                                  100%  117    47.4KB/s   00:00
[root@e ~]# scp /etc/sysconfig/modules/ipvs.modules root@node2:/etc/sysconfig/modules/ipvs.modules
ipvs.modules                                                                                                  100%  117    46.8KB/s   00:00
给脚本增加执行权限
#查看脚本执行权限
[root@e ~]# xcall.sh "ls -all /etc/sysconfig/modules/ipvs.modules"
master node1 node2
================current host is:master=================
--> excute command "root@master ls -all /etc/sysconfig/modules/ipvs.modules"
-rw-r--r--. 1 root root 117 Jun 19 22:01 /etc/sysconfig/modules/ipvs.modules
================current host is:node1=================
--> excute command "root@node1 ls -all /etc/sysconfig/modules/ipvs.modules"
-rw-r--r--. 1 root root 117 Jun 21 11:00 /etc/sysconfig/modules/ipvs.modules
================current host is:node2=================
--> excute command "root@node2 ls -all /etc/sysconfig/modules/ipvs.modules"
-rw-r--r--. 1 root root 117 Jun 21 11:00 /etc/sysconfig/modules/ipvs.modules
excute successfully !
#给文件增加执行权限
[root@e ~]# xcall.sh "chmod 711 /etc/sysconfig/modules/ipvs.modules"
master node1 node2
================current host is:master=================
--> excute command "root@master chmod 711 /etc/sysconfig/modules/ipvs.modules"
================current host is:node1=================
--> excute command "root@node1 chmod 711 /etc/sysconfig/modules/ipvs.modules"
================current host is:node2=================
--> excute command "root@node2 chmod 711 /etc/sysconfig/modules/ipvs.modules"
excute successfully !

#再次查看文件权限
[root@e ~]# xcall.sh "ls -all /etc/sysconfig/modules/ipvs.modules"
master node1 node2
================current host is:master=================
--> excute command "root@master ls -all /etc/sysconfig/modules/ipvs.modules"
-rwx--x--x. 1 root root 117 Jun 19 22:01 /etc/sysconfig/modules/ipvs.modules
================current host is:node1=================
--> excute command "root@node1 ls -all /etc/sysconfig/modules/ipvs.modules"
-rwx--x--x. 1 root root 117 Jun 21 11:00 /etc/sysconfig/modules/ipvs.modules
================current host is:node2=================
--> excute command "root@node2 ls -all /etc/sysconfig/modules/ipvs.modules"
-rwx--x--x. 1 root root 117 Jun 21 11:00 /etc/sysconfig/modules/ipvs.modules
excute successfully !
执行脚本文件
[root@e ~]# xcall.sh /etc/sysconfig/modules/ipvs.modules
master node1 node2
================current host is:master=================
--> excute command "root@master /etc/sysconfig/modules/ipvs.modules"
================current host is:node1=================
--> excute command "root@node1 /etc/sysconfig/modules/ipvs.modules"
================current host is:node2=================
--> excute command "root@node2 /etc/sysconfig/modules/ipvs.modules"
excute successfully !

#查看对应模块是否加载成功
[root@e ~]# xcall.sh "lsmod | grep -e ip_vs -e nf_conntrack_ipv4"
master node1 node2
================current host is:master=================
--> excute command "root@master lsmod | grep -e ip_vs -e nf_conntrack_ipv4"
nf_conntrack_ipv4      15053  0
nf_defrag_ipv4         12729  1 nf_conntrack_ipv4
ip_vs_sh               12688  0
ip_vs_wrr              12697  0
ip_vs_rr               12600  0
ip_vs                 145497  6 ip_vs_rr,ip_vs_sh,ip_vs_wrr
nf_conntrack          133095  2 ip_vs,nf_conntrack_ipv4
libcrc32c              12644  3 xfs,ip_vs,nf_conntrack
================current host is:node1=================
--> excute command "root@node1 lsmod | grep -e ip_vs -e nf_conntrack_ipv4"
nf_conntrack_ipv4      15053  0
nf_defrag_ipv4         12729  1 nf_conntrack_ipv4
ip_vs_sh               12688  0
ip_vs_wrr              12697  0
ip_vs_rr               12600  0
ip_vs                 145497  6 ip_vs_rr,ip_vs_sh,ip_vs_wrr
nf_conntrack          133095  2 ip_vs,nf_conntrack_ipv4
libcrc32c              12644  3 xfs,ip_vs,nf_conntrack
================current host is:node2=================
--> excute command "root@node2 lsmod | grep -e ip_vs -e nf_conntrack_ipv4"
nf_conntrack_ipv4      15053  0
nf_defrag_ipv4         12729  1 nf_conntrack_ipv4
ip_vs_sh               12688  0
ip_vs_wrr              12697  0
ip_vs_rr               12600  0
ip_vs                 145497  6 ip_vs_rr,ip_vs_sh,ip_vs_wrr
nf_conntrack          133095  2 ip_vs,nf_conntrack_ipv4
libcrc32c              12644  3 xfs,ip_vs,nf_conntrack
excute successfully !
2.9 重启服务器
reboot
三. 安装docker
3.1 安装wget
[root@master ~]# xcall.sh yum -y install wget
master node1 node2
================current host is:master=================
--> excute command "root@master yum -y install wget"
Loaded plugins: fastestmirror, product-id, search-disabled-repos, subscription-
This system is not registered with an entitlement server. You can use subscription-manager to register.
Installed:
  wget.x86_64 0:1.14-18.el7_6.1
Complete!
3.1 切换镜像源
[root@master ~]# xcall.sh wget https://mirrors.aliyun.com/docker-ce/linux/centos/docker-ce.repo -O /etc/yum.repos.d/docker-ce.repo
master node1 node2
================current host is:master=================
--> excute command "root@master wget https://mirrors.aliyun.com/docker-ce/linux/centos/docker-ce.repo -O /etc/yum.repos.d/docker-ce.repo"
--2022-06-21 11:46:49--  https://mirrors.aliyun.com/docker-ce/linux/centos/docker-ce.repo
Resolving mirrors.aliyun.com (mirrors.aliyun.com)... 116.163.18.14, 116.163.18.12, 116.163.18.17, ...
Connecting to mirrors.aliyun.com (mirrors.aliyun.com)|116.163.18.14|:443... connected.
HTTP request sent, awaiting response... 200 OK
Length: 2081 (2.0K) [application/octet-stream]
Saving to: ‘/etc/yum.repos.d/docker-ce.repo’

     0K ..                                                    100%  243M=0s
3.2 查看当前镜像源中支持的docker版本
[root@master ~]#  yum list docker-ce --showduplicates
Loaded plugins: fastestmirror, product-id, search-disabled-repos, subscription-manager

This system is not registered with an entitlement server. You can use subscription-manager to register.

Loading mirror speeds from cached hostfile
 * base: mirrors.tuna.tsinghua.edu.cn
 * extras: mirrors.tuna.tsinghua.edu.cn
 * updates: mirrors.tuna.tsinghua.edu.cn
Available Packages
docker-ce.x86_64                                            17.03.0.ce-1.el7.centos                                             docker-ce-stable
docker-ce.x86_64                                            17.03.1.ce-1.el7.centos                                             docker-ce-stable
docker-ce.x86_64                                            17.03.2.ce-1.el7.centos                                                                                        docker-ce-stable
docker-ce.x86_64                                            18.03.0.ce-1.el7.centos                                             docker-ce-stable
docker-ce.x86_64                                            18.03.1.ce-1.el7.centos                                             docker-ce-stable
docker-ce.x86_64                                            18.06.0.ce-3.el7                                                    docker-ce-stable
docker-ce.x86_64                                            18.06.1.ce-3.el7                                                    docker-ce-stable
docker-ce.x86_64                                            18.06.2.ce-3.el7                                                    docker-ce-stable
docker-ce.x86_64                                            18.06.3.ce-3.el7                                                    docker-ce-stable
docker-ce.x86_64                                            3:18.09.0-3.el7
3.3 安装特定版本的docker-ce
必须指定 ** --setopt=obsoletes=0**,否则yum会自动安装更高版本
[root@master ~]# xcall.sh yum install --setopt=obsoletes=0 docker-ce-18.06.3.ce-3.el7 -y
master node1 node2
================current host is:master=================
--> excute command "root@master yum install --setopt=obsoletes=0 docker-ce-18.06.3.ce-3.el7 -y"
Loaded plugins: fastestmirror, product-id, search-disabled-repos,
excute successfully !
检查是否安装成功
[root@master ~]# xcall.sh docker --version
master node1 node2
================current host is:master=================
--> excute command "root@master docker --version"
Docker version 1.13.1, build 7d71120/1.13.1
================current host is:node1=================
--> excute command "root@node1 docker --version"
Docker version 1.13.1, build 7d71120/1.13.1
================current host is:node2=================
--> excute command "root@node2 docker --version"
Docker version 1.13.1, build 7d71120/1.13.1
excute successfully !
3.4 使用systemd来替代cgroupfs
#Docker 在默认情况下使用Vgroup Driver为cgroupfs,而Kubernetes推荐使用systemd来替代cgroupfs
[root@master ~]# cat /etc/docker/daemon.json
{
"bip":"172.17.0.1/24",
#加上这一行
"exec-opts": ["native.cgroupdriver=systemd"],
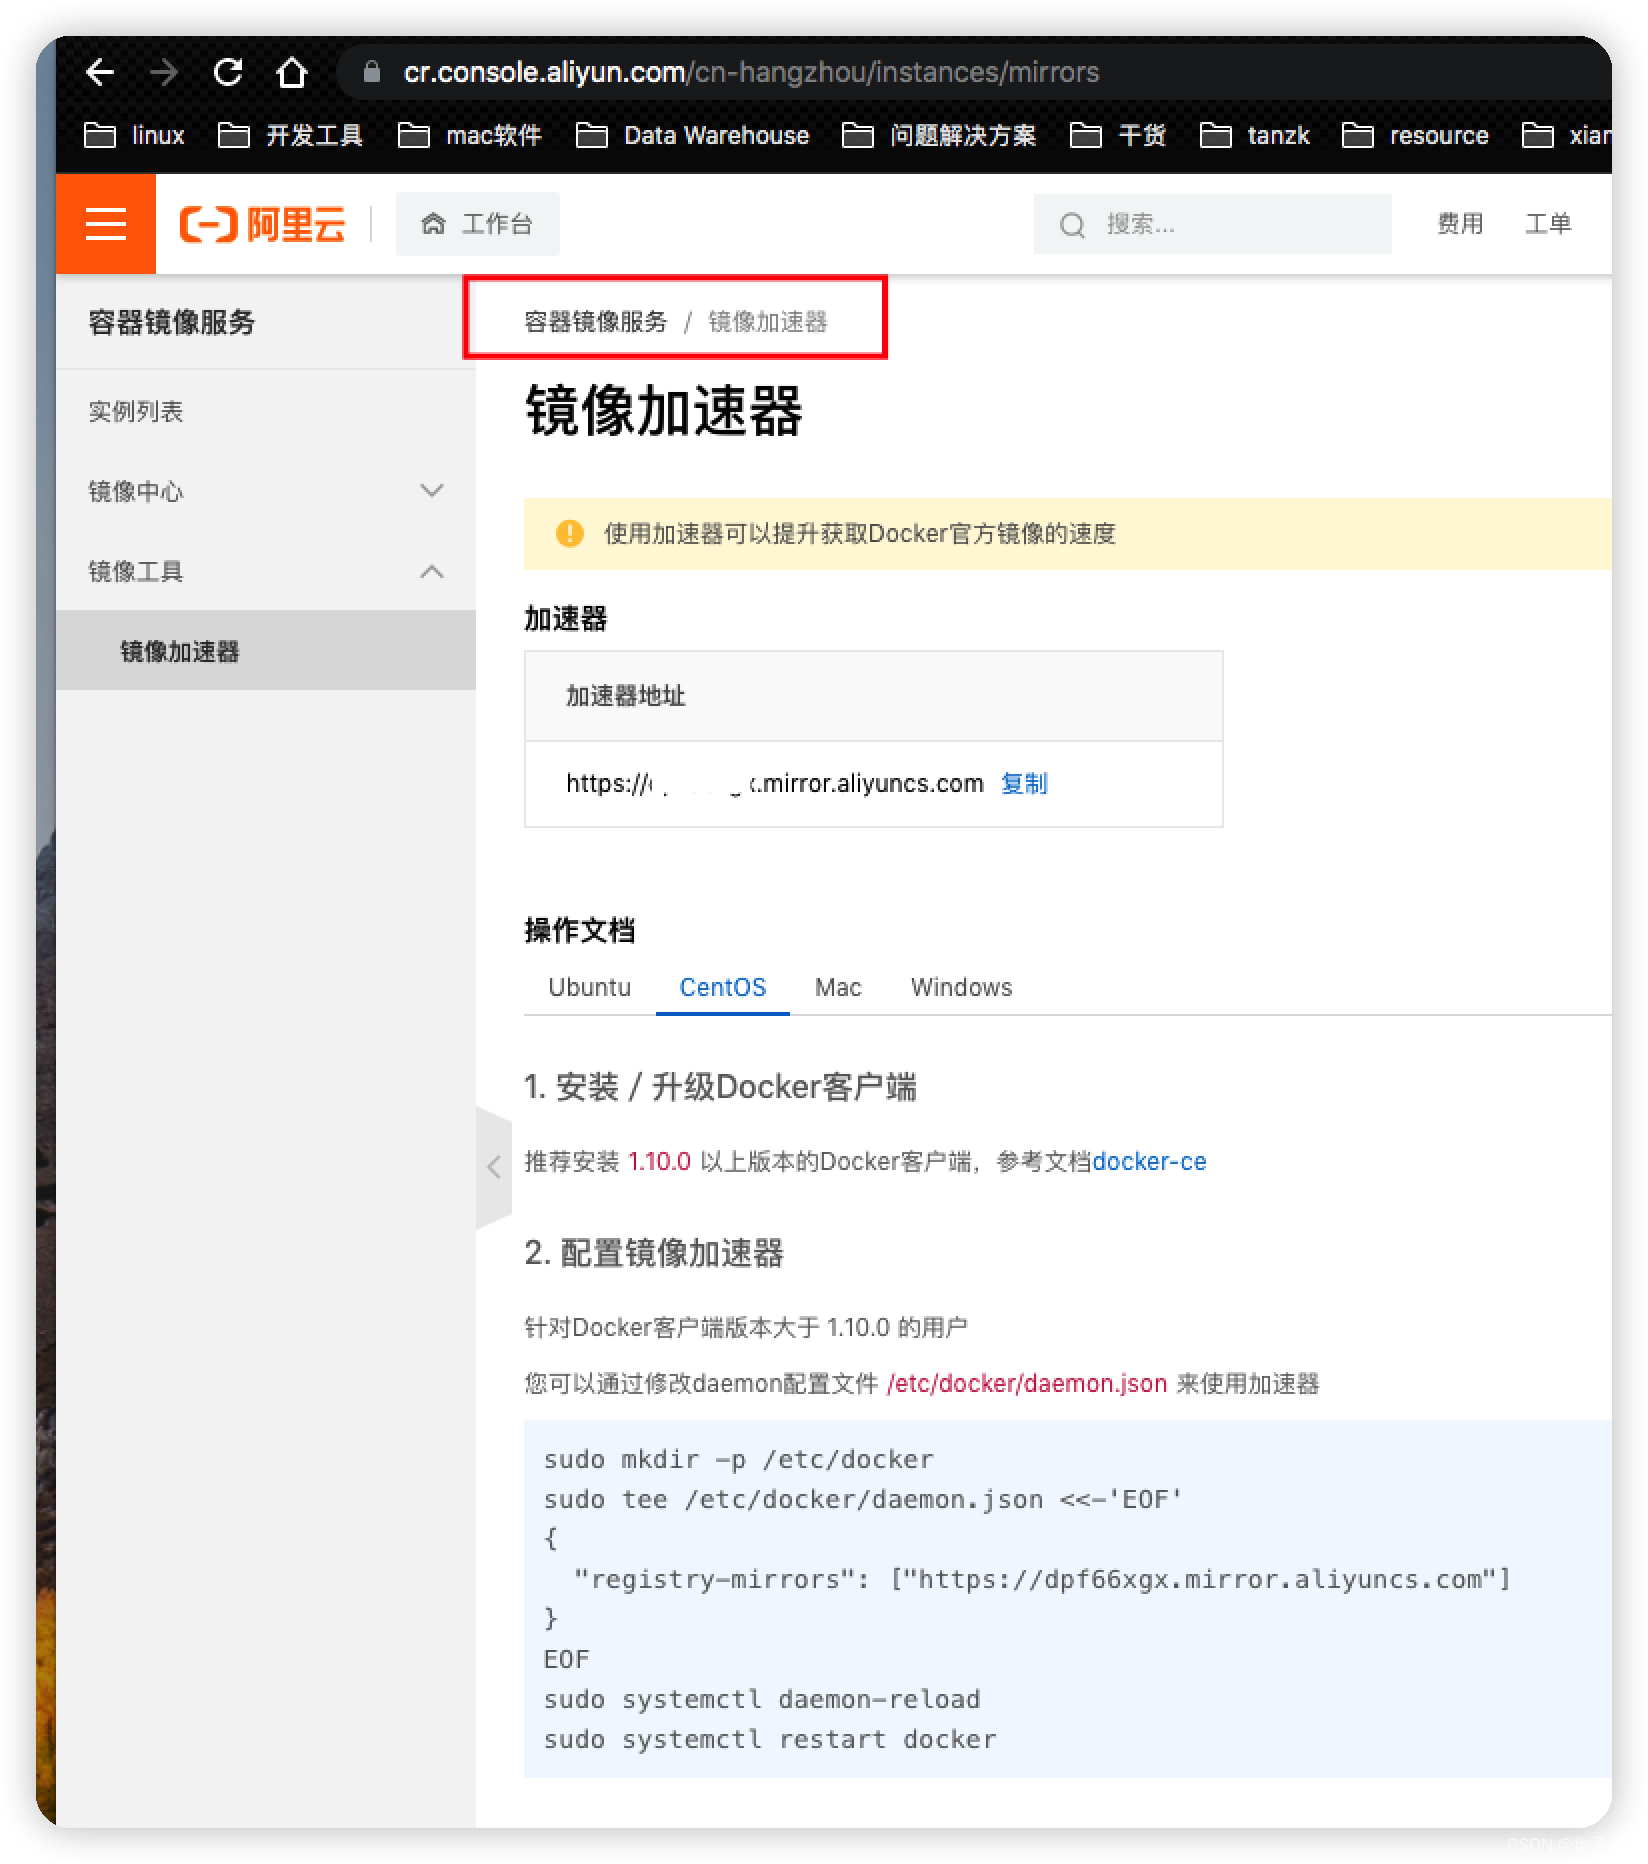
"registry-mirrors":[
"https://*****.mirror.aliyuncs.com"
,"https://registry.docker-cn.com"
,"http://localhost:5000"
]
}
#同步到其他节点
[root@master ~]# scp /etc/docker/daemon.json root@node1:/etc/docker/daemon.json
daemon.json 100% 204 171.2KB/s 00:00
[root@master ~]# scp /etc/docker/daemon.json root@node2:/etc/docker/daemon.json
daemon.json 100% 204 125.8KB/s 00:00
可以自己去申请个阿里云的镜像加速器
3.5 重启docker
[root@master ~]# xcall.sh systemctl status docker
master node1 node2
================current host is:master=================
--> excute command "root@master systemctl status docker"
● docker.service - Docker Application Container Engine
   Loaded: loaded (/usr/lib/systemd/system/docker.service; enabled; vendor preset: disabled)
   Active: failed (Result: exit-code) since Tue 2022-06-21 12:37:19 EDT; 10s ago
     Docs: http://docs.docker.com
  Process: 14149 ExecStart=/usr/bin/dockerd-current --add-runtime docker-runc=/usr/libexec/docker/docker-runc-current --default-runtime=docker-runc --exec-opt native.cgroupdriver=systemd --userland-proxy-path=/usr/libexec/docker/docker-proxy-current --init-path=/usr/libexec/docker/docker-init-current --seccomp-profile=/etc/docker/seccomp.json $OPTIONS $DOCKER_STORAGE_OPTIONS $DOCKER_NETWORK_OPTIONS $ADD_REGISTRY $BLOCK_REGISTRY $INSECURE_REGISTRY $REGISTRIES (code=exited, status=1/FAILURE)
 Main PID: 14149 (code=exited, status=1/FAILURE)

Jun 21 12:37:19 master systemd[1]: Starting Docker Application Container Engine...
Jun 21 12:37:19 master dockerd-current[14149]: unable to configure the Docker daemon with file /etc/docker/daemon.json: the following directives are specified both as a flag and in the configuration file: exec-opts: (from flag: [native.cgroupdriver=systemd], from file: [native.cgroupdriver=systemd])
Jun 21 12:37:19 master systemd[1]: docker.service: main process exited, code=exited, status=1/FAILURE
Jun 21 12:37:19 master systemd[1]: Failed to start Docker Application Container Engine.
Jun 21 12:37:19 master systemd[1]: Unit docker.service entered failed state.
Jun 21 12:37:19 master systemd[1]: docker.service failed.
修改完后重启的时候报错了。
# 解决报错
# vi /lib/systemd/system/docker.service
# 找到并删除下面这句话,保存退出,即可解决
# --exec-opt native.cgroupdriver=cgroupfs \

[root@master ~]# xcall.sh systemctl daemon-reload
master node1 node2
================current host is:master=================
--> excute command "root@master systemctl daemon-reload"
================current host is:node1=================
--> excute command "root@node1 systemctl daemon-reload"
================current host is:node2=================
--> excute command "root@node2 systemctl daemon-reload"
excute successfully !
[root@master ~]# xcall.sh systemctl restart docker
master node1 node2
================current host is:master=================
--> excute command "root@master systemctl restart docker"
================current host is:node1=================
--> excute command "root@node1 systemctl restart docker"
================current host is:node2=================
--> excute command "root@node2 systemctl restart docker"
excute successfully !
转载声明:
本文参考CSDN博主「渣渣苏」
和 kubernetes中文网,遵循CC 4.0 BY-SA版权协议,转载请附上原文出处链接及本声明。
原文链接:https://blog.csdn.net/su2231595742/article/details/124182312
转载目的只为本人学习记录,如有侵权请联系删除


 1926
1926


 被折叠的 条评论
为什么被折叠?
被折叠的 条评论
为什么被折叠?
 到【灌水乐园】发言


