


 本文详细介绍Webpack的安装与配置过程,包括环境搭建、模式设置、插件使用、Loader配置等核心内容,并提供了完整的示例代码。
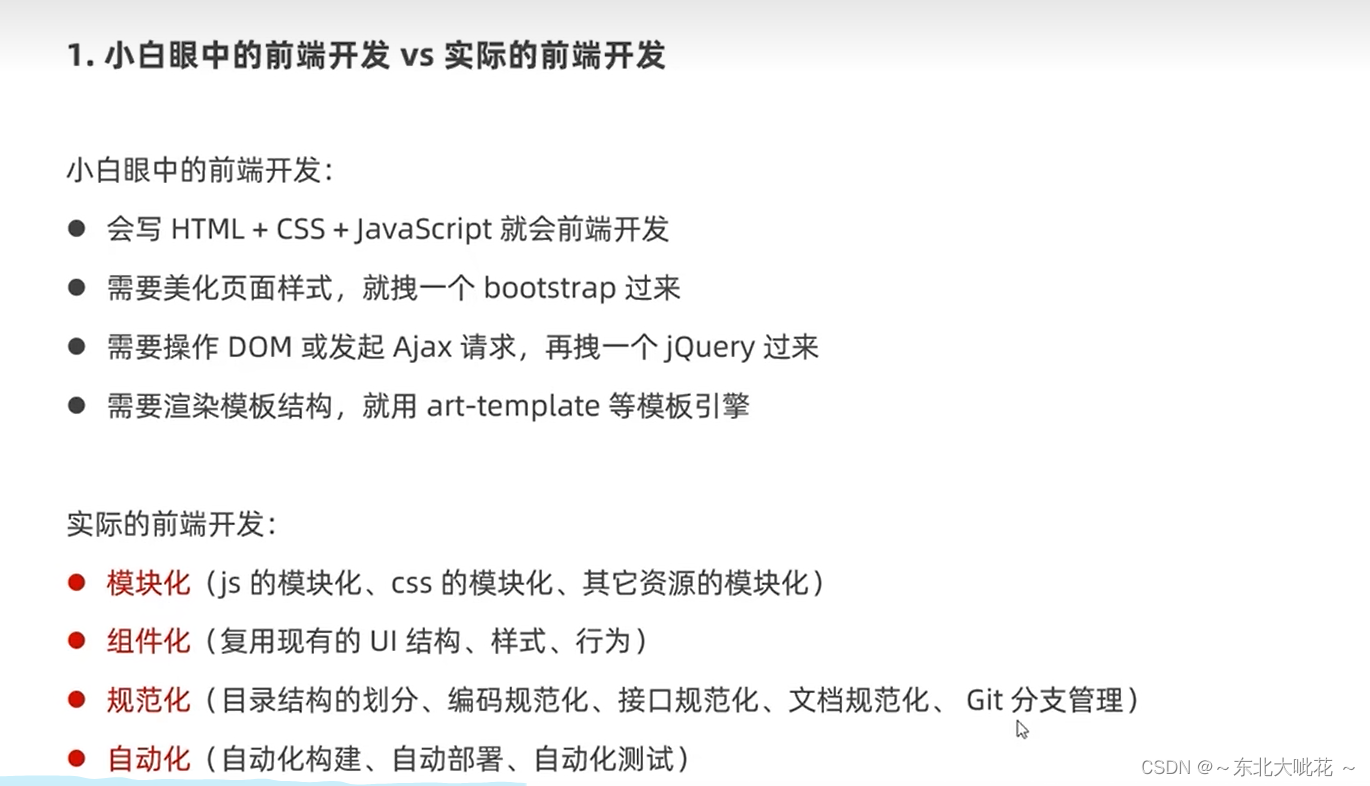
前端工程化
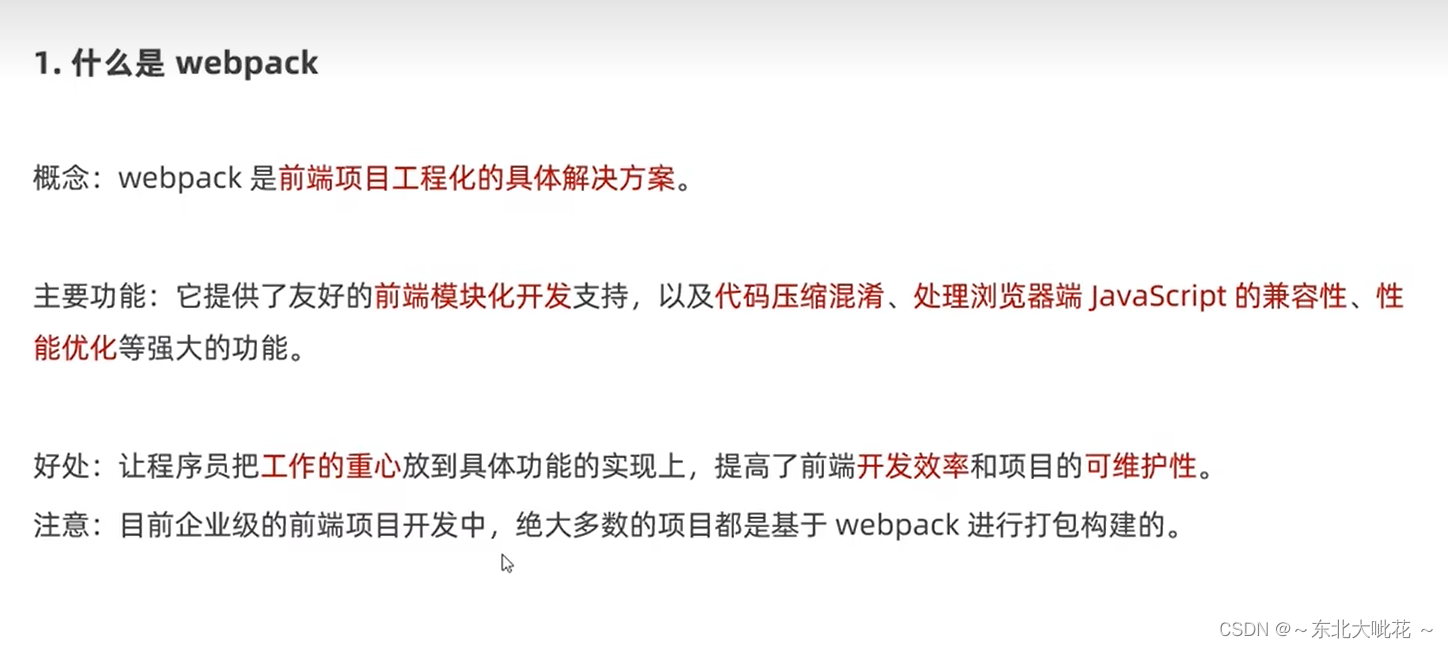
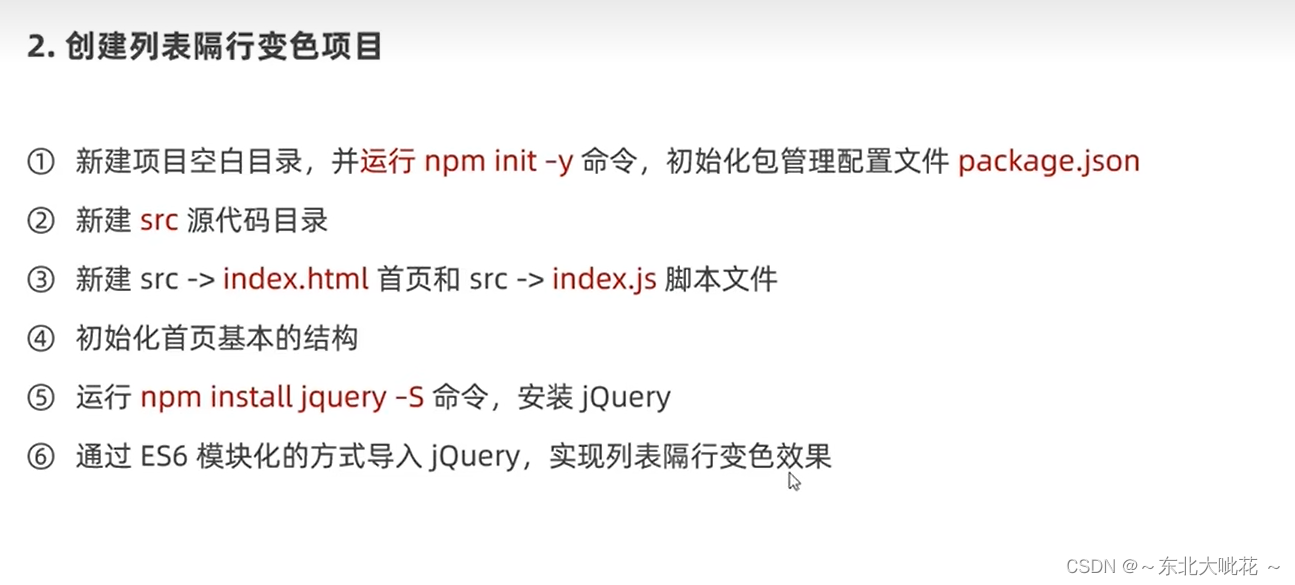
安装webpack
npm install webpack webpack-cli -D

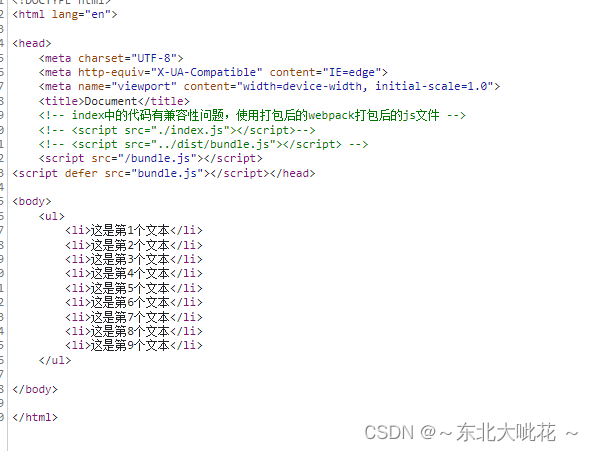
<!-- index中的代码有兼容性问题,使用打包后的webpack打包后的js文件 -->
    <!-- <script src="./index.js"></script>-->
    <script src="../dist//main.js"></script>
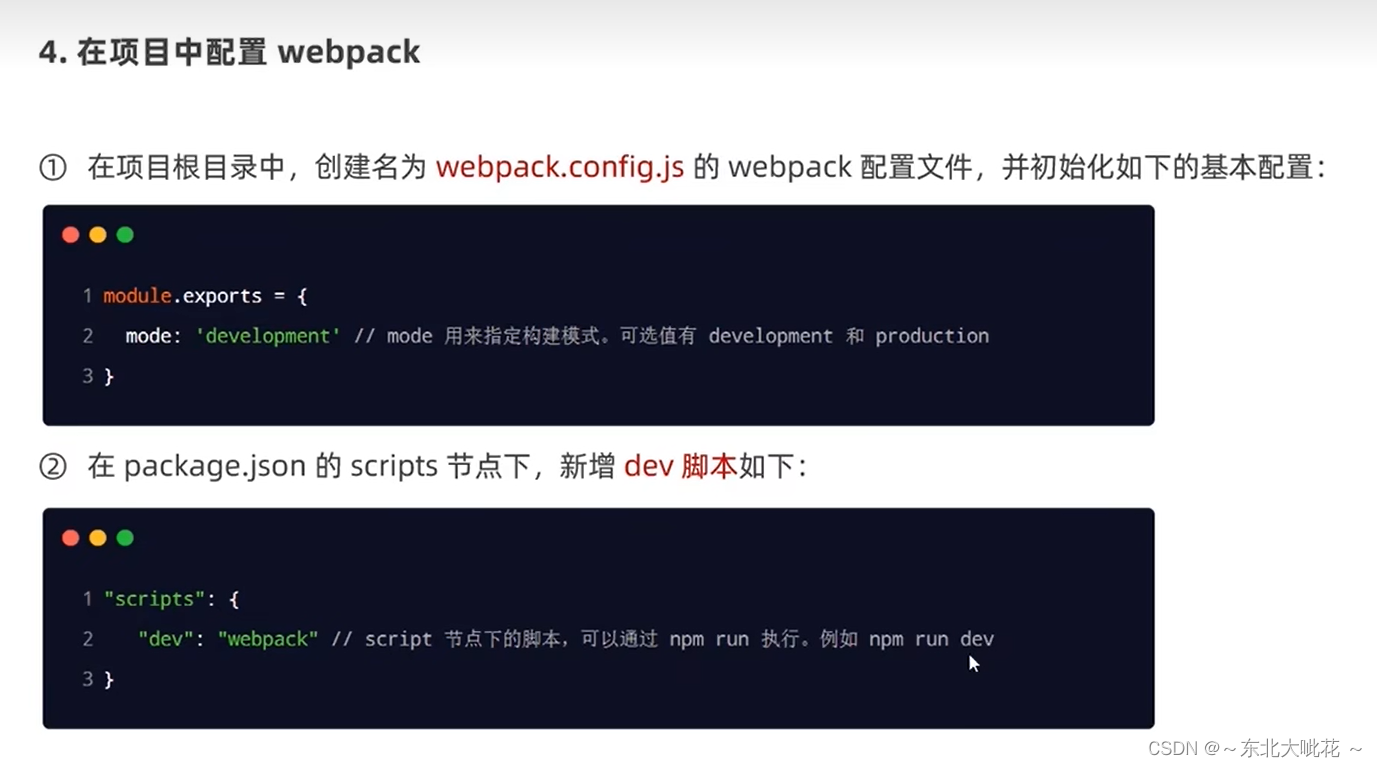
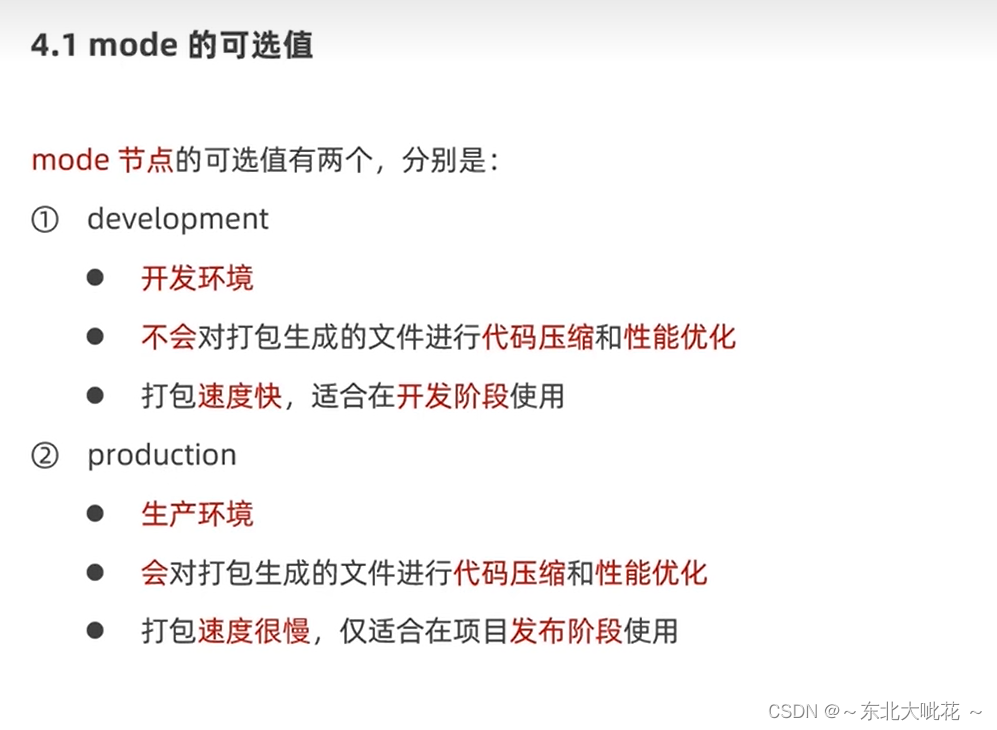
mode
mode:"development"
或
mode:"production"
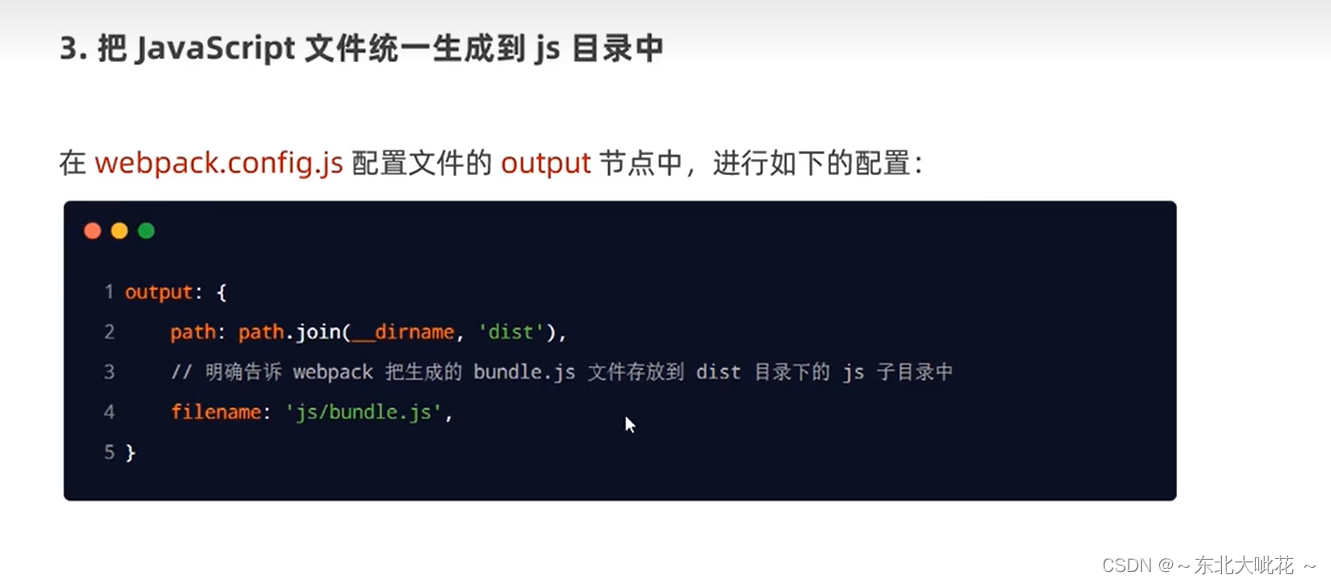
配置打包入口与出口
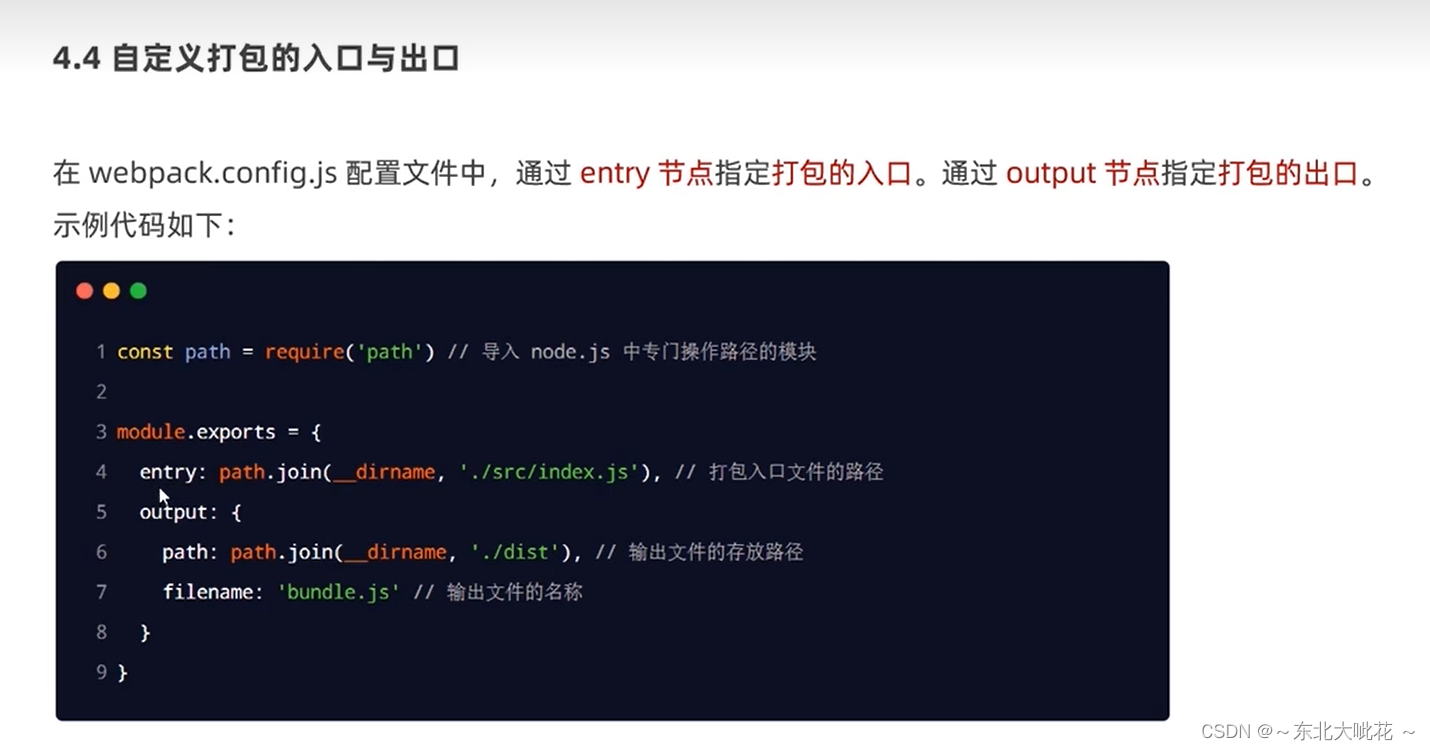
const path = require('path')

module.exports = {
    //mode 用来指定构建模式  可选development 和 production
    mode: 'development',
    //entry为指定打包入口
    entry: path.join(__dirname, './src/index.js'),
    //output指定打包出口
    output: {
        //路径
        path: path.join(__dirname, './dist'),
        //表示输出文件的名称
        filename: 'bundle.js'

    }
}
webpack中的插件
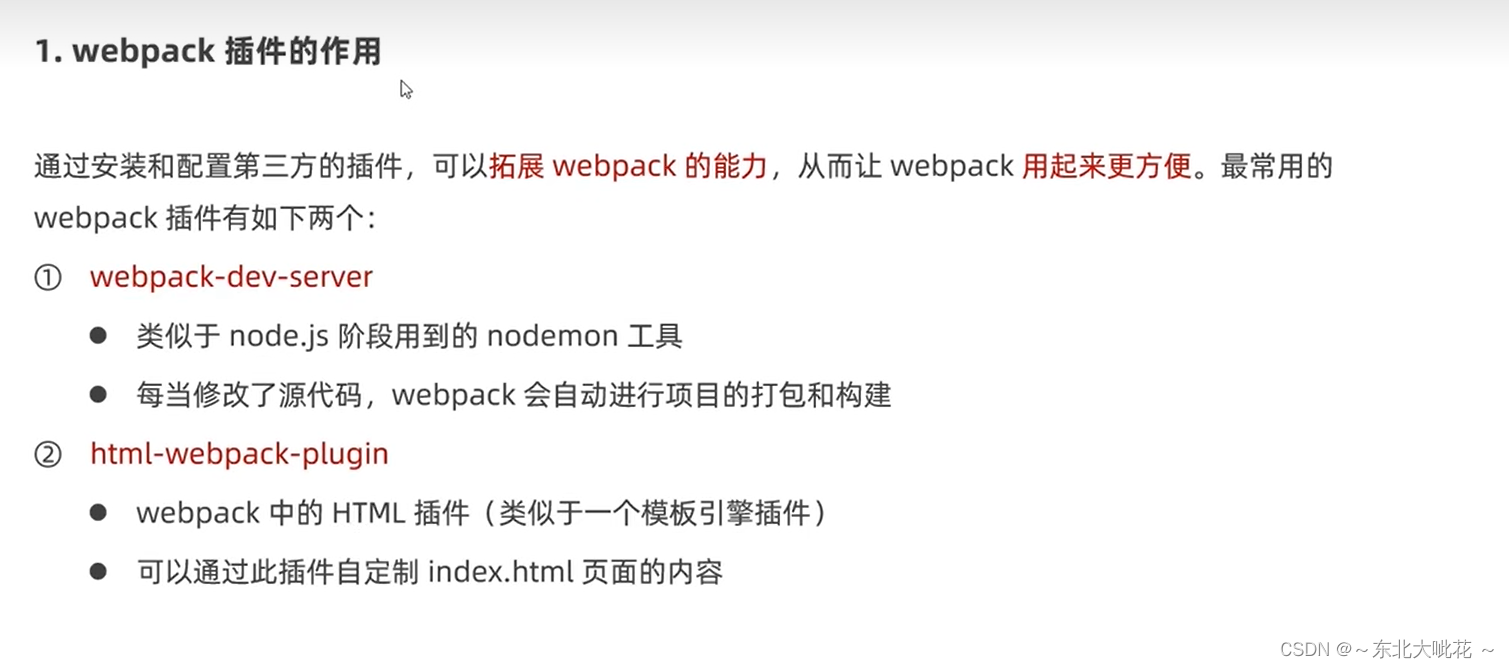
1.webpack-dev-server

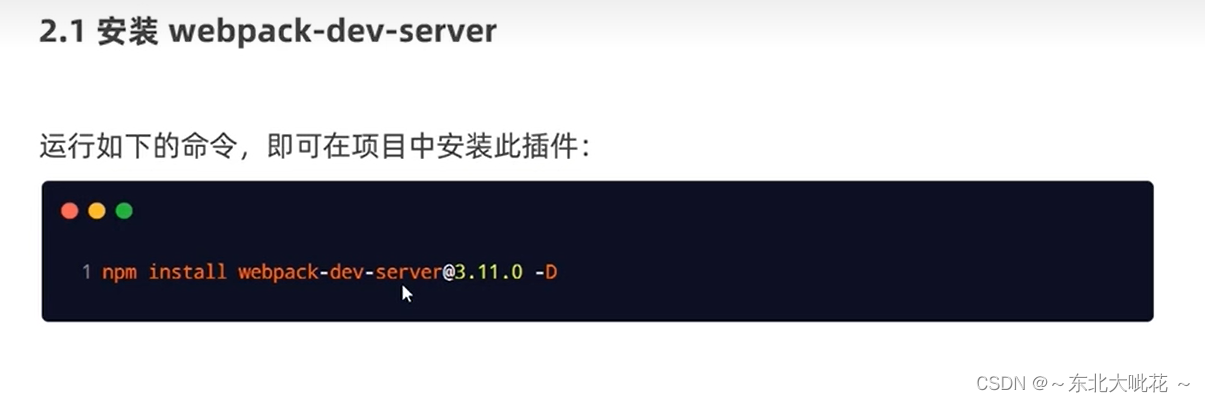
npm install webpack-dev-server -D

<!-- index中的代码有兼容性问题,使用打包后的webpack打包后的js文件 -->
<!-- <script src="./index.js"></script>-->
<!-- <script src="../dist/bundle.js"></script> -->
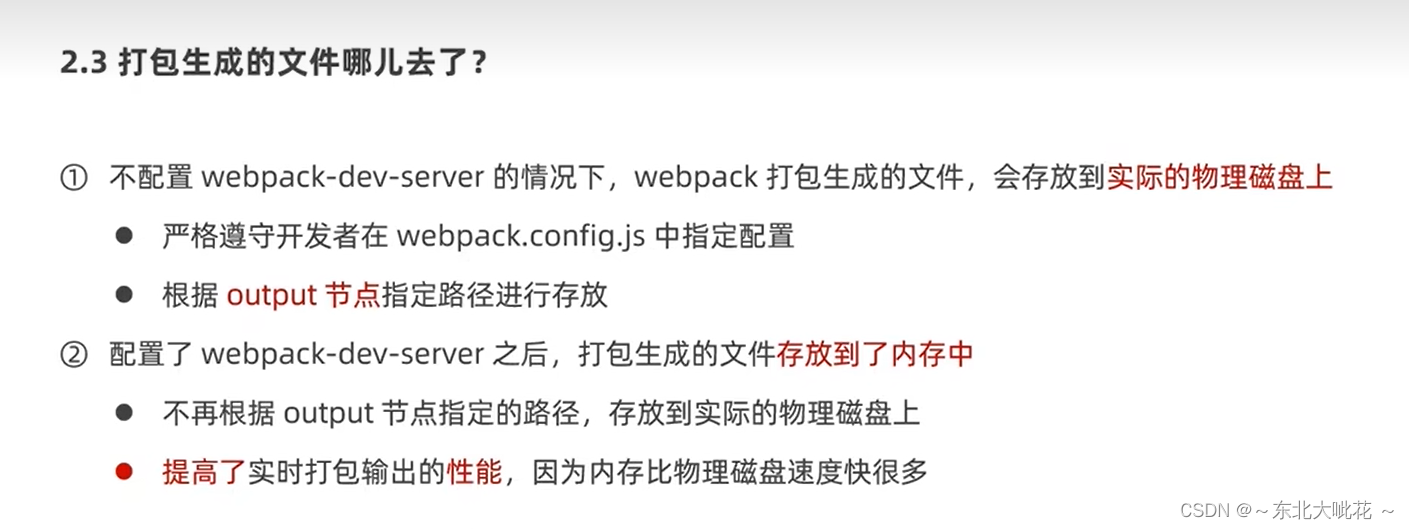
自动打包需要这样写,因为打包好的文件在内存中,根目录下,需要这样访问
<script src="/bundle.js"></script>
2.html-webpack-plugin
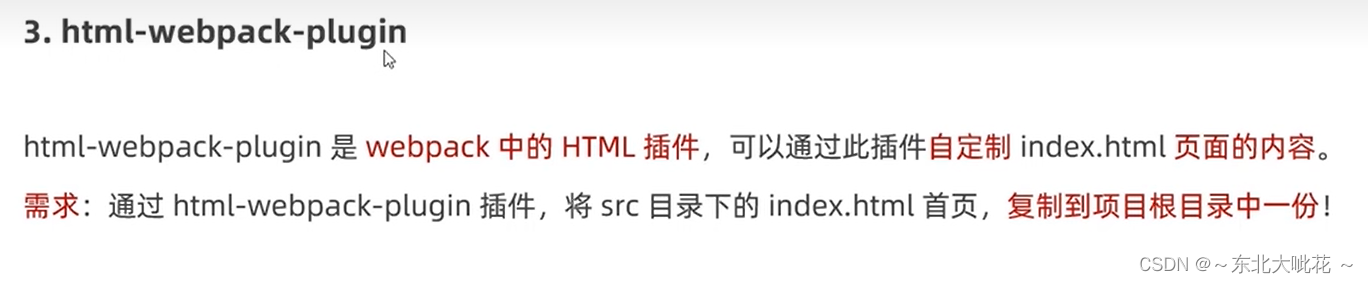
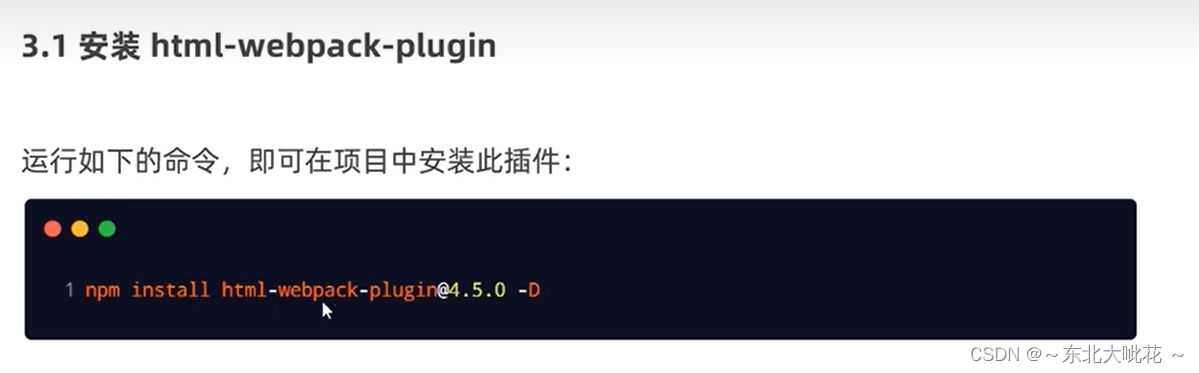
npm install html-webpack-plugin -D
配置html-webpack-plugin

const path = require('path')

//导入HTML插件,得到一个构造函数
const HtmlPlugin = require('html-webpack-plugin')

//创建HTML插件的实例对象
const htmlPlugin = new HtmlPlugin({
    //指定原文件的存放路径
    template: './src/index.html',
    //指定生成文件的存放路径
    filename: './index.html'
})

module.exports = {
    //mode 用来指定构建模式  可选development 和 production
    mode: 'development',
    //通过plugins节点,使htmlPlugin生效
    plugins: [htmlPlugin],
    //entry为指定打包入口
    entry: path.join(__dirname, './src/index.js'),
    //output指定打包出口
    output: {
        //路径
        path: path.join(__dirname, './dist'),
        //表示输出文件的名称
        filename: 'bundle.js'

    }
}
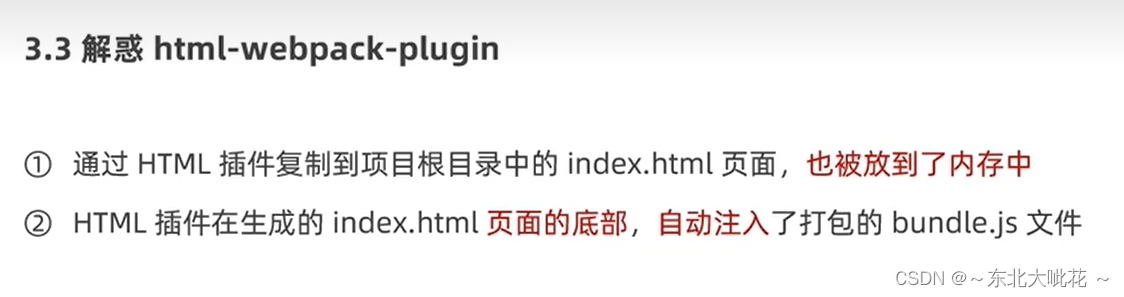
该插件会自动在index.html引入script,所以无需写dist,删除即可。
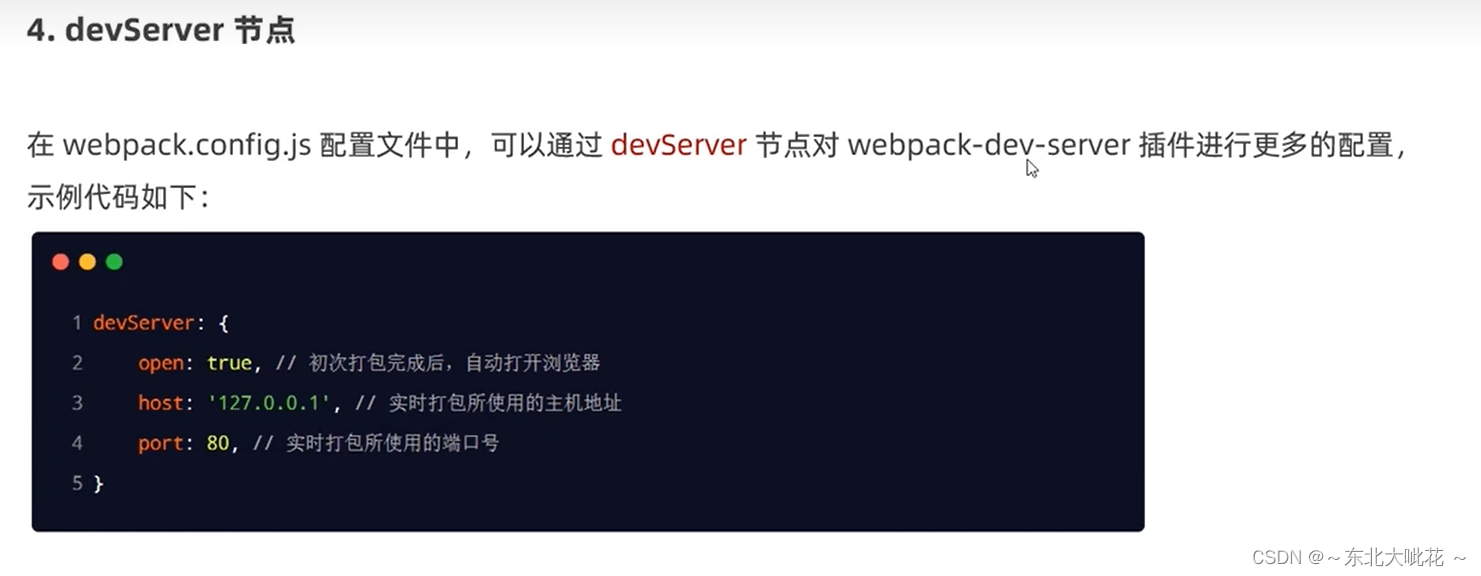
devServer节点
可以配置打包完成后是否自动打开浏览器展示页面
const path = require('path')

//导入HTML插件,得到一个构造函数
const HtmlPlugin = require('html-webpack-plugin')

//创建HTML插件的实例对象
const htmlPlugin = new HtmlPlugin({
    //指定原文件的存放路径
    template: './src/index.html',
    //指定生成文件的存放路径
    filename: './index.html'
})

module.exports = {
    //mode 用来指定构建模式  可选development 和 production
    mode: 'development',
    //通过plugins节点,使htmlPlugin生效
    plugins: [htmlPlugin],
    //entry为指定打包入口
    entry: path.join(__dirname, './src/index.js'),
    //output指定打包出口
    output: {
        //路径
        path: path.join(__dirname, './dist'),
        //表示输出文件的名称
        filename: 'bundle.js'

    },
    devServer: {
        //初次打包完成后,自动打开浏览器
        open: true,
        //实时打包所使用的主机地址
        host: '127.0.0.1',
        //实时打包所使用的端口号
        port: 8081
    }
}
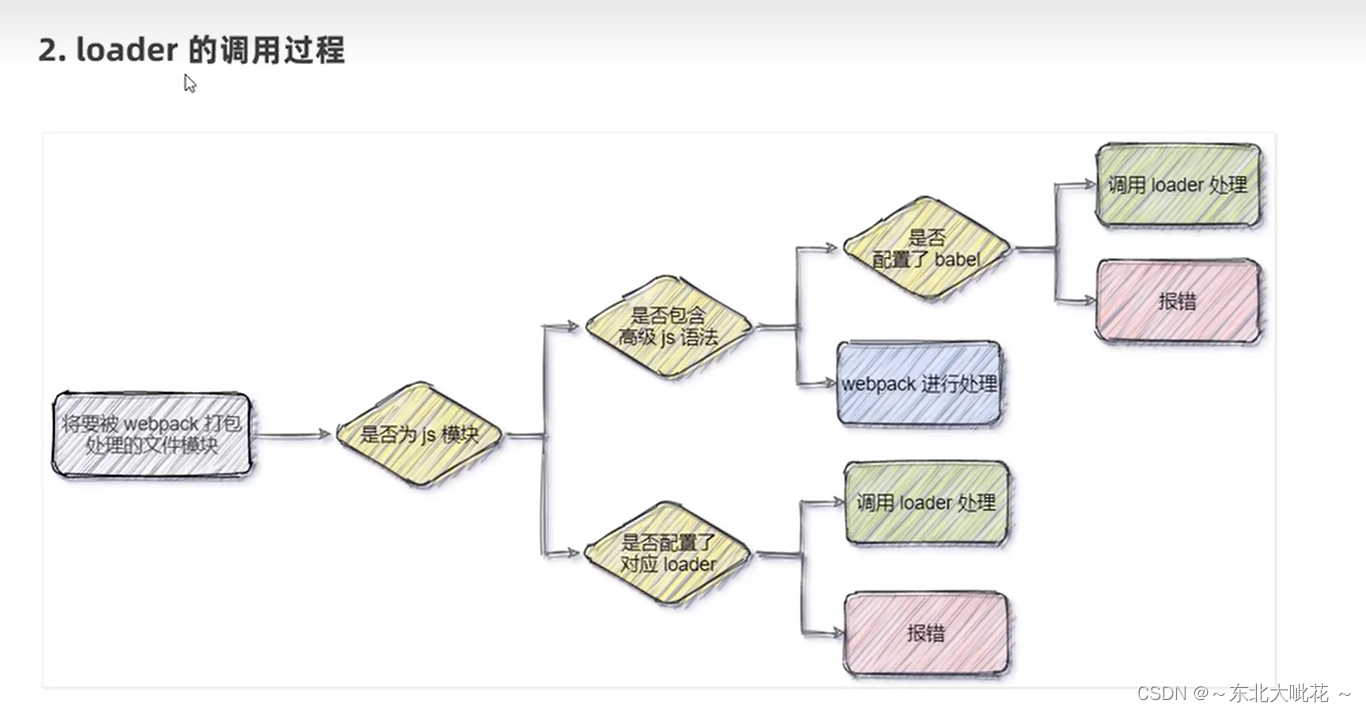
loader
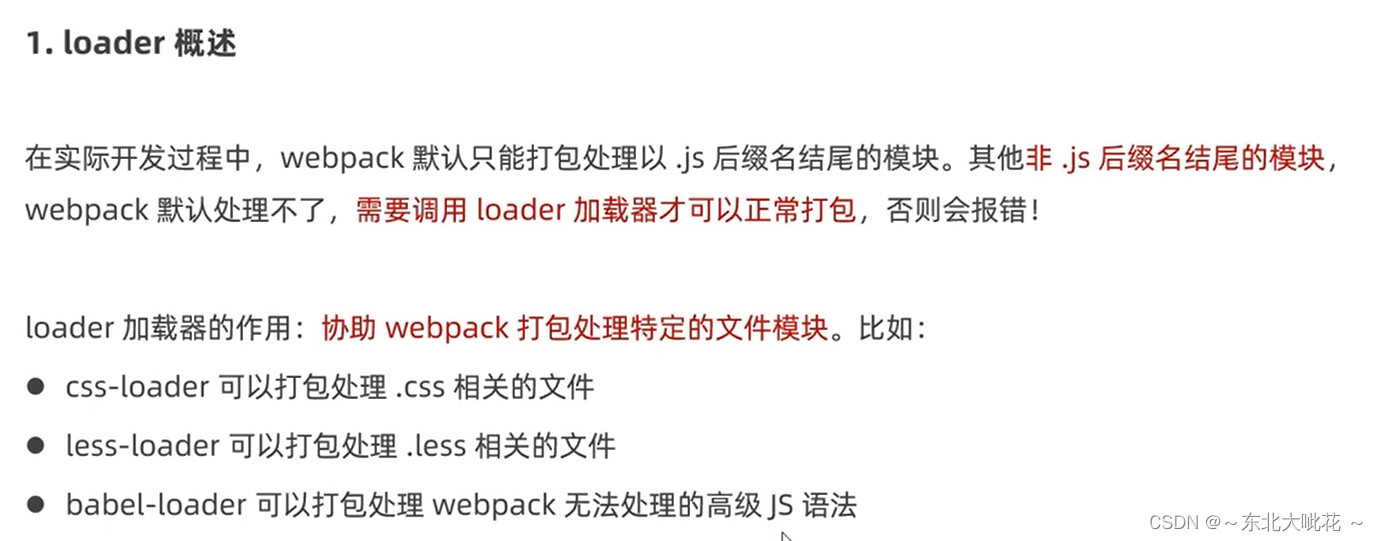
 打包处理css文件
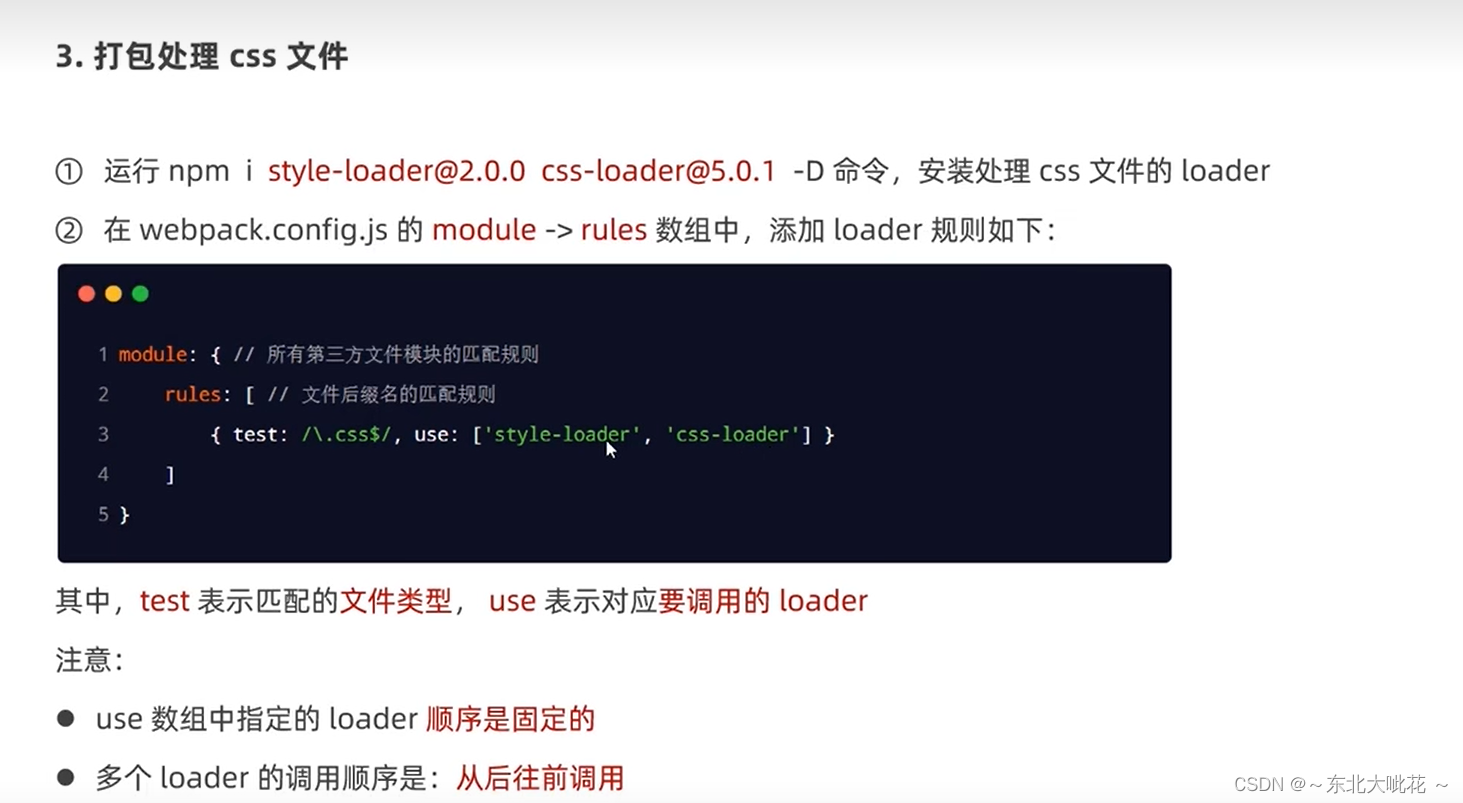
npm i style-loader css-loader -D
代码总结
const path = require('path')

//导入HTML插件,得到一个构造函数
const HtmlPlugin = require('html-webpack-plugin')

//创建HTML插件的实例对象
const htmlPlugin = new HtmlPlugin({
    //指定原文件的存放路径
    template: './src/index.html',
    //指定生成文件的存放路径
    filename: './index.html'
})

module.exports = {
    //mode 用来指定构建模式  可选development 和 production
    mode: 'development',
    //通过plugins节点,使htmlPlugin生效
    plugins: [htmlPlugin],
    //entry为指定打包入口
    entry: path.join(__dirname, './src/index.js'),
    //output指定打包出口
    output: {
        //路径
        path: path.join(__dirname, './dist'),
        //表示输出文件的名称
        filename: 'bundle.js'

    },
    devServer: {
        //初次打包完成后,自动打开浏览器
        open: true,
        //实时打包所使用的主机地址
        host: '127.0.0.1',
        //实时打包所使用的端口号
        port: 8081


    },
    //所有第三方文件模块的匹配规则
    module: {
        //文件后缀名的匹配规则
        rules: [
            //use数组中顺序是固定的,多个loader的调用顺序是从后往前调用的
            { test: /\.css$/, use: ['style-loader', 'css-loader'] }
        ]
    }


}
打包处理less文件
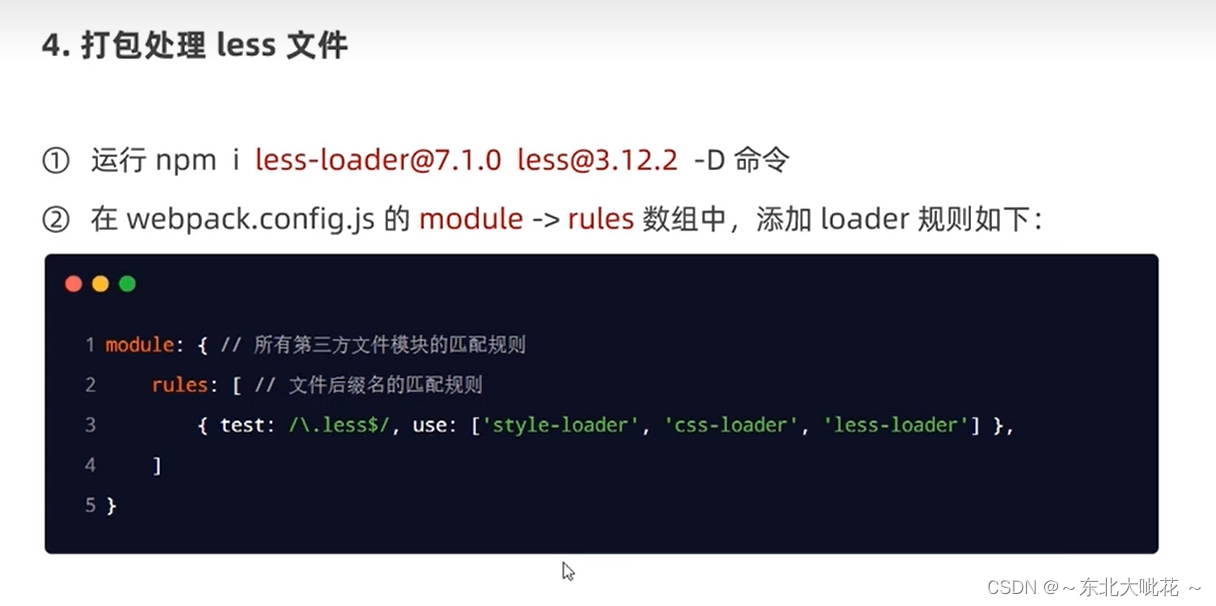
npm i less-loader less -D
 //配置打包less文件
 { test: /\.less$/, use: ['style-loader', 'css-loader', 'less-loader'] }
打包处理样式表中与URL路径相关的文件
注意:版本大于5的webpack不需要配置url-loader

npm i url-loader file-loader -D
打包处理js文件中的高级语法
注意:新版本的webpack不用配置了,可以处理高级js代码了
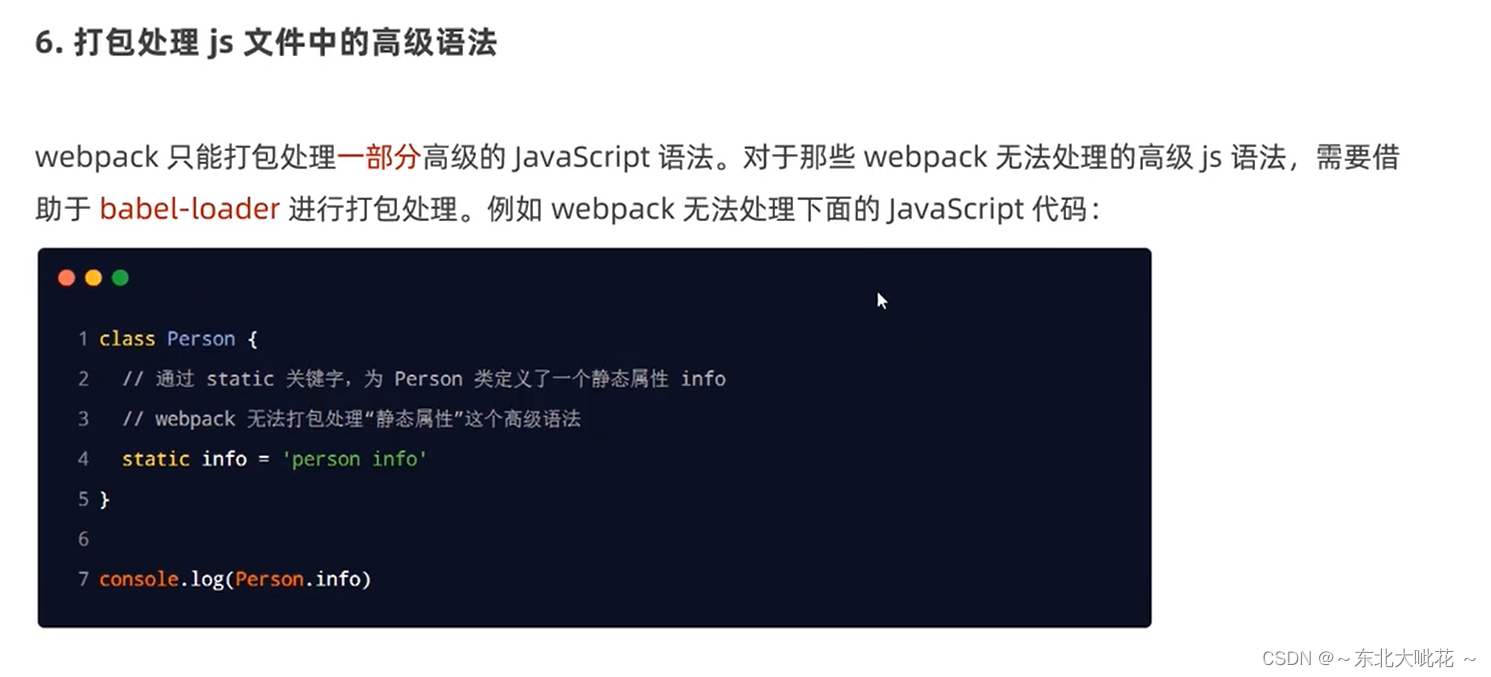
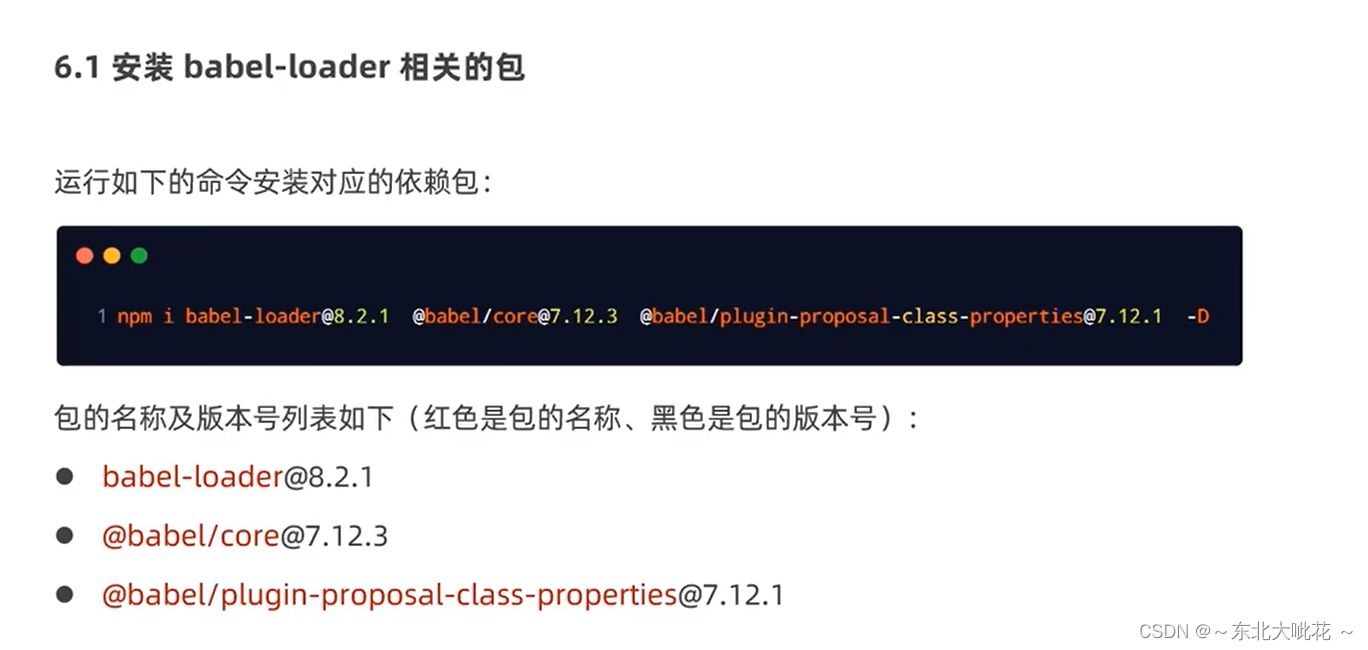
npm i babel-loader
bable/core
bable/plugin-proposal-class-properties
 -D

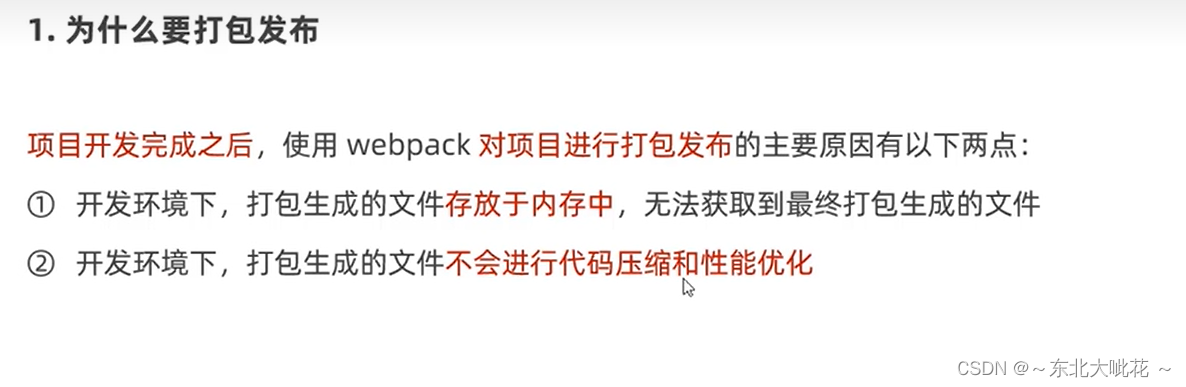
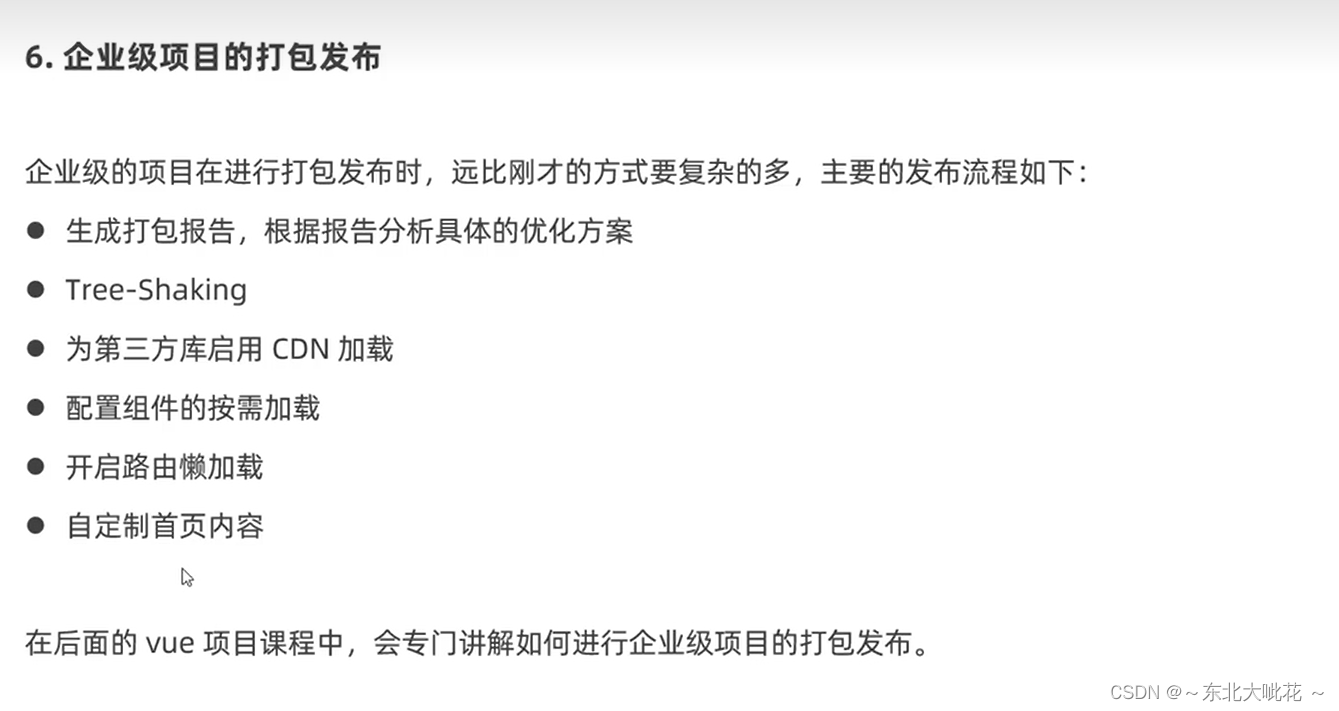
打包发布
为什么要打包发布
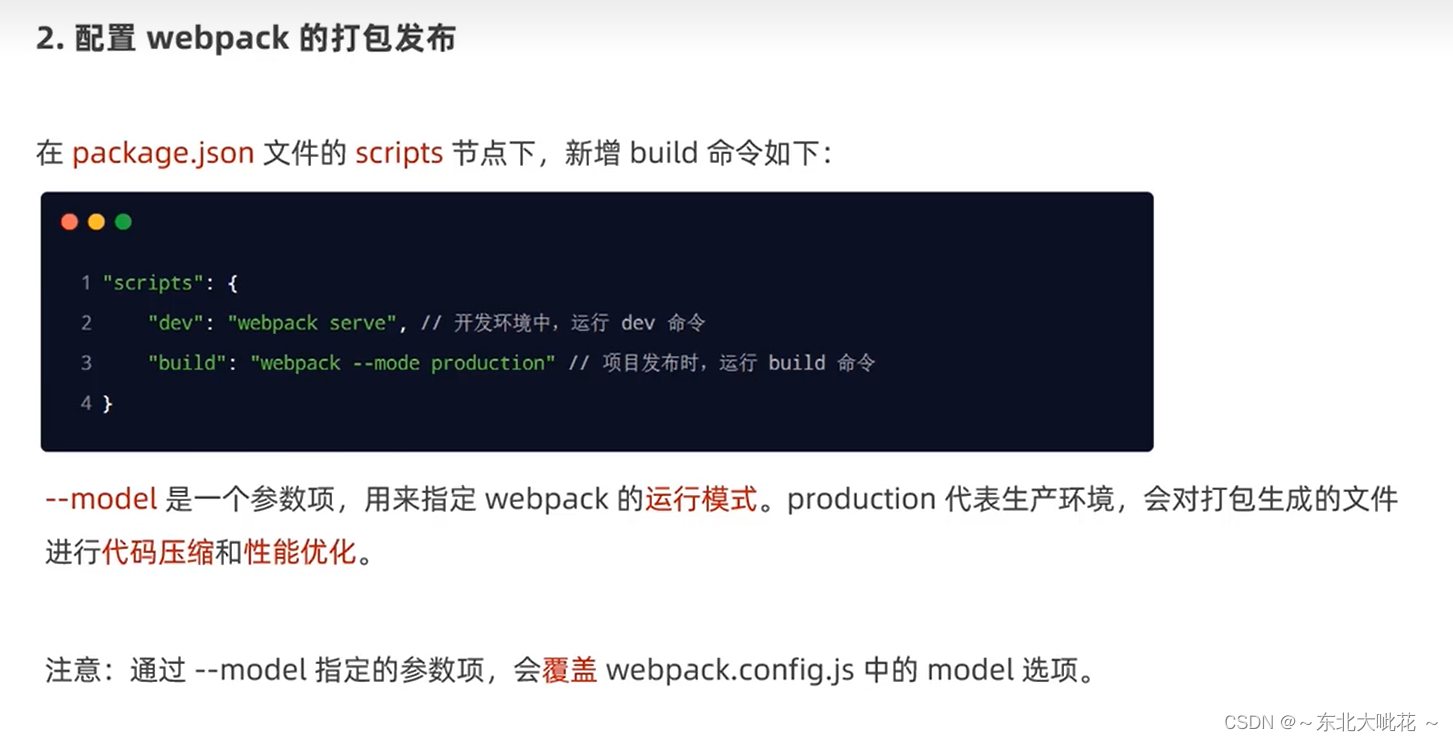
配置webpack打包发布
 图片啥的类似
自动删除dist目录下的旧文件
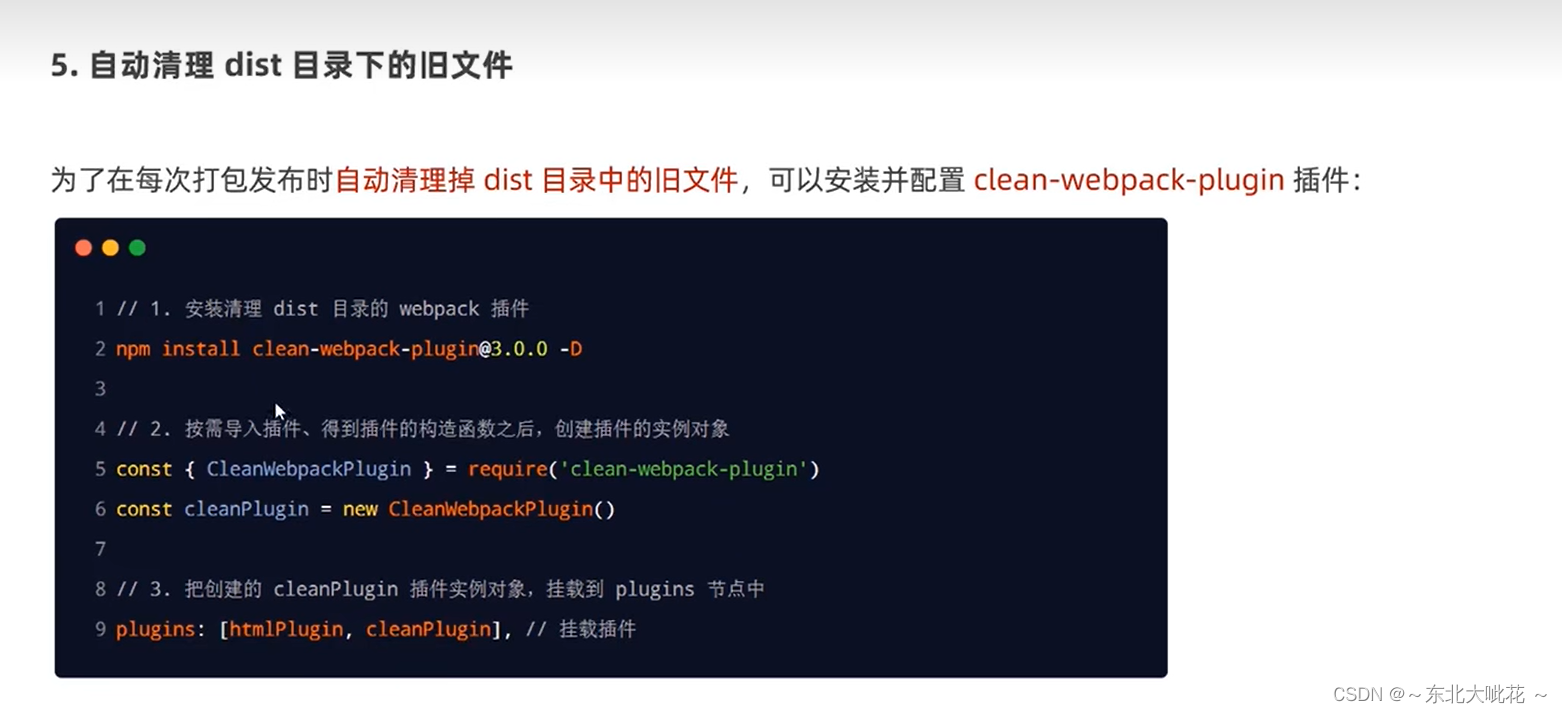
npm install clean-webpack-plugin -D
webpack.config.js代码
const path = require('path')

//导入HTML插件,得到一个构造函数
const HtmlPlugin = require('html-webpack-plugin')
    //按需导入自动删除dist文件的插件,得到插件的构造函数之后,创建插件的实例对象
const { CleanWebpackPlugin } = require('clean-webpack-plugin')
const cleanPlugin = new CleanWebpackPlugin()

//创建HTML插件的实例对象
const htmlPlugin = new HtmlPlugin({
    //指定原文件的存放路径
    template: './src/index.html',
    //指定生成文件的存放路径
    filename: './index.html'
})

module.exports = {
    //mode 用来指定构建模式  可选development 和 production
    mode: 'development',
    //通过plugins节点,使htmlPlugin生效 使cleanPlugin生效
    plugins: [htmlPlugin, cleanPlugin], //挂载插件
    //entry为指定打包入口
    entry: path.join(__dirname, './src/index.js'),
    //output指定打包出口
    output: {
        //路径
        path: path.join(__dirname, './dist'),
        //表示输出文件的名称
        filename: 'bundle.js'

    },
    devServer: {
        //初次打包完成后,自动打开浏览器
        open: true,
        //实时打包所使用的主机地址
        host: '127.0.0.1',
        //实时打包所使用的端口号
        port: 8081


    },
    //所有第三方文件模块的匹配规则
    module: {
        //文件后缀名的匹配规则
        rules: [
            //use数组中顺序是固定的,多个loader的调用顺序是从后往前调用的
            //配置打包css文件
            { test: /\.css$/, use: ['style-loader', 'css-loader'] },
            //配置打包less文件
            { test: /\.less$/, use: ['style-loader', 'css-loader', 'less-loader'] },
            //配置图片url路径相关  版本大于5的webpack不需要配置url-loader  limit代表图片体积
            { test: /\.jpg|png|gif$/, use: 'url-loader?limit=22229' }

        ]
    }


}
index.js代码
//使用ES6模块化的语法导入jquery
import $ from 'jquery'
//引入css文件模块
import './css/index.css'
//引入less文件模块
import './css/index.less'

//实现隔行变色效果
$(function() {
    $('li:odd').css('backgroundColor', 'red')
    $('li:even').css('backgroundColor', 'cyan')
})


//使用js高级语法
class Person {
    static info = 'person info'
}
package.json
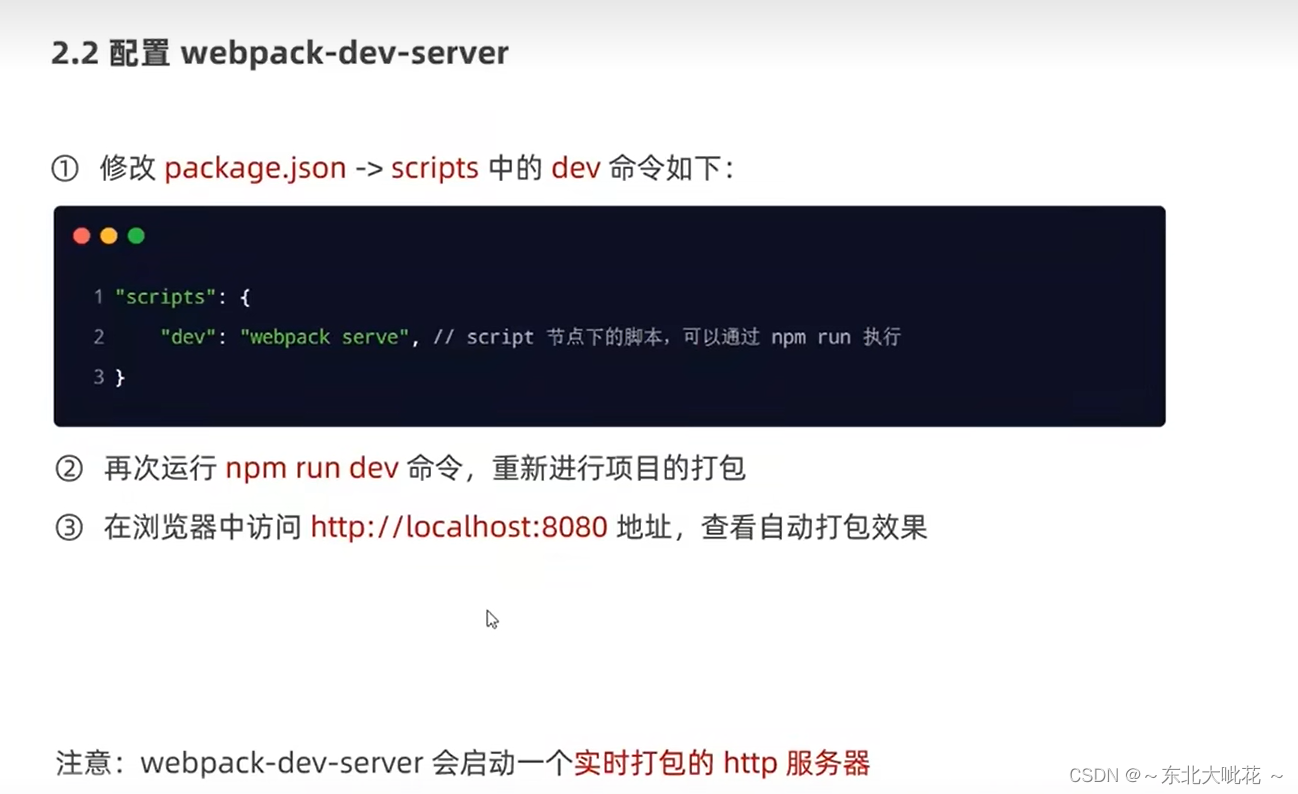
"scripts": {
        "dev": "webpack serve",
        "build": "webpack  --mode production"
    },
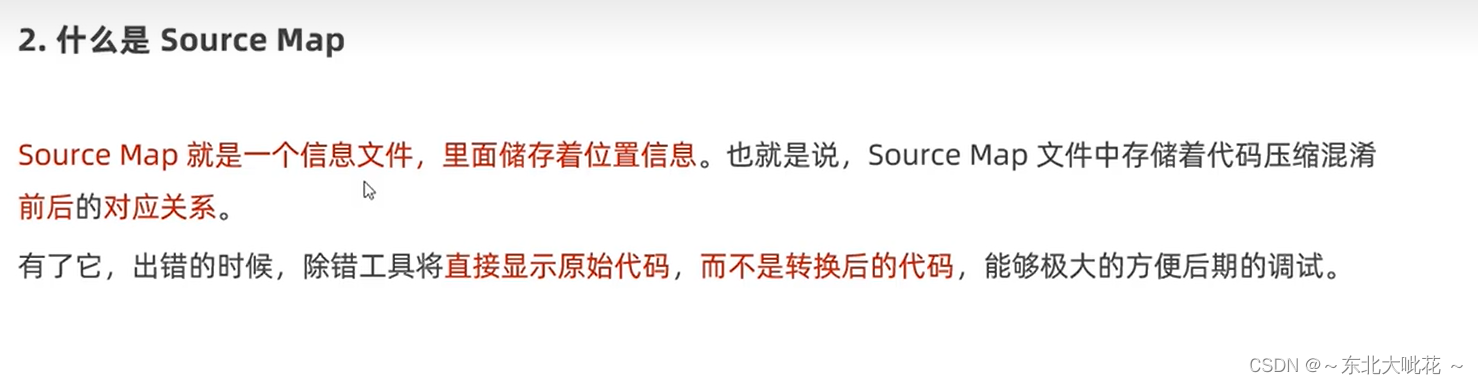
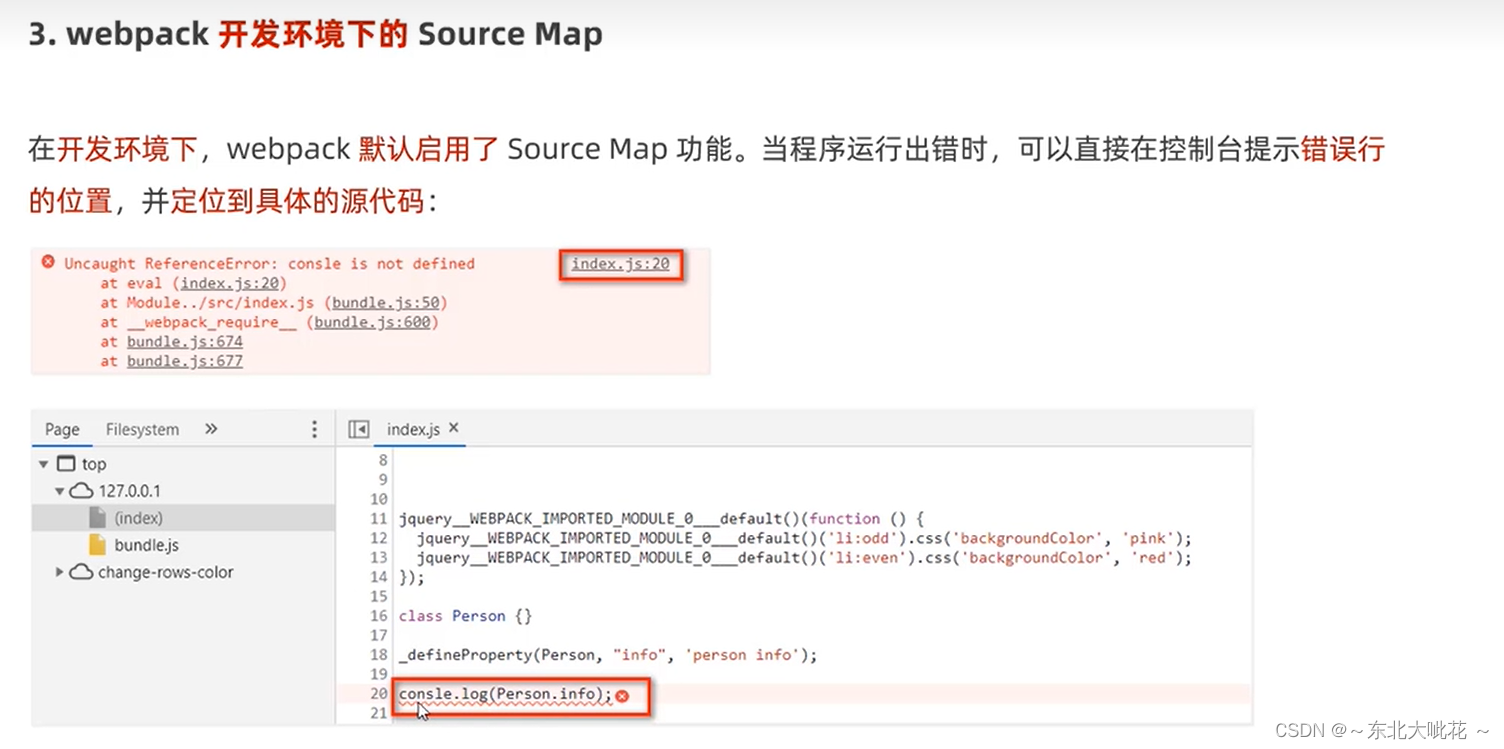
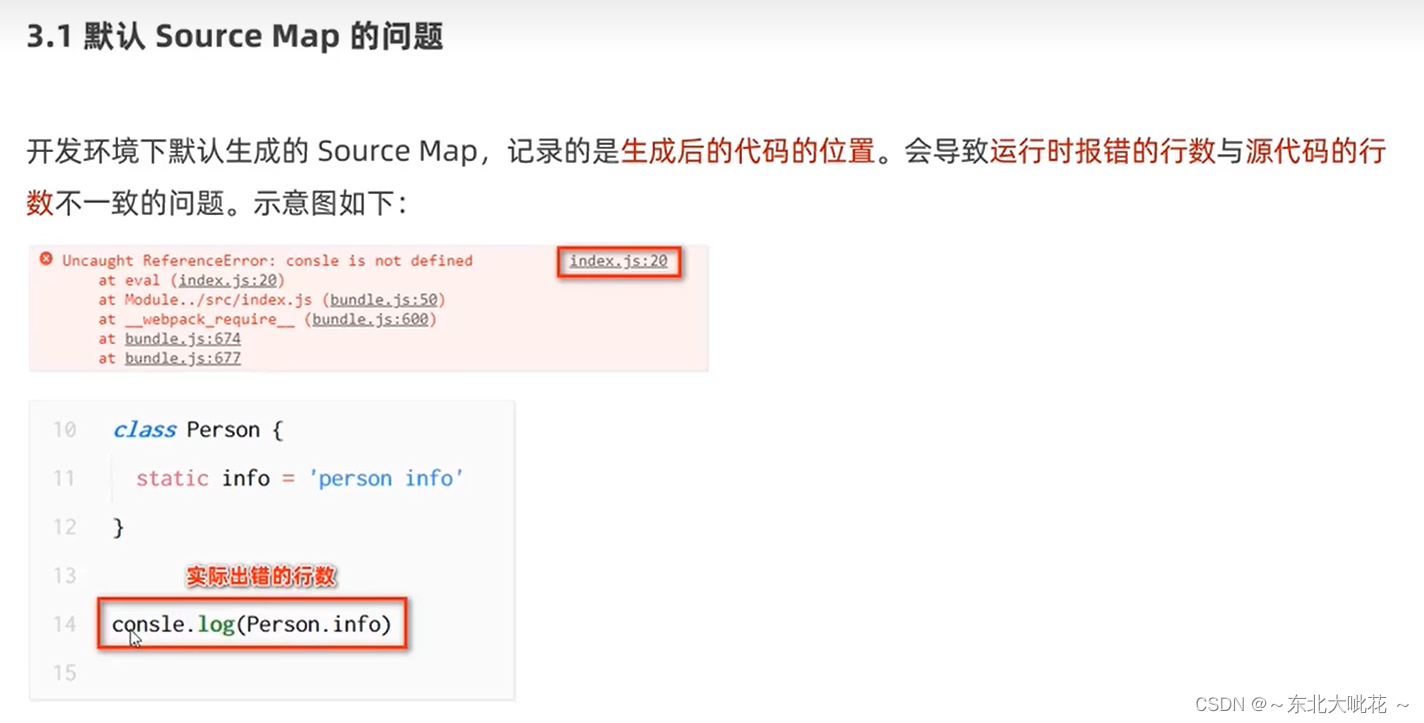
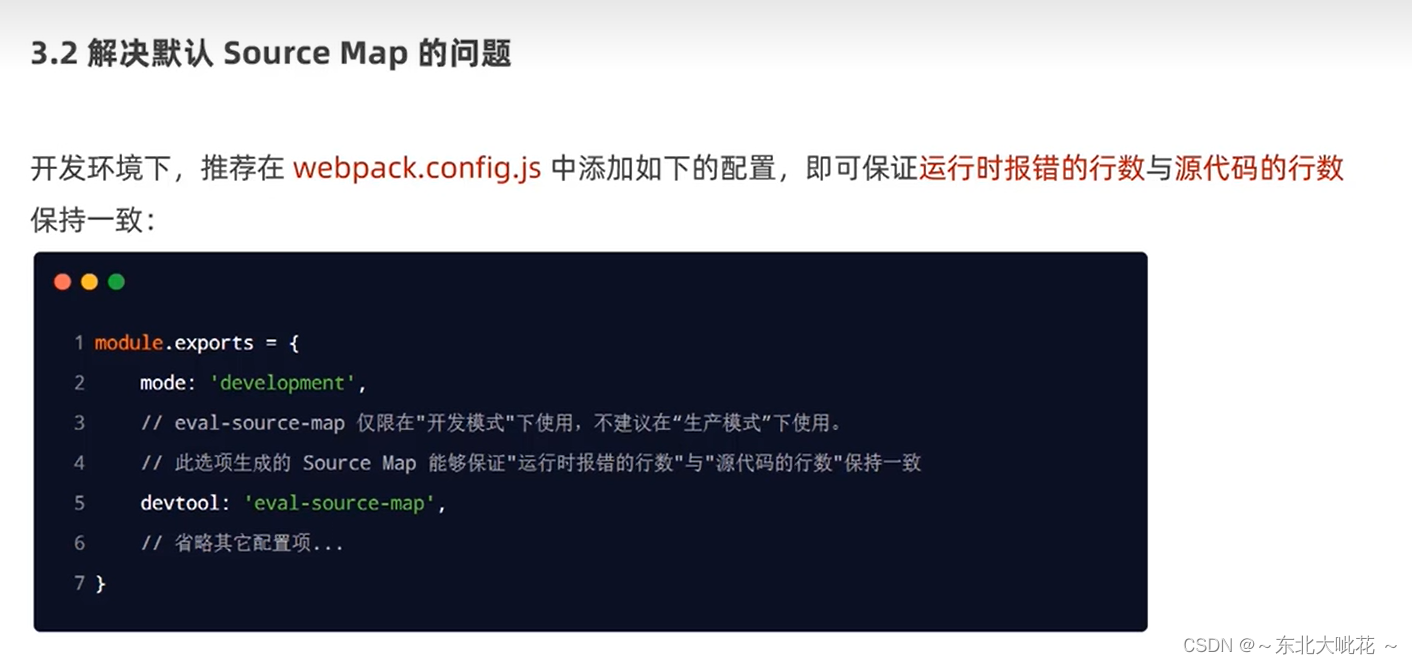
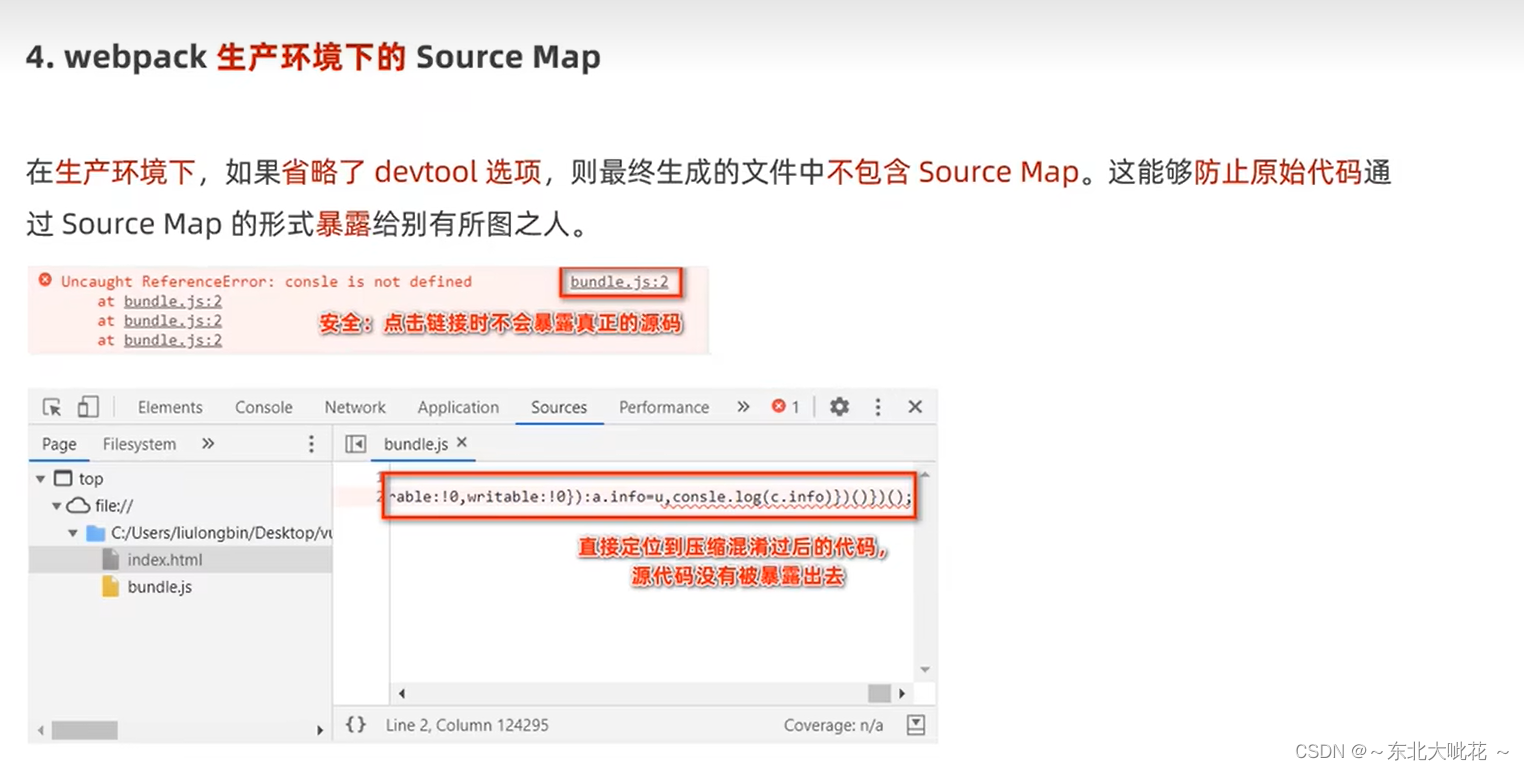
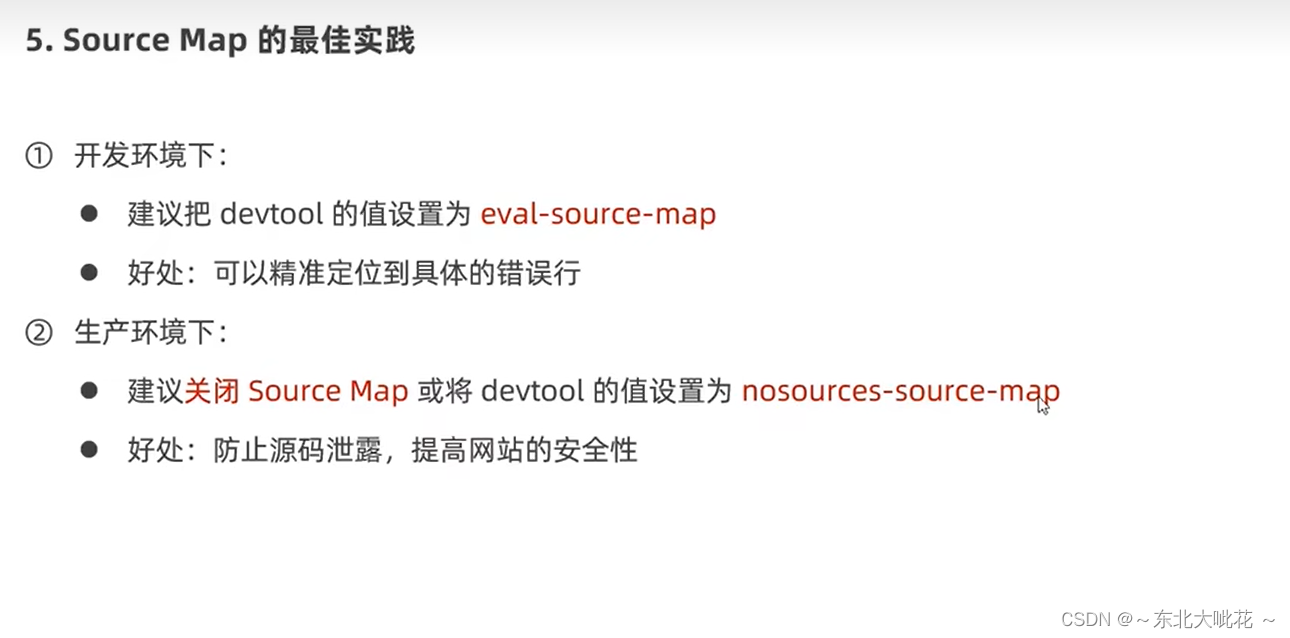
Source Map


 339
339

 被折叠的 条评论
为什么被折叠?
被折叠的 条评论
为什么被折叠?
 到【灌水乐园】发言


