


文章目录
环境
go1.17.8 darwin/arm64
摘要
- slice特点
- slice初始化
- slice遍历
- slice数据结构
- slice追加和扩容
- slice拷贝
slice(切片)
1.slice特点
- 切变的长度是可变的
- 切片是对底层数组的引用
- 切片存储的元素类型是相同的
- 可以存储相同的元素(相比于set)
2.slice初始化
- 使用字面量
- 会初始化一个匿名的底层数组,然后将s指向该数组的第一个元素
s := []int{1,2,3}
- 基于已经存在的数组
- high表示上界:默认值为数组的长度
- low表示下界:默认值为0
- low和high限定切片能访问数组下标的范围,但不包括第high个元素:即左闭右开
// array[low:high]
a := [5]int{1,2,3,4,5}
// 以下两种表示方式是相同的
s := a[:] //s := a[0:len(a)]
- 基于已经存在的切片
- 与基于数组相似,但low和high限定新切片能访问老切片的下标范围
// slice[low:high]
s := []int{1,2,3,4,5}
s2 := s[1:]
- 使用make关键字
- 第一个参数:元素的类型
- 第二个参数:切片长度
- 第三个参数:切片的容量(可省略)
// slice := make([]T, len, cap)
s := make([]int, 4, 7)
s2 := make([]int, 7)
3. slice遍历
两种遍历方式
- 使用下标
s := []int{1,2,3}
for i:= 0 ; i < len(s); i++ {
	fmt.Println(s[i])
}
- 使用range
s := []int{1,2,3}
for i,v := range s {
	fmt.Println(i,v)
}
// 或者:可以身略i,i表示访问到第几个元素(从0开始)
for _,v := range s {
	fmt.Println(i,v)
}
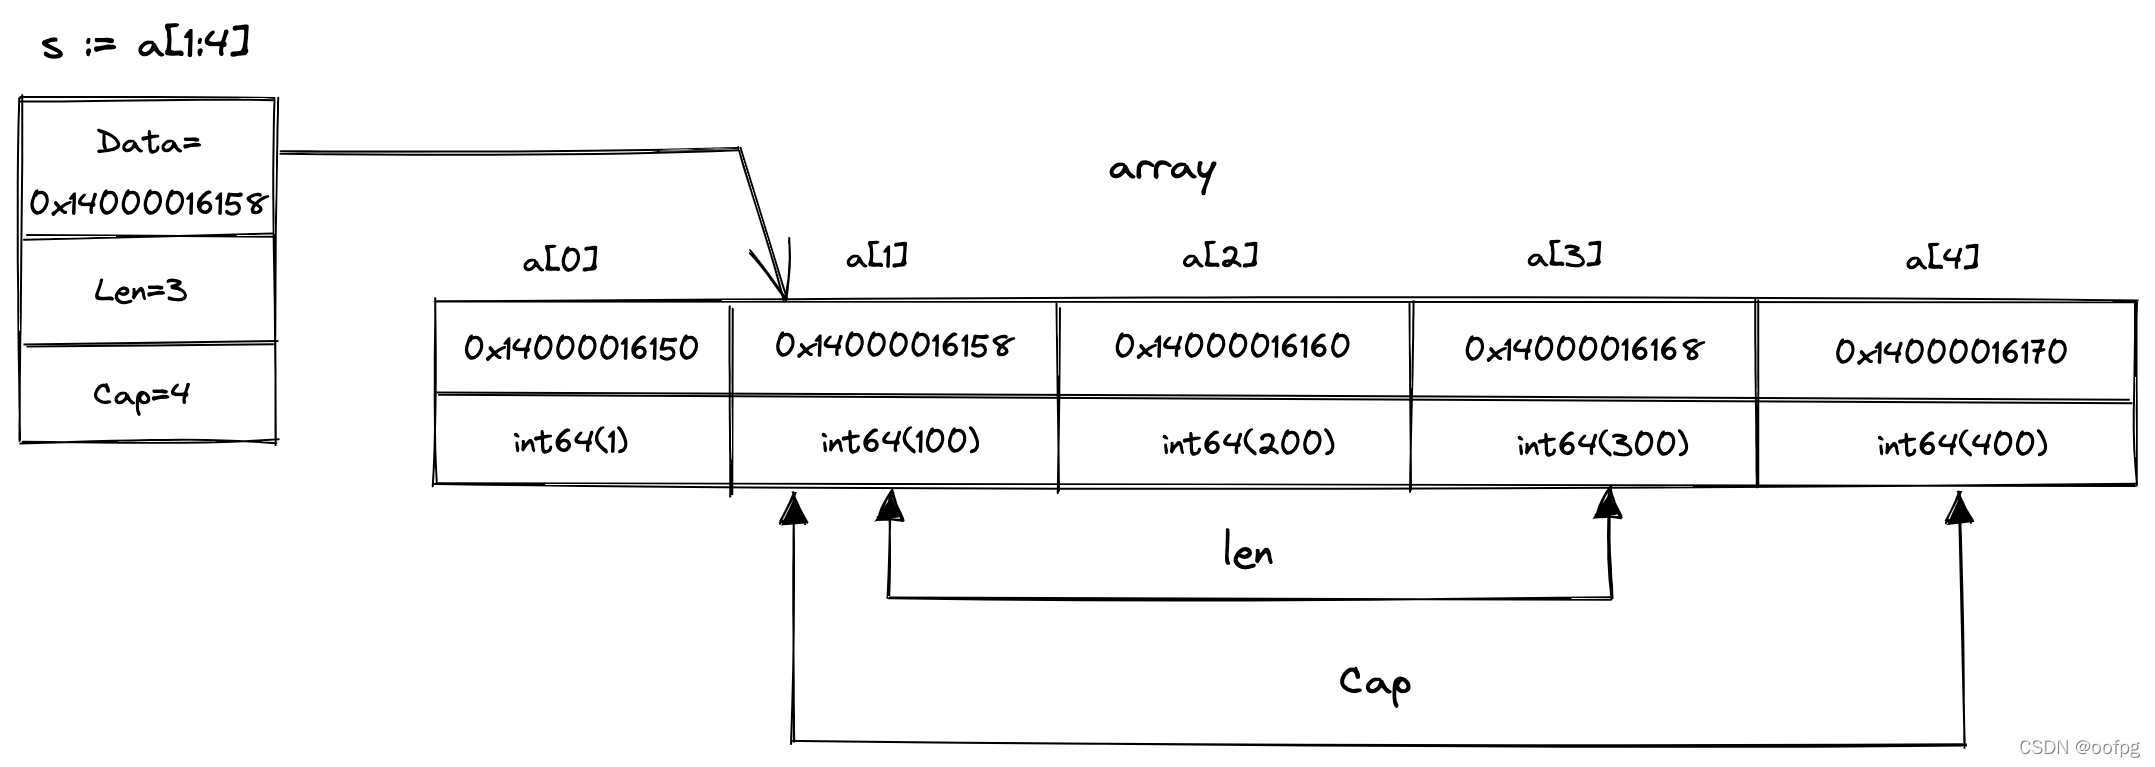
4. slice数据结构
运行时数据结构如下:
// SliceHeader is the runtime representation of a slice.
// It cannot be used safely or portably and its representation may
// change in a later release.
// Moreover, the Data field is not sufficient to guarantee the data
// it references will not be garbage collected, so programs must keep
// a separate, correctly typed pointer to the underlying data.
type SliceHeader struct {
	Data uintptr
	Len  int
	Cap  int
}
- Data:指向切片可访问底层数组的第一个元素,可能不是底层数组的第一个元素(详见下图)
- Len:切片长度,表示切片可以被访问的元素个数
- Cap:切片容量,表示切片可以容纳最大的元素个数
5. 追加和扩容
语法
s1 := []int{1,2,3}
s2 := append(s1, []int{1,2,3,4}...)
思考
在64位机器上,s2的len和cap分别是多少?
预估扩容后切片容量大小
扩容规则:
- 如果期望容量大于当前容量的两倍,则新分配的容量等于期望容量。
- 如果期望容量小于当前容量的两倍:
- 如果当前容量小于1024,则新分配的容量等于当前容量的两倍
- 如果大于1024则每次增加1.25倍,直到大于期望容量为止。
func growslice(et *_type, old slice, cap int) slice {
	...
	newcap := old.cap
	doublecap := newcap + newcap
	if cap > doublecap {
		newcap = cap
	} else {
		if old.cap < 1024 {
			newcap = doublecap
		} else {
			// Check 0 < newcap to detect overflow
			// and prevent an infinite loop.
			for 0 < newcap && newcap < cap {
				newcap += newcap / 4
			}
			// Set newcap to the requested cap when
			// the newcap calculation overflowed.
			if newcap <= 0 {
				newcap = cap
			}
		}
	}
	...
}
总的来说,主要的目的是:在容量小于1024时防止小块内存的频繁分配和拷贝,通过每次增长至少两倍的方式,能够减少可能重新分配的次数;当容量大于1024时,这时如果只是单纯的还是以至少两倍的空间扩容,很可能会浪费额外的空间(也许某次扩容期望的容量只是稍大于当前容量)
匹配合适的内存块大小
所需内存 = 预估容量 * 元素类型大小
在slice扩容时,需要计算合适的内存大小用于分配,预估容量并不一定就是最终新slice的cap。Go的内存管理模块将内存的大小分为不同规格的span,总计68种。内存管理模块会找到最合适的span规格用于slice扩容时的内存分配。

解答:
s1 := []int{1,2,3}
s2 := append(s1, []int{1,2,3,4}...)
在64位机器中,int占8个字节,所以append之后len=7,预估有7 * 8 = 56字节的大小需要分配,对应上图最接近的符合条件的span等级是6,即64字节,所以新的slice的cap = 64 / 8
源码解析:
func growslice(et *_type, old slice, cap int) slice {
	...
	var overflow bool
	var lenmem, newlenmem, capmem uintptr
	// Specialize for common values of et.size.
	// For 1 we don't need any division/multiplication.
	// For sys.PtrSize, compiler will optimize division/multiplication into a shift by a constant.
	// For powers of 2, use a variable shift.
	switch {
	case et.size == 1:
		lenmem = uintptr(old.len)
		newlenmem = uintptr(cap)
		capmem = roundupsize(uintptr(newcap))
		overflow = uintptr(newcap) > maxAlloc
		newcap = int(capmem)
	case et.size == sys.PtrSize:
		lenmem = uintptr(old.len) * sys.PtrSize
		newlenmem = uintptr(cap) * sys.PtrSize
		capmem = roundupsize(uintptr(newcap) * sys.PtrSize)
		overflow = uintptr(newcap) > maxAlloc/sys.PtrSize
		newcap = int(capmem / sys.PtrSize)
	case isPowerOfTwo(et.size):
		var shift uintptr
		if sys.PtrSize == 8 {
			// Mask shift for better code generation.
			shift = uintptr(sys.Ctz64(uint64(et.size))) & 63
		} else {
			shift = uintptr(sys.Ctz32(uint32(et.size))) & 31
		}
		lenmem = uintptr(old.len) << shift
		newlenmem = uintptr(cap) << shift
		capmem = roundupsize(uintptr(newcap) << shift)
		overflow = uintptr(newcap) > (maxAlloc >> shift)
		newcap = int(capmem >> shift)
	default:
		lenmem = uintptr(old.len) * et.size
		newlenmem = uintptr(cap) * et.size
		capmem, overflow = math.MulUintptr(et.size, uintptr(newcap))
		capmem = roundupsize(capmem)
		newcap = int(capmem / et.size)
	}

	// The check of overflow in addition to capmem > maxAlloc is needed
	// to prevent an overflow which can be used to trigger a segfault
	// on 32bit architectures with this example program:
	//
	// type T [1<<27 + 1]int64
	//
	// var d T
	// var s []T
	//
	// func main() {
	//   s = append(s, d, d, d, d)
	//   print(len(s), "\n")
	// }
	if overflow || capmem > maxAlloc {
		panic(errorString("growslice: cap out of range"))
	}

	var p unsafe.Pointer
	if et.ptrdata == 0 {
		p = mallocgc(capmem, nil, false)
		// The append() that calls growslice is going to overwrite from old.len to cap (which will be the new length).
		// Only clear the part that will not be overwritten.
		memclrNoHeapPointers(add(p, newlenmem), capmem-newlenmem)
	} else {
		// Note: can't use rawmem (which avoids zeroing of memory), because then GC can scan uninitialized memory.
		p = mallocgc(capmem, et, true)
		if lenmem > 0 && writeBarrier.enabled {
			// Only shade the pointers in old.array since we know the destination slice p
			// only contains nil pointers because it has been cleared during alloc.
			bulkBarrierPreWriteSrcOnly(uintptr(p), uintptr(old.array), lenmem-et.size+et.ptrdata)
		}
	}
	memmove(p, old.array, lenmem)

	return slice{p, old.len, newcap}
}
- 上面的switch,case代码段中主要是计算:
- lenmem:原先切片内的元素所占内存大小
- newlenmem:原先切片内的元素加新增的元素后所占内存大小
- capmem:扩容后切片所占最大内存大小
- 下面if,else中代码,主要分两种情况:
- slice中元素是值类型
- mallocgc:
- memclrNoHeapPointers:由于GC释放的内存单元中可能原先存在脏值,但其实只需要将多余分配的部分清空即可。在之前的例子中即s[7:8]的区域。
- slice中元素是指针类型
- slice中元素是值类型
测试用例
func Test_SliceAppend(t *testing.T) {
	s := make([]int, 3, 3)
	s1 := append(s, []int{1,2,3,4}...)
	// the result is
	//s1:len=7, cap=8
	//new_cap = cap(64 / 8)
	// 7 * 8 byte = 56B
	//span level 6 = 64B
	t.Logf("s1:len=%d, cap=%d \n", len(s1), cap(s1))
	t.Logf("s:ptr=%p, s1:ptr=%p \n", s, s1)

	s = make([]int, 256, 256)
	s1 = append(s, 1)
	// the result is
	//s1:len=257, cap=512
	//new_cap = double old_cap
	t.Logf("s1:len=%d, cap=%d \n", len(s1), cap(s1))


	s = make([]int, 1024, 1024)
	s1 = append(s, 1)
	// the result is
	//s1:len=1025, cap=1280
	//new_cap = old_cap * 1.25
	t.Logf("s1:len=%d, cap=%d \n", len(s1), cap(s1))
}
6. slice拷贝
// slicecopy is used to copy from a string or slice of pointerless elements into a slice.
func slicecopy(toPtr unsafe.Pointer, toLen int, fromPtr unsafe.Pointer, fromLen int, width uintptr) int {
	if fromLen == 0 || toLen == 0 {
		return 0
	}
	...
	if size == 1 { // common case worth about 2x to do here
		// TODO: is this still worth it with new memmove impl?
		*(*byte)(toPtr) = *(*byte)(fromPtr) // known to be a byte pointer
	} else {
		memmove(toPtr, fromPtr, size)
	}
	return n
}
- 若src_slice 或dst_slice任意长度位0,则无需复制直接返回 0
- 若 Slice 只有一个元素,则直接利用指针取值复制
- 若 Slice 大于一个元素,则调用memmove内存块直接拷贝
测试用例
func Benchmark_SliceCopy(b *testing.B) {
	benchmarks := []struct {
		name string
		dst []int
		src []int
	}{
		{
			name: "zero",
			dst:  make([]int, 0),
			src:  make([]int, 0),
		},{
			name: "one",
			dst:  make([]int, 1),
			src:  make([]int, 1),
		},{
			name: "two",
			dst:  make([]int, 2),
			src:  make([]int, 2),
		},{
			name: "more",
			dst:  make([]int, 100),
			src:  make([]int, 100),
		},
	}
	for _, bm := range benchmarks {
		b.Run(bm.name, func(b *testing.B) {
			for i := 0; i < b.N; i++ {
				copy(bm.dst, bm.src)
			}
		})
	}
	/*
	Benchmark_SliceCopy
	Benchmark_SliceCopy/zero
	Benchmark_SliceCopy/zero-10         	1000000000	         0.5941 ns/op
	Benchmark_SliceCopy/one
	Benchmark_SliceCopy/one-10          	645597904	         1.851 ns/op
	Benchmark_SliceCopy/two
	Benchmark_SliceCopy/two-10          	622364944	         1.915 ns/op
	Benchmark_SliceCopy/more
	Benchmark_SliceCopy/more-10         	96457857	        11.84 ns/op
	PASS
	*/
}


 2549
2549


 被折叠的 条评论
为什么被折叠?
被折叠的 条评论
为什么被折叠?
 到【灌水乐园】发言


