


Azure移动服务使您可以从通用Windows应用程序对用户进行身份验证。 在本教程中,您将学习如何:
- 使用Azure移动服务支持的其他身份提供程序将身份验证添加到Windows Phone 8.1 WinRT应用程序
- 将缓存的身份验证令牌存储在客户端上
- 使用服务器脚本检索用户配置文件详细信息并将其存储在Azure数据库中
- 添加其他身份验证范围以从服务器检索更多用户信息
- 如果不存在具有相同
userId的用户,则编辑UsersTable的插入脚本以插入一条记录,否则更新现有用户
要在您的应用中启用身份验证,需要执行以下步骤:
- 注册您的应用程序以进行身份验证
- 配置Azure移动服务
- 将表权限限制为经过身份验证的用户
- 配置您的应用程序以使用Azure移动服务
- 向应用添加身份验证
- 在客户端上缓存身份验证令牌
- 从服务器检索用户信息
您必须向身份提供者注册您的应用,并将提供者生成的凭据添加到Azure移动服务。 首先让我们看看如何为Microsoft帐户登录注册您的应用。
1.应用注册
若要将Live Connect用作Azure移动服务的身份验证提供程序,请按照下列步骤操作。
步骤1:在开发中心中创建新应用
打开浏览器,转到Windows Store应用程序的开发中心 。 导航到“ 提交应用”页面,然后单击“ 应用名称” 。
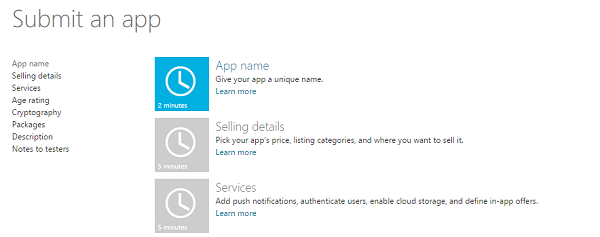
步骤2:保留应用程式名称
保留应用名称 ,然后单击“ 保存”。 该应用程序将以该名称在Windows应用商店中列出。

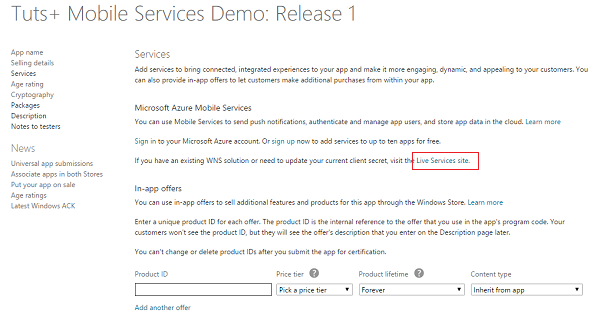
步骤3:为应用程序配置实时服务
在“ 服务”页上,单击“ Windows Azure移动服务”下的“ 实时 服务” 。
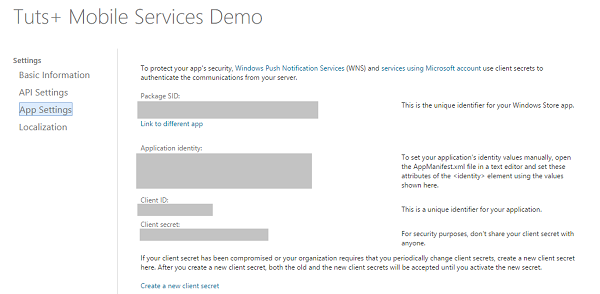
步骤4:注意应用程序设置值
请注意客户端ID , 客户端密码和程序包安全性标识符(SID)的值 。 您稍后将需要这些值。
步骤5:为应用设置重定向URI
在“ API设置”下 ,提供以下值作为“ 重定向UR1” ,然后单击“ 保存” 。
https://<mobile_service>.azure-mobile.net/login/microsoftaccount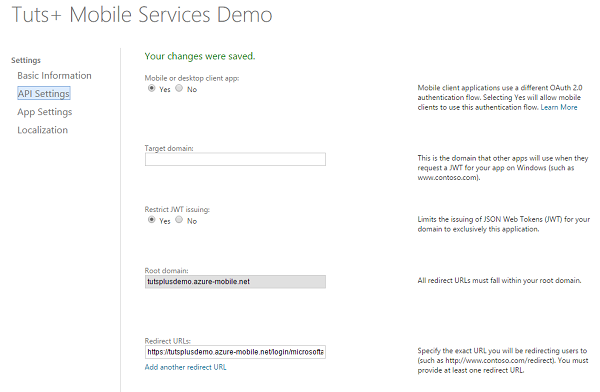
这将为您的应用程序启用Microsoft帐户身份验证。
2.配置Azure移动服务
在身份提供者中注册应用后,需要使用Azure管理门户配置Azure移动服务。
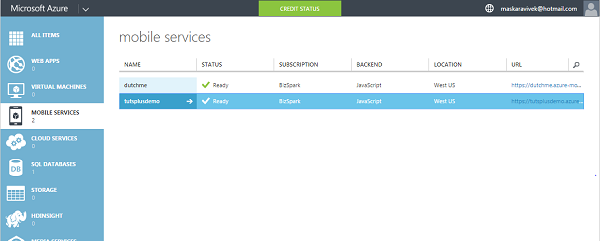
步骤1:为应用选择移动服务
登录到Azure管理门户 ,单击“ 移动服务” ,然后选择您的应用程序。
步骤2:配置推送设置
在“ 推送”选项卡下,输入“ 客户端密钥”和“ 程序包SID”值,然后单击“ 保存” 。
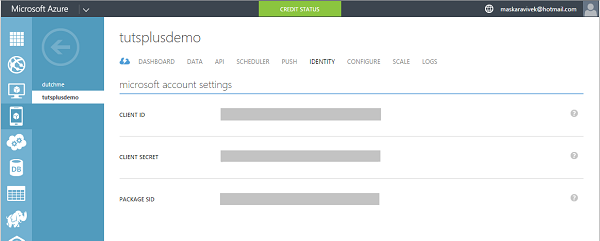
步骤3:配置身份设置
在身份标签下,设置客户端ID 。 如果尚未设置,则还应设置“ 客户端密钥”和“ 程序包SID”值。
现在,您可以使用Azure移动服务在应用程序中使用Microsoft帐户进行身份验证了。
3.限制表权限
使用Azure管理门户,我们可以设置表权限以将访问权限限制为仅登录用户。
步骤1:选择UsersTable
在Azure管理门户的“ 数据”选项卡下,选择要为其更改权限的表。 在本教程中,我们将修改UsersTable的权限。
步骤2:设置表权限
在权限标签下,将所有权限设置为仅经过身份验证的用户 ,然后点击保存 。

当您的Windows Store应用程序尝试访问该表时,会引发状态代码为401(未经授权)的未处理异常。 发生这种情况是因为该应用程序尝试以未经身份验证的用户身份访问Azure移动服务。
4.配置应用程序以使用移动服务
接下来,我们需要配置Windows Phone 8.1 WinRT应用程序以使用Azure移动服务。
步骤1 :(可选)将您的应用与商店相关联
此步骤仅适用于Microsoft帐户登录提供程序。 通过向Mobile Services注册Windows Store应用程序包信息时,客户端可以重用Microsoft登录详细信息以获得单点登录体验。
在解决方案资源管理器中右键单击该项目,选择“ 商店” ,然后单击“将应用程序与商店关联” 。 在“将应用程序与Windows应用商店向导相关联”中,单击“ 登录”并使用您的Microsoft帐户登录。 选择您之前注册的应用程序并将其与商店关联 。

然后将所需的Windows Store注册信息添加到应用程序清单中。
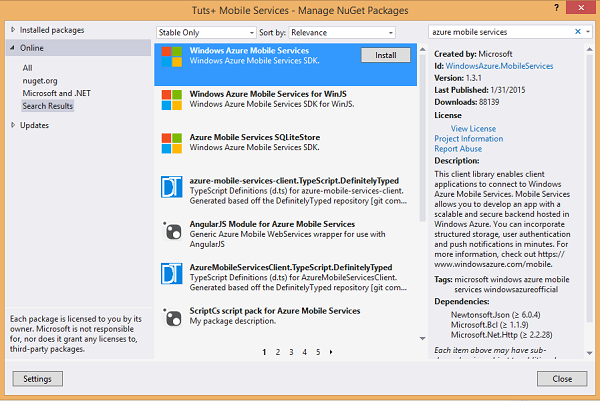
步骤2:添加Windows Azure移动服务SDK
接下来,使用NuGet程序包管理器添加Windows Azure移动服务 SDK。
步骤3:将Azure移动服务添加为连接服务
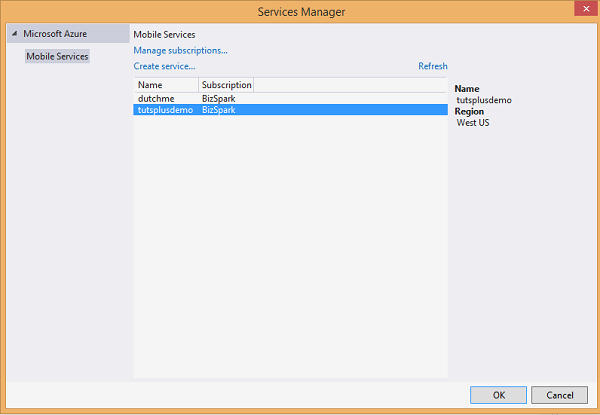
您在Azure管理门户中创建的移动服务需要与该应用程序链接。 在解决方案资源管理器中右键单击该项目 并在添加下选择连接的服务 。
在出现的“ 服务管理器”对话框中,选择您之前创建的移动服务,然后单击“ 确定” 。 这将在App.xaml.cs中添加移动服务的实例。
步骤4:为UsersTable添加一个类
定义一个UsersTable类,其数据成员表示表中的列。 您需要在应用程序中添加对Json.NET库的引用,才能使用JsonProperty类。
class UsersTable
{
    [JsonProperty(PropertyName = "id")]
    public string Id { get; set; }

    [JsonProperty(PropertyName = "userId")]
    public string UserID { get; set; }

    [JsonProperty(PropertyName = "user_email")]
    public string Email { get; set; }

    [JsonProperty(PropertyName = "profile_picture")]
    public string ProfilePicture { get; set; }

    [JsonProperty(PropertyName = "display_name")]
    public string DisplayName { get; set; }

}5.向应用程序添加身份验证
接下来,我们将添加用户身份验证,然后再向移动服务请求任何资源。
步骤1:声明全局变量
声明MainPage类全局的成员变量,以存储经过身份验证的用户。
private MobileServiceUser user; 步骤2:定义AuthenticateAsync方法
我们添加了执行身份验证过程的方法。 LoginAsync方法将身份提供者作为参数并处理身份验证流程。
private async System.Threading.Tasks.Task AuthenticateAsync()
{
    user = await App.MobileService.LoginAsync(MobileServiceAuthenticationProvider.MicrosoftAccount);
}
步骤3:处理有关应用激活的响应
在Windows Phone 8.1上,您需要处理来自WebAuthenticationBroker的响应。 我们在App.xaml.cs中添加了一个OnActivated方法来处理此响应。
protected override void OnActivated(IActivatedEventArgs args)
{
    #if WINDOWS_PHONE_APP
    if (args.Kind == ActivationKind.WebAuthenticationBrokerContinuation)
    {
        App.MobileService.LoginComplete(args as WebAuthenticationBrokerContinuationEventArgs);
    }
    #endif

    base.OnActivated(args);
} 如果OnActivated方法已经存在,则只需添加上面的#if...#endif代码块。 请注意, LoginAsync方法必须在后调用OnNavigated方法被调用以及页面的后Loaded事件被触发。
步骤4:添加登录按钮
在应用程序的MainPage.xaml中添加一个登录按钮,并在单击按钮时调用一种方法来对用户进行身份验证。
<Button Name="ButtonLogin" Click="ButtonLogin_Click" Visibility="Visible">Sign in</Button> 单击按钮后,调用AuthenticateAsync方法,如果身份验证成功,则隐藏登录按钮。
private async void ButtonLogin_Click(object sender, RoutedEventArgs e)
{
    // Login the user and then load data from the mobile service.
    await AuthenticateAsync();

    // Hide the login button and load items from the mobile service.
    this.ButtonLogin.Visibility = Windows.UI.Xaml.Visibility.Collapsed;
} 第5步:处理AuthenticateAsync方法中的异常
我们的AuthenticateAsync方法处理用户的身份验证,但是我们可以添加代码来处理异常和备用流。 我们更新该函数以迭代地调用LoginAsync方法,直到user不为null为止。 成功认证后,我们将显示已认证用户的UserId 。 用户成功登录后,该应用程序应运行无误。
private async System.Threading.Tasks.Task AuthenticateAsync()
{
    while (user == null)
    {
        string message;
        try
        {
            user = await App.MobileService.LoginAsync(MobileServiceAuthenticationProvider.MicrosoftAccount);
            message = string.Format("You are now signed in - {0}", user.UserId);
        }
        catch (InvalidOperationException)
        {
            message = "Login Required";
        }

        var dialog = new MessageDialog(message);
        dialog.Commands.Add(new UICommand("OK"));
        await dialog.ShowAsync();
    }
}6.客户端上的缓存身份验证令牌
AuthenticateAsync功能要求客户端在每次启动应用程序时都与身份提供商和移动服务联系。 那不是很有效。 另外,如果许多用户同时使用该应用程序,则可能会遇到加载问题。
要解决此问题,我们可以缓存身份验证令牌。 我们可以尝试使用缓存的身份验证令牌,如果身份验证令牌不再有效,则使用默认的身份验证流程。
private async System.Threading.Tasks.Task AuthenticateAsync(String provider)
{
    string message;

    // Use the PasswordVault to securely store and access credentials.
    PasswordVault vault = new PasswordVault();
    PasswordCredential credential = null;

    while (credential == null)
    {
        try
        {
            // Try to get an existing credential from the vault.
            credential = vault.FindAllByResource(provider).FirstOrDefault();
        }
        catch (Exception)
        {
            // When there is no matching resource an error occurs, which we ignore.
        }

        if (credential != null)
        {
            // Create a user from the stored credentials.
            user = new MobileServiceUser(credential.UserName);
            credential.RetrievePassword();
            user.MobileServiceAuthenticationToken = credential.Password;

            // Set the user from the stored credentials.
            App.MobileService.CurrentUser = user;

            try
            {
                // Try to return an item now to determine if the cached credential has expired.
                await App.MobileService.GetTable<TodoItem>().Take(1).ToListAsync();
            }
            catch (MobileServiceInvalidOperationException ex)
            {
                if (ex.Response.StatusCode == System.Net.HttpStatusCode.Unauthorized)
                {
                    // Remove the credential with the expired token.
                    vault.Remove(credential);
                    credential = null;
                    continue;
                }
            }
        }
        else
        {
            try
            {
                // Login with the identity provider.
                user = await App.MobileService.LoginAsync(provider);

                // Create and store the user credentials.
                credential = new PasswordCredential(provider, user.UserId, user.MobileServiceAuthenticationToken);
                vault.Add(credential);
            }
            catch (MobileServiceInvalidOperationException ex)
            {
                message = "You must log in. Login Required";
            }
        }
        message = string.Format("You are now logged in - {0}", user.UserId);
        var dialog = new MessageDialog(message);
        dialog.Commands.Add(new UICommand("OK"));
        await dialog.ShowAsync();
    }
} 修改后的AuthenticateAsync函数尝试使用存储在PasswordVault的凭据来访问移动服务。 发生以下事件序列:
- 如果存在凭据,则从
PasswordVault提取它们。 - 发送一个简单查询以验证令牌尚未过期。
- 如果服务器以401状态码响应,那么我们将退回到默认的身份验证流程。
- 如果
PasswordVault不包含凭据,我们将退回到默认的身份验证流程。
请注意,该应用会在登录期间测试过期的身份验证令牌。 但是,当用户使用应用程序时,身份验证令牌可能在身份验证后过期。 一个MSDN博客文章解释了如何处理这种情况。
7.获取用户信息
客户端对象不会公开所有用户信息,但是在服务器上,我们可以获得所需的所有信息。 传递给所有脚本的User对象具有getIdentities函数,该函数返回带有提供程序特定数据的对象。 可用于查询用户信息。 对于使用Microsoft帐户认证的用户,通过调用user.getIdentities返回对象。
{
    "microsoft":{
        "userId":"MicrosoftAccount:my-actual-user-id",
        "accessToken":"the-actual-access-token"
    }
} 要获取用户信息,我们向https://apis.live.net/v5.0/me/发送请求,并将访问令牌作为参数传递。 从提供者到用户脚本的可用信息量是有限的。 这是对/me端点的请求结果:
{
  "id": "my-live-id",
  "name": "Vivek Maskara",
  "first_name": "Vivek",
  "last_name": "Maskara",
  "link": "https://profile.live.com/",
  "gender": null,
  "locale": "en_US",
  "updated_time": "2015-03-10T16:03:43-08:00"
}
需要其他身份验证范围,以获取更多信息。 Azure移动服务使我们可以指定在执行服务器端身份验证时传递给身份验证提供程序的自定义范围。
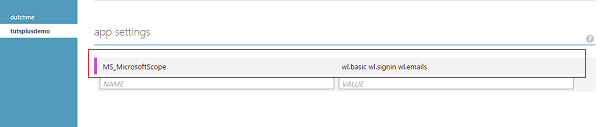
默认情况下,登录名仅请求wl.basic范围。 如果我们设置一些其他范围,我们可以获得有关用户的更多信息。 现在,让我们从Microsoft登录名请求其他范围。
在移动服务的“ 配置”标签下,在应用程序设置中设置 MS_MicrosoftScope 。
进行此更改后,我将在再次登录后获得要求的其他信息。
{
"id": "my-live-id",
"name": "Vivek Maskara",
"first_name": "Vivek",
"last_name": "Maskara",
"link": "https://profile.live.com/",
"gender": null,
"emails": {
"preferred": "maskaravivek@hotmail.com",
"account": "maskaravivek@hotmail.com",
"personal": null,
"business": null
},
"locale": "en_US",
"updated_time": "2015-03-10T16:03:43-08:00"
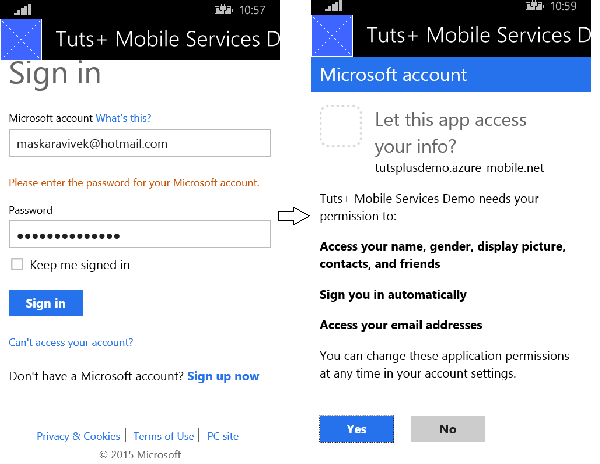
}如果用户通过Microsoft帐户登录,它将向Live Connect API发送请求,并在用户身份对象中传递存储的令牌。 最后,它将解析返回的JSON对象并检索用户配置文件详细信息。
user.getIdentities({
	success: function (identities) {
		var url;
		var oauth = null;
		if (identities.microsoft) {
			var liveAccessToken = identities.microsoft.accessToken;
			url = 'https://apis.live.net/v5.0/me/?method=GET&access_token=' + liveAccessToken;
		}

		if (url) {
			var requestCallback = function (err, resp, body) {
				if (err || resp.statusCode !== 200) {
					console.error('Error sending data to the provider: ', err);
					request.respond(statusCodes.INTERNAL_SERVER_ERROR, body);
				} else {
					try {
						var userData = JSON.parse(body);
						item.userId = user.userId;
						item.display_name = userData.name;
						item.user_email= userData.emails['account'];
						request.execute();
					} catch (ex) {
						console.error('Error parsing response from the provider API: ', ex);
						request.respond(statusCodes.INTERNAL_SERVER_ERROR, ex);
					}
				}
			}
			var req = require('request');
			var reqOptions = {
				uri: url,
				headers: { Accept: "application/json" }
			};
			req(reqOptions, requestCallback);
		} else {
			// Insert with default user name
			request.execute();
		}
	}
}); 现在,如果不存在具有userId的用户,我们需要修改插入脚本以插入新记录。 如果存在用户,我们将更新该用户。 您可以使用服务器端表脚本在完成插入操作之前检查记录是否存在。
这是一个示例脚本,该脚本检查表中的任何项目是否具有匹配的userId值,如果是这种情况,则不执行插入操作。
function insert(item, user, request) {
    var table = tables.getTable('UsersTable');
    table.where({
       userId: user.userId
    }).read({
       success: upsertItem
    });

    function upsertItem(existingItems) {
        if (existingItems.length === 0) {
            request.execute();
        } else {
        item.id = existingItems[0].id;
          table.update(item, {
            success: function(updatedItem) {
                request.respond(200, updatedItem)
            }
          });
        }
     }
}现在,我们可以将这两个脚本结合起来,为UsersTable构建最终的插入脚本。 在UsersTable的脚本选项卡下,将插入脚本替换为以下脚本:
function insert(item, user, request) {
    item.display_name = "<unknown>"; // default
    var table = tables.getTable('UsersTable');
    table.where({
       userId: user.userId
    }).read({
       success: upsertItem
    });

    function upsertItem(existingItems) {
        if (existingItems.length === 0) {
            user.getIdentities({
			success: function (identities) {
				var url;
				var oauth = null;
				if (identities.microsoft) {
					var liveAccessToken = identities.microsoft.accessToken;
					url = 'https://apis.live.net/v5.0/me/?method=GET&access_token=' + liveAccessToken;
				}

				if (url) {
					var requestCallback = function (err, resp, body) {
						if (err || resp.statusCode !== 200) {
							console.error('Error sending data to the provider: ', err);
							request.respond(statusCodes.INTERNAL_SERVER_ERROR, body);
						} else {
							try {
								var userData = JSON.parse(body);
								item.userId = user.userId;
								item.display_name = userData.name;
								item.user_email= userData.emails['account'];
								request.execute();
							} catch (ex) {
								console.error('Error parsing response from the provider API: ', ex);
								request.respond(statusCodes.INTERNAL_SERVER_ERROR, ex);
							}
						}
					}
					var req = require('request');
					var reqOptions = {
						uri: url,
						headers: { Accept: "application/json" }
					};
					req(reqOptions, requestCallback);
				} else {
					// Insert with default user name
					request.execute();
				}
			}
		});
        } else {
        // we have updated the user with existing values but you could put new values here.
        item.id = existingItems[0].id;
        item.userId= existingItems[0].userId;
        item.display_name= existingItems[0].display_name;
        item.user_email= existingItems[0].user_email;
        item.profile_picture= existingItems[0].profile_picture;
          table.update(item, {
            success: function(updatedItem) {
                request.respond(200, updatedItem)
            }
          });
        }
     }
} 现在我们已经更新了插入脚本,如果不存在具有特定userId的用户,则对插入操作的任何调用都将添加一条新记录。 此外,插入项目还会使用用户信息userId , name和email 。
我添加了一个方法InsertUser ,该方法接受类型为UsersTable的参数user并将其插入表中。
private async Task InsertUser(UsersTable user)
{
    await peopleTable.InsertAsync(user);
} 单击按钮后调用AuthenticateAsync方法后,我调用InsertUser方法将用户添加到UsersTable 。
await InsertUser(new UsersTable
{
    ProfilePicture= string.Empty
});
您可以在模拟器中运行该应用程序以查看其是否有效。 当您第二次登录时,该应用程序将使用缓存的身份验证令牌,而不是显示登录屏幕。
结论
使用Azure移动服务为不同的身份提供者验证用户非常简单。 在本教程中,我展示了如何将Microsoft帐户用于身份验证。 使用其他身份提供者的过程是相同的。 在AuthenticateAsync调用中仅需要更改provider参数。 建议缓存身份验证令牌,以便用户可以进行单点登录。
可以请求其他身份验证范围以获取更多用户信息。 此MSDN文章讨论了如何为各种身份提供者完成此操作。 随时下载本教程的源文件以供参考。 在部署应用之前,请记住将应用配置为使用Azure移动服务。
翻译自: https://code.tutsplus.com/tutorials/adding-authentication-using-azure-mobile-services--cms-23552


 1173
1173

 被折叠的 条评论
为什么被折叠?
被折叠的 条评论
为什么被折叠?
 到【灌水乐园】发言


