


jplayer css文件
编排Orman Clark的Premium Pixel设计非常有趣,这次我们将看看他的Video Player界面 ! 我们将使用名为jPlayer的超棒HTML5视频库以及一些HTML和CSS来构建它。
步骤1: HTML5基本标记
首先,我们将一个空白HTML5文档放在一起,同时记住要从头开始使用jQuery(我使用的是Google托管的jQuery)。 我还将链接到最新的HTML shiv ,它将确保Internet Explorer正确解释和设置HTML5元素的样式。
最后一件事,您会注意到我也链接到样式表,我们将在本教程的后面部分添加CSS。
<!DOCTYPE>
<html>
	<head>

		<!--Meta tags-->
		<meta charset="utf-8">

		<!--Title-->
		<title></title>

		<!--Stylesheets-->
		<link rel="stylesheet" href="css/styles.css">

		<!--jQuery-->
		<script src="https://ajax.googleapis.com/ajax/libs/jquery/1.7.1/jquery.min.js"></script>

		<!--[if lt IE 9]>
        	<script src="http://html5shim.googlecode.com/svn/trunk/html5.js"></script>
    	<![endif]-->

	</head>
<body>

</body>
</html>步骤2:下载jPlayer
接下来,我们需要下载jPlayer“ jQuery HTML5音频/视频库”。 转到jplayer.org并下载当前版本。

继续,在Web文件夹中创建一个名为“ javascript”或“ js”(或您惯用的名称)的文件夹,然后将jquery.jplayer.min.js复制到其中。 接下来,您需要在HTML中链接至此,因此请在<head>部分中添加以下内容(请记住,请相应地更改路径)。
<!--jPlayer-->
<script src="js/jquery.jplayer.min.js"></script>步骤3:玩家加价
现在,我们将添加创建播放器所需的标记。 不必担心它是否势不可挡,其中大部分来自jplayer.org网站上的演示, 稍后我将解释所有必要的内容。
<!--container for everything-->
<div id="jp_container_1" class="jp-video jp-video-360p">
<!--container in which our video will be played-->
<div id="jquery_jplayer_1" class="jp-jplayer"></div>
<!--main containers for our controls-->
<div class="jp-gui">
<div class="jp-interface">
<div class="jp-controls-holder">
</div><!--end jp-controls-holder-->
</div><!--end jp-interface-->
</div><!--end jp-gui-->
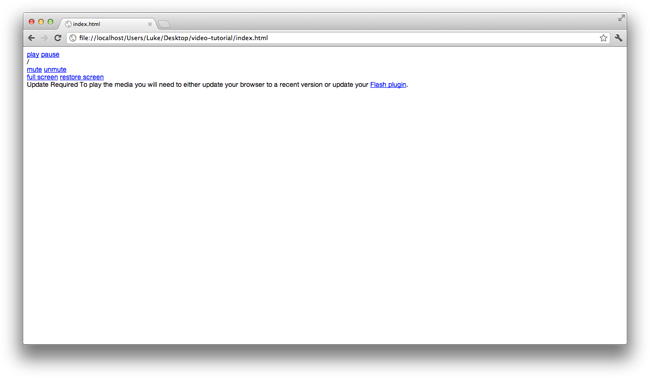
<!--unsupported message-->
<div class="jp-no-solution">
<span>Update Required</span>
Here's a message which will appear if the video isn't supported. A Flash alternative can be used here if you fancy it.
</div>
</div><!--end jp_container_1-->首先,您将看到一个包含所有内容的主容器。 我们将对此应用一些全局样式。 然后是div“#jquery_jplayer_1”,jPlayer脚本将其定位并将其添加到视频中(添加该视频时,您会在jQuery函数中看到该ID)。
您实际上只需要关心<div class="jp-gui">标记内的内容。 这是主要部分,将包含视频控件。 我们将在其中创建另外两个容器,这些容器都有助于调整大小,具体取决于全屏是打开还是关闭。
步骤4:控制标记
现在换好东西了。
<!--play and pause buttons-->
<a href="javascript:;" class="jp-play" tabindex="1">play</a>
<a href="javascript:;" class="jp-pause" tabindex="1">pause</a>
<span class="separator sep-1"></span>

<!--progress bar-->
<div class="jp-progress">
    <div class="jp-seek-bar">
        <div class="jp-play-bar"><span></span></div>
    </div>
</div>

<!--time notifications-->
<div class="jp-current-time"></div>
<span class="time-sep">/</span>
<div class="jp-duration"></div>
<span class="separator sep-2"></span>

<!--mute / unmute toggle-->
<a href="javascript:;" class="jp-mute" tabindex="2" title="mute">mute</a>
<a href="javascript:;" class="jp-unmute" tabindex="2" title="unmute">unmute</a>

<!--volume bar-->
<div class="jp-volume-bar">
    <div class="jp-volume-bar-value"><span class="handle"></span></div>
</div>
<span class="separator sep-2"></span>

<!--full screen toggle-->
<a href="javascript:;" class="jp-full-screen" tabindex="3" title="full screen">full screen</a>
<a href="javascript:;" class="jp-restore-screen" tabindex="3" title="restore screen">restore screen</a>
在这里,我们添加了控件,所有注释都为了清楚起见。 首先,我们的播放按钮,然后是暂停按钮。 都给它们都提供了合适的类名称,以供以后使用。 接下来,我们有一个带有“分隔符”类的跨度。 Orman在设计中使用了一些漂亮的小分隔符,因为它们是上面带有渐变的分隔符,我们将为此使用图像(尽管您可以放心使用CSS3渐变)。
接下来,我们创建进度条,并包含一些构建它的元素。 首先,我们有“ jp-progress”,它是进度条的基础。 接下来,我们有“ jp-play-bar”。 这是一个很酷的红色条,滚动显示视频的进度。 请注意,这里我们还使用带有“ handle”类的跨度来创建设计中所示的小旋钮。
现在,就视频的当前时间和持续时间。 我们将再次使用div(类别为“ jp-current-time”和“ jp-duration”)创建它们。 请注意,我们也再次使用了另一个span类,这次创建了另一个分隔符,但是使用了正斜杠,因此此处将不使用任何图像。 之后,您会看到我们有另一个分隔符,与以前一样。
然后需要制作音量按钮和条形图。 首先,我们将创建两个按钮,“ jp-mute”和“ jp-unmute”。 一次将仅显示其中之一,其他将被jPlayer隐藏。 音量栏与进度栏具有相同的原理,但具有相同的结构(尽管类别名称明显不同)。
如果您在浏览器中查看文件,则不会发生太多事情。
步骤5:添加视频
现在是主要部分,我们将添加一个视频! 为了获得完整的功能和跨浏览器支持,您将需要多种格式的视频。 jPlayer支持HTML5媒体格式为:
- mp3
- mp4(AAC / H.264)
- ogg(Vorbis / Theora)
- webm(Vorbis / VP8)
- 波形
各种浏览器支持不同的视频格式。 只要提供了相关的浏览器,就会选择相关的格式。 请访问caniuse.com ,以获取有关谁,什么地点以及地点的更多信息。
我们还需要一个.png文件,用作电影不播放时的海报。
出于本教程的目的,我使用从http://trailers.apple.com下载的电影预告片。 然后,我将其转换为正确的格式(有大量免费的在线资源可以在这里帮助您, Google可以免费使用。 )
因此,一旦您转换了它们并创建了.png海报,就将它们放置在项目中的适当位置。 之后,我们需要添加一个示例代码片段以启动并运行jPlayer。
将以下内容添加到文档的末尾,记住要更改文件路径以反映您自己的路径。 您会看到我们将jPlayer指向“#jquery_jplayer_1”元素。
<!--instantiate-->
<script type="text/javascript">
$(document).ready(function(){

	$("#jquery_jplayer_1").jPlayer({
		ready: function () {
			$(this).jPlayer("setMedia", {
				m4v: "mi4.m4v",
				ogv: "mi4.ogv",
				webmv: "mi4.webm",
				poster: "mi4.png"
			});
		},
		swfPath: "js",
		supplied: "webmv, ogv, m4v",
		size: {
			width: "570px",
			height: "340px",
			cssClass: "jp-video-360p"
		}
	});

});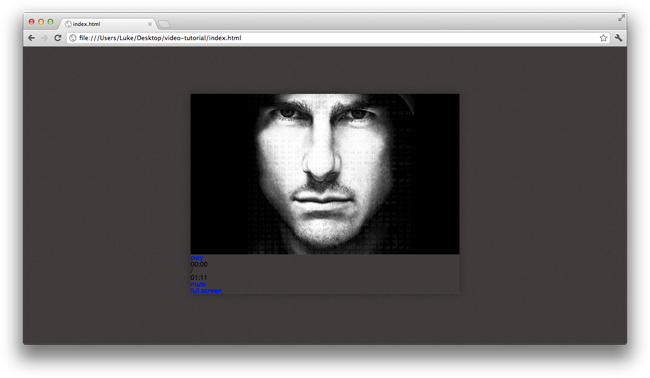
</script>请查阅jPlayer文档以获取更多选项和属性。 好的,您应该有类似以下内容:

第6步:视频基础CSS
在为控制界面添加一些CSS之前,我们将为主体添加背景,字体等,并为视频的基础添加样式。 继续创建样式表,记住要链接到网页的头部。 我还抛出了一个重置,以防您的浏览器决定增加一些边距而已!
重置规则后,我添加了带有图像的背景。 接下来,我针对整个播放器(视频和控件),给了它一个字体系列,并添加了一些框阴影(同时要记住使用浏览器前缀!)。 然后,我们为播放器处于全屏模式时的样式提供了样式。
html,body,div,span,applet,object,iframe,h1,h2,h3,h4,h5,h6,p,blockquote,pre,a,abbr,and,address,cite,code,del,dfn,em,img,ins,kbd,q,s,samp,small,strike,strong,sub,sup,tt,var,b,u,i,dl,dt,dd,ol,ul,li,fieldset,form,label,legend,table,caption,tbody,tfoot,thead,tr,th,td,article,aside,canvas,details,embed,figure,figcaption,footer,header,hgroup,menu,nav,output,ruby,section,summary,time,mark,audio,video,input,textarea,select{background:transparent;border:0;font-size:100%;margin:0;outline:0;padding:0;vertical-align:baseline}article,aside,details,figcaption,figure,footer,header,hgroup,menu,nav,section{display:block}body{line-height:1}abbr[title],dfn[title]{border-bottom:1px dotted;cursor:help}blockquote,q{quotes:none}blockquote:before,blockquote:after,q:before,q:after{content:none}del{text-decoration:line-through}hr{background:transparent;border:0;clear:both;color:transparent;height:1px;margin:0;padding:0}mark{background-color:#ffffb3;font-style:italic}input,select{vertical-align:middle}ins{background-color:red;color:white;text-decoration:none}ol,ul{list-style:none}table{border-collapse:collapse;border-spacing:0}a{text-decoration:none;}
body {
margin:0;
padding:0;
background:url("bg.jpg") repeat;
}
.jp-video {
font-family:"Helvetica Neue", Helvetica, Arial, sans-serif;
position:relative;
-webkit-box-shadow:0px 0px 20px rgba(0,0,0,.3);
-moz-box-shadow:0px 0px 20px rgba(0,0,0,.3);
box-shadow:0px 0px 20px rgba(0,0,0,.3);
}
.jp-video-360p {
width:570px;
margin: 100px auto;
}
.jp-video-full {
width:480px;
height:270px;
position:static !important;
position:relative
}
.jp-video-full .jp-jplayer {
top: 0;
left: 0;
position: fixed !important; position: relative; /* Rules for IE6 (full-screen) */
overflow: hidden;
z-index:1000;
}
.jp-video-full .jp-gui {
position: fixed !important; position: static; /* Rules for IE6 (full-screen) */
top: 0;
left: 0;
width:100%;
height:100%;
z-index:1000;
}
.jp-video-full .jp-interface {
position: absolute !important; position: relative; /* Rules for IE6 (full-screen) */
bottom: 0;
left: 0;
z-index:1000;
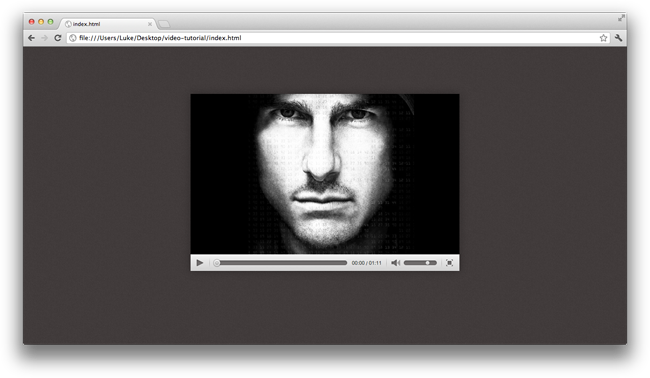
}您现在应该具有类似于以下内容的内容:
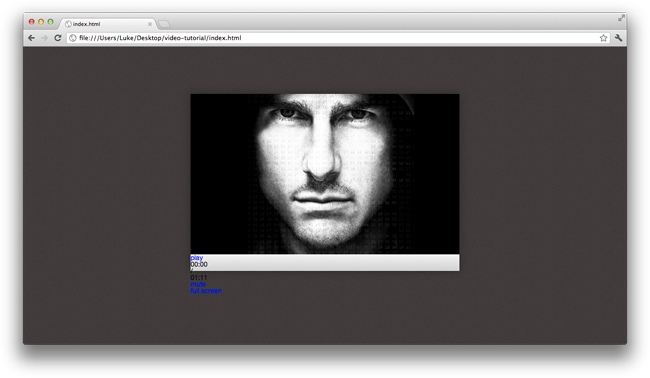
步骤7:基本控件样式
是时候开始设计控件部分了! 我们将首先对基础灰色部分进行样式设置。 我们将使用100%的流体宽度,这样可以在全屏模式下将其拉伸到全宽。 我还添加了35px的固定高度。 接下来,我们将渐变用作背景,我继续使用GradientApp创建了渐变 ,然后使用Prefixr API对其进行了清理 。
最后,我添加了一个阴影框来创建插图阴影,再次记住要使用浏览器前缀。 接下来,我为控件支架(基本上是容器)添加了一些样式,使我们可以在全屏模式下将控制面板居中。 稍后您将了解其工作原理。 我使用了570px的固定宽度,并使用margin: 0 auto;其居中margin: 0 auto;
.jp-interface {
	position: relative;
	width:100%;
	height: 35px;

	background-image: -webkit-linear-gradient(top, rgb(242, 242, 242), rgb(209, 209, 209));
	background-image: -moz-linear-gradient(top, rgb(242, 242, 242), rgb(209, 209, 209));
	background-image: -o-linear-gradient(top, rgb(242, 242, 242), rgb(209, 209, 209));
	background-image: -ms-linear-gradient(top, rgb(242, 242, 242), rgb(209, 209, 209));
	background-image: linear-gradient(top, rgb(242, 242, 242), rgb(209, 209, 209));
	filter: progid:DXImageTransform.Microsoft.gradient(GradientType=0,StartColorStr='#f2f2f2', EndColorStr='#d1d1d1');

	-webkit-box-shadow:
		inset 0px 1px 0px #f7f7f7,
		inset 0px -1px 0px #e2e2e2;
	-moz-box-shadow:
		inset 0px 1px 0px #f7f7f7,
		inset 0px -1px 0px #e2e2e2;
	box-shadow:
		inset 0px 1px 0px #f7f7f7,
		inset 0px -1px 0px #e2e2e2;
}

div.jp-controls-holder {
	clear: both;
	width:570px;
	margin: 0 auto;

	position: relative;
	overflow:hidden;
}
自从上一步以来,您应该不会看到太大的变化,除了我们刚刚添加的渐变背景:
步骤8:播放和暂停按钮
接下来,我们将添加播放和暂停按钮以及分隔符。 我将为所有按钮使用一个精灵,您可以在源文件中获取该精灵。

我首先为暂停和播放按钮定义了宽度和高度,它们的尺寸都相同。 接下来,我添加了一个文本缩进以将锚链接中的所有文本推离屏幕,因为我们不需要它们,我们将使用精灵图片。 最后,我们将使用outline:none; 这样可以解决点击时的问题,从而防止某些浏览器在按钮周围显示出可怕的蓝色光芒。
a.jp-play,
a.jp-pause {
	width:40px;
	height:35px;
	float:left;
	text-indent:-9999px;
	outline:none;
}

a.jp-play {
	background: url("sprite.png") 0 0 no-repeat;
}

a.jp-pause {
	background: url("sprite.png") -40px 0 no-repeat;
	display: none;
}

.separator {
	background-image:url("separator.png");
	background-repeat:no-repeat;
	width: 2px;
	height: 35px;
	float:left;
	margin-top: 7px;
	margin-right: 10px;
}步骤9:进度条
好的,首先我们以进度条为基础。 我们给它一个纯色背景,添加一个5px(带有前缀)的边框半径,两个框阴影,一个阴影和一个嵌入式阴影。 接下来,我们将添加一些固定的宽度和高度。 然后,我们将添加一些边距顶部,以使其在整个界面中居中。
接下来,我们将为搜索栏添加一些样式,以显示视频已加载了多少。 我们将使用0px的宽度,因为jPlayer将动态处理实际宽度,并且高度为100%,因此它将继承进度条的高度,将其全部填满。 我们还将为它提供5px的边框半径和一个背景。
最后,我们将创建进度条,该进度条会在视频播放时移动。 我将使用图像并在y轴上重复该图像。 再一次,像以前一样,我们将添加一个0px的宽度,jPlayer将处理其余部分。 接下来,还记得我们创建的span标签吗? 这将用于手柄。 我们也将为此使用图像,并对其进行绝对定位。 我们将需要使用right:XXpx; 确保它与播放栏一起移动。
.jp-progress {
	background: #706d6d;

	-webkit-border-radius:5px;
	-moz-border-radius:5px;
	border-radius:5px;

	-webkit-box-shadow:
		inset 0px 1px 4px rgba(0,0,0,.4),
		0px 1px 0px rgba(255,255,255,.4);
	-moz-box-shadow:
		inset 0px 1px 4px rgba(0,0,0,.4),
		0px 1px 0px rgba(255,255,255,.4);
	box-shadow:
		inset 0px 1px 4px rgba(0,0,0,.4),
		0px 1px 0px rgba(255,255,255,.4);

	width:280px;
	height:10px;
	float:left;
	margin-top: 13px;
}

.jp-seek-bar {
	width:0px;
	height:100%;
	cursor: pointer;
}

.jp-seeking-bg {
	background:#575555;
	-webkit-border-radius:5px;
	-moz-border-radius:5px;
	border-radius:5px;
}

.jp-play-bar {
	background: url("play-bar.png") left repeat-x;
	width:0px;
	height:10px;
	position:relative;
	z-index: 9999;

	-webkit-border-radius:5px;
	-moz-border-radius:5px;
	border-radius:5px;
}

.jp-play-bar span {
	position:absolute;
	top: -3px;
	right: -12px;

	background:url("handle.png") no-repeat center;
	width: 16px;
	height: 17px;
}
第10步:当前时间/持续时间
花费时间(嗅探器)认真地说,让我们来设计当前时间和持续时间。 我们将首先针对他们两个,以应用他们将分享的一些样式。 剩下的就是利润之类的基本东西。
.jp-current-time,
.jp-duration {
	font-size:11px;
	font-family:Arial;
	color:#444444;
	margin-top: 12px;
	float:left;
}
.jp-current-time {
	float: left;
	display:inline;
}
.jp-duration {
	float: left;
	display:inline;
	text-align: right;
}
.jp-video .jp-current-time {
	margin-left:10px;
}
.jp-video .jp-duration {
	margin-right:10px;
}
.time-sep {
	float:left;
	margin: 13px 3px 0 3px;

	font-size:11px;
	font-family:Arial;
	color:#444444;
}步骤11:音量按钮和条形图
现在离完成还很遥远,所以让我们来谈谈音量部分。 我们需要两个按钮,静音和取消静音。 我们将对两个对象都应用某种样式,然后对每个对象分别应用精灵。
注意,我们使用了outline:none; 再次避免有问题的活动状态。 要创建音量条,我们将使用与进度条类似的过程。 我们将应用固定的宽度和高度,为其指定背景,一些框阴影和5px的边框半径。 音量条本身是透明的,因此我们不会对其应用背景。 接下来,我们还有另一个旋钮。 再次使用跨度,我们将应用背景图像,使用position:absolute; 并将其定位在右侧,以便正确移动。
.jp-video a.jp-mute,
.jp-video a.jp-unmute {
	text-indent:-9999px;
	float:left;

	height: 35px;
	outline:none;
}

.jp-mute {
	float:left;
	background: url(../images/sprite.png) -80px 0 no-repeat;
	margin-top: 1px;
	margin-left: -10px;
	width: 35px;
}

a.jp-unmute {
	background: url(../images/sprite.png) -115px 0 no-repeat;
	margin-top: 1px;
	margin-left: -13px;
	display: none;
	width: 38px;
}

.jp-volume-bar {
	float:left;
	margin-top: 13px;
	margin-right: 10px;
	overflow:hidden;
	width:70px;
	height:10px;
	cursor: pointer;

	background: #706d6d;

	-webkit-border-radius:5px;
	-moz-border-radius:5px;
	border-radius:5px;

	-webkit-box-shadow:
		inset 0px 1px 4px rgba(0,0,0,.4),
		0px 1px 0px rgba(255,255,255,.4);
	-moz-box-shadow:
		inset 0px 1px 4px rgba(0,0,0,.4),
		0px 1px 0px rgba(255,255,255,.4);
	box-shadow:
		inset 0px 1px 4px rgba(0,0,0,.4),
		0px 1px 0px rgba(255,255,255,.4);
}

.jp-volume-bar-value {
	background: transparent;
	width:0px;
	height:10px;
	position: relative;
}

.jp-volume-bar-value span {
	position:absolute;
	top: 0px;
	right: 0px;

	background:url(../images/volume.png) no-repeat center;
	width: 11px;
	height: 10px;
}步骤12:全萤幕按钮
我们现在处于最后一步! 我们只剩下全屏按钮。 使用与之前类似的步骤,我们将再次应用精灵,使用text-indent隐藏文本(也称为“推入屏幕”)。 并记住使用outline:none; 再次(当然可以在样式表的开头将其应用于所有锚点)。
.jp-full-screen {
background: url(../images/sprite.png) -150px 0 no-repeat;
float:left;
width: 40px;
height: 35px;
text-indent:-9999px;
margin-left: -15px;
outline:none;
}
.jp-restore-screen {
background: url(../images/sprite.png) -150px 0 no-repeat;
float:left;
width: 40px;
height: 35px;
text-indent:-9999px;
margin-left: -15px;
outline:none;
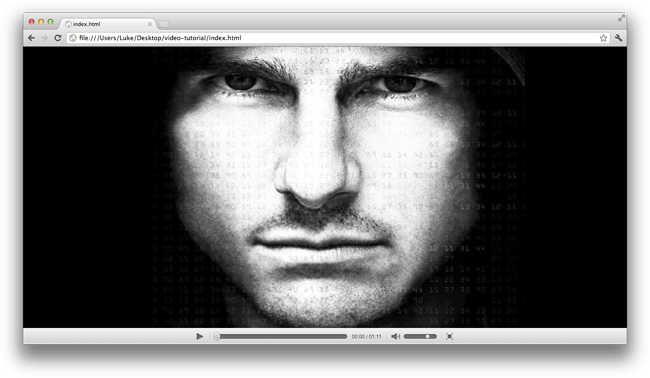
}我们的视频播放器已经完成!
继续尝试全屏功能,太棒了!
结论
通过使用jPlayer插件和Orman令人愉悦的设计,我们已经编写了一个像素完美的视频播放器界面。 别忘了,jPlayer还有很多技巧,因此请确保查看示例和文档。 我希望您喜欢本教程,感谢您的阅读。
jplayer css文件


 412
412

 被折叠的 条评论
为什么被折叠?
被折叠的 条评论
为什么被折叠?
 到【灌水乐园】发言


