


文章目录
github: https://github.com/youngsoft/TangramKit/blob/master/README.zh.md
TangramKit是一套在Swift3.0语言上开发的iOS界面视图布局框架。它的名字来源于中国古代的玩具七巧板,寓意着可以用简单的功能来构造出各种千变万化且非常复杂的UI界面。TangramKit的内核是基于对UIView的layoutSubviews方法的重载以及对子视图的bounds和center属性的设置而实现的。
系统结构
![[外链图片转存失败,源站可能有防盗链机制,建议将图片保存下来直接上传(img-YGPkCJSe-1672301971447)(/assets/upload/note/2022/11/e898c436006a28c4c4a6603833dbd778.png)]](https://img-blog.csdnimg.cn/63176395823d47f39befa5d6a75c569b.png)
CocoaPods安装
gem install cocoapods
为了用CocoaPods整合TangramKit到您的Xcode工程, 请建立如下的Podfile:
source 'https://github.com/CocoaPods/Specs.git'
platform :ios, '8.0'

pod 'TangramKit'
然后运行如下命令
pod install
举例下面一个应用场景:
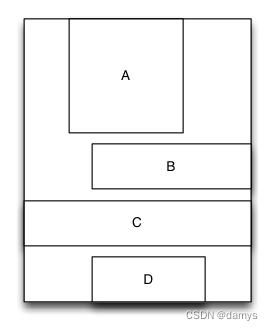
- 有一个容器视图S的宽度是100而高度则是由四个从上到下依次排列的子视图A,B,C,D的高度总和。
- 视图A的左边距占用父视图宽度的20%,而右边距则占用父视图宽度的30%,高度则等于自身的宽度。
- 视图B的左边距是40,宽度则占用父视图的剩余宽度,高度是40。
- 视图C的宽度占用父视图的所有宽度,高度是40。
- 视图D的右边距是20,宽度是父视图宽度的50%,高度是40。
let S = TGLinearLayout(.vert)
    S.tg_vspace = 10
    S.tg_width.equal(100)
    S.tg_height.equal(.wrap)
    //you can use S.tg_size(width:100, height:.wrap) to instead

    let A = UIView()
    A.tg_left.equal(20%)
    A.tg_right.equal(30%)
    A.tg_height.equal(A.tg_width)
    S.addSubview(A)

    let B = UIView()
    B.tg_left.equal(40)
    B.tg_width.equal(.fill)
    B.tg_height.equal(40)
    S.addSubview(B)

    let C = UIView()
    C.tg_width.equal(.fill)
    C.tg_height.equal(40)
    S.addSubview(C)

    let D = UIView()
    D.tg_right.equal(20)
    D.tg_width.equal(50%)
    D.tg_height.equal(40)
    S.addSubview(D)
重载了运算符:~=、>=、<=、+=、-=、*=、/= 来实现布局尺寸类TGLayoutSize和布局位置类
TGLayoutPos的equal,max,min,add,offset,multiply方法。因此您也可以将代码写成如下方式
 let S = TGLinearLayout(.vert)
    S.tg_vspace = 10
    S.tg_width ~=100
    S.tg_height ~=.wrap

    let A = UIView()
    A.tg_left ~=20%
    A.tg_right ~=30%
    A.tg_height ~=A.tg_width
    S.addSubview(A)

    let B = UIView()
    B.tg_left ~=40
    B.tg_width ~=.fill
    B.tg_height ~=40
    S.addSubview(B)

    let C = UIView()
    C.tg_width ~=.fill
    C.tg_height ~=40
    S.addSubview(C)

    let D = UIView()
    D.tg_right ~=20
    D.tg_width ~=50%
    D.tg_height ~=40
    S.addSubview(D)
布局
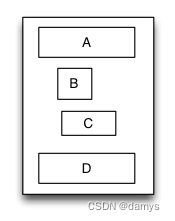
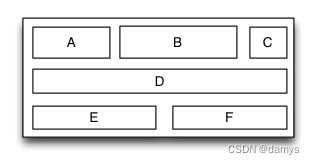
线性布局TGLinearLayout
线性布局是一种里面的子视图按添加的顺序从上到下或者从左到右依次排列的单列(单行)布局视图,因此里面的子视图是通过添加的顺序建立约束和依赖关系的。 子视图从上到下依次排列的线性布局视图称为垂直线性布局视图,而子视图从左到右依次排列的线性布局视图则称为水平线性布局
override func loadView() {

	super.loadView()

	let S = TGLinearLayout(.vert)
	S.tg_width.equal(120)
	S.tg_height.equal(.wrap)
	S.tg_vspace = 10

	let A = UIView()
	A.tg_left.equal(5)
	A.tg_right.equal(5)
	A.tg_width.equal(100)
	A.tg_height.equal(40)
	S.addSubview(A)

	let B = UIView()
	B.tg_left.equal(20)
	B.tg_width.equal(40)
	B.tg_height.equal(40)
	S.addSubview(B)

	let C = UIView()
	C.tg_right.equal(40)
	C.tg_width.equal(50)
	C.tg_height.equal(40)
	S.addSubview(C)

	let D = UIView()
	D.tg_left.equal(10)
	D.tg_right.equal(10)
	D.tg_width.equal(100)
	D.tg_height.equal(40)
	S.addSubview(D)

	self.view.addSubview(S)
	S.backgroundColor = .red
	A.backgroundColor = .green
	B.backgroundColor = .blue
	C.backgroundColor = .orange
	D.backgroundColor = .cyan
}
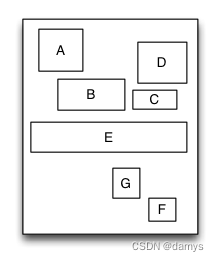
相对布局TGRelativeLayout
相对布局是一种里面的子视图通过相互之间的约束和依赖来进行布局和定位的布局视图。相对布局里面的子视图的布局位置和添加的顺序无关,而是通过设置子视图的相对依赖关系来进行定位和布局的。
override func loadView() {


	super.loadView()

	let S = TGRelativeLayout()
	S.tg_width.equal(170).and().tg_height.equal(280)

	let A = UIView()
	A.tg_left.equal(20).and().tg_top.equal(20)
	A.tg_width.equal(40).and().tg_height.equal(A.tg_width)
	S.addSubview(A)

	let B = UIView()
	B.tg_left.equal(A.tg_centerX).and().tg_top.equal(A.tg_bottom).offset(10)
	B.tg_width.equal(60).and().tg_height.equal(A.tg_height)
	S.addSubview(B)

	let C = UIView()
	C.tg_left.equal(B.tg_right).offset(10)
	C.tg_bottom.equal(B.tg_bottom)
	C.tg_width.equal(40)
	C.tg_height.equal(B.tg_height, multiple:0.5)
	S.addSubview(C)

	let D = UIView()
	D.tg_bottom.equal(C.tg_top).offset(10)
	D.tg_right.equal(15)
	D.tg_height.equal(A.tg_height)
	D.tg_width.equal(D.tg_height)
	S.addSubview(D)

	let E = UIView()
	E.tg_centerY.equal(0)
	E.tg_centerX.equal(0)
	E.tg_height.equal(40)
	E.tg_width.equal(S.tg_width).add(-20)
	S.addSubview(E)
	//...F,G

	self.view.addSubview(S)
	S.backgroundColor = .red
	A.backgroundColor = .green
	B.backgroundColor = .blue
	C.backgroundColor = .orange
	D.backgroundColor = .cyan
	E.backgroundColor = .magenta
}
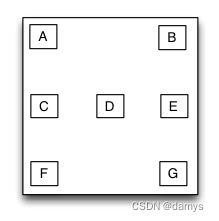
框架布局TGFrameLayout
框架布局是一种里面的子视图停靠在父视图特定方位并且可以重叠的布局视图。框架布局里面的子视图的布局位置和添加的顺序无关,只跟父视图建立布局约束依赖关系。框架布局将垂直方向上分为上、中、下三个方位,而水平方向上则分为左、中、右三个方位,任何一个子视图都只能定位在垂直方向和水平方向上的一个方位上。
override func loadView() {

	super.loadView()

	let S = TGFrameLayout()
	S.tg_width.equal(320)
	S.tg_height.equal(500)

	let A = UIView()
	A.tg_width.equal(40)
	A.tg_height.equal(40)
	S.addSubview(A)

	let B = UIView()
	B.tg_width.equal(40)
	B.tg_height.equal(40)
	B.tg_right.equal(0)
	S.addSubview(B)

	let C = UIView()
	C.tg_width.equal(40)
	C.tg_height.equal(40)
	C.tg_centerY.equal(0)
	S.addSubview(C)

	let D = UIView()
	D.tg_width.equal(40)
	D.tg_height.equal(40)
	D.tg_centerY.equal(0)
	D.tg_centerX.equal(0)
	S.addSubview(D)

	//..E,F,G

	self.view.addSubview(S)
	S.backgroundColor = .red
	A.backgroundColor = .green
	B.backgroundColor = .blue
	C.backgroundColor = .orange
	D.backgroundColor = .cyan
}
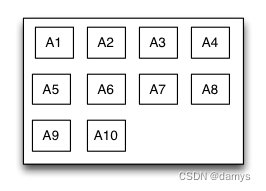
表格布局TGTableLayout
表格布局是一种里面的子视图可以像表格一样多行多列排列的布局视图。子视图添加到表格布局视图前必须先要建立并添加行视图,然后再将子视图添加到行视图里面。如果行视图在表格布局里面是从上到下排列的则表格布局为垂直表格布局,垂直表格布局里面的子视图在行视图里面是从左到右排列的;如果行视图在表格布局里面是从左到右排列的则表格布局为水平表格布局,水平表格布局里面的子视图在行视图里面是从上到下排列的。
override func loadView() {


	super.loadView()

	let S = TGTableLayout(.vert)
	S.tg_height.equal(.wrap)
	S.tg_width.equal(.wrap)
	S.tg_vspace = 10
	S.tg_hspace = 10


	S.tg_addRow(size:TGLayoutSize.wrap,colSize:TGLayoutSize.wrap)

	let A = UIView()
	A.tg_width.equal(50)
	A.tg_height.equal(40)
	S.addSubview(A)

	let B = UIView()
	B.tg_width.equal(100)
	B.tg_height.equal(40)
	S.addSubview(B)

	let C = UIView()
	C.tg_width.equal(30)
	C.tg_height.equal(40)
	S.addSubview(C)

	S.tg_addRow(size:TGLayoutSize.wrap,colSize:TGLayoutSize.wrap)

	let D = UIView()
	D.tg_width.equal(200)
	D.tg_height.equal(40)
	S.addSubview(D)

	//...E,F

	self.view.addSubview(S)
	S.backgroundColor = .red
	A.backgroundColor = .green
	B.backgroundColor = .blue
	C.backgroundColor = .orange
	D.backgroundColor = .cyan
}
流式布局TGFlowLayout
流式布局是一种里面的子视图按照添加的顺序依次排列,当遇到某种约束限制后会另起一行再重新排列的多行展示的布局视图。这里的约束限制主要有数量约束限制和内容尺寸约束限制两种,而换行的方向又分为垂直和水平方向,因此流式布局一共有垂直数量约束流式布局、垂直内容约束流式布局、水平数量约束流式布局、水平内容约束流式布局。流式布局主要应用于那些子视图有规律排列的场景,在某种程度上可以作为UICollectionView的替代品
override func loadView() {

	super.loadView()

	let S = TGFlowLayout(.vert,arrangedCount:4)
	S.tg_height.equal(.wrap)
	S.tg_width.equal(300)
	S.tg_padding = UIEdgeInsetsMake(10,10,10,10)
	S.tg_gravity = TGGravity.horz.fill
	S.tg_space = 10

	for _ in 0 ..< 10
	{
	let A = UIView()
	A.tg_height.equal(A.tg_width)
	S.addSubview(A)

	A.backgroundColor = .green
	}

	self.view.addSubview(S)
	S.backgroundColor = .red
}
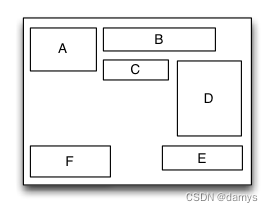
浮动布局TGFloatLayout
浮动布局是一种里面的子视图按照约定的方向浮动停靠,当尺寸不足以被容纳时会自动寻找最佳的位置进行浮动停靠的布局视图。浮动布局的理念源于HTML/CSS中的浮动定位技术,因此浮动布局可以专门用来实现那些不规则布局或者图文环绕的布局。根据浮动的方向不同,浮动布局可以分为左右浮动布局和上下浮动布局。
override func loadView() {


	super.loadView()

	let S = TGFloatLayout(.vert)
	S.tg_height.equal(.wrap)
	S.tg_width.equal(300)
	S.tg_padding = UIEdgeInsetsMake(10,10,10,10)
	S.tg_space = 10

	let A = UIView()
	A.tg_width.equal(80)
	A.tg_height.equal(70)
	S.addSubview(A)

	let B = UIView()
	B.tg_width.equal(150)
	B.tg_height.equal(40)
	S.addSubview(B)

	let C = UIView()
	C.tg_width.equal(70)
	C.tg_height.equal(40)
	S.addSubview(C)

	let D = UIView()
	D.tg_width.equal(100)
	D.tg_height.equal(140)
	S.addSubview(D)

	let E = UIView()
	E.tg_width.equal(150)
	E.tg_height.equal(40)
	E.tg_reverseFloat = true
	S.addSubview(E)

	let F = UIView()
	F.tg_width.equal(120)
	F.tg_height.equal(60)
	S.addSubview(F)

	self.view.addSubview(S)
	S.backgroundColor = .red
	A.backgroundColor = .green
	B.backgroundColor = .blue
	C.backgroundColor = .orange
	D.backgroundColor = .black
	E.backgroundColor = .magenta
	F.backgroundColor = .white
}
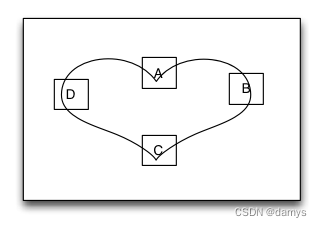
路径布局MyPathLayout
路径布局是一种里面的子视图根据您提供的一条特定的曲线函数形成的路径来进行布局的布局视图。您需要提供一个实现曲线路径的函数、一个特定的坐标体系、一种特定的子视图在曲线上的距离设置这三个要素来实现界面布局。当曲线路径形成后,子视图将按相等的距离依次环绕着曲线进行布局。路径布局主要应用于那些具有特定规律的不规则排列,而且效果很酷炫的的界面布局。
override func loadView()
{
super.loadView()

   let S = TGPathLayout()
   S.tg_width.equal(320)
   S.tg_height.equal(320)
   S.tg_coordinateSetting.isReverse = true
   S.tg_coordinateSetting.origin = CGPoint(x: 0.5, y: 0.2)
   S.tg_polarEquation = { 80 * (1 + cos(CGFloat($0))) }

   for _ in 0 ..< 4
   {
       let A = UIView()
       A.tg_size(width:40,height:40)
       S.addSubview(A)

       A.backgroundColor = .green
   }

   self.view.addSubview(S)
   S.backgroundColor = .red


 4642
4642


 被折叠的 条评论
为什么被折叠?
被折叠的 条评论
为什么被折叠?
 到【灌水乐园】发言


