


自动部署Zend Framework:
1、下载zend framework
2、cmd下输入如下命令创建项目
> cd 你解压后的zend路径 如:E:\ZendFramework-1.11.10\bin
> zf.bat create project E:/my_zend_project
3、将zend framework中的Zend文件夹粘贴到my_zend_project中的library中
4、添加虚拟主机
<VirtualHost *:80>
ServerName 要访问的域名.com
ServerAlias 要访问的域名.com
DocumentRoot 通过zf.bat create project生成的项目的/public/目录
</VirtualHost>
5、添加Host(在c:/windows/system32/drivers/etc/目录下)
127.0.0.1 要访问的域名.com
自己的环境安装方法:
1. httpd.conf文件中
a 启用LoadModule rewrite_module modules/mod_rewrite.so
b 注销DocumentRoot
c 启用Virtual hosts
2. 在httpd-vhosts.conf中
<VirtualHost *:80>
DocumentRoot "C:/wamp/www/zf/public/"
ServerName www.zf.com
DirectoryIndex index.html index.htm index.php
</VirtualHost>
3. 在C:\WINDOWS\system32\drivers\etc\hosts文件中配置域名
4. 使用zf.bat命令要设置php.exe和zendframework的bin目录所在的环境变量
E:\ZendFramework-1.11.10\bin;C:\wamp\bin\php\php5.3.3
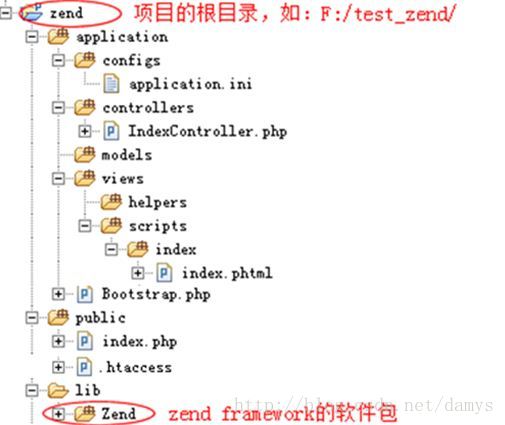
手动部署Zend Framework:
1、创建如下目录与文件,注意编码格式均为utf8的:
1、 在Apache中添加虚拟主机,或者将跟目录指向ZF项目。
<VirtualHost*:80>
ServerNamesns.com
ServerAliassns.com
DocumentRootE:/sns/public/
</VirtualHost>
这里注意要打开mod_rewrite模块,并且AllowOverride ALL
2、 创建.htaccess文件,将所有动态请求指向到index.php
RewriteEngine on
RewriteRule!\.(js|ico|gif|jpg|png|css|html|htm)$ index.php
3、 在application/下创建的Bootstrap.php中加入
class Bootstrap extendsZend_Application_Bootstrap_Bootstrap{}
4、 修改publicindex.php
RewriteEngine on
RewriteRule!\.(js|ico|gif|jpg|png|css|html|htm)$ index.php
5、 在application/下创建的Bootstrap.php中加入
class Bootstrap extendsZend_Application_Bootstrap_Bootstrap{}
6、 修改publicindex.php
//引用Application.php
require_once('/../lib/Zend/Application.php');
// 设置application目录
defined('APPLICATION_PATH')
|| define('APPLICATION_PATH',realpath(dirname(__FILE__) . '/../application'));
// 设置应用的环境变量与配置文件有关
defined('APPLICATION_ENV')
||define('APPLICATION_ENV',(getenv('APPLICATION_ENV')? getenv('APPLICATION_ENV') : 'production'));
// 确定资源包目录被引用
set_include_path(implode(PATH_SEPARATOR,array(
realpath(APPLICATION_PATH . '/../lib'),
get_include_path(),
)));
// 创建application实例并启动
$application = newZend_Application(
APPLICATION_ENV,
7、 修改IndexController.php
class IndexControllerextends Zend_Controller_Action
{
public function indexAction(){
print'------------index action-------------';
}
}
8、 添加application/views/scripts/index/index.phtml(不加这个会报错)
9、在application.ini中加入如下配置
[production]#这个就是对应与index.php的配置
bootstrap.path= APPLICATION_PATH "/Bootstrap.php"
resources.frontController.controllerDirectory = APPLICATION_PATH"/controllers
运行流程:
1、所有http请求均指向index.php
2、在index.php中实例化Zend_Application对象,
(1)并导入配置文件
(2)初始化Bootstrap class(引导类,Bootstrap __constract运行)
(3)将所有符合规则的FrontController include进来
3、通过index.php中的$application->bootstrap->run();执行请求
4、根据url访问相应的controller
(1)先执行controller的 init function
(2)执行具体的action
(4)显示VIEW
如:运行:index.php->Bootstrap.php->indexController.php(init(),indexAction())->view(scripts/index.phtml)


 2138
2138

 被折叠的 条评论
为什么被折叠?
被折叠的 条评论
为什么被折叠?
 到【灌水乐园】发言


