


一、vscode 统一代码格式,并设置保存时自动格式化代码
1、安装插件
1.ESLint
2.Prettier - Code formatter
3.Vetur
2、设置
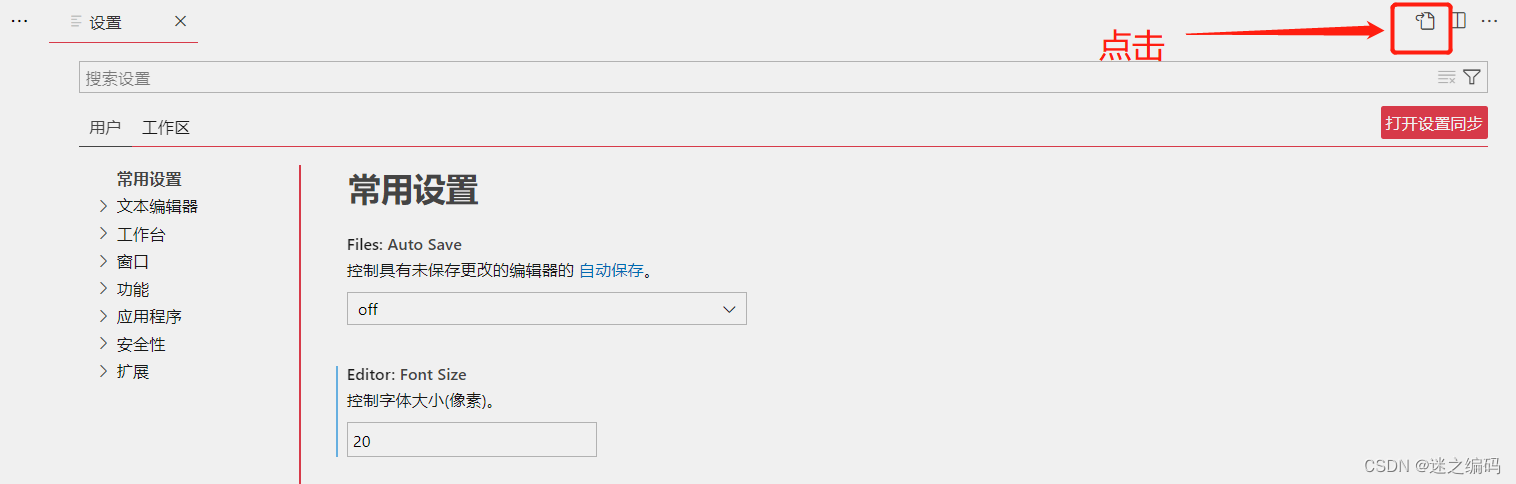
文件->首选项->设置,点击右上角的箭头所指的按钮(如下图)
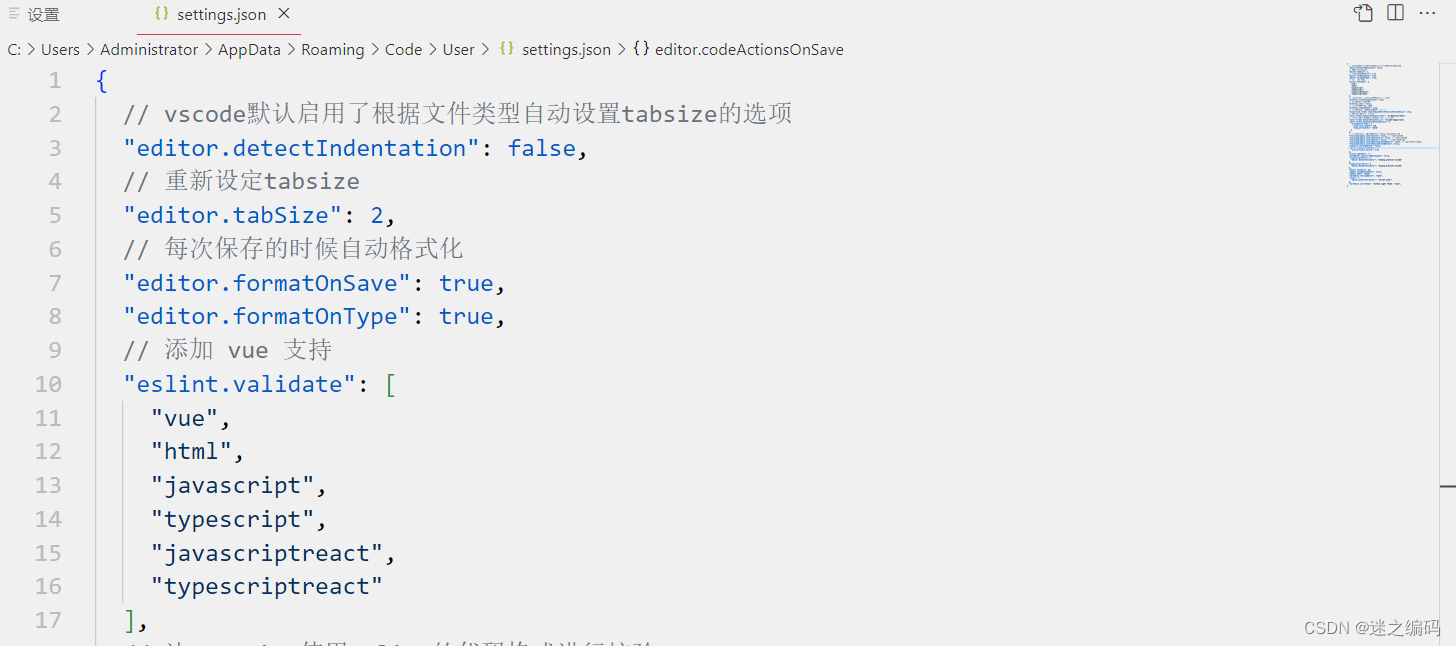
将下面的代码复制粘贴替换,并保存
{
  // vscode默认启用了根据文件类型自动设置tabsize的选项
  "editor.detectIndentation": false,
  // 重新设定tabsize
  "editor.tabSize": 2,
  // 每次保存的时候自动格式化
  "editor.formatOnSave": true,
  "editor.formatOnType": true,
  // 添加 vue 支持
  "eslint.validate": [
    "vue",
    "html",
    "javascript",
    "typescript",
    "javascriptreact",
    "typescriptreact"
  ],
  // 让prettier使用eslint的代码格式进行校验
  "prettier.eslintIntegration": true,
  // 去掉代码结尾的分号
  "prettier.semi": false,
  // 使用带引号替代双引号
  "prettier.singleQuote": true,
  // 让函数(名)和后面的括号之间加个空格
  "javascript.format.insertSpaceBeforeFunctionParenthesis": false,
  // 这个按用户自身习惯选择
  "vetur.format.defaultFormatter.html": "js-beautify-html",
  // 让vue中的js按编辑器自带的ts格式进行格式化
  "vetur.format.defaultFormatter.js": "vscode-typescript",
  "vetur.format.defaultFormatterOptions": {
    "js-beautify-html": {
      "wrap_line_length": 120,
      "wrap_attributes": "auto"
    }
  },
  // 格式化stylus, 需安装Manta's Stylus Supremacy插件
  "stylusSupremacy.insertColons": false, // 是否插入冒号
  "stylusSupremacy.insertSemicolons": false, // 是否插入分号
  "stylusSupremacy.insertBraces": false, // 是否插入大括号
  "stylusSupremacy.insertNewLineAroundImports": false, // import之后是否换行
  "stylusSupremacy.insertNewLineAroundBlocks": false,
  "explorer.confirmDelete": false,
  "editor.codeActionsOnSave": {
    "source.fixAll.eslint": true
  },
  "eslint.nodePath": "",
  "diffEditor.ignoreTrimWhitespace": false,
  "[javascript]": {
    "editor.defaultFormatter": "vscode.typescript-language-features"
  },
  "[typescriptreact]": {
    "editor.defaultFormatter": "esbenp.prettier-vscode"
  },
  "[javascriptreact]": {
    "editor.defaultFormatter": "esbenp.prettier-vscode"
  },
  "[jsonc]": {
    "editor.defaultFormatter": "esbenp.prettier-vscode"
  },
  "editor.fontSize": 20,
  "update.showReleaseNotes": false,
  "update.mode": "none",
  "workbench.startupEditor": "none"
}
重新打开vscode,在保存的时候,自动根据ES规则检查并修改语法
PS: 格式化快捷键为【Shift】+【Alt】+ F
3、可根据实际情况,调整ESLint 校验规则
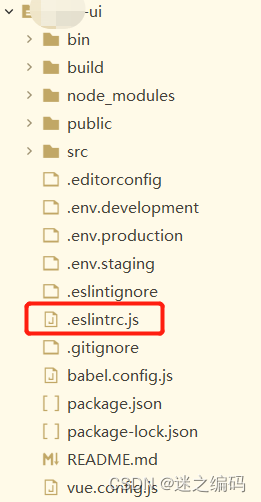
附上我本地的.eslintrc.js供参考,配置如下:
// ESlint 检查配置
module.exports = {
  root: true,
  parserOptions: {
    parser: 'babel-eslint',
    sourceType: 'module'
  },
  env: {
    browser: true,
    node: true,
    es6: true,
  },
  extends: ['plugin:vue/recommended', 'eslint:recommended'],

  // add your custom rules here
  //it is base on https://github.com/vuejs/eslint-config-vue
  rules: {
    "vue/max-attributes-per-line": [2, {
      "singleline": 10,
      "multiline": {
        "max": 1,
        "allowFirstLine": false
      }
    }],
    "vue/singleline-html-element-content-newline": "off",
    "vue/multiline-html-element-content-newline":"off",
    "vue/name-property-casing": ["error", "PascalCase"],
    "vue/no-v-html": "off",
    'accessor-pairs': 2,
    'arrow-spacing': [2, {
      'before': true,
      'after': true
    }],
    'block-spacing': [2, 'always'],
    'brace-style': [2, '1tbs', {
      'allowSingleLine': true
    }],
    'camelcase': [0, {
      'properties': 'always'
    }],
    'comma-dangle': [2, 'never'],
    'comma-spacing': [2, {
      'before': false,
      'after': true
    }],
    'comma-style': [2, 'last'],
    'constructor-super': 2,
    'curly': [2, 'multi-line'],
    'dot-location': [2, 'property'],
    'eol-last': 2,
    'eqeqeq': ["error", "always", {"null": "ignore"}],
    'generator-star-spacing': [2, {
      'before': true,
      'after': true
    }],
    'handle-callback-err': [2, '^(err|error)$'],
    'indent': [2, 2, {
      'SwitchCase': 1
    }],
    'jsx-quotes': [2, 'prefer-single'],
    'key-spacing': [2, {
      'beforeColon': false,
      'afterColon': true
    }],
    'keyword-spacing': [2, {
      'before': true,
      'after': true
    }],
    'new-cap': [2, {
      'newIsCap': true,
      'capIsNew': false
    }],
    'new-parens': 2,
    'no-array-constructor': 2,
    'no-caller': 2,
    'no-console': 'off',
    'no-class-assign': 2,
    'no-cond-assign': 2,
    'no-const-assign': 2,
    'no-control-regex': 0,
    'no-delete-var': 2,
    'no-dupe-args': 2,
    'no-dupe-class-members': 2,
    'no-dupe-keys': 2,
    'no-duplicate-case': 2,
    'no-empty-character-class': 2,
    'no-empty-pattern': 2,
    'no-eval': 2,
    'no-ex-assign': 2,
    'no-extend-native': 2,
    'no-extra-bind': 2,
    'no-extra-boolean-cast': 2,
    'no-extra-parens': [2, 'functions'],
    'no-fallthrough': 2,
    'no-floating-decimal': 2,
    'no-func-assign': 2,
    'no-implied-eval': 2,
    'no-inner-declarations': [2, 'functions'],
    'no-invalid-regexp': 2,
    'no-irregular-whitespace': 2,
    'no-iterator': 2,
    'no-label-var': 2,
    'no-labels': [2, {
      'allowLoop': false,
      'allowSwitch': false
    }],
    'no-lone-blocks': 2,
    'no-mixed-spaces-and-tabs': 2,
    'no-multi-spaces': 2,
    'no-multi-str': 2,
    'no-multiple-empty-lines': [2, {
      'max': 1
    }],
    'no-native-reassign': 2,
    'no-negated-in-lhs': 2,
    'no-new-object': 2,
    'no-new-require': 2,
    'no-new-symbol': 2,
    'no-new-wrappers': 2,
    'no-obj-calls': 2,
    'no-octal': 2,
    'no-octal-escape': 2,
    'no-path-concat': 2,
    'no-proto': 2,
    'no-redeclare': 2,
    'no-regex-spaces': 2,
    'no-return-assign': [2, 'except-parens'],
    'no-self-assign': 2,
    'no-self-compare': 2,
    'no-sequences': 2,
    'no-shadow-restricted-names': 2,
    'no-spaced-func': 2,
    'no-sparse-arrays': 2,
    'no-this-before-super': 2,
    'no-throw-literal': 2,
    'no-trailing-spaces': 2,
    'no-undef': 2,
    'no-undef-init': 2,
    'no-unexpected-multiline': 2,
    'no-unmodified-loop-condition': 2,
    'no-unneeded-ternary': [2, {
      'defaultAssignment': false
    }],
    'no-unreachable': 2,
    'no-unsafe-finally': 2,
    'no-unused-vars': [2, {
      'vars': 'all',
      'args': 'none'
    }],
    'no-useless-call': 2,
    'no-useless-computed-key': 2,
    'no-useless-constructor': 2,
    'no-useless-escape': 0,
    'no-whitespace-before-property': 2,
    'no-with': 2,
    'one-var': [2, {
      'initialized': 'never'
    }],
    'operator-linebreak': [2, 'after', {
      'overrides': {
        '?': 'before',
        ':': 'before'
      }
    }],
    'padded-blocks': [2, 'never'],
    'quotes': [2, 'single', {
      'avoidEscape': true,
      'allowTemplateLiterals': true
    }],
    'semi': [2, 'never'],
    'semi-spacing': [2, {
      'before': false,
      'after': true
    }],
    'space-before-blocks': [2, 'always'],
    'space-before-function-paren': [2, 'never'],
    'space-in-parens': [2, 'never'],
    'space-infix-ops': 2,
    'space-unary-ops': [2, {
      'words': true,
      'nonwords': false
    }],
    'spaced-comment': [2, 'always', {
      'markers': ['global', 'globals', 'eslint', 'eslint-disable', '*package', '!', ',']
    }],
    'template-curly-spacing': [2, 'never'],
    'use-isnan': 2,
    'valid-typeof': 2,
    'wrap-iife': [2, 'any'],
    'yield-star-spacing': [2, 'both'],
    'yoda': [2, 'never'],
    'prefer-const': 2,
    'no-debugger': process.env.NODE_ENV === 'production' ? 2 : 0,
    'object-curly-spacing': [2, 'always', {
      objectsInObjects: false
    }],
    'array-bracket-spacing': [2, 'never']
  }
}
二、ESLint 检查保存,问题汇总
1、报错提示:Binding “columns” should be on a new line.eslint(vue/max-attributes-per-line)
此问题是由于.eslintrc.js文件中的vue/max-attributes-per-line配置错误产生的
解决方法:改为警告,rules添加或修改
'vue/max-attributes-per-line': ['2', {
  'singleline': 10,
  'multiline': {
    'max': 1,
    'allowFirstLine': false
  }
}],
2、报错提示:Expected indentation of 15 spaces but found 8 spaces.eslint(vue/html-indent)
解决方法:修改eslint配置文件.eslintrc.js,rules添加或修改
'vue/html-indent': ['2', 2, {
  'attribute': 1,
  'baseIndent': 1,
  'closeBracket': 0,
  'alignAttributesVertically': true,
  'ignores': []
}],
3、报错提示:Missing space before function parentheses.eslint(space-before-function-paren)
原因:使用eslint时,严格模式下,方法名和括号之间需要有一个空格
解决方法:在eslintrc文件中找到rules节点,配置 ‘space-before-function-paren’: 0


 949
949


 被折叠的 条评论
为什么被折叠?
被折叠的 条评论
为什么被折叠?
 到【灌水乐园】发言


