


文章目录
HTML 表单用于搜集不同类型的用户输入。
一,创建一个表单
(一)HTML表单是什么?
表单是网页交互的基本工具, 一般网站都借助表单实现用户与服务器之间的信息交流,但是web页面也可以自己拦截它并使用它。
HTML表单是由一个或多个小部件组成的,这些小部件可以是输入框、选择框和按钮。而且为了更好地实现无障碍HTML与更好的交互,大多数情况下,这些小部件还需要与描述其目的的标签配对。
如何处理表单数据与如何设计好表单一样重要。
(二)创建一个表单
设计一个快速的模型将有助于定义想要获取哪些数据集。
假如我们需要设计一个简单的创建联系人的表单,那就需要包括能接收姓名、邮件名和其他信息的输入框,还需要一个保存信息的按钮。
1,form元素
所有HTML表单都以一个<form>元素开始:
<form action="/formhandle" post="post">
	...
</form>
2,label、input 和 textarea 元素
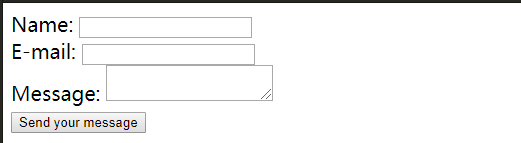
内容输入区域是表单的主体,可使用label、input等元素进行实现:
  <div>
    <label for="name">Name:</label>
    <input type="text" id="name">
  </div>
  <div>
    <label for="mail">E-mail:</label>
    <input type="email" id="mail">
  </div>
  <div>
    <label for="msg">Message:</label>
    <textarea id="msg"></textarea>
  </div>
- label元素表示用户界面中某个元素的说明。
- input元素决定当前输入框可接受的输入类型,具体由type属性定义。
- textarea元素定义一个多行的文本输入控件。
3,button 元素
表单中还需要一个提交按钮:
<div class="button">
    <button type="submit">Send your message</button>
</div>
- button元素这里定义了一个submit提交按钮,具体类型由type属性决定。
目前为止,这个简陋的表单就完成了:
(三)简单的表单样式
给朴素的表单加点CSS样式叭:
- 内部样式表:在head中使用script元素直接包含CSS。
- 外部样式表:在head中使用link元素引入外部的CSS文件。
form {
	/* Just to center the form on the page */
	margin: 0 auto;
	width: 400px;
	/* To see the outline of the form */
	padding: 1em;
	border: 1px solid #ccc;
	border-radius: 1em;
}
ul {
	list-style: none;
}
form li+li {
	margin-top: 1em;
}
label {
	/* To make sure that all labels have the same size and are properly aligned */
	display: inline-block;
	width: 90px;
	text-align: left;
}
input, textarea {
	/* To make sure that all text fields have the same font settings By default, textareas have a monospace font */
	font: 1em sans-serif;
	/* To give the same size to all text fields */
	width: 300px;
	box-sizing: border-box;
	/* To harmonize the look & feel of text field border */
	border: 1px solid #999;
}
input:focus, textarea:focus {
	/* To give a little highlight on active elements */
	border-color: #000;
}
textarea {
	/* To properly align multiline text fields with their labels */
	vertical-align: top;
	/* To give enough room to type some text */
	height: 5em;
}
.button {
	/* To position the buttons to the same position of the text fields */
	text-align: left;
}
button {
	/* This extra margin represent roughly the same space as the space between the labels and their text fields */
	margin: auto;
	background-color: #00aaff;
	font-size: 20px;
}
顺眼多了:

完整代码如下:
<!-- <!DOCTYPE html>
<html>
	<head>
		<title>Barely a script at all</title>
		<link rel="stylesheet" href="test.css">
		<script src="test.js"></script>
	</head>
	<body>
				<h1 id="myMessage">Hello, Cleveland!</h1>
		<p><button id="redirect">Click here</button> to play bingo!</p>
	</body>
</html> -->

<!DOCTYPE html>
<html>
	<head>
		<meta charset="utf-8" />
		<title>Your first HTML form, styled</title>
		<style>
			form {
				/* Just to center the form on the page */
				margin: 0 auto;
				width: 400px;
				/* To see the outline of the form */
				padding: 1em;
				border: 1px solid #ccc;
				border-radius: 1em;
			}

			ul {
				list-style: none;
			}

			form li+li {
				margin-top: 1em;
			}

			label {
				/* To make sure that all labels have the same size and are properly aligned */
				display: inline-block;
				width: 90px;
				text-align: left;
			}

			input, textarea {
				/* To make sure that all text fields have the same font settings By default, textareas have a monospace font */
				font: 1em sans-serif;
				/* To give the same size to all text fields */
				width: 300px;
				box-sizing: border-box;
				/* To harmonize the look & feel of text field border */
				border: 1px solid #999;
			}

			input:focus, textarea:focus {
				/* To give a little highlight on active elements */
				border-color: #000;
			}

			textarea {
				/* To properly align multiline text fields with their labels */
				vertical-align: top;
				/* To give enough room to type some text */
				height: 5em;
			}

			.button {
				/* To position the buttons to the same position of the text fields */
				text-align: left;
			}

			button {
				/* This extra margin represent roughly the same space as the space between the labels and their text fields */
				margin: auto;
				background-color: #00aaff;
				font-size: 20px;
			}
		</style>
	</head>

	<body>
		<form action="/my-handling-form-page" method="post">
			<ul>
				<li>
					<label for="name">Name:</label>
					<input type="text" id="name" name="user_name" />
				</li>
				<li>
					<label for="mail">E-mail:</label>
					<input type="email" id="mail" name="user_mail" />
				</li>
				<li>
					<label for="msg">Message:</label>
					<textarea id="msg" name="user_message"></textarea>
				</li>
				<li class="button">
					<button type="submit">Send message</button>
				</li>
			</ul>
		</form>
	</body>
</html>
二,可用于表单中的小部件
接下来,继续了解在浏览器中可以使用什么类型的原生表单小部件来收集数据,以及如何使用HTML实现它们。
(一)form标签的属性
1,action
就像前面提到的,action 属性定义向谁提交表单。
目的可以是某个URL,也可以是某个具体的处理模块。
如果省略 action,或设置action="",则将表当提交到当前页面。
2,method
指定表单的提交方法:
3,target
指定提交表单之后显示响应信息的位置:
- _self:默认值。在相同浏览上下文中加载。
- _blank:在新的未命名的浏览上下文中加载。
- _parent:在当前上下文的父级浏览上下文中加载,如果没有父级,则与 _self 表现一致。
- _top:在最顶级的浏览上下文中(即当前上下文的一个没有父级的祖先浏览上下文),如果没有父级,则与 _self 表现一致。
4,autocomplete
是否需要自动填充表单字段:
- off:浏览器可能不会自动补全字段。
- on:浏览器可自动补全字段。
(二)文本输入框
表单中的文本输入框主要有两种:
- 由input>元素设置单行文本框、没有文本输入的控件、时间和日期控件和按钮等。
- 由textarea元素设置多行输入文本框。
1,单行文本框
<label for="name">Name:</label>
<input type="text" id="name" name="user_name" autofocus>
type="text"设置输入类型为单行文本框。autofocus设置页面加载时自动聚焦到此表单控件。

2,E-mail 地址框
<label for="email">E-mail:</label>
<input type="email" id="email" name="email">
type="email"设置输入类型为 E-mail 地址框。

3,密码框
<label for="pwd">密 码:</label>
<input type="password" id="pwd" name="pwd">
- type="password"设置输入类型为密码框,其值会被遮盖。如果站点不安全,会警告用户。

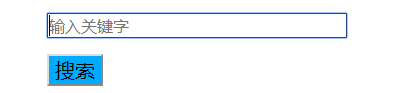
4,搜索框
<input type="search" id="search" name="search" placeholder="输入关键字">
<button type="submit">搜索</button>
type="search"设置输入类型为搜索框。- placeholder描述输入字段预期值的提示信息,并会在字段获得焦点时消失。
5,电话号码栏
<input type="tel" id="tel" name="tel">
type="tel"设置输入类型为电话号码。
6,URL 栏
<input type="url" id="url" name="url">
type="url"设置输入类型为 URL 栏
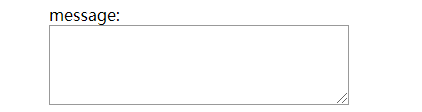
7,多行文本框
<label for="message">message:</label>
<textarea id="message" name="message" cols="30" rows="10"></textarea>
cols设置文本域的可视宽度。rows设置文本域的可视高度。
(三)可选中项
有两种可选中项:复选框和单选按钮。两者都为input元素的type属性值。
1,复选框
<input type="checkbox" checked name="vehicle" value="Bike">I have a bike
<br>
<input type="checkbox" checked name="vehicle" value="Car">I have a car
type="checkbox"设置输入类型为复选框。checked设置在页面加载时应该被选中的 input 元素。value="Bike"指定默认值。

2,单选框
<input type="radio" checked id="soup" name="soup" value="soup">soup
<br>
<input type="radio" checked id="meal" name="meal" value="meal">meal
- type="radio"设置输入类型为单选按钮。

(四)下拉列表
HTML有两种类型的下拉内容:select box和autocomplete box。
1,复选下拉列表
在不同操作系统中,选择多个选项的差异:
- 对于 windows:按住 Ctrl 按钮来选择多个选项
- 对于 Mac:按住 command 按钮来选择多个选项
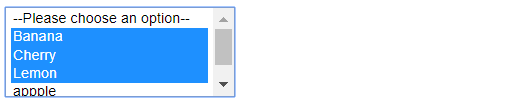
<select multiple id="multi_select" name="multi_select">
	<option  disabled selected>--Please choose an option--</option>
	<option value="Banana">Banana</option>
	<option value="Cherry">Cherry</option>
	<option value="Lemon">Lemon</option>
	<option value="appple">appple</option>
	<option value="peach">peach</option>
</select>
select元素创建一个选择框。option元素作为选择框子元素,指定了其中一个可能的值。multiple表示这是一个多选框。disabled设置该选项无法被选中。selected设置该选项是否一开始就被选中。
2,单选下拉列表
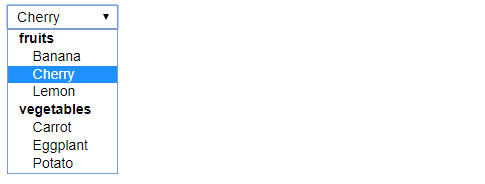
<select id="radio_select" name="radio_select">
	<optgroup label="fruits">
		<option>Banana</option>
		<option selected>Cherry</option>
		<option>Lemon</option>
	</optgroup>
	<optgroup label="vegetables">
		<option>Carrot</option>
		<option>Eggplant</option>
		<option>Potato</option>
	</optgroup>
</select>
optgroup元素对option元素进行分组。selected设置该选项是否一开始就被选中。
3,自动补全输入框
可以使用<datalist>元素来为表单小部件提供建议的、自动完成的值,并使用一些<option>子元素来指定要显示的值。然后使用list属性将数据列表绑定到一个文本框:
<form action="">
	<label for="myFruit">What's your favorite fruit?</label>
	<br>
	<input type="text" name="myFruit" id="myFruit" list="mySuggestion">
	<datalist id="mySuggestion">
		<option value="Apple">Apple</option>
		<option value="Banana">Banana</option>
		<option value="Blackberry">Blackberry</option>
		<option value="Blueberry">Blueberry</option>
		<option value="Lemon">Lemon</option>
		<option value="Lychee">Lychee</option>
		<option value="Peach">Peach</option>
		<option value="Pear">Pear</option>
	</datalist>
	<br><br>
	<input type="submit">
</form>

(五)button标签的属性
1,type
通过设置type属性指定button按钮的类型。
在HTML表单中,有三种按钮:
- Submit:将表单数据发送到服务器。对于 元素, 省略 type 属性或用一个无效的 type 值的结果就是一个提交按钮。
- Reset:将所有表单小部件重新设置为它们的默认值。
- Anonymous:没有自动生效的按钮,但是可以使用JavaScript代码进行定制。
1,提交按钮
<button type="submit">submit</button>
<br>
<input type="submit" value="This is a submit button too">
type="submit"可将button和input设置为提交按钮。
2,重置按钮
<button type="reset">reset</button>
<br>
<input type="reset" value="This is a reset button too">
type="reset"可将button和input设置为重置按钮。
但是,通过button和input设置的按钮还是有不同之处:
button元素允许继续在标签中使用HTML内容而input元素不允许。button元素也能设置value属性值。
下面这几种属性都能够进行重写从而覆盖form元素中的属性(input元素也能用)。
2,formaction
如果指定了,将重写button表单拥有者的action属性。
3,formmethod
如果指定了,将重写button拥有者的method属性。
4,formtarget
如果指定了,将重写button拥有者的target属性。
(六)其它表单部件
1,数字输入栏
<input type="number" name="age" id="age" min="1" max="10" step="1">
type="number"设置输入类型为数字输入。min指定最小值。max指定最大值。step指定步长。

2,滑块
<input type="range" list="tickmarks" oninput="document.getElementById('show').innerHTML=value+'%'">
<span id="show"></span>
<datalist id="tickmarks">
	<option value="0" label="0%"></option>
	<option value="10"></option>
	<option value="20"></option>
	<option value="30"></option>
	<option value="40"></option>
	<option value="50" label="50%"></option>
	<option value="60"></option>
	<option value="70"></option>
	<option value="80"></option>
	<option value="90"></option>
	<option value="100" label="100%"></option>
</datalist>
type="range"设置输入类型为滑块。- oninput事件在用户输入时触发。这里将实时显示滑块数值。

3,日期时间选择器
(1)本地时间
<label for="meeting-time">Choose a time for your appointment:</label>
<br>
<input type="datetime-local" id="meeting-time" name="meeting-time" min="2010-06-07T00:00" max="2030-06-14T00:00">
type="datetime-local"设置输入类型为时间选择。

(2)时间
<input type="time" name="time" id="time">

(3)星期
<label for="week">Choose a week in May or June:</label>
<br>
<input type="week" name="week" id="camp-week" min="2018-W18" max="2018-W26" required>

(4)月
<input type="month" name="month" id="month">

4,拾色器
<input type="color" name="color" id="color">

5,文件选择器
<input type="file" name="file" id="file" accept="image/doc/txt/*">
6,图像按钮
<input type="image" id="ImgClk" alt="Click me!" src="./爱心.png" width="80" height="80" />
7,隐藏内容
有时候,由于为了方便技术原因,有些数据是用表单发送的,但不显示给用户。
<input type="hidden" id="timestamp" name="timestamp" value="1286705410">
8,进度条
<progress max="100" value="75">75/100</progress>
- progress元素创建进度条。
到目前为止,我们创建的表单差不多都是“静态”的,如果要像“滑块”那样有些交互性的东西,就还需要使用JavaScript来进一步实现所需要的交互性功能。
三,提交表单数据
在前面提到过:
form元素的action属性指定提交表单数据的目的地。它的值必须是一个有效的URL。如果没有提供此属性,则数据将被发送到包含这个表单的页面的URL。form元素的action属性指定提交表单数据的方法。- 上面的两个属性都能在包含
type="submit"的提交元素中重新指定。
(一)通过GET方式提交表单
<form action="" method="get">
	<ul>
		<li>
			<label for="say">What greeting do you want to say?</label>
			<input type="text" id="say" name="say" />
		</li>
		<li>
			<label for="to">Who do you want to say it to?</label>
			<input type="text" id="to" name="to" />
		</li>
		<li class="button">
			<button type="submit">Send message</button>
		</li>
	</ul>
</form>
填入数据并提交后会产生如下的请求:


- 浏览器发送的请求中一个空的主体。由于主体是空的,如果使用该方法发送一个表单,数据将被追加到URL,
http://127.0.0.1:8000/?say=hi&to=mom,在URL web地址结束之后紧跟一个问号(?),后面跟着由一个与符号(&)互相分隔开的名称/值对。
(二)通过POST方式提交表单
将method改为post,填入数据并提交后会产生如下的请求:


- 如果使用该方法发送表单,则将数据追加到HTTP请求的主体中而不会像GET方法那样直接出现在URL中。
是否将数据显示在URL中,这是GET与POST提交的最大区别,由此需要注意一些问题:
- 如果需要发送一个密码(或其他敏感数据),永远不要使用GET方法。
- 如果需要发送大量的数据,首选POST方法,因为一些浏览器和许多服务器会限制URL的大小。
四,获取表单数据
到目前为止我们只完成了form表单的编写,要能使用表单中的数据,还需要使用服务器端编程技术进行数据解析。这里以flask框架为例进行说明。
<form action="{{ url_for('hello') }}" method="get">
	<ul>
		<li>
			<label for="say">What greeting do you want to say?</label>
			<input type="text" id="say" name="say" />
		</li>
		<li>
			<label for="to">Who do you want to say it to?</label>
			<input type="text" id="to" name="to" />
		</li>
		<li class="button">
			<button type="submit">Send message</button>
		</li>
	</ul>
</form>
from flask import Flask, render_template, request
app = Flask(__name__)

@app.route('/', methods=['GET', 'POST'])
def form():
    return render_template('form.html')

@app.route('/hello', methods=['GET', 'POST'])
def hello():
    return render_template('greeting.html', say=request.form['say'], to=request.form['to'])

if __name__ == "__main__":
    app.run()
flask框架。- flask将接收到的表单数据封装为字典类型,访问就很简单。
四,验证表单数据
浏览器可根据表单中input元素的type属性实现字段验证,也可以在前端使用JavaScript实现html表单验证:
- 减小后端压力。


 1889
1889


 被折叠的 条评论
为什么被折叠?
被折叠的 条评论
为什么被折叠?
 到【灌水乐园】发言


