


文章目录
Vue 3 已经在 2022 年 2 月 7 日星期一成为默认版本。
Outside of Vue core, we have improved almost every aspect of the framework:
- Blazing fast, Vite-powered build toolchain
- More ergonomic Composition API syntax via
<script setup>- Improved TypeScript IDE support for Single File Components via Volar
- Command line type checking for SFCs via vue-tsc
- Simpler state management via Pinia
- New devtools extension with simultaneous Vue 2 / Vue 3 support and a plugin system that allows community libraries to hook into the
devtools panels
这里就面向新手简单介绍一下 VUE 3 的使用。
一,安装与使用
官方也不推荐新手直接使用 vue-cli,尤其是在还不熟悉基于 Node.js 的构建工具时。
如果只是为了制作原型或学习而不是创建前端工程,可以直接引用:
<script src="https://unpkg.com/vue@next"></script>
- 默认导入最新版本。
1,声明式渲染
先看一个 文本插值 的例子:
<!DOCTYPE html>
<html>
	<head>
		<meta charset="utf-8">
		<title>学习VUE3</title>
		<script src="https://unpkg.com/vue@next"></script>

		<style type="text/css">
			#counter {
				color: red;
				font-size: 20px;
				font-weight: bolder;
			}
		</style>
	</head>
	<body>
		<div id="counter">
			Counter: {{ counter }}
		</div>

		<script>
			const Counter = {
				data() {
					return {
						counter: 0
					}
				},
				mounted() {
					setInterval(() => {
						this.counter++
					}, 1000)
				}
			}
			Vue.createApp(Counter).mount('#counter')
		</script>
	</body>
</html>
- 看起来这跟渲染一个字符串模板非常类似,但是 Vue 在背后做了大量工作:在数据和 DOM 之间建立联系——所有东西都是响应式的——Vue.js 的核心是一个允许采用简洁的模板语法来声明式地将数据渲染进 DOM 的系统。
- 关于 Vue3 底层是如何实现这种响应式数据驱动效果的,感兴趣的话可以自己去分析源码,或者跟着其他人的解读捋一下:
效果如下:

再来看一个 绑定元素 attribute 的例子:
<div id="bind-attribute">
    <span v-bind:title="message">
        鼠标悬停几秒钟查看此处动态绑定的提示信息!
    </span>
</div>

<script>
	const AttributeBinding = {
	    data() {
	        return {
	        message: 'You loaded this page on ' + new Date().toLocaleString()
	        }
	    }
	}
	Vue.createApp(AttributeBinding).mount('#bind-attribute')
</script>
v-bind之类的带有前缀 v- 的 attribute 被称为指令,vue 提供的指令会在要渲染的 DOM 上应用特殊的响应式行为。- 在这里指令的意思是:“将这个元素节点的 title attribute 和当前Vue应用实例的 message property 保持一致”。关于 attribute 和 property 区别,可以看看前端杂谈: Attribute VS Property。
效果如下:

2,处理用户输入
我们可以用 v-on 指令添加一个事件监听器,绑定在实例中定义的事件处理方法,以此完成用户和应用的交互:
<div id="event-handling">
    <p>{{ message }}</p>
    <button v-on:click="reverseMessage">反转 Message</button>
</div>

<script>
    const EventHandling = {
        data() {
            return {
                message: 'Hello Vue.js!'
            }
        },
        methods: {
            reverseMessage() {
                this.message = this.message
                    .split('')
                    .reverse()
                    .join('')
            }
        }
    }

    Vue.createApp(EventHandling).mount('#event-handling')
</script>
- 我们仅仅是监听了一个事件并挂载了一组内容,具体的 DOM 操作都由 Vue 来处理。
效果如下:

再看一个更加体现双向数据绑定的例子:
<div id="two-way-binding">
    <p>Hello {{ message }}!</p>
    <label>
        <input v-model="message"/>
    </label>
</div>

<script>
    const TwoWayBinding = {
        data() {
            return {
                message: ''
            }
        }
    }

    Vue.createApp(TwoWayBinding).mount('#two-way-binding')
</script>
v-model指令能轻松实现表单输入和应用状态之间的双向绑定。
效果如下:

3,条件与循环
我们不仅可以把数据绑定到 DOM 文本或 attribute,还可以绑定 DOM 结构.
例如,用 v-if 指令控制切换一个元素:
<div id="conditional-rendering">
    <span v-if="seen">现在你看到我了</span>
</div>

<script>
    const ConditionalRendering = {
        data() {
            return {
                seen: true	// 试试 seen: false
            }
        }
    }

    Vue.createApp(ConditionalRendering).mount('#conditional-rendering')
</script>
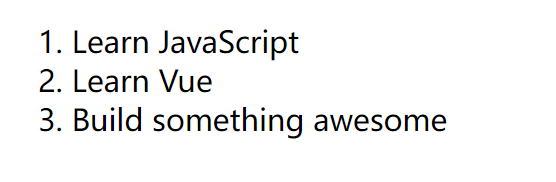
例如,用 v-for 指令可以绑定数组的数据来渲染一个项目列表:
<div id="list-rendering">
    <ol>
        <li v-for="todo in todos">
            {{ todo.text }}
        </li>
    </ol>
</div>

<script>
    const ListRendering = {
        data() {
            return {
                todos: [
                    { text: 'Learn JavaScript' },
                    { text: 'Learn Vue' },
                    { text: 'Build something awesome' }
                ]
            }
        }
    }

    Vue.createApp(ListRendering).mount('#list-rendering')
</script>
4,组件化应用构建
组件系统是 Vue 的另一个重要概念,因为它是一种抽象,允许我们使用小型、独立和通常可复用的组件构建大型应用——几乎任意类型的应用界面都可以抽象为一个组件树。

组件本质上是一个具有预定义选项的实例,只需要被创建、被注册就能直接使用:
// 创建一个新组件
const TodoItem = {
  template: `<li>This is a todo</li>`
}

// 创建 Vue 应用
const app = Vue.createApp({
  components: {
    TodoItem // 在父级组件的 components 中注册一个新组件
  },
  ... // 组件的其它 property
})

// 挂载 Vue 应用
app.mount(...)

// 使用一个新组件
<ol>
  <!-- 创建一个 todo-item 组件实例 -->
  <todo-item></todo-item>
</ol>
下面就用前面见过的指令来渲染一个待办列表:
<div id="todo-list-app">
    <ol>
        <!-- 使用子组件 -->
        <!--循环遍历副组件数组数据,这会自动渲染多次子组件-->
        <!--为每个子组件添加key属性,这样可以提高渲染效率-->
        <!--将数据绑定到子组件的props属性上-->
        <todo-item
                v-for="item in groceryList"
                v-bind:key="item.id"
                v-bind:todo="item"
        ></todo-item>
    </ol>
</div>

<script>
    // 1,子组件
    const TodoItem = {
        props: ['todo'],    // 1.1 接受来自父组件的数据
        template: `         // 1.2 渲染来自父组件的数据
        <li>{{ todo.text }}</li>`
    }

    // 2,父组件
    const TodoList = {
        data() {            // 2.1 父组件的初始数据
            return {
                groceryList: [
                    {id: 0, text: 'Vegetables'},
                    {id: 1, text: 'Cheese'},
                    {id: 2, text: 'Whatever else humans are supposed to eat'}
                ]
            }
        },
        components: {
            TodoItem        // 2.2 在父组件中注册子组件
        }
    }

    // 3,创建 vue 应用
    const app = Vue.createApp(TodoList);

    // 4,挂载 vue 应用
    app.mount('#todo-list-app');
</script>
在一个大型应用中,有必要将整个应用程序划分为多个组件,以使开发更易管理。
官方的基础介绍到这里差不多就结束了,vue 通过数据双向绑定和组件化系统这两大最重要的特点给我们留下了印象,接下来就跟着官方教程更加详细地了解 vue 的基础部分。
二,应用 & 组件实例
(一)创建应用实例
每个 Vue 应用都是通过用 createApp 函数创建一个新的应用实例开始的:
const app = Vue.createApp({
  /* properties */
})
- 该应用实例是用来在应用中注册“全局”组件的(后面解释“全局”的含义)。
- 应用实例允许链式调用暴露出来的方法(大多数都会返回该同一实例)具体有哪些方法,请参考完整的应用 API。
// 注册“全局”组件
const app = Vue.createApp({})
// 调用实例方法
app.component('SearchInput', SearchInputComponent)
app.directive('focus', FocusDirective)
app.use(LocalePlugin)

// 链式调用实例方法
Vue.createApp({})
  .component('SearchInput', SearchInputComponent)
  .directive('focus', FocusDirective)
  .use(LocalePlugin)
Vue 允许多个 Vue 应用程序在同一页面上共存,每个应用程序都有自己的配置范围:
- 官方建议,如果只用 Vue 来渲染 HTML,应避免在整个页面上挂载单个 Vue 应用实例,而应创建多个小型应用程序实例并将它们挂载在它们负责的元素上。
const app1 = createApp({
  /* ... */
})
app1.mount('#container-1')

const app2 = createApp({
  /* ... */
})
app2.mount('#container-2')
(二)根组件与挂载
传递给 createApp 的选项(property)用于配置根组件,当我们挂载应用实例到一个 DOM 元素时,根组件被用作渲染的起点。
<!--一个用于挂载应用的容器-->
<div id="app">
    <!--子元素-->
</div>

<script>
    // 1,根组件
    const RootComponent = {
        /* 选项 */
    }

    // 2,创建应用实例
    const app = Vue.createApp(RootComponent)

    // 3,挂载应用实例到 DOM,就创建了一个根组件实例
    const vm = app.mount('#app')
</script>
虽然官方指南中的许多示例只需要一个组件,但大多数实际应用程序都被组织成一个嵌套的、可重用的组件树:
App (root component)
├─ TodoList
│  └─ TodoItem
│     ├─ TodoDeleteButton
│     └─ TodoEditButton
└─ TodoFooter
   ├─ TodoClearButton
   └─ TodoStatistics
(三)组件实例的 property
vue 会将我们配置的组件选项——用户定义的 property——添加到组件实例中,然后组件实例会自动暴露它们:
const app = Vue.createApp({
  // 组件配置选项
  data() {	// data property
    return { count: 4 }
  }
})

const vm = app.mount('#app')

console.log(vm.count) // 通过组件实例暴露,=> 4
其他的组件选项将在后面继续讨论。
(四)生命周期
每个组件在被创建时都要经过一系列的初始化过程——例如,需要设置数据监听、编译模板、将实例挂载到 DOM 并在数据变化时更新 DOM 等。同时在初始化过程中也会运行一些叫做生命周期钩子的函数,这给了用户在不同阶段添加自己的代码的机会。
- 所有生命周期钩子请参考生命周期钩子 API(具体的内容后面再讲)。
下图展示了实例的生命周期:

三,模板语法
Vue.js 使用了基于 HTML 的模板语法,允许开发者声明式地将 DOM 绑定至底层组件实例的数据。所有 Vue.js 的模板都是合法的 HTML,所以能被遵循规范的浏览器和 HTML 解析器解析。
在底层的实现上,Vue 将模板编译成高度优化的 JavaScript 虚拟 DOM 渲染函数。结合 reactivity system,它能够智能地计算出最少需要重新渲染多少组件,并把 DOM 操作次数减到最少。
- 如果你熟悉虚拟 DOM 与 JavaScript,可以不用模板,而是像 React 那样使用渲染函数与 JSX 语法。
(一)插值
1,文本插值
最基本的数据绑定形式是使用 Mustache 语法(双花括号)的文本插值:
<span>Message: {{ msg }}</span>

举个例子:
<!DOCTYPE html>
<html>
	<head>
		<meta charset="utf-8">
		<script src="https://unpkg.com/vue@next"></script>
	</head>
	<body>
		<div id="app">
			Counter: {{ counter }}
		</div>

		<script>
			const Root = {
				data() {
					return {
						msg: "hello world"
					}
				}
			};
			Vue.createApp(Root).mount('#app');
		</script>
	</body>
</html>
Mustache 标签将会被替代为对应组件实例中 msg property 的值。
- 无论何时,绑定的组件实例上 msg property 发生了改变,插值处的内容都会更新。
- 使用
v-once指令能执行一次性地插值:后续数据改变时,插值处的内容不会更新。
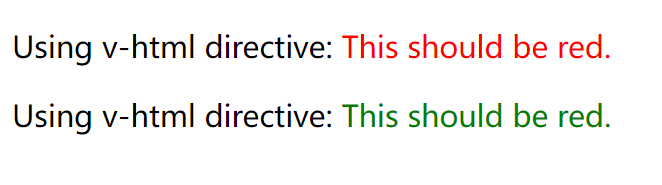
2,原始 HTML 插值
如果要输出插值 HTML 内容,则需要使用 v-html 指令:
<div id="example" class="demo">
    <p>Using mustaches: {{ rawHtml }}</p>
    <p>Using v-html directive: <span v-html="rawHtml"></span></p>
</div>

<script>
    const RenderHtmlApp = {
        data() {
            return {
                rawHtml: '<span style="color: red">This should be red.</span>'
            }
        }
    }

    Vue.createApp(RenderHtmlApp).mount('#example')
</script>
效果如下:

在站点上动态渲染任意的 HTML 是非常危险的,因为它很容易导致 XSS 攻击。请只对可信内容使用 HTML 插值,绝不要将用户提供的内容作为插值。
3,绑定 Attribute
如果要设置 HTML attribute,则需要使用 v-bind 指令 而不再是 {{}}:
- 如果绑定的值是
null或undefined,那么该 attribute 将不会被包含在渲染的元素上。
<div v-bind:id="dynamicId"></div>
对于布尔 attribute (它们只要存在就意味着值为 true),该指令工作起来略有不同:
<button v-bind:disabled="isButtonDisabled">按钮</button>
- 如果 isButtonDisabled 的值是 truthy,那么 disabled attribute 将被包含在内。如果该值是一个空字符串,它也会被包括在内,此时等价于
<button disabled="">。对于其他 falsy 的值,该 attribute 将不被包含在内。
还可以使用不带参数的 v-bind 将 JavaScript 对象动态绑定到多个 attribute:
<img v-bind="objectOfAttrs" >

<script>
    const App = {
        data() {
            return {
                objectOfAttrs: {
                    id: 'container',
                    src: './img1.jpg',
                    href: '/index/',
                    alt: 'logo'
                }
            }
        }
    }

    Vue.createApp(App).mount('img')
</script>
4,使用 JavaScript 表达式
对于所有的数据绑定,Vue.js 都提供了完全的 JavaScript 表达式支持。
- 每个绑定都只能包含单个表达式。
{{ number + 1 }}

{{ ok ? 'YES' : 'NO' }}

{{ message.split('').reverse().join('') }}

<div v-bind:id="'list-' + id"></div>

// 调用组件公开的方法
<span :title="toTitleDate(date)">
  {{ formatDate(date) }}
</span>

<!--  这是语句,不是表达式:-->
{{ var a = 1 }}
<!-- 流程控制也不会生效,请使用三元表达式 -->
{{ if (ok) { return message } }}
(二)指令
指令是带有 v- 前缀的特殊 attribute。
- 指令 attribute 的值一般是单个 JavaScript 表达式 (
v-for和v-on是例外情况,稍后我们再讨论)。 - 指令的职责是,当表达式的值改变时,将其产生的连带影响,响应式地作用于 DOM。
1,参数
一些指令能够接收一个参数,在指令名称之后以冒号表示。
例如,v-bind 指令可以用于响应式地更新 HTML attribute:
<a v-bind:href="url"> ... </a>
- href 参数告知
v-bind指令将该元素的hrefattribute 与表达式 url 的值绑定。
另一个例子是 v-on 指令,它用于监听 DOM 事件:
<a v-on:click="doSomething"> ... </a>
- 这里参数是监听的事件名。
2,动态参数
也可以在指令参数中使用 JavaScript 表达式,这个表达式的结果将作为最终参数:
<a v-bind:[attributeName]="url"> ... </a>
<a v-on:[eventName]="doSomething"> ... </a>
对动态参数表达式的约束:
- 动态参数的计算结果应该是字符串,特殊值
null意为显式移除该绑定。其他非字符串的值会触发警告。 - 动态参数表达式还有一些语法限制,因为某些字符(例如空格和引号)在 HTML 属性名称中是无效的。
- 如果需要传递复杂的动态参数,最好使用 compute property(后面再说)。
3,修饰符
修饰符 (modifier) 是以半角句号 . 指明的特殊后缀,用于指出一个指令应该以特殊方式绑定。
- 用于事件监听的
@也是一个修饰符。
例如,.prevent 修饰符告诉 v-on 指令对于触发的事件调用 event.preventDefault():
<form v-on:submit.prevent="onSubmit">...</form>
(三)缩写
v- 前缀作为一种视觉提示用来识别模板中 Vue 特定的 attribute,这在当使用 Vue.js 为现有标签添加动态行为时很有帮助,
然而对于一些频繁用到的指令来说,就会感到使用繁琐。
同时,在构建由 Vue 管理所有模板的单页面应用程序时,v- 前缀也变得没那么重要了。
因此,Vue 为 v-bind 和 v-on 这两个最常用的指令提供了特定简写:
- 缩写是 Vue 开发者最常用的用法。
<!-- 完整语法 -->
<a v-bind:href="url"> ... </a>
<!-- 缩写 -->
<a :href="url"> ... </a>
<!-- 动态参数的缩写 -->
<a :[key]="url"> ... </a>


<!-- 完整语法 -->
<a v-on:click="doSomething"> ... </a>
<!-- 缩写 -->
<a @click="doSomething"> ... </a>
<!-- 动态参数的缩写 -->
<a @[event]="doSomething"> ... </a>
总之,完整指令语法:

四,Data Property 和 Methods Property
(一)Data Property
组件的 data 选项必须是一个函数,Vue 会在创建新组件实例的过程中调用此函数,且它必须返回一个对象。
- 为什么
data选项必须是一个函数?——一个组件可能在很多地方使用,也就是会创建很多个实例,如果data是一个对象(对象是引用类型)的话,一个实例修改了data就会影响到其他实例,所以data必须是函数。为每一个实例创建一个属于自己的data,可以使其同一个组件的不同实例互不影响。
返回的这个对象,Vue 会通过响应式系统将其包裹起来,并以 $data 的形式存储在组件实例中。此对象的任何顶层 property 也会直接通过组件实例(即方法和生命周期钩子中的 this)暴露出来:
<div id="app_1"><p>Using v-html directive: <span v-html="rawHtml"></span></p></div>
<div id="app_2"><p>Using v-html directive: <span v-html="rawHtml"></span></p></div>

<script>
    const RenderHtmlApp = {
        // data property is a function that returns an object
        data() {
            return {
                rawHtml: '<span style="color: red">This should be red.</span>'
            }
        }
    }

    // RenderHtmlApp组件实例一
    const app_1 = Vue.createApp(RenderHtmlApp).mount('#app_1')

    // RenderHtmlApp组件实例二
    const app_2 = Vue.createApp(RenderHtmlApp).mount('#app_2')

    // data property 返回的对象会以 $data 的形式存储在组件实例中
    console.log(app_1.$data.rawHtml) // => red
    console.log(app_2.rawHtml)       // => red

    // 修改对象的值会更新 $data
    app_2.rawHtml = '<span style="color: blue">This should be red.</span>'
    console.log(app_2.$data.rawHtml) // => blue

    // 反之亦然
    app_2.$data.rawHtml = '<span style="color: green">This should be red.</span>'
    console.log(app_2.rawHtml) // => green
</script>
效果如下:
这些实例的 property 仅在实例首次创建时被添加,所以你需要确保它们都在 data 函数返回的对象中。
- 必要时,要对尚未提供所需值的 property 使用
null、undefined或其他占位的值。
(二)Methods Property
还可以用 methods Property 向组件实例添加方法,它应该是一个包含所需方法的对象:
- Vue 自动为
methods绑定this,以便于它始终指向组件实例。这将确保该方法在用作事件监听或回调时保持正确的this指向。不应该在定义methods时使用箭头函数,因为箭头函数没有自己的this上下文。
const app = Vue.createApp({
    data() {
        return { count: 4 }
    },
    methods: {
        increment() {
            // `this` 指向该组件实例本身
            this.count++
        }
    }
})

const vm = app.mount('#app')
console.log(vm.count) // => 4
vm.increment()
console.log(vm.count) // => 5
methods 和组件实例的其它所有 property 一样可以在组件的模板中被访问。在模板中,它们通常被当做事件处理函数进行使用:
<div id="app">
    <button @click="reduction">-1</button>
    <span style="margin:10px;">{{ count }}</span>
    <button @click="increment">+1</button>
</div>


<script>
    const app = Vue.createApp({
        data() {
            return {count: 0}
        },
        methods: {
            increment() {
                // `this` 指向该组件实例
                this.count++;
            },
            reduction() {
                // `this` 指向该组件实例
                if ( this.count > 0 ) {
                    this.count--;
                }
            },
        }
    })

    const vm = app.mount('#app')
</script>
效果如下:

也可以直接从模板中调用方法。就像下一章节即将看到的,通常换做计算属性会更好。但是,在计算属性不可行的情况下,使用方法可能会很有用。你可以在模板支持 JavaScript 表达式的任何地方调用方法:
<span :title="toTitleDate(date)">
  {{ formatDate(date) }}
</span>
五,Computed Property 和 Watch Property
(一)Computed Property
模板内使用JavaScript表达式非常便利,设计它们的初衷是用于简单运算的,但是在模板中放入太多的逻辑会让模板过重且难以维护。
例如,在模板中对一个复杂对象进行计算:
<div id="computed-basics">
    <p>Has published books:</p>
    <span>{{ author.books.length > 0 ? 'Yes' : 'No' }}</span>
</div>
<script>
    Vue.createApp({
        data() {
            return {
                author: {
                    name: 'John Doe',
                    books: [
                        'Vue 2 - Basic Guide',
                        'Vue 3 - Advanced Guide',
                        'Vue 4 - The Mystery'
                    ]
                }
            }
        }
    }).mount("#computed-basics")
</script>
所以,对于任何包含响应式数据的复杂逻辑,官方建议应该使用 Computed Property。
1,Computed Property 的 getter
Computed Property 的目的就是简化模板中的复杂计算:
<div id="computed-basics">
    <p>Has published books:</p>
    <span>{{ publishedBooksMessage }}</span>
</div>
<script>
    Vue.createApp({
        data() {    // 提供数据
            return {
                author: {
                    name: 'John Doe',
                    books: [
                        'Vue 2 - Basic Guide',
                        'Vue 3 - Advanced Guide',
                        'Vue 4 - The Mystery'
                    ]
                }
            }
        },
        computed: {
            // 计算属性的 getter
            publishedBooksMessage() {
                // `this` 指向实例本身
                return this.author.books.length > 0 ? 'Yes' : 'No'
            }
        }
    }).mount('#computed-basics')
</script>
可以像普通属性一样将数据绑定到模板中的计算属性。
Vue 知道 publishedBookMessage 依赖于 author.books,因此 author.books 发生改变时,所依赖的 publishedBookMessage 的绑定也会更新。而且最妙的是我们已经以声明的方式创建了这个依赖关系:计算属性中的 getter 函数没有副作用,它更易于测试和理解。
- 一个计算属性的声明中描述的是如何根据其他值派生一个值。因此 getter 的职责应该仅为计算和返回该值,所以,不要在 getter 中做异步请求或者更改 DOM!
2,Computed Property 的 setter
默认情况下,Computed Property是 getter-only。如果尝试为计算属性分配新值,将收到运行时警告。在极少数需要“可写”Computed Property 的情况下,可以通过同时提供 getter 和 setter 来创建:
- 当 computed 监测的值变化的时候,set 才回被调用。
// ...
computed: {
    fullName: {
        // getter
        get() {
            return this.firstName + ' ' + this.lastName
        },
        // setter
        set(newValue) {
            const names = newValue.split(' ')
            this.firstName = names[0]
            this.lastName = names[names.length - 1]
            // 或使用解构赋值
            // [this.firstName, this.lastName] = newValue.split(' ')
        }
    }
}
// ...
Computed Property 返回的值是派生状态。可以把它看作是一个“临时快照”,每当源状态发生变化时,就会创建一个新的快照。改变快照是没有意义的,因此返回值应该被视为只读的并且永远不会被改变。相反,更新它所依赖的源状态以触发新的计算才是被推荐的。
3,Computed Property VS Methods Property
尽管我们同样可以通过在表达式中调用 Methods Property 中的方法来达到同样的效果:
<p>{{ calculateBooksMessage() }}</p>

// 在组件中
methods: {
  calculateBooksMessage() {
    return this.author.books.length > 0 ? 'Yes' : 'No'
  }
}
从最终结果来说,这两种实现方式确实是完全相同的。然而,Computed Property 将基于响应式的依赖关系进行缓存,只要其依赖还没有发生改变,多次访问 publishedBookMessage 时 Computed Property 会立即返回之前的计算结果,而不是多次重复调用函数。
- 为什么需要缓存?——假设我们有一个性能开销比较大的 list,它需要遍历一个巨大的数组并做大量的计算,然后我们还有其他的计算依赖于 list。如果没有缓存,我们将不可避免的多次执行 list 的相关计算!
正因为 Computed Property 具有缓存依赖的特性,也就意味着下面的时间将永远不会更新,因为 Date.now () 不是响应式依赖:
computed: {
  now() {
    return Date.now()
  }
}
- 每当触发重新渲染时,调用方法时才再次执行函数。
(二)Watch Property
Computed Property 允许我们以声明的方式获取派生值。但是在某些情况下,我们需要在状态变化时执行一些“副作用”,例如,改变 DOM,或根据异步操作的结果更改另一部分的状态。
1,浅监测
我们可以使用 Watch Property 在每次响应式属性发生变化时触发一个回调函数,看一个例子:
<div id="app" style="text-align: center">
    <p style="font-size:25px;">计数器: {{ counter }}</p>
    <button @click="counter++" style="font-size:25px;">点我+1</button>
    <button @click="information" style="font-size:25px;">点我不变</button>
</div>

<script>
    Vue.createApp({
        data() {
            return {
                counter: 0
            }
        },
        watch: {
        	// 监测响应式数据 counter 是否发生变化
            counter: function (newvalue, oldvalue) {
                alert('计数器值的变化 :' + oldvalue + ' 变为 ' + newvalue);
            }
        },
        methods: {
            information() {
                alert('计数器值无变化。');
                console.log(this.counter);
            }
        }
    }).mount("#app")
</script>
效果如下:

watch 选项也支持把键设置成用 . 分隔的路径:
  watch: {
    // 注意:只能是简单的路径,不支持表达式。
    'some.nested.key'(newValue) {
      // ...
    }
  }
2,深监测
Watch Property 默认是浅监测的:被侦听的属性仅在被赋新值时才会触发回调函数——而嵌套属性的变化不会触发。如果想侦听所有嵌套的变更,则需要深监测。
watch: {
    someObject: {
        handler(newValue, oldValue) {
            // Note: `newValue` will be equal to `oldValue` here
            // on nested mutations as long as the object itself
            // hasn't been replaced.
        },
        deep: true	// 启动深监测
    }
}
深监测需要遍历被监视对象中的所有嵌套属性,这在用于大型数据结构时会损失很大的性能,因此仅在必要时使用它并注意性能影响。
3,积极监测
Watch Property 默认情况下是惰性的:在源发生更改之前不会调用相应的回调函数。
但在某些情况下,如果希望创建监测器时就立即执行回调逻辑——例如,我们可能希望获取一些初始数据(第一次变更之前),然后在初始数据状态发生变化时重新获取数据——需要使用积极监测:
watch: {
    question: {
        handler(newQuestion) {
            // this will be run immediately on component creation.
        },
        // force eager callback execution
        immediate: true		//启动积极监测
    }
}
4,回调的触发时机
回调函数的初次执行就发生在 created 钩子之前。Vue 此时已经处理了 Data、Computed 和 Methods 选项,所以这些属性在第一次调用回调时就是可用的。
当更改了响应式状态数据,它可能会同时触发 Vue 组件更新和监测器回调。
默认情况下,用户创建的侦听器回调,都会在 Vue 组件更新之前被调用。这意味着你在侦听器回调中访问的 DOM 将是被 Vue 更新之前的状态。
如果想在侦听器回调中能访问被 Vue 更新之后的DOM,需要使用 flush: ‘post’ 选项:
watch: {
    question: {
        handler(newQuestion) {
            // this will be run after updating DOM
        },
        flush: 'post'
    }
}
4,$watch
使用$watch()方法会更简便,比如只侦听响应用户交互的内容等:
- 第一个参数是要监测的源数据或状态。
- 第二个参数是源数据或状态改变后要使用的回调函数。
const WatchComponent  = {
    data() {
        return {
            counter: 0
        }
    },
    methods: {
        information() {
            alert('计数器值无变化。');
            console.log(this.counter);
        }
    }
}
const app = Vue.createApp(WatchComponent)
const vm = app.mount("#app")
vm.$watch('counter', function(nval, oval) {
    alert('计数器值的变化 :' + oval + ' 变为 ' + nval + '!');
});
通常会在创建组件时开启监听:
  created() {
    this.$watch('question', (newQuestion) => {
      // ...
    })
  }
更过细节请参考实例方法:$watch。
5,停止监听
监听器会在宿主组件卸载时自动停止。因此,在大多数场景下无需关心怎么停止它。
如果确实需要手动停止监听,则可以调用 $watch() API 返回的函数:
const unwatch = this.$watch('foo', callback)

// ...当该侦听器不再需要时
unwatch()
(三)Computed Property vs Watch Property
Watch Property 或 $watch 有点事件处理的感觉,多用于处理不太复杂的异步结果或者是交互性场景。
Computed Property 优点则在于其缓存特性,这对处理比较大量的数据比较友好。
六,Class 与 Style 绑定
操作元素的 class 和 style 是数据绑定的一个常见需求。
因为它们都是 attribute,所以我们可以用 v-bind 处理它们:只需要通过表达式计算出字符串结果即可。
不过,字符串拼接麻烦且易错。因此,在将 v-bind 用于 class 和 style 时,Vue.js 做了专门的增强。表达式结果的类型除了字符串之外,还可以是对象或数组。
(一)绑定 HTML Class
1,对象语法
可以传给 :class (v-bind:class 的简写) 一个对象,以动态地切换 class:
<div :class="{ active: isActive }"></div>
- 也可以在对象中传入更多字段来动态切换多个 class。
此外,:class 指令也可以与普通的 class attribute 共存。
<div
  class="static"
  :class="{ active: isActive, 'text-danger': hasError }"
></div>

//
	data() {
	  return {
	  	// 当 isActive 或者 hasError 变化时,class 将相应地更新。
	    isActive: true,
	    hasError: false
	  }
	}
//

渲染效果为:
<div class="static active"></div>
也可以将它们定义为 data property 中的一个对象,来集中管理,更加方便:
<div :class="classObject"></div>
...
data() {
  return {
    isActive: true,
    hasError: false
  }
}
...

渲染结果为:
<div class="static active"></div>
还可以在这里绑定一个返回对象的 computed property。这是更加方便且常用的方式:
<div :class="classObject"></div>

...
data() {
  return {
    isActive: true,
    error: null
  }
},
computed: {
  classObject() {
    return {
      active: this.isActive && !this.error,
      'text-danger': this.error && this.error.type === 'fatal'
    }
  }
}
...
2,数组语法
可以把一个数组传给 :class,以应用一个 class 列表:
<div :class="[activeClass, errorClass]"></div>

...
data() {
  return {
    activeClass: 'active',
    errorClass: 'text-danger'
  }
}
...

渲染的结果为:
<div class="active text-danger"></div>
如果想根据条件切换列表中的 class,可以使用三元表达式:
<div :class="[isActive ? activeClass : '', errorClass]"></div>
在数组语法中也可以使用对象语法:
<div :class="[{ active: isActive }, errorClass]"></div>
3,在组件上使用
当在带有单个根元素的自定义组件上使用 class attribute 时,这些 class 将被添加到该元素中。此元素上的现有 class 将不会被覆盖:
<div id="app">
  <my-component class="baz boo"></my-component>
</div>

...
const app = Vue.createApp({})

app.component('my-component', {
  template: `<p class="foo bar">Hi!</p>`
})
...

将被渲染为:
<p class="foo bar baz boo">Hi</p>
对于数据绑定 class 也同样适用:
<my-component :class="{ active: isActive }"></my-component>

当 isActive 为 truthy 时将被渲染成为:
<p class="foo bar active">Hi</p>
如果组件有多个根元素,则需要定义哪些部分将接收这个 class。可以使用组件的 $attrs property 执行此操作:
<div id="app">
  <my-component class="baz"></my-component>
</div>

...
const app = Vue.createApp({})

app.component('my-component', {
  template: `
    <p :class="$attrs.class">Hi!</p>
    <span>This is a child component</span>
  `
})
...
(二)绑定内联样式
1,对象语法
:style 的对象语法看着非常像 CSS,但其实是一个 JavaScript 对象。
CSS property 名可以用驼峰式 (camelCase) 或短横线分隔 (kebab-case,记得用引号括起来) 来命名:
<div :style="{ color: activeColor, fontSize: fontSize + 'px' }"></div>

...
data() {
  return {
    activeColor: 'red',
    fontSize: 30
  }
}
...
直接绑定到一个样式对象通常更好,这会让模板更清晰:
<div :style="styleObject"></div>

...
data() {
  return {
    styleObject: {
      color: 'red',
      fontSize: '13px'
    }
  }
}
...
同样的,对象语法常常结合返回对象的 computed property 使用。
2,数组语法
:style 的数组语法可以将多个样式对象应用到同一个元素上:
<div :style="[baseStyles, overridingStyles]"></div>
七,条件渲染
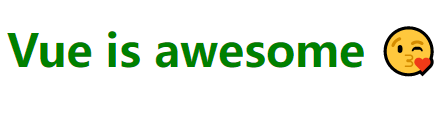
(一)v-if
v-if 指令会根据条件表达式的计算结果决定是否渲染一块内容:
<div id="app" >
    <h1 v-if="isShow" :style="styleObject">Vue is awesome 😘</h1>
</div>

<script>
    const CountComponent = {
        data() {
            return {
                awesome: undefined,
                styleObject: {
                    color: "green",
                    fontSize: "30px"
                }
            }
        },
        computed: {
            isShow() {
                return this.awesome === undefined ? true : this.awesome;
            }
        }
    }

    Vue.createApp(CountComponent).mount("#app")
</script>
效果如下:
也能这样根据条件判断是否渲染一组元素:
<div id="app" v-if="isShow">
    <h1 :style="styleObject">Vue is awesome 😘</h1>
    <h1 :style="styleObject">Vue is awesome 😘</h1>
    <h1 :style="styleObject">Vue is awesome 😘</h1>
</div>
v-if 是惰性的:如果在初始渲染时条件为假,则什么也不做——直到条件第一次变为真时,才会开始渲染条件块。
- 在切换过程中,条件块内的事件监听器和子组件会响应地被销毁和重建。
(二)v-else
<div id="app">
    <p>What do you think about Vue?</p>
    <button v-on:click="like">Like</button>
    <button v-on:click="dislike">Dislike</button>
    <div v-if="isClicked">
        <h1 v-if="awesome">😘</h1>
        <h1 v-else>😢</h1>
    </div>
</div>

<script>
    const CountComponent = {
        data() {
            return {
                awesome: false,
                isClicked: false
            }
        },
        methods: {
            like() {
                this.awesome = true;
                this.isClicked = true;
            },
            dislike() {
                this.awesome = false;
                this.isClicked = true;
            }
        }
    }

    Vue.createApp(CountComponent).mount("#app")
</script>
效果如下:

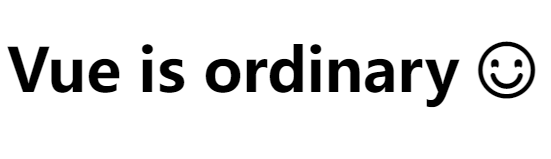
(三)v-else-if
<div id="app">
    <h1 v-if="assessment === 'outstanding'">Vue is outstanding 😘</h1>
    <h1 v-else-if="assessment === 'ordinary'">Vue is ordinary ☺</h1>
    <h1 v-else-if="assessment === 'bad'">Vue is bad 😢</h1>
</div>

<script>
    const CountComponent = {
        data() {
            return {
                assessment: "ordinary"
            }
        }
    }

    Vue.createApp(CountComponent).mount("#app")
</script>
效果如下:
(四)v-show
另一个用于条件性展示元素的选项是 v-show 指令:
<h1 v-show="ok">Hello!</h1>
不管初始条件是什么,带有 v-show 的元素始终会被渲染并保留在 DOM 中,它只是简单地切换元素的CSS display property。 例如:
<div id="app" >
    <h1 v-if="awesome" :style="styleObject">v-if false 😘</h1>
    <h1 v-show="awesome" :style="styleObject">v-show false 😘</h1>
</div>

<script>
    const myComponent = {
        data() {
            return {
                awesome: false,
                styleObject: {
                    color: "green",
                    fontSize: "30px"
                }
            }
        }
    }

    Vue.createApp(myComponent).mount("#app")
</script>

if 还是 show :
v-if有更高的切换开销(主要是条件区块内的事件监听器和子组件都会被销毁与重建。),更适用于运行时条件很少改变的情况。而v-show有更高的初始渲染开销,更适合需要非常频繁地切换是否显示的情况。v-show不支持在<template>元素上使用,v-if支持。
八,列表渲染
v-for 指令可以渲染一个列表。指令需要使用 item in items 形式的特殊语法。
(一)在 v-for 里使用对象
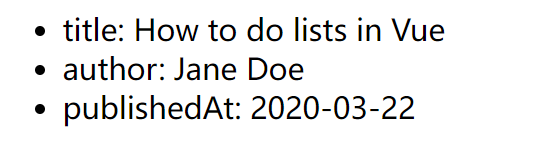
可以用 v-for 来遍历一个对象:
<div>
    <ul id="v-for-object">
        <li v-for="(value, name) in myObject">
            {{ name }}: {{ value }}
        </li>
    </ul>
</div>

<script>
    Vue.createApp({
        data() {
            return {
                myObject: {
                    title: 'How to do lists in Vue',
                    author: 'Jane Doe',
                    publishedAt: '2020-03-22'
                }
            }
        }
    }).mount('#v-for-object')
</script>
v-for 遍历数组时支持一个可选的第二个参数,即当前元素的索引:
<div>
    <ul id="v-for" class="demo">
        <li v-for="(book, index) in bookList">
            {{ index }}:{{ book.name }}——{{ book.price }}
        </li>
    </ul>
</div>
v-for 遍历对象时支持一个可选的第二个参数,即当前对象的属性名:
<div>
    <ul id="v-for-object">
        <li v-for="(value, name) in myObject">
            {{ name }}: {{ value }}
        </li>
    </ul>
</div>
效果如下:
遍历对象时还可以用第三个参数作为索引:
<div>
    <ul id="v-for-object">
        <li v-for="(value, name, index) in myObject">
            {{ index }}. {{ name }}: {{ value }}
        </li>
    </ul>
</div>
(二)在 v-for 里使用数组
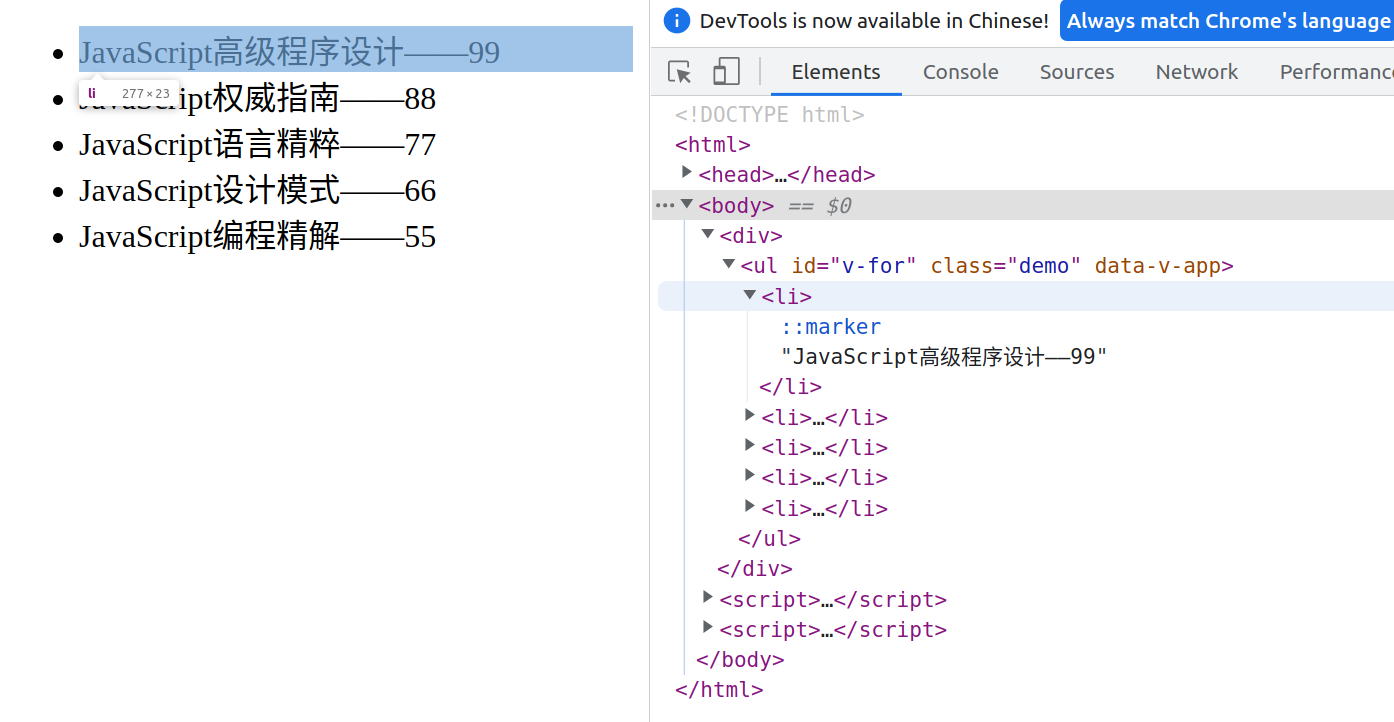
1,遍历渲染数组
也可以用 v-for 指令渲染一个数组中的值:
<div>
    <ul id="v-for" class="demo">
        <li v-for="book in bookList">
            {{ book.name }}——{{ book.price }}
        </li>
    </ul>
</div>

<script>
    Vue.createApp({
        data() {
            return {
                bookList: [
                    {name: 'JavaScript高级程序设计', price: 99},
                    {name: 'JavaScript权威指南', price: 88},
                    {name: 'JavaScript语言精粹', price: 77},
                    {name: 'JavaScript设计模式', price: 66},
                    {name: 'JavaScript编程精解', price: 55},
                ],
            }
        }
    }).mount('#v-for')
</script>
效果如下:
v-for 遍历数组时还支持一个可选的第二个参数,即当前项的索引:
<div>
    <ul id="v-for" class="demo">
        <li v-for="book in bookList">
            {{ book.name }}——{{ book.price }}
        </li>
    </ul>
</div>
2,数组更新检测
Vue 能够侦听响应式数组的变更方法,并在它们被调用时触发相关的更新:
- push()
- pop()
- shift()
- unshift()
- splice()
- sort()
- reverse()
对于例如 filter()、concat() 和 slice() 等非变更方法,它们不会变更原始数组,而总是返回一个新数组,此时可以用新数组替换旧数组:
- 任然使用原有的 DOM。
example1.items = example1.items.filter(item => item.message.match(/Foo/))
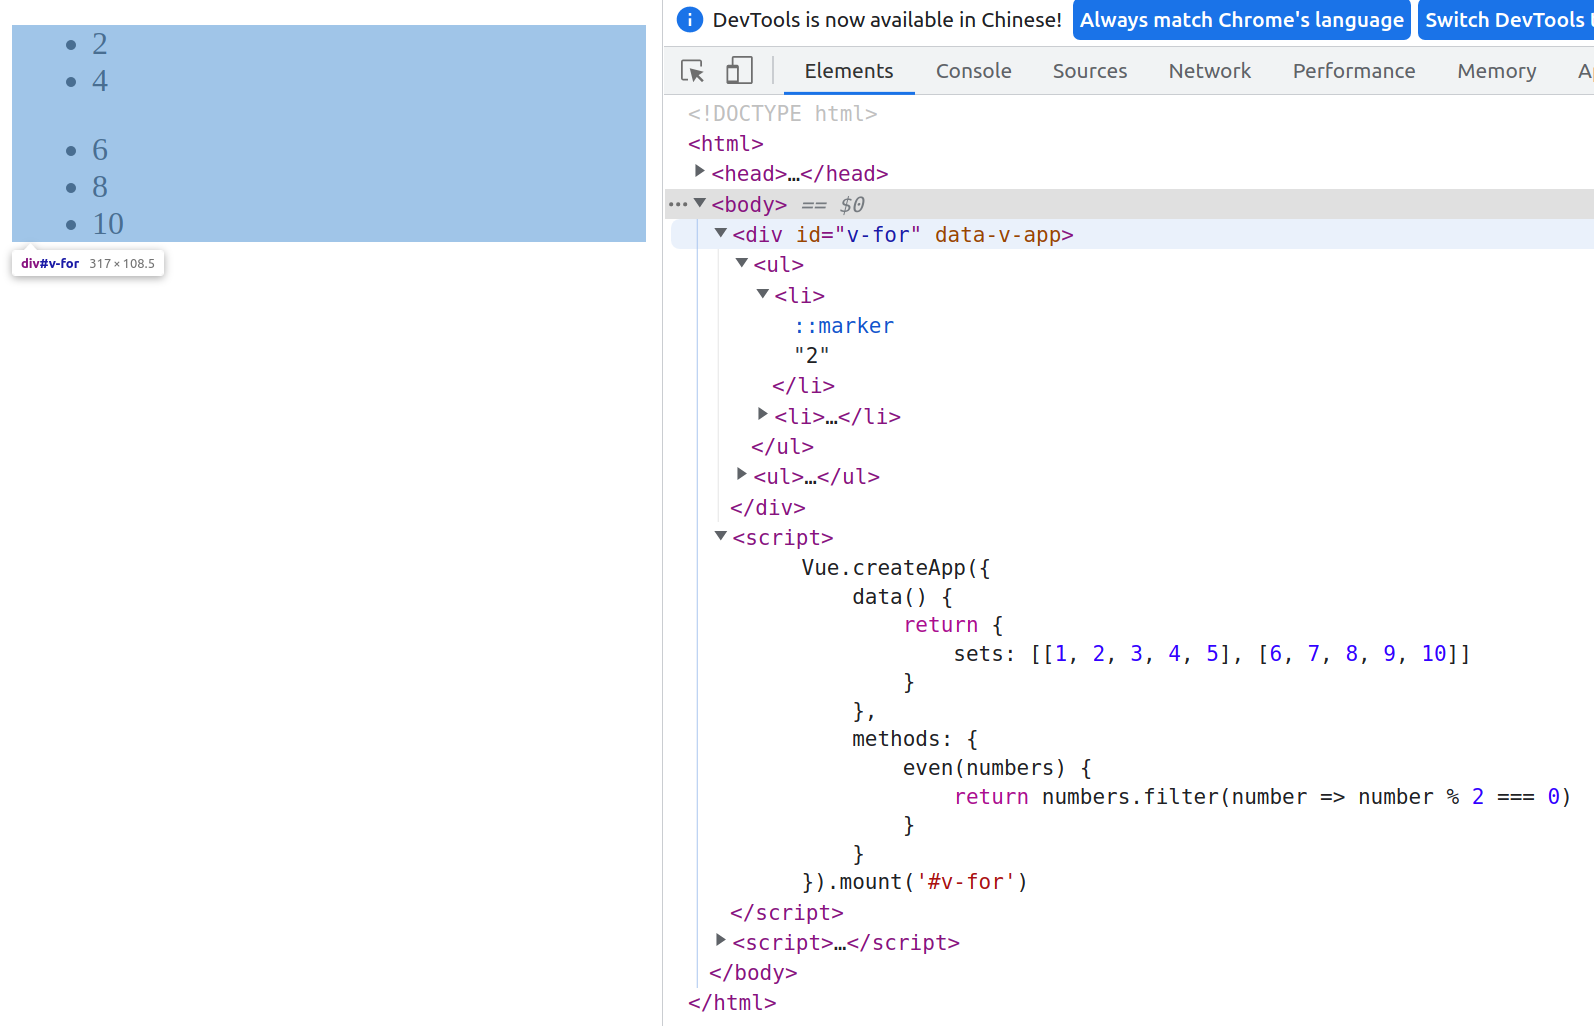
3,显示过滤或排序后的结果
Computed Property 能够显示数组经过过滤或排序后的版本却不实际变更或重置原始数据:
<li v-for="n in evenNumbers" :key="n">{{ n }}</li>

...
	data() {
	  return {
	    numbers: [ 1, 2, 3, 4, 5 ]
	  }
	},
	computed: {
	  evenNumbers() {
	    return this.numbers.filter(number => number % 2 === 0)
	  }
	}
...
在计算属性中使用 reverse() 和 sort() 将变更原始数组,计算函数中不应该这么做。请在调用这些方法之前创建一个原数组的副本:
- return numbers.reverse()
+ return [...numbers].reverse()
在计算属性不适用的情况下 (例如在多层嵌套的 v-for 循环中),可以使用Methods Property:
(三)维护状态
当 Vue 正在更新使用 v-for 渲染的元素列表时,它默认使用“就地更新”的策略:如果数据项的顺序被改变,Vue 将不会移动 DOM 元素来匹配数据项的顺序,而是就地更新每个元素,并且确保它们在每个索引位置正确渲染。
这个默认的模式是高效的,但是只适用于不依赖子组件状态或临时 DOM 状态 (例如:表单输入值) 的列表渲染输出。
重用和重新排序现有元素,你需要为每项提供一个唯一的 key attribute:
- 官方建议尽可能在使用
v-for时提供keyattribute,除非遍历输出的 DOM 内容非常简单,或者是刻意依赖默认行为以获取性能上的提升。
<div v-for="item in items" :key="item.id">
  <!-- 内容 -->
</div>
(四)在 v-for 里使用范围值
v-for 也可以接受整数。在这种情况下,它会把指令所在的元素重复对应次数:
<div id="range" class="demo">
  <span v-for="n in 10" :key="n">{{ n }} </span>
</div>
v-for 也能拥有渲染一个包含多个元素的模板:
<div>
    <ul id="array-rendering">
        <template v-for="item in books" :key="item.id">
            <li>{{item.id}} 😘: {{ item.name }}</li>
            <li class="divider" role="presentation"></li>
        </template>
    </ul>
</div>
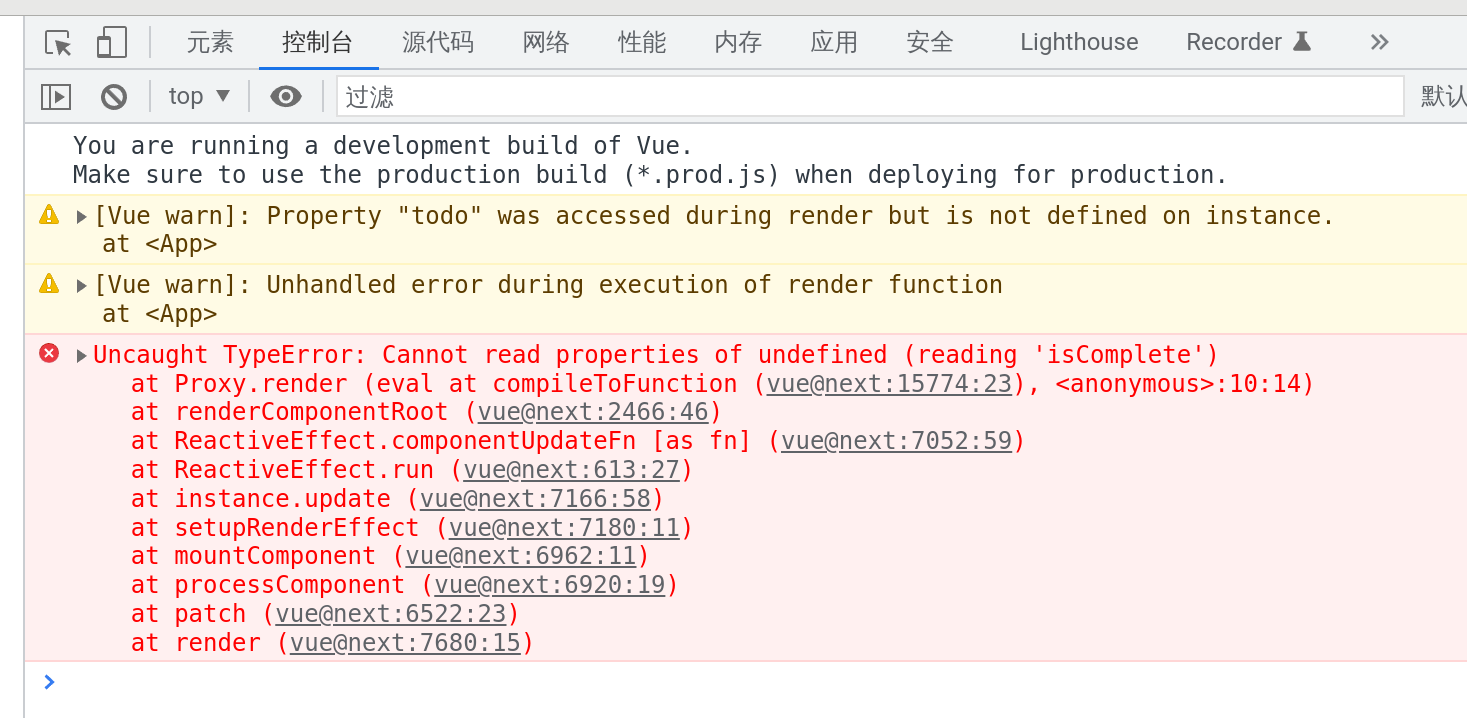
(五)v-for 与 v-if
官方不推荐在同一元素上使用 v-if 和 v-for,这是因为当它们处于同一节点时候,v-if 的优先级比 v-for 更高,这意味着 v-if 可能就没有权限访问 v-for 里的变量:
<!-- 这将抛出一个错误,因为“todo” property 没有在实例上定义 -->
<div id="app">
    <ul>
        <li v-for="todo in todos" :key="index" v-if="!todo.isComplete">{{ todo.name }}</li>
    </ul>
</div>

<script>
    const myComponent = {
        data() {
            return {
                todos: [
                    {'name':'buy books', 'isComplete': false},
                    {'name':'buy milk', 'isComplete': true},
                    {'name':'buy eggs', 'isComplete': false},
                ]
            }
        }
    }

    Vue.createApp(myComponent).mount("#app")
</script>
报错:
一般来说有这么几种容易产生冲突的情况:
-
为了对列表中的项目进行过滤 (比如
v-for="user in users" v-if="user.isActive")。在这种情形下,请将 users 替换为一个计算属性 (比如 activeUsers),返回过滤后的列表:<div id="v-for"> <p>show administator:</p> <ul v-for="user in adminList"> <li>{{ id }} {{ user.name }}</li> </ul> </div> <script> Vue.createApp({ data() { return { userList: [ {id:1, name: 'John', isAdmin: true}, {id:2, name: 'Jane', isAdmin: false}, {id:3, name: 'Jack', isAdmin: true}, {id:4, name: 'Jill', isAdmin: false}, ] } }, computed: { adminList() { // 过滤出管理员列表,解决在 v-for 中使用 v-if 进行条件判断的问题 return this.userList.filter(user => user.isAdmin) } } }).mount('#v-for') </script> -
为了避免渲染本应该被隐藏的列表 (比如
v-for="user in users" v- if="shouldShowUsers")。这种情形下,请将v-if移动至子元素上:<ul> <template v-for="user in users" :key="user.id"> <li v-if="user.isActive"> {{ user.name }} </li> </template> </ul>
(六)在组件上使用 v-for
在自定义组件上,你可以像在任何普通元素上一样使用 v-for。
然而,因为组件有自己独立的作用域,所以任何数据都不会被自动传递到组件里,为了把迭代数据传递到组件里,要使用 props,这里放到后面组件部分再来说。
九,事件处理
(一)v-on 指令监听事件
事件处理的基础是监听事件,可以通过使用 v-on 指令将要监听的 DOM 事件类型与一段 JavaScript 代码关联起来。举个例子🌰:
<div id="basic-event">
    <button v-on:click="counter += 1">➕1️⃣</button>
    <p>The button above has been clicked {{ counter }} times.</p>
</div>

<script>
    Vue.createApp({
        data() {
            return {
                counter: 0
            }
        }
    }).mount('#basic-event')
</script>

缩写方式为:
<button @click="counter += 1">➕1️⃣</button>
也可以在内联 JavaScript 语句中调用方法。举个例子🌰:
<div id="inline-handler">
    <button @click="say('hi')">Say hi</button>
    <button @click="say('what')">Say what</button>
</div>


<script>
    Vue.createApp({
        methods: {
            say(message) {
                alert(message)
            }
        }
    }).mount('#inline-handler')
</script>
在内联语句处理器中可以用特殊变量 $event 将原始的 DOM 事件传入方法。举个例子🌰:
<button @click="warn('Form cannot be submitted yet.', $event)">
    Submit
</button>

<script>
    Vue.createApp({
        methods: {
            warn(message, event) {
                // 现在可以访问到原生事件
                if (event) {
                    event.preventDefault()
                }
                alert(message)
            }
        }
    }).mount('#inline-handler')
</script>
(二)事件处理程序
最好是直接将事件类型与Methods Property中的事件处理程序关联起来。举个例子🌰:
<div id="app">
    <button @click="reduction">➖1️⃣</button>
    <span style="margin:10px;">{{ count }}</span>
    <button @click="increment">➕1️⃣</button>
</div>

<script>
    const app = Vue.createApp({
        data() {
            return {count: 0}
        },
        methods: {
            increment() {
                // `this` 指向该组件实例
                this.count++;
            },
            reduction() {
                // `this` 指向该组件实例
                this.count--;
            },
        }
    })

    const vm = app.mount('#app')
</script>
(三)多个事件处理方法
事件处理程序中可以有由逗号运算符分隔的多个方法。举个例子🌰:
<!-- 这两个 one() 和 two() 将执行按钮点击事件 -->
<button @click="one('hi!',$event), two('bye!',$event)">
    Submit
</button>

<script>
    Vue.createApp({
        methods: {
            one(msg, event) {
                // 第一个事件处理器逻辑...
                alert(msg)
                alert(event.name)
            },
            two(msg, event) {
                // 第二个事件处理器逻辑...
                alert(msg)
                alert(event.action)
            }
        }
    }).mount('#inline-handler')
</script>
(四)事件修饰符
在事件处理程序中调用 event.preventDefault() 阻止与事件关联的默认动作(如果存在这样的动作)或 event.stopPropagation() 阻止事件的传播,是非常常见的需求。
v-on 可以使用事件修饰符来在代码中简化逻辑而非关注 DOM 事件细节。举个例子🌰:
<!-- 阻止单击事件继续冒泡 -->
<a @click.stop="doThis"></a>

<!-- 点击事件将只会触发一次 -->
<a @click.once="doThis"></a>

<!-- 滚动事件的默认行为 (即滚动行为) 将会立即触发,   -->
<!-- 而不会等待 `onScroll` 完成,                    -->
<!-- 以防止其中包含 `event.preventDefault()` 的情况  -->
<!-- 尤其能够提升移动端的性能  -->
<div @scroll.passive="onScroll">...</div>

<!-- 提交事件不再重载页面 -->
<form @submit.prevent="onSubmit"></form>

<!-- 修饰符可以串联 -->
<a @click.stop.prevent="doThat"></a>

<!-- 只有修饰符 -->
<form @submit.prevent></form>

<!-- 添加事件监听器时使用事件捕获模式 -->
<!-- 即内部元素触发的事件先在此处理,然后才交由内部元素进行处理 -->
<div @click.capture="doThis">...</div>

<!-- 只当在 event.target 是当前元素自身时触发处理函数 -->
<!-- 即事件不是从内部元素触发的 -->
<div @click.self="doThat">...</div>
- 使用修饰符时,顺序很重要。
(五)键盘事件修饰符
(六)系统修饰符
十,表单输入绑定
(一)v-model 指令
用 v-model 指令在表单的 <input>、<textarea> 及 <select> 元素上创建双向数据绑定。这条指令负责监听用户的输入事件,并根据控件类型自动选取正确的方法来更新数据。
v-model会忽略所有表单元素的value、checked、selectedattribute 的初始值,因为它将始终将当前实例的数据作为数据来源,如果需要默认值,则应该在组件的DataProperty中声明对应的初始值。
v-model 在内部为不同的输入元素使用不同的 property 并抛出不同的事件:
text和textarea元素使用valueproperty 和input事件;checkbox和radio使用checkedproperty 和change事件;select字段将value作为 prop 并将change作为事件。
1,文本 (Text)
对于中文、日文、韩文等语言, v-model 不会在输入法组织文字过程中实时更新绑定的数据。举个例子🌰:
<div id="v-model-text">
    <label>
        <input v-model="message" placeholder="edit me" />
    </label>
    <p>——输入中文是不会实时更新</p>
    <p>Message is: {{ message }}</p>
</div>

<script>
    Vue.createApp({
        data() {
            return {
                message: ''
            }
        }
    }).mount('#v-model-text')
</script>

其实 v-model就是下面语句的缩写:
<input type="text" v-bind:value="something" v-on:input="something = $event.target.value" />
v-model与value动态绑定,然后监听 input 事件获取值后再赋给 something 。
如果需要实时更新,请使用 input 事件监听器和 value 绑定来替代 v-model:
<div id="v-model-text">
    <label>
        <input type="text" @input="handleInput" placeholder="edit me" />
    </label>
    <p>——此时输入中文会实时更新</p>
    <p>{{ value }}</p>
</div>

<script>
    Vue.createApp({
        data() {
            return {
                value: ''
            }
        },
        methods:{
            // 如果想总实时更新的话 可以使用@input
            handleInput: function (e) {
                this.value = e.target.value
            }
        }
    }).mount('#v-model-text')
</script>
2,多行文本 (Textarea)
插值在 textarea 中不起作用,应使用 v-model 来代替。
<div id="v-model-textarea">
    <span>Multiline message is:</span>
    <p style="white-space: pre-line;">{{ message }}</p>
    <br />
    <label>
        <textarea v-model="message" placeholder="add multiple lines"></textarea>
        <!-- bad -->
        <!-- <textarea>{{ message }}</textarea> -->
    </label>
</div>

<script>
    Vue.createApp({
        data() {
            return {
                message: ''
            }
        }
    }).mount('#v-model-textarea')
</script>
3,复选框 (Checkbox)
<div id="v-model-checkbox" class="demo">
    <input type="checkbox" id="checkbox" v-model="checked" />我已阅读<a href="#">用户隐私协议</a>
    <label for="checkbox">——{{ checked }}</label>
</div>

<script>
    Vue.createApp({
        data() {
            return {
                checked: false
            }
        }
    }).mount('#v-model-checkbox')
</script>

多个复选框的值绑定到同一个数组:
<div id="v-model-multiple-checkboxes">
    <input type="checkbox" id="jack" value="Jack" v-model="checkedNames" />
    <label for="jack">Jack</label>
    <input type="checkbox" id="john" value="John" v-model="checkedNames" />
    <label for="john">John</label>
    <input type="checkbox" id="mike" value="Mike" v-model="checkedNames" />
    <label for="mike">Mike</label>
    <br />
    <span>Checked names: {{ checkedNames }}</span>
</div>

<script>
    Vue.createApp({
        data() {
            return {
                checkedNames: []
            }
        }
    }).mount('#v-model-multiple-checkboxes')
</script>

4,单选框 (Radio)
<div id="v-model-radiobutton">
    <input type="radio" id="one" value="One" v-model="picked" />
    <label for="one">One</label>
    <br />
    <input type="radio" id="two" value="Two" v-model="picked" />
    <label for="two">Two</label>
    <br />
    <span>Picked: {{ picked }}</span>
</div>

<script>
    Vue.createApp({
        data() {
            return {
                picked: ''
            }
        }
    }).mount('#v-model-radiobutton')
</script>

5,选择框 (Select)
单选选择框:
<div id="v-model-select" class="demo">
    <label>
        <select v-model="selected">
            <option disabled value="">Please select one</option>
            <option>A</option>
            <option>B</option>
            <option>C</option>
        </select>
    </label>
    <span>Selected: {{ selected }}</span>
</div>

<script>
    Vue.createApp({
        data() {
            return {
                selected: ''
            }
        }
    }).mount('#v-model-select')
</script>

多选选择框同样可以将值绑定到一个数组:
<div id="v-model-select" class="demo">
    <label>
        <select v-model="selected" multiple>
            <option>A</option>
            <option>B</option>
            <option>C</option>
        </select>
    </label>
    <br />
    <span>Selected: {{ selected }}</span>
</div>

<script>
    Vue.createApp({
        data() {
            return {
                selected: ''
            }
        }
    }).mount('#v-model-select')
</script>

还能结合使用 v-for 和 v-bind 来动态渲染选项:
<div id="v-model-select-dynamic" class="demo">
    <label>
        <select v-model="selected">
            <option v-for="option in options" v-bind:value="option.value">
                {{ option.text }}
            </option>
        </select>
    </label>
    <span>Selected: {{ selected }}</span>
</div>

<script>
    Vue.createApp({
        data() {
            return {
                selected: 'A',
                options: [
                    { text: 'One', value: 'A' },
                    { text: 'Two', value: 'B' },
                    { text: 'Three', value: 'C' }
                ]
            }
        }
    }).mount('#v-model-select-dynamic')
</script>

(二)值绑定
前面几种选择框值的绑定情况如下:
<!-- 当选中时,`picked` 为字符串 "a" -->
<input type="radio" v-model="picked" value="a" />

<!-- `toggle` 为 true 或 false -->
<input type="checkbox" v-model="toggle" />

<!-- 当选中第一个选项时,`selected` 为字符串 "abc" -->
<select v-model="selected">
  <option value="abc">ABC</option>
</select>
(三)修饰符
跟前面提到的事件修饰符一样, v-model 指令也可以接受一些修饰符来控制数据绑定中的效果。
1,.lazy
在默认情况下,v-model 在每次 input 事件触发后将输入框的值与数据进行同步 (除了特别控制输入法组织文字时)。你可以添加 lazy 修饰符,从而转为在 change 事件之后进行同步:
<!-- 在“change”时而非“input”时更新 -->
<input v-model.lazy="msg" />
2,.number
给 v-model 添加 number 修饰符可以自动将用户的输入值转为数值类型,当输入类型为 text 时这通常很有用:
<input v-model.number="age" type="text" />
- 如果输入类型是 number,Vue 能够自动将原始字符串转换为数字,无需为
v-model添加.number修饰符。 - 如果这个值无法被
parseFloat()解析,则返回原始的值。
3,.trim
给 v-model 添加 trim 修饰符可以自动过滤用户输入的值的首尾空白字符:
<input v-model.trim="msg" />
十一,组件基础
(一)基本示例
先来回顾一下,前面创建应用、并挂载到 DOM 的过程:
<!--一个用于挂载应用的 DOM 容器-->
<div id="app">
    <!--子元素-->
</div>

<script>
    // 1,创建根组件
    const RootComponent = {
        /* Propertys */
    }

    // 2,创建应用实例
    const app = Vue.createApp(RootComponent)

    // 3,挂载应用实例到 DOM,就创建了一个根组件实例
    const vm = app.mount('#app')
</script>
再来看看一个最简单的 Vue 子组件的示例:
<div id="components-demo">
    <!-- 4,在 DOM 中使用自身定义组件 -->
    <button-counter></button-counter>
</div>

<script>
    // 1,用一个空的根组件创建一个Vue 应用
    const app = Vue.createApp({})

    // 2,注册一个名为 button-counter 的全局组件
    app.component('button-counter', {
        data() {
            return {
                count: 0
            }
        },
        // 通过 template 的方式创建模板
        template: `
          <button @click="count++">
          You clicked me {{ count }} times.
          </button>`
    })

    // 3,挂载到 DOM,就创建了一个组件实例
    app.mount('#components-demo')
</script>
因为自定义的应用放入实例就是一种可复用的实例,它与根实例接受相同的 Propertys,如data、computed、watch、methods 以及生命周期钩子等。
为了能在模板中使用,组件必须先注册以便 Vue 能够识别。
有两种组件的注册类型:全局注册和局部注册。
到目前为止,我们的组件是通过调用 Vue 应用的 component 方法进行全局注册的,这意味着该组件可以在应用中的任何组件的模板或者任何元素中使用。
(二)组件的复用与组织方式
就目前来看,组件确实是可复用的:
<div id="components-demo">
    <button-counter></button-counter><br>
    <button-counter></button-counter><br>
    <button-counter></button-counter><br>
</div>

- 同一组件的不同实例拥有自己的命名空间,故不相互干扰。
通常一个应用会以一棵嵌套的组件树的形式来组织,即所谓的应用组件化:

举个例子🌰:博客应用:页面中包含博主个人信息简介和博客列表。
<div id="root-component">
    <h3>{{ info.name }}</h3>
    <ul :style="styleObject">
        <li v-for="post in posts" :key="post.id">{{ post.title }}</li>
    </ul>
</div>

<script>
    const app = Vue.createApp({
        data() {
            return {
                info: {
                    name: 'xiaolu2333',
                },
                posts: [
                    { id: 1, title: 'My journey with Vue😘' },
                    { id: 2, title: 'Blogging with Vue🚄' },
                    { id: 3, title: 'Why Vue is so interesting🥰' }
                ],
                styleObject: {
                    color: 'green',
                }
            }
        }
    })
    app.mount('#root-component')
</script>
- 首先创建了一个 Vue 应用,应用中包含了一个
dataproperty,其有(通常从后端服务中获取)一些需要被展示的数据,以及一些对styleattribute 的配置,并将这个应用挂载到一个“容器”上。 - 然后再在这个“容器”中的几个不同的子元素中使用插值来展示数据。
现在,出于复用原因,我们显式地将它组件化:将比较具体的两部分内容拆分到两个子组件中(对数据与模板的拆分),并进行适当复用:
<h2>XXX博客系统</h2>
<div id="app">
    <person-info></person-info>
    <posts-info></posts-info>
</div>

<script>
    const Root = {}

    // 1,创建应用
    const app = Vue.createApp(Root)

    // 2,定义一个名为 user-info 的新全局组件
    app.component('user-info', {
        data() {
            return {
                info: {
                    name: 'xiaolu2333',
                }
            }
        },
        template: `
          <h3>{{ info.name }}</h3>`
    });

    // 3,定义一个名为 posts-info 的新全局组件
    app.component('posts-info', {
        data() {
            return {
                posts: [
                    {id: 1, title: 'My journey with Vue😘'},
                    {id: 2, title: 'Blogging with Vue🚄'},
                    {id: 3, title: 'Why Vue is so interesting🥰'}
                ],
                styleObject: {
                    color: 'green',
                }
            }
        },
        template: `
          <ul :style='styleObject'>
            <li v-for='item in posts' :key='item.id'>{{ item.title }}</li>
          </ul>`
    })

    // 4,挂载应用实例到 DOM,创建根组件实例
    const vm = app.mount('#app')
</scrip
- 我们创建了一个应用,通过它来配置一个根组件(啥都没有)。
- 注册了两个全局组件,完成所有的取值、插值和渲染工作。
- 与上面那个版本的唯一区别,就是将原本的数据和几个子元素拆分到根组件的两个子组件中。
这种在一个组件中嵌套其他组件的形式,就产生了组件之间的父子关系:这里的根组件就是父组件,注册到它底下的就是子组件。
(四)通过 Prop 向子组件传递数据
在前面,我们是直接通过数据绑定的方式来将数据传入到元素中进行渲染的。
我们也能从父组件中向子组件传递数据——在子组件中使用 props Property。
<h2>XXX博客系统</h2>
<div id="app">
    <person-info name="xiaolu2333"></person-info>
    <post-info title="My journey with Vue😘"></post-info>
    <post-info title='Blogging with Vue🚄'></post-info>
    <post-info title='Why Vue is so fun🥰'></post-info>
</div>

<script>
    const Root = {}

    const app = Vue.createApp(Root)

    app.component('person-info', {
        props: ['name'],
        template: `
          <h3>{{ name }}</h3>`
    });

    app.component('post-info', {
        props: ['title'],
        template: `
          <p>文章标题:{{ title }}</p>
          `
    })

    const vm = app.mount('#app')
</script>

- 在子组件不再有
dataproperty,而是在propproperty 指定了能接受哪些数据(包含在数组中),然后在子组件的templateproperty 中插值渲染。 - 在父组件内复用了子组件,并通过绑定 attribute 的方式,向子组件的
propproperty 中与 attribute 同名的部分传值。
然而在一个典型的应用中,我们通常是在根组件的 data property 中获得从后端请求到的数据,然后通过数据绑定的方式,按需将它们传入到子组件中:
<h2>XXX博客系统</h2>
<div id="app">
	向子组件的 props 传递数据
    <person-info :info="info"></person-info>
    <posts-info v-for="post in posts"
                :title="post.title"
                :style="styleObject"
    ></posts-info>
</div>

<script>
    const Root = {
        data() {
            return {
                info: {
                    name: 'xiaolu2333',
                },
                posts: [
                    {id: 1, title: 'My journey with Vue😘'},
                    {id: 2, title: 'Blogging with Vue🚄'},
                    {id: 3, title: 'Why Vue is so fun🥰'}
                ],
                styleObject: {
                    color: 'green',
                }
            }
        }
    }

    const app = Vue.createApp(Root)

    app.component('person-info', {
        props: ['info'],
        template: `
          <h3>{{ info.name }}</h3>`
    });

    app.component('posts-info', {
        props: ['title', 'styleObject'],
        template: `
          <p>{{ title }}</p>`
    })

    const vm = app.mount('#app')
</script>
- 使用
v-bind来向prop动态传值,非常有用。
简单理解一下父组件向子组件传递数据的过程:

理解数据流动方向和方式是相当重要的。到这里就行了,后面再说更详细的内容。
(五)监听子组件事件
组件和普通元素没什么区别,除了能显示数据之外,自然还需要能绑定事件。
1,父组件捕获子组件的事件
普通元素中的事件会不断向上传播,但在 vue 中,父组件想要捕获到子组件的事件却不那么容易。
举个例子🌰:子组件中的按钮切换主题。
首先在父组件中指定默认的数据,并创建基本子组件:
<div id="app">
    <user-info :userinfo="userInfo"></user-info>
    <posts-list :posts="postsList" :style="themeSettings"></posts-list>
</div>

<script>
    const Root = {
        data() {
            return {
                userInfo: {
                    username: 'xiaolu2333',
                    grade: 12,
                },
                postsList: [
                    {id: 1, title: 'My journey with Vue😘'},
                    {id: 2, title: 'Blogging with Vue🚄'},
                    {id: 3, title: 'Why Vue is so fun🥰'}
                ],
                themeSettings: {
                    color: 'green',
                }
            }
        },
    }

    const app = Vue.createApp(Root)

    app.component('user-info', {
        props: ['userinfo'],
        template: `
            <div>
                <p>用户名:{{ userinfo.username }} 等级:{{ userinfo.grade }}</p>
            </div>
        `
    })

    app.component('posts-list', {
        props: ['posts'],
        template: `
            <div>
                <h3>文章列表</h3>
                <ul v-for="post in posts" :key="post.id">
                    <li>{{ post.title }}</li>
                </ul>
            </div>
        `
    })

    // 4,挂载应用实例到 DOM,创建根组件实例
    const vm = app.mount('#app')
</script>
然后创建切换主题的子组件:
<div id="app">
    ......
    <theme-switcher :style="themeSettings"></theme-switcher>
    ......
</div>

<script>
    ......

    // 修改主题颜色
    app.component('theme-switcher', {
        template: `
          <button @click="switchTheme">切换主题</button>
        `
    })

    ......
</script>
同时在模板中监听主题切换事件:
<div id="app">
    ......
    <theme-switcher @switch-theme="switchTheme" :style="themeSettings"></theme-switcher>
	......
</div>

<script>
    const Root = {
        ......
        methods: {
            switchTheme() {
                // 随机生成颜色
                this.themeSettings.color = '#' + Math.floor(Math.random() * 0xffffff).toString(16).padEnd(6, '0');
            }
        },
    }

    ......
</script>
- 与最开始时父组件直接向子组件传值的情况一样,直接在父组件中自定义一个监听事件。
试一试,没有任何反应。显然我们缺少了什么。
回忆一下,在普通元素中我们通过 v-on 指令来将一个事件和应用实例中 methods Property 里的某些个方法绑定起来,正是这种绑定机制,才让事件是完整可工作的。
当然。这在父组件自身或者子组件自身上是没有问题的,但在父组件监听子组件时间的时候,我们需要的是这样一种机制:子组件的事件的触发会导致父组件事件的触发。
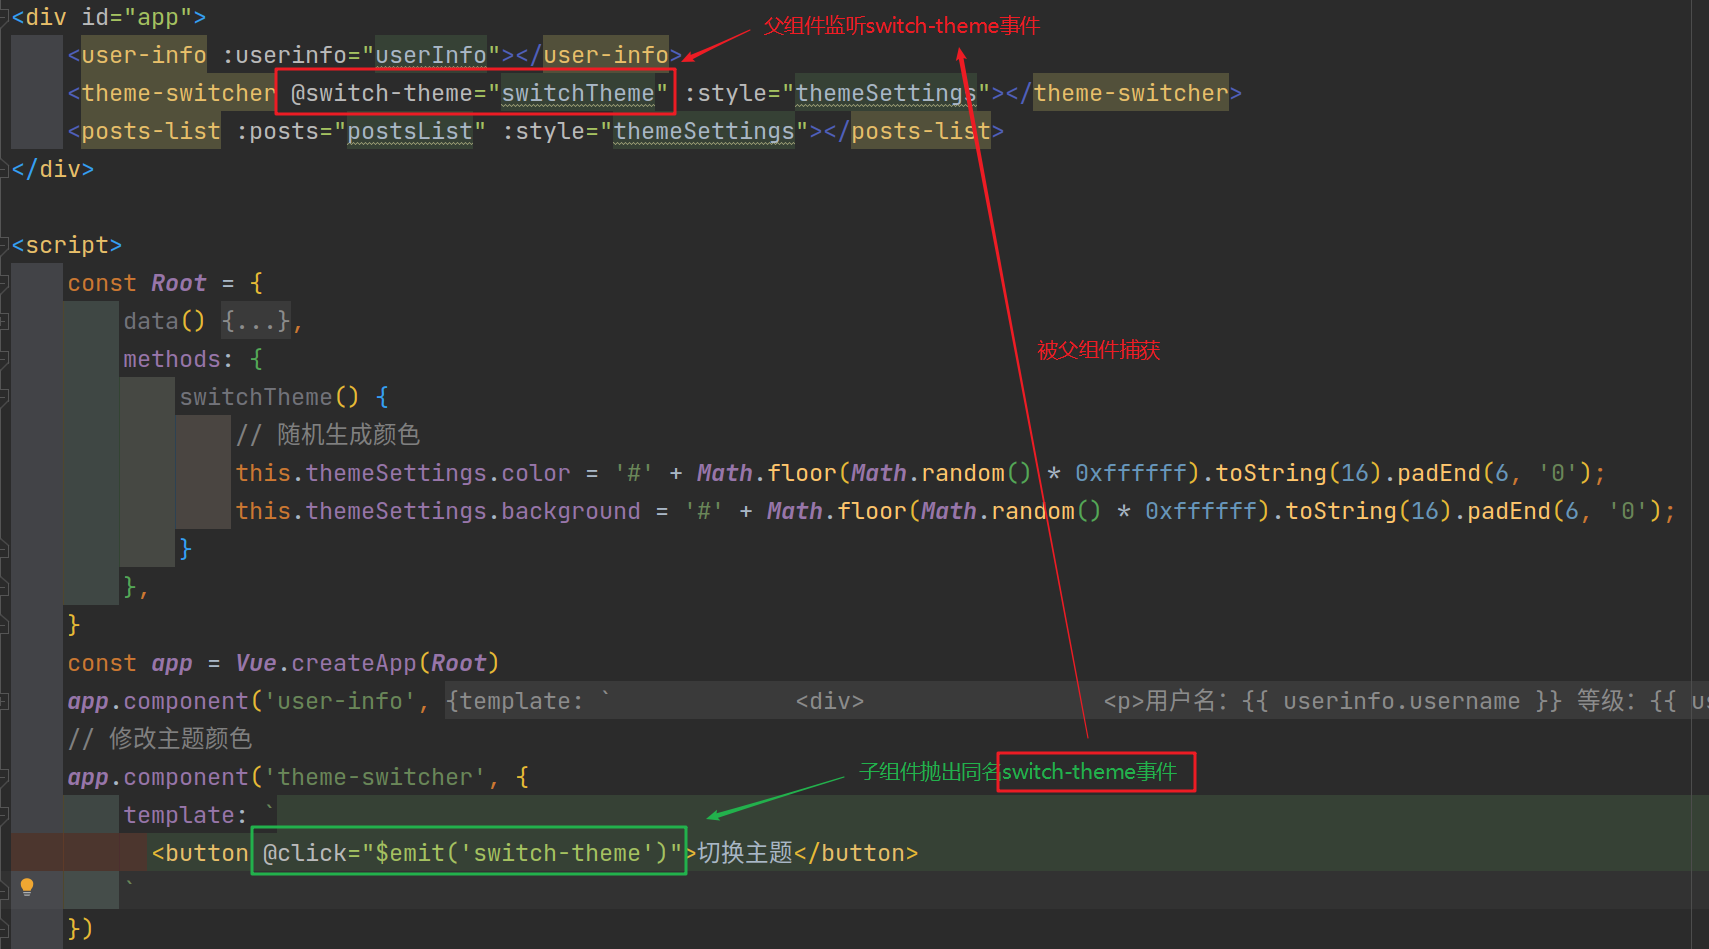
Vue 就提供 $emit() 方法来完成这个过程:在子组件中触发自定义的事件时, $emit() 通过传入事件名称来抛出一个事件,父组件通过监听同名时间来不或子组件抛出的这个时间,然后调用对应绑定的事件处理程序。
    // 修改主题颜色
    app.component('theme-switcher', {
        methods: {
            switchTheme() {
                console.log('switch theme');
            }
        },
        template: `
          <button @click="$emit('switch-theme')">切换主题</button>
        `
    })
- 子组件模板里
$emit(event-name)中的 event-name 要与上级组件要监听的事件同名。
完整代码如下:
<!DOCTYPE html>
<html>
<head>
    <meta charset="utf-8">
    <script src="https://unpkg.com/vue@next"></script>
</head>
<body>
<div id="app">
    <user-info :userinfo="userInfo"></user-info>
    <theme-switcher @switch-theme="switchTheme" :style="themeSettings"></theme-switcher>
    <posts-list :posts="postsList" :style="themeSettings"></posts-list>
</div>

<script>
    const Root = {
        data() {
            return {
                userInfo: {
                    username: 'xiaolu2333',
                    grade: 12,
                },
                postsList: [
                    {id: 1, title: 'My journey with Vue😘'},
                    {id: 2, title: 'Blogging with Vue🚄'},
                    {id: 3, title: 'Why Vue is so fun🥰'}
                ],
                themeSettings: {
                    color: 'green',
                    background: 'white'
                }
            }
        },
        methods: {
            switchTheme() {
                // 随机生成颜色
                this.themeSettings.color = '#' + Math.floor(Math.random() * 0xffffff).toString(16).padEnd(6, '0');
                this.themeSettings.background = '#' + Math.floor(Math.random() * 0xffffff).toString(16).padEnd(6, '0');
            }
        },
    }

    const app = Vue.createApp(Root)

    app.component('user-info', {
        props: ['userinfo'],
        template: `
            <div>
                <p>用户名:{{ userinfo.username }} 等级:{{ userinfo.grade }}</p>
            </div>
        `
    })

    // 修改主题颜色
    app.component('theme-switcher', {
        template: `
          <button @click="$emit('switch-theme')">切换主题</button>
        `
    })

    app.component('posts-list', {
        props: ['posts'],
        template: `
            <div>
                <h3>文章列表</h3>
                <ul>
                    <li v-for="post in posts" :key="post.id">{{ post.title }}</li>
                </ul>
            </div>
        `
    })

    // 4,挂载应用实例到 DOM,创建根组件实例
    const vm = app.mount('#app')
</script>
</body>
</html>
效果如下:

$emit()产生的事件传递方向:
2,使用事件抛出值
除了能抛出事件,$emit() 还能抛出值,这就能实现父子组件之间的数据交互,只需要:
- 为子组件中的
$emit()额外添加要被抛出的参数:$emit(event-name, ...args)。 - 在父组件监听这个事件时通过
$event访问被抛出的值。
举个例子🌰:获取子组件中按钮点击次数
<div id="app">
    <user-info :userinfo="userInfo"></user-info>
    <theme-switcher @switch-theme="switchTheme" :style="themeSettings"></theme-switcher>
    <posts-list :posts="postsList" :style="themeSettings"></posts-list>
</div>

<script>
    const Root = {
        ......
        methods: {
            switchTheme(clickCounter) {
                console.log(clickCounter);
                ......
            }
        },
    }
	......
    // 修改主题颜色
    app.component('theme-switcher', {
        data() {
            return {
                clickCounter: 0		// 统计点击次数
            }
        },
        template: `
          <button @click="$emit('switch-theme', ++clickCounter)">切换主题</button>
        `
    })
	......
</script>
如果父组件中该事件处理程序是一个方法,则方法中第一个参数就是捕获的值:
<posts-info ... @enlarge-text="onEnlargeText"></posts-info>

...
methods: {
  onEnlargeText(enlargeAmount) {
    this.postFontSize += enlargeAmount
  }
}
...
3,v-model 与输入事件
自定义事件也可以用于创建支持 v-model 的自定义输入组件。
前面简单提到过,v-model是一个语法糖:
<input v-model="searchText" />
等价于:
<input :value="searchText" @input="searchText = $event.target.value" />
当用在组件上时,v-model 则会展开成这样:
<CustomInput
  :modelValue="searchText"
  @update:modelValue="newValue => searchText = newValue"
/>
为了让 v-model 正常工作,这个组件内的 <input> 必须:
- 将内部原生
input元素的valueattribute 绑定到modelValueprop - 输入新的值时在
input元素上触发update:modelValue事件
举个例子🌰:添加一个搜索框
<div id="app">
    ......
    <search-post v-model="searchText"></search-post>
    ......
</div>

<script>
    const Root = {
        data() {
            return {
                ......
                searchText: ""
            }
        },
		......
        watch: {
            searchText(newVal, oldVal) {
                let searchResult = [];
                if (newVal !== ""){
                    for (let i = 0; i < this.postsList.length; i++) {
                        if (this.postsList[i].title.toLowerCase().includes(newVal.toLowerCase())) {
                            searchResult.push(this.postsList[i]);
                        }
                    }
                    console.log(searchResult);
                }
            }
        },
    }
    const app = Vue.createApp(Root)
    ......

    app.component('search-post', {
        props: ['modelValue'],
        emits: ['update:modelValue'],
        template: `
          <div>
              <input type="text"
                     :value="modelValue"
                     @input="$emit('update:modelValue', $event.target.value)"
                     placeholder="搜索文章">
          </div>
        `
    })

    ......
    const vm = app.mount('#app')
</script>
</body>
</html>
(六)通过插槽分发内容
和普通元素一样,我们经常需要向一个组件传递内容,像这样传递一段文本值“用户名:”:
<div id="app">
    <person-info :info="info">用户名:</person-info>
    ...
</div>
但实际上,插入到子组件中的这部分内容并没有被渲染出来,这可以在子组件的 template property 中使用 <slot> 作为我们想要插入内容的占位符来解决:
...
    app.component('person-info', {
        props: ['info'],
        template: `
          <h3><slot></slot>{{ info.name }}</h3>`
    });
...
插槽可以接受许多类型的内容,具体后面再说。
(七)动态组件
可以通过向 Vue 的 <component> 元素加一个特殊的 is attribute 来在不同组件之间进行动态切换:
<!-- 组件会在 `currentTabComponent` 改变时改变 -->
<component :is="currentTabComponent"></component>
currentTabComponent 可以包括:
- 已注册组件的名。
- 导入的组件对象。
举个例子🌰:添加顶部菜单标签
<div id="app">
    <div class="demo">
        <button
           v-for="tab in tabObj.tabs"
           :key="tab"
           :class="['tab-button', { active: tabObj.currentTab === tab }]"
           @click="tabObj.currentTab = tab"
         >
          {{ tab }}
        </button>
        <keep-alive>
            <component :is="currentTabComponent" class="tab"></component>
        </keep-alive>
    </div>
	......
</div>

<script>
    const Root = {
        data() {
            return {
                tabObj: {
                    currentTab: "Home",
                    tabs: ["home", "posts", "archive"],
                },
				......
            }
        },
        ......
        computed: {
        	// 根据tabObj.tabs的值,动态计算出当前tab对应的组件名
            currentTabComponent() {
                return 'tab-' + this.tabObj.currentTab.toLowerCase();
            }
        }
    }

    const app = Vue.createApp(Root)

    app.component('tab-home', {
        template: `<div class="Home-tab">Home page</div>`
    })
    app.component('tab-posts', {
        template: `<div class="Posts-tab">Posts page</div>`
    })
    app.component('tab-archive', {
        template: `<div class="Archive-tab">Archive page</div>`
    })

	......
    const vm = app.mount('#app')
</script>
效果如下:

暂时来说,完整的 demo 如下:
<!DOCTYPE html>
<html>
<head>
    <meta charset="utf-8">
    <script src="https://unpkg.com/vue@next"></script>
</head>
<body>
<div id="app">
    <div class="demo">
        <button
           v-for="tab in tabObj.tabs"
           :key="tab"
           :class="['tab-button', { active: tabObj.currentTab === tab }]"
           @click="tabObj.currentTab = tab"
         >
          {{ tab }}
        </button>
        <keep-alive>
            <component :is="currentTabComponent" class="tab"></component>
        </keep-alive>
    </div>
    <user-info :userinfo="userInfo"></user-info>
    <theme-switcher @switch-theme="switchTheme" :style="themeSettings"></theme-switcher>
    <search-post v-model="searchText"></search-post>
    <posts-list :posts="postsList" :style="themeSettings">文章列表:</posts-list>
</div>

<script>
    const Root = {
        data() {
            return {
                tabObj: {
                    currentTab: "Home",
                    tabs: ["home", "posts", "archive"],
                },
                currentTab: 'Home',
                tabs: ['Home', 'Posts', 'Archive'],
                userInfo: {
                    username: 'xiaolu2333',
                    grade: 12,
                },
                postsList: [
                    {id: 1, title: 'My journey with Vue😘'},
                    {id: 2, title: 'Blogging with Vue🚄'},
                    {id: 3, title: 'Why Vue is so fun🥰'}
                ],
                themeSettings: {
                    color: 'green',
                    background: 'white'
                },
                searchText: ""
            }
        },
        methods: {
            switchTheme(clickCounter) {
                console.log(clickCounter);
                this.themeSettings.color = '#' + Math.floor(Math.random() * 0xffffff).toString(16).padEnd(6, '0');
                this.themeSettings.background = '#' + Math.floor(Math.random() * 0xffffff).toString(16).padEnd(6, '0');
            },
        },
        watch: {
            searchText(newVal, oldVal) {
                let searchResult = [];
                if (newVal !== ""){
                    for (let i = 0; i < this.postsList.length; i++) {
                        if (this.postsList[i].title.toLowerCase().includes(newVal.toLowerCase())) {
                            searchResult.push(this.postsList[i]);
                        }
                    }
                    console.log(searchResult);
                }
            }
        },
        computed: {
            // 根据tabObj.tabs的值,动态计算出当前tab对应的组件名
            currentTabComponent() {
                return 'tab-' + this.tabObj.currentTab.toLowerCase();
            }
        }
    }
    const app = Vue.createApp(Root)

    app.component('tab-home', {
        template: `<div class="Home-tab">Home page</div>`
    })
    app.component('tab-posts', {
        template: `<div class="Posts-tab">Posts page</div>`
    })
    app.component('tab-archive', {
        template: `<div class="Archive-tab">Archive page</div>`
    })

    app.component('user-info', {
        props: ['userinfo'],
        template: `
          <div>
            <p>用户名:{{ userinfo.username }} 等级:{{ userinfo.grade }}</p>
          </div>
        `
    })

    app.component('theme-switcher', {
        emits: ['switch-theme'],
        data() {
            return {
                clickCounter: 0
            }
        },
        template: `
          <div>
            <button @click="$emit('switch-theme', ++clickCounter)">切换主题</button>
          </div>
        `
    })

    app.component('search-post', {
        props: ['modelValue'],
        emits: ['update:modelValue'],
        template: `
          <div>
              <input type="text"
                     :value="modelValue"
                     @input="$emit('update:modelValue', $event.target.value)"
                     placeholder="搜索文章">
          </div>
        `
    })

    app.component('posts-list', {
        props: ['posts'],
        template: `
          <div>
              <h3><slot></slot></h3>
              <ul>
                  <li v-for="post in posts" :key="post.id">{{ post.title }}</li>
              </ul>
          </div>
        `
    })

    const vm = app.mount('#app')
</script>
</body>
</html>
(八)解析 DOM 模板时的注意事项
如果想在 DOM 中直接书写 Vue 模板,Vue 将不得不从 DOM 中获取字符串。这会因为浏览器的原生 HTML 解析行为而导致一些小问题。
1,元素位置受限
有些 HTML 元素(例如 <ul>、<ol>、<table> 和 <select>),对于哪些元素可以出现在其内部是有严格限制的。
而有些元素(例如 <li>、<tr> 和 <option>),只能出现在其它某些特定的元素内部。
这会导致我们使用这些有约束条件的元素时遇到一些问题。例如:
<table>
  <blog-post-row></blog-post-row>
</table>
这个自定义组件 <blog-post-row> 会被作为无效的内容而提升到外部,并导致最终渲染结果出错。我们可以使用特殊的 is attribute 来解决:
- 当自定义组件用于原生元素时,
is的值必须以vue:开头才被解释为 Vue 组件,从而避免和原生自定义元素混淆。
<table>
  <tr is="vue:blog-post-row"></tr>
</table>
2,大小写不敏感
由于HTML attribute 名不区分大小写,因此浏览器将所有大写字符解释为小写。
这意味着当你在 DOM 模板中使用时,驼峰 prop 名称和 event 处理器参数需要使用它们的 kebab-cased (横线字符分隔) 等效值:
//  在 JavaScript 中是驼峰式
app.component('posts-info', {
  props: ['postTitle'],
  template: `
    <h3>{{ postTitle }}</h3>
  `
})

<!-- 在 HTML 中则是横线字符分割 -->
<blog-post post-title="hello!"></blog-post>


 9582
9582


 被折叠的 条评论
为什么被折叠?
被折叠的 条评论
为什么被折叠?
 到【灌水乐园】发言


