


在Windows上安装Git
安装完成后,在开始菜单里找到“Git”->“Git Bash”,蹦出一个类似命令行窗口的东西,就说明Git安装成功!
安装完成后,还需要最后一步设置,在命令行输入:
$ git config --global user.name "Your Name"
$ git config --global user.email "email@example.com" 注意git config命令的--global参数,用了这个参数,表示你这台机器上所有的Git仓库都会使用这个配置,当然也可以对某个仓库指定不同的用户名和Email地址
新建一个本地版本库
1.创建一个空目录
$ mkdir 你的目录
$ cd 你的目录
$ pwd //查看当前路径 比如我的是:/e/javaFile/blogdemo
初始化
$ git init添加文件
$ git add file1 file2 file3多个文件之间用空格隔开
如果想要添加整个文件夹,可以先
cd 想要添加的文件夹
git add . //注意这里有一个“.”,表示添加所有
把文件提交到git本地库,一次提交多个文件
$ git commit -m "本次提交的说明,方便查看改动记录"小结
初始化一个Git仓库,使用git init命令。
添加文件到Git仓库,分两步:
- 使用命令
git add <file>,注意,可反复多次使用,添加多个文件; - 使用命令
git commit -m <message>,完成。
添加远程库
首先,登陆GitHub,然后,在右上角找到“Create a new repo”按钮,创建一个新的仓库,在Repository name填入仓库名,其他保持默认设置,点击“Create repository”按钮,就成功地创建了一个新的Git仓库
在本地仓库中添加远程库
$ git remote add origin 远程库的地址添加后,远程库的名字就是origin,这是Git默认的叫法,也可以改成别的,但是origin这个名字一看就知道是远程库。
然后就可以把本地库的所有内容推送到远程库上
$ git push -u origin master把本地库的内容推送到远程,用git push命令,实际上是把当前分支master推送到远程。
由于远程库是空的,我们第一次推送master分支时,加上了-u参数,Git不但会把本地的master分支内容推送到远程新的master分支,还会把本地的master分支和远程的master分支关联起来,在以后的推送或者拉取时就可以简化命令为 git push origin master
我第一次使用时出现错误
error: src refspec master does not match any.
error: failed to push some refs to 'https://github.com/AntonDai/Blog.git'
原因:本地仓库为空
解决方法:使用命令添加文件并提交
有时候我们可能会将一些不需要跟踪的文件上传到远程仓库中,例如配置文件等等。为了不影响其他开发者使用git上的代码,我们需要删除已经传到远程仓库中的错误文件。
1.在本地拉取远程分支 git pull origin master
2.在本地删除对应的文件:git rm filename
3.提交修改 git commit -m "本地删除远程文件filename"
4.推送到远程库 git push origin master
查看状态 git status
查看日志 git log
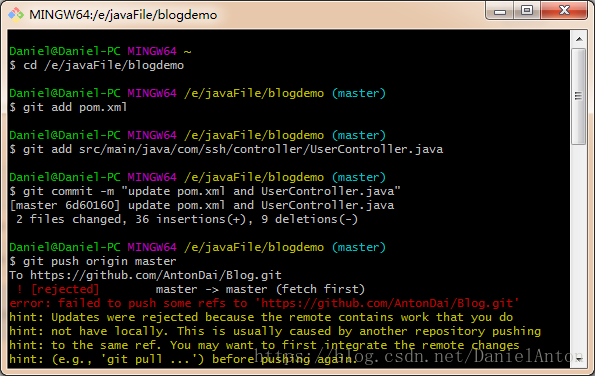
新的错误
! [rejected] master -> master (fetch first)
error: failed to push some refs to 'https://github.com/AntonDai/Blog.git'
hint: Updates were rejected because the remote contains work that you do
hint: not have locally. This is usually caused by another repository pushing
hint: to the same ref. You may want to first integrate the remote changes
hint: (e.g., 'git pull ...') before pushing again.
hint: See the 'Note about fast-forwards' in 'git push --help' for details.
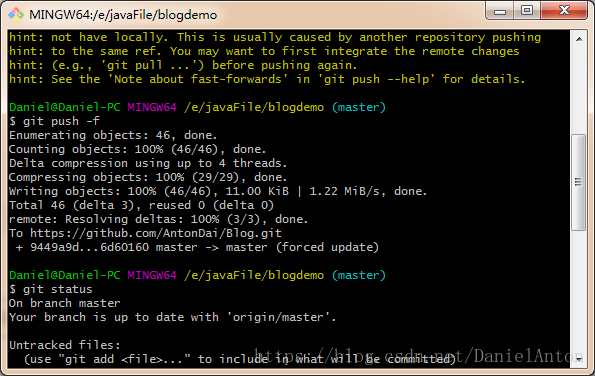
解决办法:
git pull -f


 25万+
25万+


 被折叠的 条评论
为什么被折叠?
被折叠的 条评论
为什么被折叠?
 到【灌水乐园】发言


