


scala入门
- 教程I:设置scala和scalatra以在Eclipse中使用,并创建您的第一个应用程序。
- 教程II:开始嵌入scalatra,创建使用JSON的REST API并使用specs2进行测试
- 教程三:使用scalaquery添加持久性并添加基于hmac的安全层
本教程中的示例假定您已经完成了前三个教程。 我们不会显示所有细节,而是着重于向现有应用程序中添加新功能(第三部分)。 确切地说,在此示例中,我们将向您显示以下步骤:
- 首先,我们将subcut引入应用程序以进行依赖项注入
- 接下来,我们将使用Akka的期货使请求异步
- 最后,我们将启用CORS,打包应用程序并将其部署到openshift
我们将拥有一个可以在openshift云上调用的API。

让我们从子切入开始, 向应用程序添加依赖项注入
在Java中,有许多依赖项注入框架。 大多数人都听说过Spring和Guice,并且依赖注入甚至具有自己的JSR和规范。 但是在scala中,情况并非如此。 关于scala应用程序是否需要DI框架的讨论很多,因为也可以使用标准Scala语言构造来应用这些概念。 当您开始研究Scala的依赖项注入时,您会很快遇到蛋糕模式(请参阅此处以获取详细说明)。 我不会详细介绍为什么应该使用或不应该使用蛋糕图案,但是对我个人而言,感觉就像引入了太多的残篇和胶合代码,我想简化一些事情。 对于本文,我将使用subcut 。 Subcut是一个非常小巧且易于使用的框架,这使得在Scala中使用DI非常容易且不引人注目。
没有什么比示例更有效。 因此,您需要做什么让subcut管理您的依赖项。 首先,我们当然需要很好地将实现与接口/特征分开。 在第三部分中,我们创建了一组存储库,将它们创建为类变量,可以直接从scalatra路由中使用它们:
// repo stores our items
  val itemRepo = new ItemRepository;
  val bidRepo = new BidRepository;
问题是这将我们的路由直接绑定到实现,这是我们不想要的。 因此,首先让我们通过定义这些存储库的特征来扩展存储库。
trait BidRepo {

  def get(bid:Long , user: String ) : Option [Bid]
  def create(bid: Bid): Bid
  def delete(user: String , bid: Long ) : Option [Bid]
}

trait ItemRepo {
  def get(id: Number ) : Option [Item]
  def delete(id: Number ) : Option [Item]
}

trait KeyRepo {
  def validateKey(key: String , app: String , server: String ): Boolean
}
没有什么不寻常的。 我们从实现中使用此特征,如下所示,我们已经完成了。
class BidRepository extends RepositoryBase with BidRepo {
 ...
}
既然我们已经定义了特征,就可以开始使用子切割来管理依赖项了。 为此,我们需要注意以下几点:
- 哪种实现方式绑定到什么特征
- 哪些课程需要注入资源
- 用我们的配置引导“ root”对象
在我们开始之前。 我们首先需要使用subcut依赖项更新build.sbt并添加正确的存储库。
libraryDependencies ++= Seq(
  'com.escalatesoft.subcut' %% 'subcut' % '2.0-SNAPSHOT',
  'org.scalaquery' %% 'scalaquery' % '0.10.0-M1',
  'postgresql' % 'postgresql' % '9.1-901.jdbc4',
  'net.liftweb' %% 'lift-json' % '2.4',
  'org.scalatra' % 'scalatra' % '2.1.0',
  'org.scalatra' % 'scalatra-scalate' % '2.1.0',
  'org.scalatra' % 'scalatra-specs2' % '2.1.0',
  'org.scalatra' % 'scalatra-akka' % '2.1.0',
  'ch.qos.logback' % 'logback-classic' % '1.0.6' % 'runtime',
  'org.eclipse.jetty' % 'jetty-webapp' % '8.1.5.v20120716' % 'container',
  'org.eclipse.jetty' % 'test-jetty-servlet' % '8.1.5.v20120716' % 'test',
  'org.eclipse.jetty.orbit' % 'javax.servlet' % '3.0.0.v201112011016' % 'container;provided;test' artifacts (Artifact('javax.servlet', 'jar', 'jar'))
)

resolvers ++= Seq('Scala-Tools Maven2 Snapshots Repository' at 'https://oss.sonatype.org/content/groups/public/',
                  'Typesafe Repository' at 'http://repo.typesafe.com/typesafe/releases/')
这不仅添加了subcut依赖项,还添加了akka一次,我们将在本文中进一步介绍
将实现绑定到特征
子切割中的绑定是在绑定模块中定义的。 因此,通过扩展模块,可以为应用程序创建配置。 例如,您可以定义一个测试配置,一个配置用于质量检查,另一个配置用于生产。
// this defines which components are available for this module
    // for this example we won't have that much to inject. So lets
    // just inject the repositories.
    object ProjectConfiguration extends NewBindingModule(module => {
      import module._   // can now use bind directly

      // in our example we only need to bind to singletons, all bindings will
      // return the same instance.
      bind [BidRepo] toSingle new BidRepository
      bind [ItemRepo] toSingle new ItemRepository

      // with subcut however, we have many binding option as an example we bind the keyrepo and want a new
      // instance every time the binding is injected. We'll use the toProvider option for this
      bind [KeyRepo] toProvider {new KeyRepository}
    }
 )
无需潜入过深的子切口。 在此代码段中,我们要做的是将实现绑定到特征。 我们对要注入的所有资源执行此操作,因此subcut会在遇到特定接口时知道要创建哪个实现。 如果我们想注入特定特征的不同实现,我们还可以在绑定中添加一个id,因此我们可以唯一地引用它们。
配置需要注入资源的类
现在,我们具有绑定到实现的一组特征,我们可以让subcut注入资源。 为此,我们需要做两件事。 首先,我们需要向HelloScalatraServlet类添加一个隐式val。
class HelloScalatraServlet(implicit val bindingModule: BindingModule) extends ScalatraServlet with Authentication
                                                   with RESTRoutes {
 ....
}
这需要添加到所有希望通过子切割注入资源的类中。 有了此隐式值,子cut可以访问配置并可以使用它来注入依赖项。 我们已经在RESTRoutes特性中定义了路由,因此让我们看一下如何配置此特性以与subcut一起使用:
trait RESTRoutes extends ScalatraBase with Injectable {

    // simple logger
  val logger = Logger(classOf[RESTRoutes]);

  // This repository is injected based on type. If no type can be found an exception is thrown
  val itemRepo = inject[ItemRepo]
  // This repo is injected optionally. If none is provided a standard one will be created
  val bidRepo = injectOptional[BidRepo] getOrElse {new BidRepository};

  ...
}
我们从子切割中添加了Injectable特征,因此我们可以使用inject函数(其中有多个变体)。 在此示例中,使用注入功能注入了itemRepo。 如果找不到合适的实现,则会引发错误消息。 然后使用injectOptional注入bidRepo。 如果未绑定任何内容,则使用默认值。 由于该特性由servlet使用(我们刚刚看到的(带有隐式bindingmodule的特性)),它可以访问绑定配置,并且subcut将注入所需的依赖项。
用我们的配置引导“ root”对象
现在我们需要做的就是告诉我们的根对象(Servlet)它应该使用哪种配置,所有东西都将被连接在一起。 我们从生成的Scalatra侦听器执行此操作,在其中添加以下内容:
...
  override def init(context: ServletContext) {

    // reference the project configuation, this is implicatly passed into the
    // helloScalatraServlet
    implicit val bindingModule = ProjectConfiguration

    // Mount one or more servlets, this will inject the projectconfiguration
    context.mount(new HelloScalatraServlet, '/*')
  }

  ...
在这里,我们创建bindingModule,该绑定模块隐式传递到HelloScalatraServlet的构造函数中。 就是这样,当您现在启动应用程序时,子切割将确定需要注入哪个依赖项。 就是这样。 如果我们现在启动,则应用程序子剪切将处理依赖项。 如果一切顺利,并且找到了所有依赖项,则应用程序将成功启动。 如果找不到依赖项之一,则会引发如下错误:
15:05:51.112 [main] WARN  o.eclipse.jetty.webapp.WebAppContext - Failed startup of context o.e.j.w.WebAppContext{/,file:/Users/jos/Dev/scalatra/firststeps/hello-scalatra/src/main/webapp/},src/main/webapp
org.scala_tools.subcut.inject.BindingException: No binding for key BindingKey(org.smartjava.scalatra.repository.ItemRepo,None)
 at org.scala_tools.subcut.inject.BindingModule$class.inject(BindingModule.scala:66) ~[subcut_2.9.1-2.0-SNAPSHOT.jar:2.0-SNAPSHOT]
转到列表中的下一项,Akka。
使用Akka添加异步处理
Akka为您提供了完整的Actor框架,可用于创建可扩展的多线程应用程序。 Scalatra开箱即用地支持Akka,因此使其易于使用非常容易。 只需添加正确的特征,将功能与Future函数包装在一起,就可以完成工作。 所有动作都发生在我们定义路线的RESTRoutes特性中。 让我们启用其中两种方法来使用Akka。
trait RESTRoutes extends ScalatraBase with Injectable with AkkaSupport{
...
/**
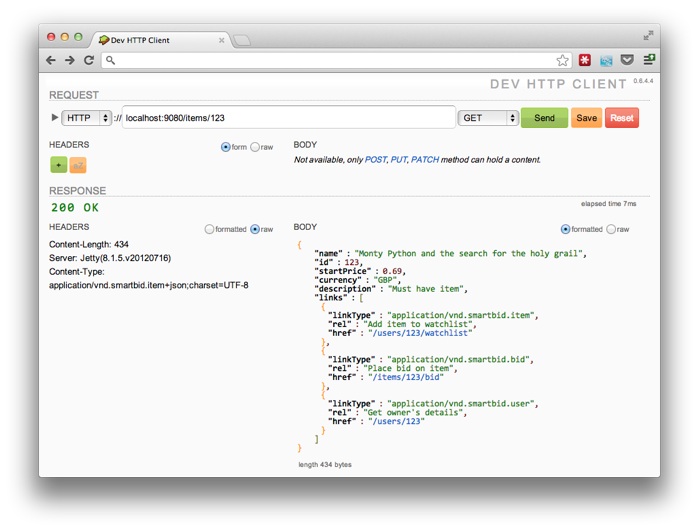
* Handles get based on items id. This operation doesn't have a specific
* media-type since we're doing a simple GET without content. This operation
* returns an item of the type application/vnd.smartbid.item+json
*/
get('/items/:id') {
// set the result content type
contentType = 'application/vnd.smartbid.item+json'
// the future can't access params directly, so extract them first
val id = params('id').toInt;
Future {
// convert response to json and return as OK
itemRepo.get(id) match {
case Some(x) => Ok(write(x));
case None =>NotFound ('Item with id ' + id + ' not found');
}
}
}
/**
* Delete the specified item
*/
delete('/items/:id') {
val id = params('id').toInt;
Future {
itemRepo.delete(id) match {
case Some(x) => NoContent();
case None => NotFound ('Item with id ' + id + ' not found');
}
}
}
...
} 太多没有看到这里。 我们只是添加了AkkaSupport特性,并用Future函数包装了我们的方法主体。 这将异步运行代码块。 Scalatra将等待直到完成此块,然后返回结果。 这里要注意的一件事是,您无权访问scalatra提供的请求上下文变量。 因此,如果您想设置响应内容类型,则需要在以后进行。 例如,对于访问参数或请求正文也是如此。
现在您需要做的就是设置一个Akka ActorSystem。 最简单的方法是仅使用默认的actor系统。 有关高级选项,请参阅Akka文档。
class HelloScalatraServlet(implicit val bindingModule: BindingModule) extends ScalatraServlet with Authentication
                                                   with AkkaSupport
                                                   with RESTRoutes {

  // create a default actor system. This is used from the futures in the web routes
  val system = ActorSystem()
}
现在,当您运行servlet容器时,将使用Akka期货来处理请求。
添加CORS并在云上部署
最后一步,添加CORS 。 使用CORS,您可以打开自己的API,以供其他域使用。 这样可以避免使用JSONP。 在scalatra中使用它非常简单。 只需添加特征CorsSupport,就完成了。 启动应用程序时,您将看到类似以下内容:
15:31:28.505 [main] DEBUG o.s.scalatra.HelloScalatraServlet - Enabled CORS Support with:
allowedOrigins:
 *
allowedMethods:
 GET, POST, PUT, DELETE, HEAD, OPTIONS, PATCH
allowedHeaders:
Cookie, Host, X-Forwarded-For, Accept-Charset, If-Modified-Since, Accept-Language, X-Forwarded-Port, Connection, X-Forwarded-Proto, User-Agent, Referer, Accept-Encoding, X-Requested-With, Authorization, Accept, Content-Type您可以使用此处说明的一组init参数来微调支持的内容。
现在剩下的就是打包所有内容,并将其部署到openshift 。 如果还没有注册,请在openshift上注册(免费)。 在我的示例中,我使用标准的“ JBoss Application Server 7.1”应用程序,没有任何盒带。

我不想配置postgresql,所以我创建了一个虚拟仓库实现:
class DummyBidRepository extends BidRepo{

  val dummy = new Bid(Option (10l),10,10,20,'FL',10l,12345l, List ());

  def get(bid: Long , user: String ) : Option [Bid] = {
    Option (dummy);
  }
  def create(bid: Bid): Bid = {
    dummy;
  }
  def delete(user: String , bid: Long ) : Option [Bid] = {
    Option (dummy);
  }
}
并使用subcut注入了这个子库,而不是需要数据库的仓库:
bind [BidRepo] toSingle new DummyBidRepository有了这个小的更改,我们就可以使用sbt创建war文件。
jos@Joss-MacBook-Pro.local:~/Dev/scalatra/firststeps/hello-scalatra$ sbt package && cp target/scala-2.9.1/hello-scalatra_2.9.1-0.1.0-SNAPSHOT.war ~/dev/git/smartjava/deployments/
[info] Loading project definition from /Users/jos/Dev/scalatra/firststeps/hello-scalatra/project
[info] Set current project to hello-scalatra (in build file:/Users/jos/Dev/scalatra/firststeps/hello-scalatra/)
[info] Compiling 2 Scala sources to /Users/jos/Dev/scalatra/firststeps/hello-scalatra/target/scala-2.9.1/classes...
[info] Packaging /Users/jos/Dev/scalatra/firststeps/hello-scalatra/target/scala-2.9.1/hello-scalatra_2.9.1-0.1.0-SNAPSHOT.war ...
[info] Done packaging.
[success] Total time: 7 s, completed Oct 5, 2012 1:57:12 PM
并使用git将其部署到openshift
jos@Joss-MacBook-Pro.local:~/git/smartjava/deployments$ git add hello-scalatra_2.9.1-0.1.0-SNAPSHOT.war && git commit -m 'update' && git push
[master b1c6eae] update
 1 files changed, 0 insertions(+), 0 deletions(-)
Counting objects: 7, done.
Delta compression using up to 8 threads.
Compressing objects: 100% (4/4), done.
Writing objects: 100% (4/4), 11.16 KiB, done.
Total 4 (delta 3), reused 0 (delta 0)
remote: Stopping application...
remote: Done
remote: ~/git/smartjava.git ~/git/smartjava.git
remote: ~/git/smartjava.git
remote: Running .openshift/action_hooks/pre_build
...
remote: Emptying tmp dir: /var/lib/stickshift/3bc81f5b0d7c48ad84442698c9da3ac4/smartjava/jbossas-7/standalone/tmp/work
remote: Running .openshift/action_hooks/deploy
remote: Starting application...
remote: Done
remote: Running .openshift/action_hooks/post_deploy
To ssh://3bc81f5b0d7c48ad84442698c9da3ac4@smartjava-scalatra.rhcloud.com/~/git/smartjava.git/
   a45121a..b1c6eae  master -> master
您可能会看到类似的内容,现在完成了。 或者至少,差不多完成了。 导致访问资源时发生的情况:
嗯..出了点问题。 这是我们感兴趣的消息:
java.lang.IllegalStateException: The servlet or filters that are being used by this request do not support async operation嗯..显然JBoss AS处理servlet的方式与Jetty有所不同。 我们看到此消息的原因是,根据Servlet 3.0规范,默认情况下,未启用Servlet支持异步操作。 由于我们在路线上使用Akka Futures,因此我们需要这种异步支持。 通常,您可以在web.xml或使用Servlet上的注释来启用此支持。 但是,在我们的情况下,我们的servlet是从侦听器启动的:
override def init(context: ServletContext) {

    // reference the project configuation, this is implicatly passed into the
    // helloScalatraServlet
    implicit val bindingModule = ProjectConfiguration

    // Mount one or more servlets, this will inject the projectconfiguration
    context.mount(new HelloScalatraServlet, '/*')
  }
Context.mount是scalatra提供的一种便捷方法,用于注册servlet。 但是,这不会启用异步支持。 如果我们自己注册servlet,则可以启用此异步支持。 因此,用以下函数替换先前的函数:
override def init(context: ServletContext) {

    // reference the project configuation, this is implicatly passed into the
    // helloScalatraServlet
    implicit val bindingModule = ProjectConfiguration

    val servlet = new HelloScalatraServlet

    val reg = context.addServlet(servlet.getClass.getName,servlet);
    reg.addMapping('/*');
    reg.setAsyncSupported(true);
  }
现在,我们明确启用异步支持。 再次创建一个程序包,并使用git将Web应用程序部署到openshift
sbt package
git add hello-scalatra_2.9.1-0.1.0-SNAPSHOT.war && git commit -m 'update' && git push
现在,您已经在openshift上运行了API的有效版本!
祝您编程愉快,别忘了分享!
参考: 教程:scala和scalatra入门– Smart Java博客上JCG合作伙伴 Jos Dirksen的第四部分 。
翻译自: https://www.javacodegeeks.com/2012/10/getting-started-with-scala-and-scalatra.html
scala入门


 71
71


 被折叠的 条评论
为什么被折叠?
被折叠的 条评论
为什么被折叠?
 到【灌水乐园】发言


