


Google TV应用程序的标准设计模式通常是使用LeftNavBar库。 不幸的是,这里没有apklib,并且没有包含在Google电视插件库中,因此必须编译并使用该库本身。 LeftNavBar库基本上是垂直翻转的操作栏。
我遇到的问题是,该栏始终在屏幕上可见,并且没有实现“抽屉布局”模式,该模式使菜单一直滑入。它允许显示可用的图标,并且始终在屏幕上可见。 因此,我创建了一个替代版本,将从1.4.0开始与Serenity一起使用。 这将使用MenuDrawer库和以下自定义布局。
<?xml version="1.0" encoding="utf-8"?>
<RelativeLayout xmlns:android="http://schemas.android.com/apk/res/android"
    android:layout_width="match_parent"
    android:layout_height="match_parent"
    android:background="#50000000" >

    <LinearLayout
        android:id="@+id/title_bar_layout"
        android:layout_width="match_parent"
        android:layout_height="59dp"
        android:background="@android:color/background_dark"
        android:gravity="center_vertical"
        android:paddingLeft="8dip"
        android:paddingRight="8dip" >

        <ImageView
            android:id="@+id/left_icon"
            android:layout_width="36dip"
            android:layout_height="36dip"
            android:layout_marginRight="8dip"
            android:scaleType="fitCenter"
            android:src="@drawable/serenity_bonsai_logo_small"
            android:visibility="visible" />

        <LinearLayout
            android:layout_width="0dip"
            android:layout_height="59dp"
            android:layout_marginRight="8dip"
            android:layout_weight="1"
            android:gravity="center_vertical"
            android:orientation="vertical" >

            <TextView
                android:id="@+id/title"
                android:layout_width="match_parent"
                android:layout_height="0dip"
                android:layout_weight="1"
                android:ellipsize="end"
                android:gravity="center_vertical"
                android:singleLine="true"
                android:text="@string/app_label" />

            <TextView
                android:id="@+id/subtitle"
                android:layout_width="match_parent"
                android:layout_height="wrap_content"
                android:ellipsize="end"
                android:singleLine="true"
                android:visibility="gone" />
        </LinearLayout>

        <ProgressBar
            android:id="@+id/progress_circular"
            style="?android:attr/progressBarStyle"
            android:layout_width="wrap_content"
            android:layout_height="wrap_content"
            android:layout_marginRight="8dip"
            android:max="10000"
            android:visibility="gone" />

        <ImageView
            android:id="@+id/right_icon"
            android:layout_width="36dip"
            android:layout_height="36dip"
            android:layout_marginRight="8dip"
            android:scaleType="fitCenter"
            android:visibility="gone" />
    </LinearLayout>

    <ListView
        android:id="@+id/menu_list_options"
        android:layout_width="match_parent"
        android:layout_height="wrap_content"
        android:layout_below="@+id/title_bar_layout"
        android:descendantFocusability="afterDescendants"
        android:focusable="false"
        android:nextFocusDown="@+id/menu_help_text"
        android:nextFocusUp="@+id/menu_settings"
        android:scrollingCache="true" >
    </ListView>

    <LinearLayout android:id="@+id/menu_help"
        android:layout_width="match_parent"
        android:layout_height="wrap_content"
        android:gravity="center_vertical"
        android:orientation="horizontal"
        android:layout_above="@+id/menu_settings"
        android:layout_alignParentBottom="true"
        android:visibility="visible"
        android:addStatesFromChildren="true" >

        <TextView android:id="@+id/menu_help_text"
            android:layout_width="0dp"
            style="@android:style/TextAppearance.Holo.Medium"
            android:text="Help"
            android:textColor="@android:color/white"
            android:layout_height="wrap_content"
            android:layout_weight="1"
            android:gravity="center_vertical"
            android:background="@drawable/menu_item_selector"
            android:drawableLeft="@drawable/ic_action_action_help"
            android:focusable="true"
            android:focusableInTouchMode="true"
            android:nextFocusUp="@+id/menu_list_options"
            android:clickable="true"
             />
    </LinearLayout>

    <LinearLayout android:id="@+id/menu_settings"
        android:layout_width="match_parent"
        android:layout_height="wrap_content"
        android:background="@android:color/background_dark"
        android:gravity="center_vertical"
        android:orientation="horizontal"
        android:layout_alignParentBottom="true"
        android:focusable="true"
        android:focusableInTouchMode="true"
        android:visibility="gone" >

        <TextView android:id="@+id/menu_settings_text"
            android:layout_width="0dp"
            style="@android:style/TextAppearance.Holo.Medium"
            android:text="Help"
            android:textColor="@android:color/white"
            android:layout_height="wrap_content"
            android:layout_weight="1"
            android:gravity="center_vertical"
            android:background="@drawable/menu_item_selector"
            android:drawableLeft="@drawable/leftnav_bar_option_icon_normal_dark"
            android:focusable="true"
            android:focusableInTouchMode="true"
            android:nextFocusUp="@+id/menu_options"
            android:clickable="true"
             />
    </LinearLayout>
</RelativeLayout>
这从Google TV LeftNavBar(主要是应用程序标题,进度项和菜单中的“设置”选项)中借鉴了一些设计元素。 其余的包含一个名为menu_list_options的ListView,可用于填充菜单的选项列表。 在某些情况下,我可以使用TextView CompoundDrawable来创建带有图标的选项。 您可以根据需要填充列表,如果将MenuDrawer与“ SlidingMenu”结合使用 , 则可以实现在YouTube等应用中看到的多级滑动抽屉。
结果类似于以下内容:
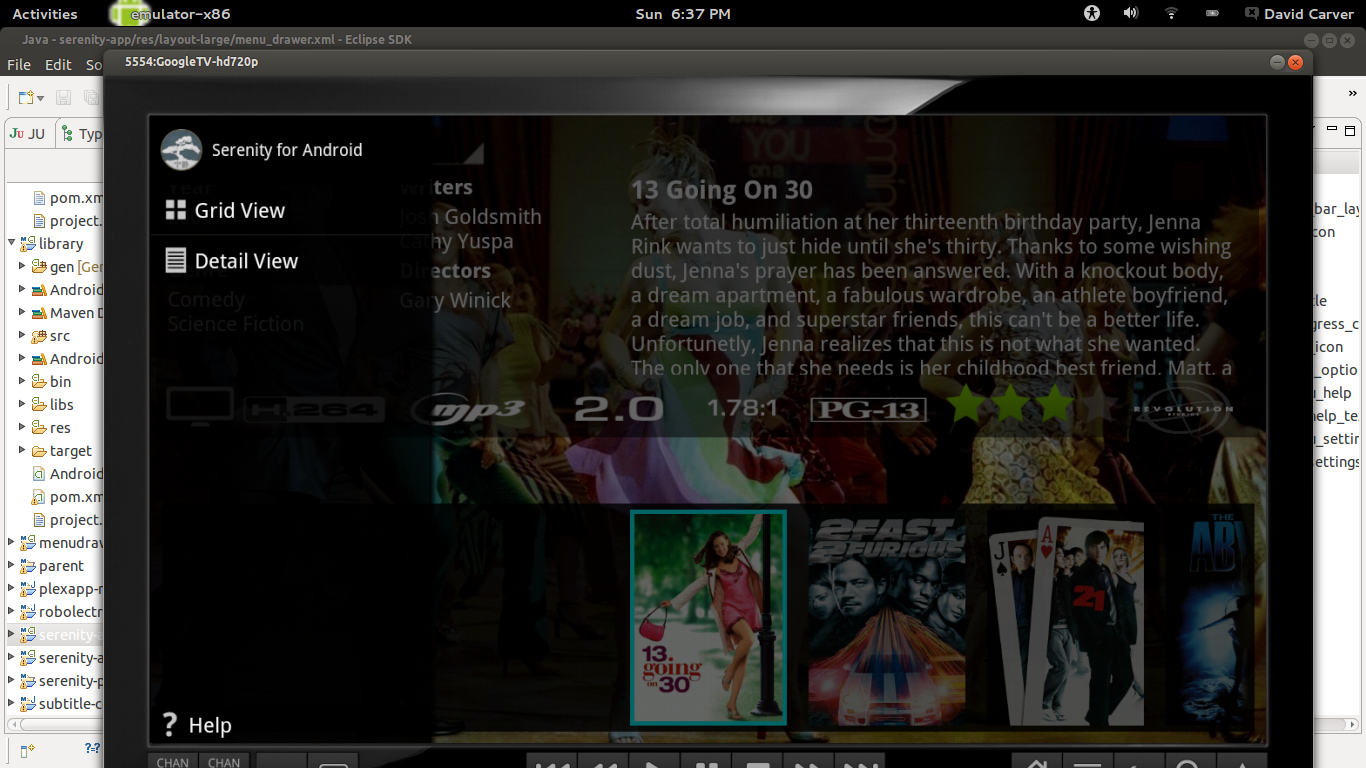
通过将内容进一步绑定到Google TV遥控器的“菜单”键和可单击的屏幕抽屉图标上,可以使抽屉在需要时滑出,而在不需要时可以隐藏。 重要的是要确保用户拥有某种视觉指示器,例如大多数应用程序在ActionBar中看到的标准3点或破折号。
将此绑定到活动类似于以下内容:
protected void createSideMenu() {
   mainContext = this;
   menuDrawer = MenuDrawer.attach(this, MenuDrawer.Type.OVERLAY);
   menuDrawer.setMenuView(R.layout.menu_drawer);
   menuDrawer.setContentView(R.layout.activity_plex_app_main);
   menuDrawer.setDrawerIndicatorEnabled(true);

   View menuButton = findViewById(R.id.menu_button);
   menuButton.setOnClickListener(new MenuDrawerOnClickListener(menuDrawer));
   populateMenuOptions();
}

protected void populateMenuOptions() {
   List<MenuDrawerItem> drawerMenuItem = new ArrayList<MenuDrawerItem>();
   drawerMenuItem.add(new MenuDrawerItemImpl(getResources().getString(R.string.options_main_about), R.drawable.ic_action_action_about));
   drawerMenuItem.add(new MenuDrawerItemImpl(getResources().getString(R.string.options_main_clear_image_cache), R.drawable.ic_action_content_remove));
   drawerMenuItem.add(new MenuDrawerItemImpl(getResources().getString(R.string.tutorial), R.drawable.ic_action_tutorial));
   drawerMenuItem.add(new MenuDrawerItemImpl("Empty Video Queue", R.drawable.ic_action_content_remove));

   ListView listView = (ListView)menuDrawer.getMenuView().findViewById(R.id.menu_list_options);
   hideMenuItems(listView);
   listView.setAdapter(new MenuDrawerAdapter(this, drawerMenuItem));
   listView.setOnItemClickListener(new MainMenuDrawerOnItemClickedListener(menuDrawer, mainGallery));
}
如果您想将其绑定到Google TV菜单键,请参考以下示例:
if (keyCode == KeyEvent.KEYCODE_MENU && !menuDrawer.isMenuVisible()) {
   menuDrawer.toggleMenu();
   return true;
}

if (keyCode == KeyEvent.KEYCODE_BACK && menuDrawer.isMenuVisible()) {
   menuDrawer.toggleMenu();
   return true;
}
通常,使用MenuDrawer与SlidingMenu时,我发现前者更易于使用,并且可以与遥控器很好地配合使用。 尝试与遥控器一起使用SlidingMenu时遇到了焦点问题,而MenuDrawer却没有。 注意,使用MenuDrawer布局时,抽屉中的项目即使不可见也可以通过D-Pad导航获得焦点。 因此,请确保在布局中使用nextFocus *选项来帮助控制事物。 另外,当菜单菜单实际上未显示时,您可能希望将其隐藏,例如menu_list_options视图。
这样便有了一个基本的导航抽屉,该抽屉在不需要时会隐藏,并在需要时可以滑出。 对于电视体验,屏幕空间非常宝贵,因此有时可能需要释放尽可能多的空间。
翻译自: https://www.javacodegeeks.com/2013/08/creating-a-google-tv-sliding-navigation-menu.html


 563
563

 被折叠的 条评论
为什么被折叠?
被折叠的 条评论
为什么被折叠?
 到【灌水乐园】发言


