


接触过Spring的同学肯定都听过IOC。在传统的Java编程中,当需要用到某个对象的时候,我们都是主动显式创建一个对象实例(new)。使用Spring后就不需要这样做了,因为Spring会帮我们在需要用到某些对象的地方自动注入该对象,而无须我们自己去创建。这种模式俗称控制反转,即IOC(Inversion of Control)。那么Spring是从什么地方获取到我们所需要的对象呢?其实Spring给我们提供了一个IOC容器,里面管理着所有我们需要的对象,组件注册就是我们去告诉Spring哪些类需要交给IOC容器管理。
通过@Bean注册组件
在较早版本的Spring中,我们都是通过XML的方式来往IOC容器中注册组件的,下面这段代码大家肯定不会陌生:
1 2 3 | // 返回 IOC 容器,基于 XML配置,传入配置文件的位置
ApplicationContext applicationContext = new ClassPathXmlApplicationContext("xxx.xml");
User user = (User) applicationContext.getBean("user");
|
Spring 4后推荐我们使用Java Config的方式来注册组件。
为了演示,我们通过http://start.spring.io/搭建一个简单Spring Boot应用,然后引入Lombok依赖(编辑器也需要安装Lombok插件):
1 2 3 4 5 | <dependency>
<groupId>org.projectlombok</groupId>
<artifactId>lombok</artifactId>
<scope>provided</scope>
</dependency>
|
然后创建一个User类:
1 2 3 4 5 6 7 | @ToString
@AllArgsConstructor
@Data
public class User {
private String name;
private Integer age;
}
|
接着创建一个配置类,在里面通过@Bean注解注册User类:
1 2 3 4 5 6 7 | @Configuration
public class WebConfig {
@Bean()
public User user() {
return new User("mrbird", 18);
}
}
|
通过@Bean注解,我们向IOC容器注册了一个名称为user(Bean名称默认为方法名,我们也可以通过@Bean("myUser")方式来将组件名称指定为myUser)。
组件注册完毕后,我们测试一下从IOC容器中获取这个组件。在Spring Boot入口类中编写如下代码:
1 2 3 4 5 6 7 8 9 10 11 | @SpringBootApplication
public class DemoApplication {
public static void main(String[] args) {
SpringApplication.run(DemoApplication.class, args);
// 返回 IOC 容器,使用注解配置,传入配置类
ApplicationContext context = new AnnotationConfigApplicationContext(WebConfig.class);
User user = context.getBean(User.class);
System.out.println(user);
}
}
|
因为我们是通过注解方式来注册组件的,所以需要使用AnnotationConfigApplicationContext来获取相应的IOC容器,入参为配置类。
启动项目,看下控制台输出:

说明组件注册成功。
我们将组件的名称改为myUser,然后看看IOC容器中,User类型组件是否叫myUser:
1 2 3 4 5 6 7 8 9 10 11 | @SpringBootApplication
public class DemoApplication {
public static void main(String[] args) {
SpringApplication.run(DemoApplication.class, args);
ApplicationContext context = new AnnotationConfigApplicationContext(WebConfig.class);
// 查看 User 这个类在 Spring 容器中叫啥玩意
String[] beanNames = context.getBeanNamesForType(User.class);
Arrays.stream(beanNames).forEach(System.out::println);
}
}
|
启动项目,观察控制台输出:

使用@ComponentScan扫描
在使用XML配置组件扫描的时候,我们都是这样配置的:
1 | <context:component-scan base-package=""></context:component-scan> |
其中base-package指定了扫描的路径。路径下所有被@Controller、@Service、@Repository和@Component注解标注的类都会被纳入IOC容器中。
现在我们脱离XML配置后,可以使用@ComponentScan注解来扫描组件并注册。
在使用@ComponentScan扫描之前,我们先创建一个Controller,一个Service,一个Dao,并标注上相应的注解。
然后修改配置类:
1 2 3 4 5 6 7 8 9 | @Configuration
@ComponentScan("cc.mrbird.demo")
public class WebConfig {
// @Bean("myUser")
// public User user() {
// return new User("mrbird", 18);
// }
}
|
在配置类中,我们通过@ComponentScan("cc.mrbird.demo")配置了扫描路径,并且将User组件注册注释掉了,取而代之的是在User类上加上@Component注解:
1 2 3 4 5 6 7 8 9 | @ToString
@AllArgsConstructor
@NoArgsConstructor
@Data
@Component
public class User {
private String name;
private Integer age;
}
|
值得注意的是,我们不能将Spring Boot的入口类纳入扫描范围中,否则项目启动将出错。
接下来我们看下在基于注解的IOC容器中是否包含了这些组件:
1 2 3 4 5 6 7 8 9 10 11 | @SpringBootApplication
public class DemoApplication {
public static void main(String[] args) {
SpringApplication.run(DemoApplication.class, args);
ApplicationContext context = new AnnotationConfigApplicationContext(WebConfig.class);
// 查看基于注解的 IOC容器中所有组件名称
String[] beanNames = context.getBeanDefinitionNames();
Arrays.stream(beanNames).forEach(System.out::println);
}
}
|
启动项目,观察控制台:

可见,组件已经成功被扫描进去了,并且名称默认为类名首字母小写。
这里,配置类WebConfig也被扫描并注册了,查看@Configuration源码就会发现原因:
1 2 3 4 5 6 7 | @Target(ElementType.TYPE)
@Retention(RetentionPolicy.RUNTIME)
@Documented
@Component
public @interface Configuration {
String value() default "";
}
|
指定扫描策略
@ComponentScan注解允许我们指定扫描策略,即指定哪些被扫描,哪些不被扫描,查看其源码可发现这两个属性:
1 2 3 4 5 6 7 8 9 10 11 12 13 14 15 16 17 | /**
* Specifies which types are eligible for component scanning.
* <p>Further narrows the set of candidate components from everything in {@link #basePackages}
* to everything in the base packages that matches the given filter or filters.
* <p>Note that these filters will be applied in addition to the default filters, if specified.
* Any type under the specified base packages which matches a given filter will be included,
* even if it does not match the default filters (i.e. is not annotated with {@code @Component}).
* @see #resourcePattern()
* @see #useDefaultFilters()
*/
Filter[] includeFilters() default {};
/**
* Specifies which types are not eligible for component scanning.
* @see #resourcePattern
*/
Filter[] excludeFilters() default {};
|
其中Filter也是一个注解:
1 2 3 4 5 6 7 8 9 10 11 12 13 14 15 16 17 | /**
* Declares the type filter to be used as an {@linkplain ComponentScan#includeFilters
* include filter} or {@linkplain ComponentScan#excludeFilters exclude filter}.
*/
@Retention(RetentionPolicy.RUNTIME)
@Target({})
@interface Filter {
FilterType type() default FilterType.ANNOTATION;
@AliasFor("classes")
Class<?>[] value() default {};
@AliasFor("value")
Class<?>[] classes() default {};
String[] pattern() default {};
}
|
接下来我们使用excludeFilters来排除一些组件的扫描:
1 2 3 4 5 6 7 8 9 10 | @Configuration
@ComponentScan(value = "cc.mrbird.demo",
excludeFilters = {
@Filter(type = FilterType.ANNOTATION,
classes = {Controller.class, Repository.class}),
@Filter(type = FilterType.ASSIGNABLE_TYPE, classes = User.class)
})
public class WebConfig {
}
|
上面我们指定了两种排除扫描的规则:
-
根据注解来排除(
type = FilterType.ANNOTATION),这些注解的类型为classes = {Controller.class, Repository.class}。即Controller和Repository注解标注的类不再被纳入到IOC容器中。 -
根据指定类型类排除(
type = FilterType.ASSIGNABLE_TYPE),排除类型为User.class,其子类,实现类都会被排除。
启动项目,观察控制台:

可见排除成功。
除了上面两种常用的规则外,我们还可以使用别的规则,查看FilterType源码:
1 2 3 4 5 6 7 8 9 10 11 12 13 14 15 16 17 18 19 20 21 22 23 24 25 26 27 28 29 30 31 32 33 34 35 | public enum FilterType {
/**
* Filter candidates marked with a given annotation.
*
* @see org.springframework.core.type.filter.AnnotationTypeFilter
*/
ANNOTATION,
/**
* Filter candidates assignable to a given type.
*
* @see org.springframework.core.type.filter.AssignableTypeFilter
*/
ASSIGNABLE_TYPE,
/**
* Filter candidates matching a given AspectJ type pattern expression.
*
* @see org.springframework.core.type.filter.AspectJTypeFilter
*/
ASPECTJ,
/**
* Filter candidates matching a given regex pattern.
*
* @see org.springframework.core.type.filter.RegexPatternTypeFilter
*/
REGEX,
/**
* Filter candidates using a given custom
* {@link org.springframework.core.type.filter.TypeFilter} implementation.
*/
CUSTOM
}
|
可看到,我们还可以通过ASPECTJ表达式,REGEX正则表达式和CUSTOM自定义规则(下面详细介绍)来指定扫描策略。
includeFilters的作用和excludeFilters相反,其指定的是哪些组件需要被扫描:
1 2 3 4 5 6 7 8 | @Configuration
@ComponentScan(value = "cc.mrbird.demo",
includeFilters = {
@Filter(type = FilterType.ANNOTATION, classes = Service.class)
}, useDefaultFilters = false)
public class WebConfig {
}
|
上面配置了只将Service纳入IOC容器,并且需要用useDefaultFilters = false来关闭Spring默认的扫描策略才能让我们的配置生效(Spring Boot入口类的@SpringBootApplication注解包含了一些默认的扫描策略)。
启动项目,观察控制台:

可看到,IOC容器中将不再包含dao,controller。
多扫描策略配置
在Java 8之前,我们可以使用@ComponentScans来配置多个@ComponentScan以实现多扫描规则配置:

而在Java 8中,新增了@Repeatable注解,使用该注解修饰的注解可以重复使用,查看@ComponentScan源码会发现其已经被该注解标注:
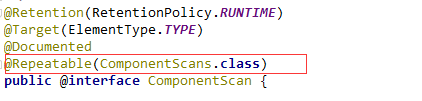
所以除了使用@ComponentScans来配置多扫描规则外,我们还可以通过多次使用@ComponentScan来指定多个不同的扫描规则。
自定义扫描策略
自定义扫描策略需要我们实现org.springframework.core.type.filter.TypeFilter接口,创建MyTypeFilter实现该接口:
1 2 3 4 5 6 | public class MyTypeFilter implements TypeFilter {
@Override
public boolean match(MetadataReader metadataReader, MetadataReaderFactory metadataReaderFactory) throws IOException {
return false;
}
}
|
该接口包含match方法,其两个入参MetadataReader和MetadataReaderFactory含义如下:
-
MetadataReader:当前正在扫描的类的信息; -
MetadataReaderFactory:可以通过它来获取其他类的信息。
当match方法返回true时说明匹配成功,false则说明匹配失败。继续完善这个过滤规则:
1 2 3 4 5 6 7 8 9 10 11 12 13 14 | public class MyTypeFilter implements TypeFilter {
@Override
public boolean match(MetadataReader metadataReader, MetadataReaderFactory metadataReaderFactory) {
// 获取当前正在扫描的类的注解信息
AnnotationMetadata annotationMetadata = metadataReader.getAnnotationMetadata();
// 获取当前正在扫描的类的类信息
ClassMetadata classMetadata = metadataReader.getClassMetadata();
// 获取当前正在扫描的类的路径等信息
Resource resource = metadataReader.getResource();
String className = classMetadata.getClassName();
return StringUtils.hasText("er");
}
}
|
上面指定了当被扫描的类名包含er时候,匹配成功,配合excludeFilters使用意指当被扫描的类名包含er时,该类不被纳入IOC容器中。
我们在@ComponentScan中使用这个自定义的过滤策略:
1 2 3 4 5 6 7 | @Configuration
@ComponentScan(value = "cc.mrbird.demo",
excludeFilters = {
@Filter(type = FilterType.CUSTOM, classes = MyTypeFilter.class)
})
public class WebConfig {
}
|
启动项目,观察输出:

因为User,UserMapper,UserService和UserController等类的类名都包含er,所以它们都没有被纳入到IOC容器中。
组件作用域@Scope
默认情况下,在Spring的IOC容器中每个组件都是单例的,即无论在任何地方注入多少次,这些对象都是同一个,我们来看下例子。
首先将User对象中的@Component注解去除,然后在配置类中配置User Bean:
1 2 3 4 5 6 7 | @Configuration
public class WebConfig {
@Bean
public User user() {
return new User("mrbird", 18);
}
}
|
接着多次从IOC容器中获取这个组件,看看是否为同一个:
1 2 3 4 5 | // 返回 IOC 容器,使用注解配置,传入配置类
ApplicationContext context = new AnnotationConfigApplicationContext(WebConfig.class);
Object user1 = context.getBean("user");
Object user2 = context.getBean("user");
System.out.println(user1 == user2);
|
启动项目,观察控制台输出:

结果证实了上面的观点。
在Spring中我们可以使用@Scope注解来改变组件的作用域:
-
singleton:单实例(默认),在Spring IOC容器启动的时候会调用方法创建对象然后纳入到IOC容器中,以后每次获取都是直接从IOC容器中获取(map.get()); -
prototype:多实例,IOC容器启动的时候并不会去创建对象,而是在每次获取的时候才会去调用方法创建对象; -
request:一个请求对应一个实例; -
session:同一个session对应一个实例。
懒加载@Lazy
懒加载是针对单例模式而言的,正如前面所说,IOC容器中的组件默认是单例的,容器启动的时候会调用方法创建对象然后纳入到IOC容器中。
在User Bean注册的地方加入一句话以观察:
1 2 3 4 5 6 7 8 | @Configuration
public class WebConfig {
@Bean
public User user() {
System.out.println("往IOC容器中注册user bean");
return new User("mrbird", 18);
}
}
|
测试:
1 2 | ApplicationContext context = new AnnotationConfigApplicationContext(WebConfig.class);
System.out.println("容器创建完毕");
|
启动项目观察控制台输出:

可以看到,在IOC容器创建完毕之前,组件已经添加到容器中了。
将User Bean改为懒加载的方式:
1 2 3 4 5 6 7 8 9 | @Configuration
public class WebConfig {
@Bean
@Lazy
public User user() {
System.out.println("往IOC容器中注册user bean");
return new User("mrbird", 18);
}
}
|
再次启动项目,观察输出:

可看到,容器创建完的时候,User Bean这个组件并未添加到容器中。
所以懒加载的功能是,在单例模式中,IOC容器创建的时候不会马上去调用方法创建对象并注册,只有当组件第一次被使用的时候才会调用方法创建对象并加入到容器中。
测试一下:
1 2 3 4 | ApplicationContext context = new AnnotationConfigApplicationContext(WebConfig.class);
System.out.println("容器创建完毕");
Object user1 = context.getBean("user");
Object user2 = context.getBean("user");
|
启动项目,观察输出:

结果证实了我们的观点。
条件注册组件
@Conditional
使用@Conditional注解我们可以指定组件注册的条件,即满足特定条件才将组件纳入到IOC容器中。
在使用该注解之前,我们需要创建一个类,实现Condition接口:
1 2 3 4 5 6 | public class MyCondition implements Condition {
@Override
public boolean matches(ConditionContext context, AnnotatedTypeMetadata metadata) {
return false;
}
}
|
该接口包含一个matches方法,包含两个入参:
-
ConditionContext:上下文信息; -
AnnotatedTypeMetadata:注解信息。
简单完善一下这个实现类:
1 2 3 4 5 6 7 | public class MyCondition implements Condition {
@Override
public boolean matches(ConditionContext context, AnnotatedTypeMetadata metadata) {
String osName = context.getEnvironment().getProperty("os.name");
return osName != null && osName.contains("Windows");
}
}
|
接着将这个条件添加到User Bean注册的地方:
1 2 3 4 5 | @Bean
@Conditional(MyCondition.class)
public User user() {
return new User("mrbird", 18);
}
|
在Windows环境下,User这个组件将被成功注册,如果是别的操作系统,这个组件将不会被注册到IOC容器中。
@Profile
@Profile可以根据不同的环境变量来注册不同的组件,下面我们来学一下它的用法。
新建一个接口CalculateService:
1 2 3 | public interface CalculateService {
Integer sum(Integer... value);
}
|
接着添加两个实现Java7CalculateServiceImpl和Java8CalculateServiceImpl:
1 2 3 4 5 6 7 8 9 10 11 12 13 | @Service
@Profile("java7")
public class Java7CalculateServiceImpl implements CalculateService {
@Override
public Integer sum(Integer... value) {
System.out.println("Java 7环境下执行");
int result = 0;
for (int i = 0; i <= value.length; i++) {
result += i;
}
return result;
}
}
|
1 2 3 4 5 6 7 8 9 | @Service
@Profile("java8")
public class Java8CalculateServiceImpl implements CalculateService {
@Override
public Integer sum(Integer... value) {
System.out.println("Java 8环境下执行");
return Arrays.stream(value).reduce(0, Integer::sum);
}
}
|
通过@Profile注解我们实现了:当环境变量包含java7的时候,Java7CalculateServiceImpl将会被注册到IOC容器中;当环境变量包含java8的时候,Java8CalculateServiceImpl将会被注册到IOC容器中。
测试一下:
1 2 3 4 5 6 7 | ConfigurableApplicationContext context1 = new SpringApplicationBuilder(DemoApplication.class)
.web(WebApplicationType.NONE)
.profiles("java8")
.run(args);
CalculateService service = context1.getBean(CalculateService.class);
System.out.println("求合结果: " + service.sum(1, 2, 3, 4, 5, 6, 7, 8, 9, 10));
|
启动项目,控制台输出如下:


如果将.profiles("java8")改为.profiles("java7")的话,控制台输出如下:


导入组件
@Import
到目前为止,我们可以使用包扫描和@Bean来实现组件注册。除此之外,我们还可以使用@Import来快速地往IOC容器中添加组件。
创建一个新的类Hello:
1 2 | public class Hello {
}
|
然后在配置类中导入这个组件:
1 2 3 4 5 | @Configuration
@Import({Hello.class})
public class WebConfig {
...
}
|
查看IOC容器中所有组件的名称:
1 2 3 | ApplicationContext context = new AnnotationConfigApplicationContext(WebConfig.class); String[] beanNames = context.getBeanDefinitionNames(); Arrays.stream(beanNames).forEach(System.out::println); |
启动项目,控制台输出:
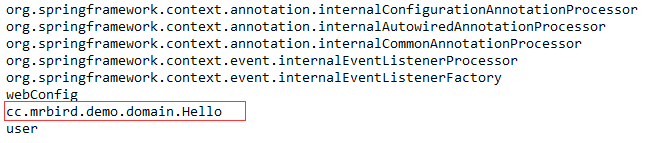
可看到,通过@Import我们可以快速地往IOC容器中添加组件,Id默认为全类名。
ImportSelector
通过@Import我们已经实现了组件的导入,如果需要一次性导入较多组件,我们可以使用ImportSelector来实现。
新增三个类Apple,Banana和Watermelon,代码略。
查看ImportSelector源码:
1 2 3 4 5 6 7 8 | public interface ImportSelector {
/**
* Select and return the names of which class(es) should be imported based on
* the {@link AnnotationMetadata} of the importing @{@link Configuration} class.
*/
String[] selectImports(AnnotationMetadata importingClassMetadata);
}
|
ImportSelector是一个接口,包含一个selectImports方法,方法返回类的全类名数组(即需要导入到IOC容器中组件的全类名数组),包含一个AnnotationMetadata类型入参,通过这个参数我们可以获取到使用ImportSelector的类的全部注解信息。
我们新建一个ImportSelector实现类MyImportSelector:
1 2 3 4 5 6 7 8 9 10 | public class MyImportSelector implements ImportSelector {
@Override
public String[] selectImports(AnnotationMetadata importingClassMetadata) {
return new String[]{
"cc.mrbird.demo.domain.Apple",
"cc.mrbird.demo.domain.Banana",
"cc.mrbird.demo.domain.Watermelon"
};
}
}
|
上面方法返回了新增的三个类的全类名数组,接着我们在配置类的@Import注解上使用MyImportSelector来把这三个组件快速地导入到IOC容器中:
1 2 3 4 | @Import({MyImportSelector.class})
public class WebConfig {
...
}
|
查看容器中是否已经有这三个组件:
1 2 3 | ApplicationContext context = new AnnotationConfigApplicationContext(WebConfig.class); String[] beanNames = context.getBeanDefinitionNames(); Arrays.stream(beanNames).forEach(System.out::println); |
启动项目,观察控制台:

组件已经成功导入。
ImportBeanDefinitionRegistrar
除了上面两种往IOC容器导入组件的方法外,我们还可以使用ImportBeanDefinitionRegistrar来手动往IOC容器导入组件。
查看其源码:
1 2 3 | public interface ImportBeanDefinitionRegistrar {
public void registerBeanDefinitions(AnnotationMetadata importingClassMetadata, BeanDefinitionRegistry registry);
}
|
ImportBeanDefinitionRegistrar是一个接口,包含一个registerBeanDefinitions方法,该方法包含两个入参:
-
AnnotationMetadata:可以通过它获取到类的注解信息; -
BeanDefinitionRegistry:Bean定义注册器,包含了一些和Bean有关的方法:1 2 3 4 5 6 7 8 9 10 11 12 13 14 15
public interface BeanDefinitionRegistry extends AliasRegistry { void registerBeanDefinition(String var1, BeanDefinition var2) throws BeanDefinitionStoreException; void removeBeanDefinition(String var1) throws NoSuchBeanDefinitionException; BeanDefinition getBeanDefinition(String var1) throws NoSuchBeanDefinitionException; boolean containsBeanDefinition(String var1); String[] getBeanDefinitionNames(); int getBeanDefinitionCount(); boolean isBeanNameInUse(String var1); }
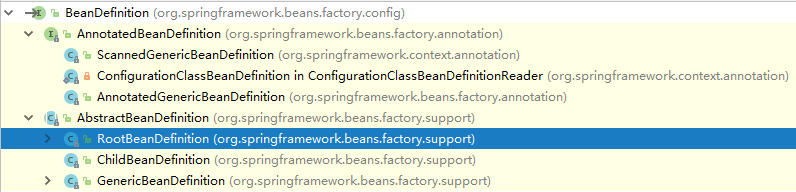
这里我们需要借助BeanDefinitionRegistry的registerBeanDefinition方法来往IOC容器中注册Bean。该方法包含两个入参,第一个为需要注册的Bean名称(Id),第二个参数为Bean的定义信息,它是一个接口,我们可以使用其实现类RootBeanDefinition来完成:
为了演示ImportBeanDefinitionRegistrar的使用,我们先新增一个类,名称为Strawberry,代码略。
然后新增一个ImportBeanDefinitionRegistrar实现类MyImportBeanDefinitionRegistrar:
1 2 3 4 5 6 7 8 9 10 11 | public class MyImportBeanDefinitionRegistrar implements ImportBeanDefinitionRegistrar {
@Override
public void registerBeanDefinitions(AnnotationMetadata importingClassMetadata, BeanDefinitionRegistry registry) {
final String beanName = "strawberry";
boolean contain = registry.containsBeanDefinition(beanName);
if (!contain) {
RootBeanDefinition rootBeanDefinition = new RootBeanDefinition(Strawberry.class);
registry.registerBeanDefinition(beanName, rootBeanDefinition);
}
}
}
|
在上面的实现类中,我们先通过BeanDefinitionRegistry的containsBeanDefinition方法判断IOC容器中是否包含了名称为strawberry的组件,如果没有,则手动通过BeanDefinitionRegistry的registerBeanDefinition方法注册一个。
定义好MyImportBeanDefinitionRegistrar后,我们同样地在配置类的@Import中使用它:
1 2 3 4 5 | @Configuration
@Import({MyImportBeanDefinitionRegistrar.class})
public class WebConfig {
...
}
|
查看容器中是否已经有这个组件:
1 2 3 | ApplicationContext context = new AnnotationConfigApplicationContext(WebConfig.class); String[] beanNames = context.getBeanDefinitionNames(); Arrays.stream(beanNames).forEach(System.out::println); |
启动项目,观察控制台:
组件已经注册成功。
使用FactoryBean注册组件
Spring还提供了一个FactoryBean接口,我们可以通过实现该接口来注册组件,该接口包含了两个抽象方法和一个默认方法:

为了演示FactoryBean的使用,我们新增一个Cherry类,代码略。
然后创建FactoryBean的实现类CherryFactoryBean:
1 2 3 4 5 6 7 8 9 10 11 12 13 14 15 16 | public class CherryFactoryBean implements FactoryBean<Cherry> {
@Override
public Cherry getObject() {
return new Cherry();
}
@Override
public Class<?> getObjectType() {
return Cherry.class;
}
@Override
public boolean isSingleton() {
return false;
}
}
|
getObject返回需要注册的组件对象,getObjectType返回需要注册的组件类型,isSingleton指明该组件是否为单例。如果为多例的话,每次从容器中获取该组件都会调用其getObject方法。
定义好CherryFactoryBean后,我们在配置类中注册这个类:
1 2 3 4 | @Bean
public CherryFactoryBean cherryFactoryBean() {
return new CherryFactoryBean();
}
|
测试从容器中获取:
1 2 3 | ApplicationContext context = new AnnotationConfigApplicationContext(WebConfig.class);
Object cherry = context.getBean("cherryFactoryBean");
System.out.println(cherry.getClass());
|
启动项目,观察控制台输出:

可看到,虽然我们获取的是Id为cherryFactoryBean的组件,但其获取到的实际是getObject方法里返回的对象。
如果我们要获取cherryFactoryBean本身,则可以这样做:
1 2 | Object cherryFactoryBean = context.getBean("&cherryFactoryBean");
System.out.println(cherryFactoryBean.getClass());
|
启动项目,观察控制台:

为什么加上&前缀就可以获取到相应的工厂类了呢,查看BeanFactory的源码会发现原因:

源码链接:https://github.com/wuyouzhuguli/SpringAll/tree/master/50.Spring-Regist-Bean


 930
930


 被折叠的 条评论
为什么被折叠?
被折叠的 条评论
为什么被折叠?
 到【灌水乐园】发言


