


有请下面五位神秘大哥登场-----
自动执行代码
1 static代码块
static静态代码块,在类加载的时候即自动执行。
2 构造方法
在对象初始化时执行。执行顺序在static静态代码块之后。
3 Spring启动时加载方式
@PostConstruct注解
PostConstruct注解使用在方法上,这个方法在对象依赖注入初始化之后执行。
4 ApplicationRunner
5 CommandLineRunner
SpringBoot提供了两个接口来实现Spring容器启动完成后执行的功能,两个接口分别为CommandLineRunner和ApplicationRunner。
这两个接口需要实现一个run方法,将代码在run中实现即可。这两个接口功能基本一致,其区别在于run方法的入参。ApplicationRunner的run方法入参为ApplicationArguments,为CommandLineRunner的run方法入参为String数组。
Order注解
当有多个类实现了CommandLineRunner和ApplicationRunner接口时,可以通过在类上添加@Order注解来设定运行顺序。
测试:
TestPostConstruct
@Component
public class TestPostConstruct {

    static {
        System.out.println("static");
    }
    public TestPostConstruct() {
        System.out.println("constructer");
    }

    @PostConstruct
    public void init() {
        System.out.println("PostConstruct");
    }
}
TestApplicationRunner
@Component
@Order(1)
public class TestApplicationRunner implements ApplicationRunner{
    @Override
    public void run(ApplicationArguments applicationArguments) throws Exception {
        System.out.println("order1:TestApplicationRunner");
    }
}
TestCommandLineRunner
@Component
@Order(2)
public class TestCommandLineRunner implements CommandLineRunner {
    @Override
    public void run(String... strings) throws Exception {
        System.out.println("order2:TestCommandLineRunner");
    }
}
执行结果:
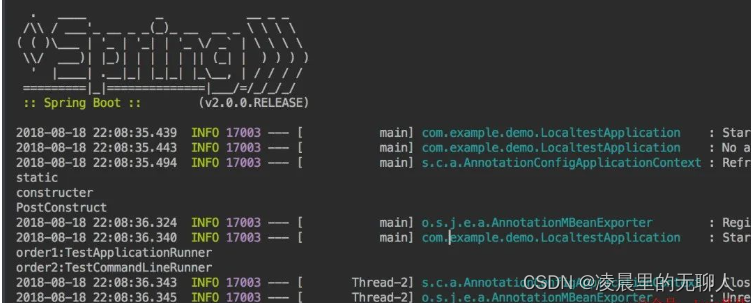 总结
总结
Spring应用启动过程中,肯定是要自动扫描有@Component注解的类,加载类并初始化对象进行自动注入。加载类时首先要执行static静态代码块中的代码,之后再初始化对象时会执行构造方法。
在对象注入完成后,调用带有@PostConstruct注解的方法。当容器启动成功后,再根据@Order注解的顺序调用CommandLineRunner和ApplicationRunner接口类中的run方法。
因此,加载顺序为static>constructer>@PostConstruct>CommandLineRunner和ApplicationRunner.
> 提高springboot的吞吐量
1 异步执行:
JDK 8本身有一个非常好用的Future类——CompletableFuture
@AllArgsConstructor
public class AskThread implements Runnable{
    private CompletableFuture<Integer> re = null;

    public void run() {
        int myRe = 0;
        try {
            myRe = re.get() * re.get();
        } catch (Exception e) {
            e.printStackTrace();
        }
        System.out.println(myRe);
    }

    public static void main(String[] args) throws InterruptedException {
        final CompletableFuture<Integer> future = new CompletableFuture<>();
        new Thread(new AskThread(future)).start();
        //模拟长时间的计算过程
        Thread.sleep(1000);
        //告知完成结果
        future.complete(60);
    }
}
在该示例中,启动一个线程,此时AskThread对象还没有拿到它需要的数据,执行到 myRe = re.get() * re.get()会阻塞。我们用休眠1秒来模拟一个长时间的计算过程,并将计算结果告诉future执行结果,AskThread线程将会继续执行。
异步调用使用Callable来实现
@RestController
public class HelloController {

    private static final Logger logger = LoggerFactory.getLogger(HelloController.class);

    @Autowired
    private HelloService hello;

    @GetMapping("/helloworld")
    public String helloWorldController() {
        return hello.sayHello();
    }

    /**
     * 异步调用restful
     * 当controller返回值是Callable的时候,springmvc就会启动一个线程将Callable交给TaskExecutor去处理
     * 然后DispatcherServlet还有所有的spring拦截器都退出主线程,然后把response保持打开的状态
     * 当Callable执行结束之后,springmvc就会重新启动分配一个request请求,然后DispatcherServlet就重新
     * 调用和处理Callable异步执行的返回结果, 然后返回视图
     *
     * @return
     */
    @GetMapping("/hello")
    public Callable<String> helloController() {
        logger.info(Thread.currentThread().getName() + " 进入helloController方法");
        Callable<String> callable = new Callable<String>() {

            @Override
            public String call() throws Exception {
                logger.info(Thread.currentThread().getName() + " 进入call方法");
                String say = hello.sayHello();
                logger.info(Thread.currentThread().getName() + " 从helloService方法返回");
                return say;
            }
        };
        logger.info(Thread.currentThread().getName() + " 从helloController方法返回");
        return callable;
    }
}
2增加内嵌Tomcat的最大连接数
@Configuration
public class TomcatConfig {
    @Bean
    public ConfigurableServletWebServerFactory webServerFactory() {
        TomcatServletWebServerFactory tomcatFactory = new TomcatServletWebServerFactory();
        tomcatFactory.addConnectorCustomizers(new MyTomcatConnectorCustomizer());
        tomcatFactory.setPort(8005);
        tomcatFactory.setContextPath("/api-g");
        return tomcatFactory;
    }
    class MyTomcatConnectorCustomizer implements TomcatConnectorCustomizer {
        public void customize(Connector connector) {
            Http11NioProtocol protocol = (Http11NioProtocol) connector.getProtocolHandler();
            //设置最大连接数
            protocol.setMaxConnections(20000);
            //设置最大线程数
            protocol.setMaxThreads(2000);
            protocol.setConnectionTimeout(30000);
        }
    }

}
3 使用@ComponentScan()定位扫包比@SpringBootApplication扫包更快
4默认tomcat容器改为Undertow(Jboss下的服务器,Tomcat吞吐量5000,Undertow吞吐量8000)
<exclusions>
  <exclusion>
     <groupId>org.springframework.boot</groupId>
     <artifactId>spring-boot-starter-tomcat</artifactId>
  </exclusion>
</exclusions>
改为:
<dependency>
  <groupId>org.springframework.boot</groupId>
  <artifactId>spring-boot-starter-undertow</artifactId>
</dependency>
本文参考:
https://mp.weixin.qq.com/s?__biz=MzIxMjU5NjEwMA==&mid=2247514747&idx=1&sn=84831c8be4b0611fde12eb641d804693&chksm=97415e90a036d786186a4426c47b99e1d2609b6585c688b17e25163bd9bc836cbfaf0b5900aa&mpshare=1&scene=23&srcid=0726Dnnok4dDWotqgDrRpN8E&sharer_sharetime=1658791921737&sharer_shareid=5e1f720976235b1e81fd0d6731dbec3a#rd
https://mp.weixin.qq.com/s?__biz=MzI5NDUwMzQzNQ==&mid=2247497321&idx=1&sn=e59647816bf659856ff32686344df504&chksm=ec63630ddb14ea1b63c5b9c1dabb8c9fd267d3cac3066253fbbecaff09a8fcd47b3e3ceef1f3&mpshare=1&scene=23&srcid=0712CXC7wjnFCpF0DvXynKMP&sharer_sharetime=1658711445362&sharer_shareid=5e1f720976235b1e81fd0d6731dbec3a#rd


 1111
1111


 被折叠的 条评论
为什么被折叠?
被折叠的 条评论
为什么被折叠?
 到【灌水乐园】发言


