


 本文深入讲解Java NIO的概念、工作原理及应用场景,并通过实例演示如何使用Buffer和Channel进行高效的数据读写操作。
2 NIO
2.1 NIO概念
Java NIO(全称java non-blockingIO): 同步非阻塞,服务器实现模式为一个线程处理多个请求(连接),即客户端发送的连接请求都会注册到多路复用器上,多路复用器轮询到连接有I/O请求就进行处理。
NIO和BIO的作用和目的相同,但是实现方式不同。BIO以流的方式处理数据,而NIO以块的方式处理数据,因此效率要高很多。
NIO是在Java 1.4开始引入了NIO框架(java.nio包) ,java提供了一系列改进的输入输出的新特性,这些统称NIO,也有人成为New IO.
NIO提供了Channel、Selector、 Buffer等新的抽象 ,可以构建多路复用IO程序,同时提供更接近操作系统底层的高性能数据操作方式。传统BIO基于字节流和字符流进行操作,而NIO基于Channe(通道)和Buffer(缓冲区)进行操作,数据总是从通道读取到缓冲区,或者从缓冲区写入到通道中。Selector用于监听多个通道的事件,因此使用单个线程就可以监听多个数据通道。
2.2 工作原理
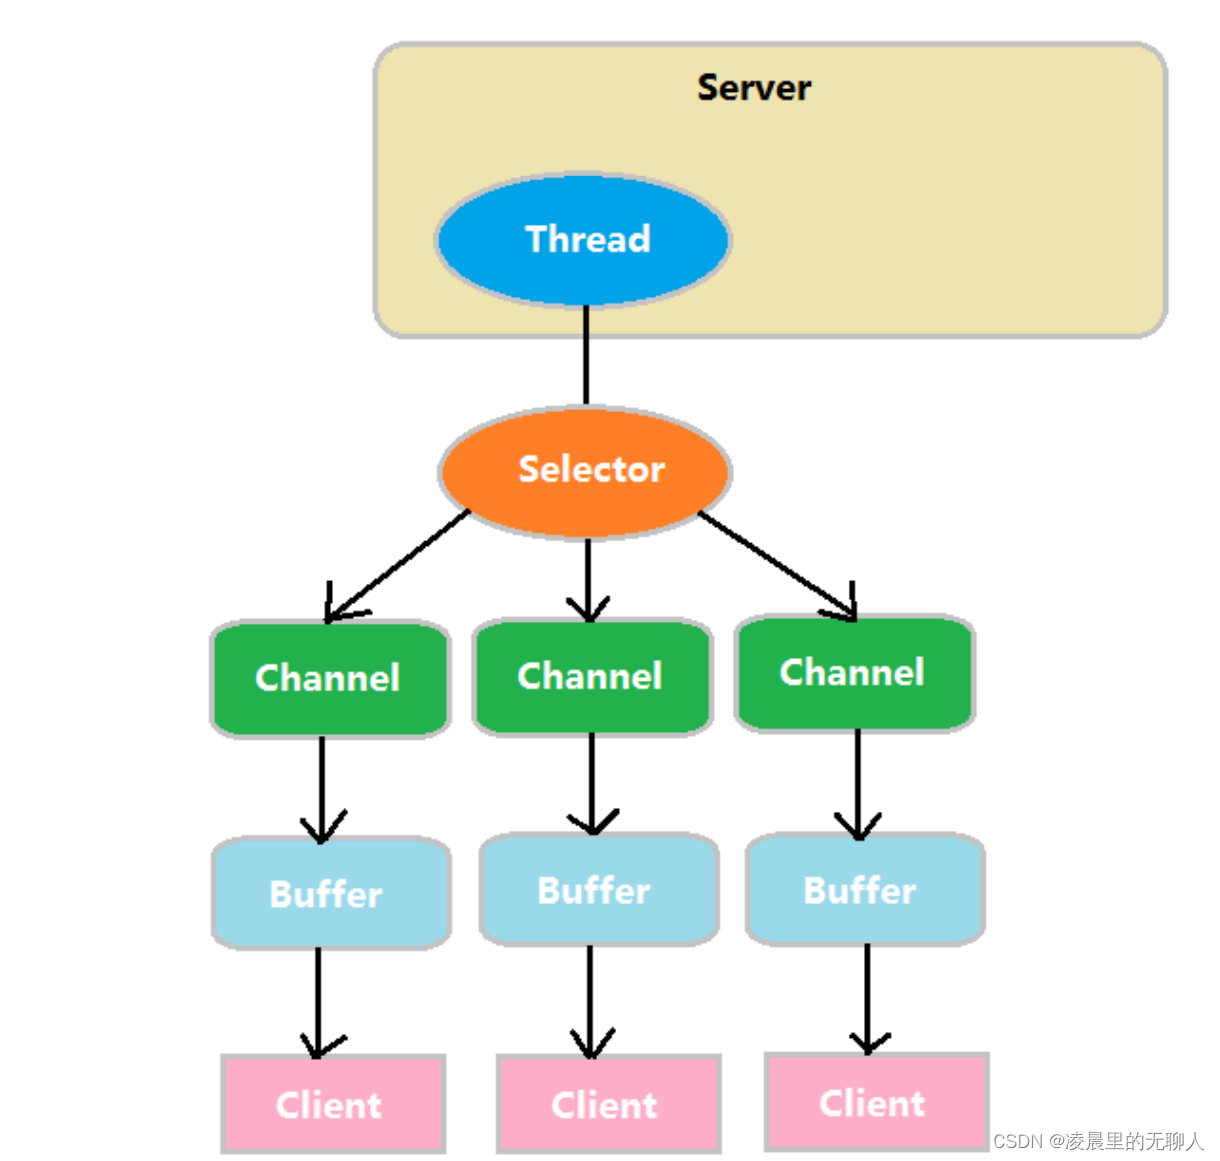
1、一个线程一个selector,一个线程对应多个channel(连接),每个Channel对应一个Buffer。
2、多个channel可以注册到一个selector,事件决定selector切换到哪一个channel。
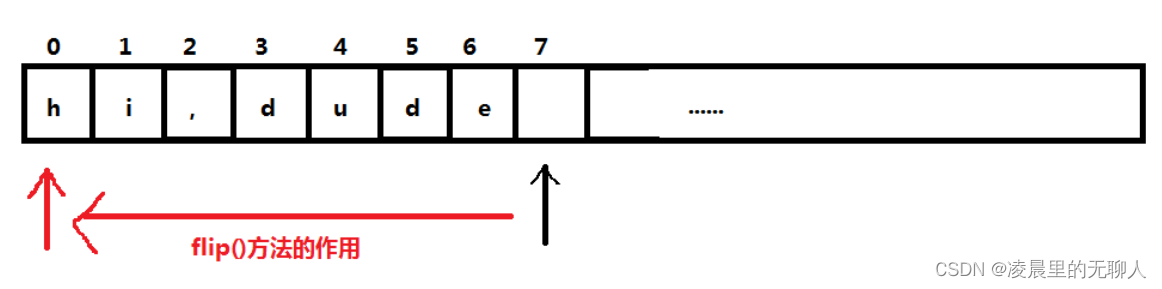
3、数据的读写通过Buffer,BIO中的流是单向的,要么输入流要么输出流,NIO的Buffer是可双向读写,通过flip方法切换即可。
4、channel也是双向的,可以返回底层操作系统的情况,例如Linux,底层的操作系统通道就是双向的。
2.3 使用场景
NIO方式适用于连接数目多且连接比较短(轻操作)的架构,比如聊天服务器。
2.3.1 NIO核心— 缓冲区 Buffe
概念
缓冲区(Buffer) :缓冲区本质上是一块可以写入数据,然后可以从中读取数据的内存,这块内存被包装成NIO Buffer对象,可以理解成是一个容器,是一个特殊的数组,该对象提供了一组方法,用来方便的访问该块内存。

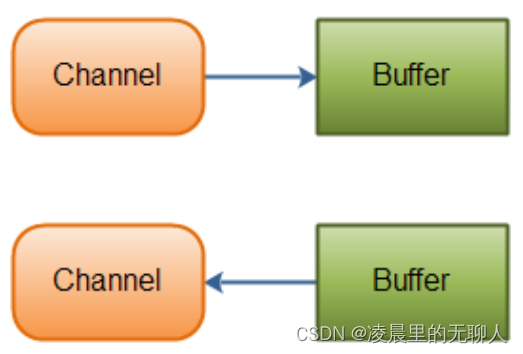
Channel提供从文件或网络读取数据的渠道,但是读取或者写入的数据都是经过Buffer。
2.3.2 Buffer类及其子类
在NIO中,Buffer是一个顶级父类,也是一个抽象类,有很多的子类。

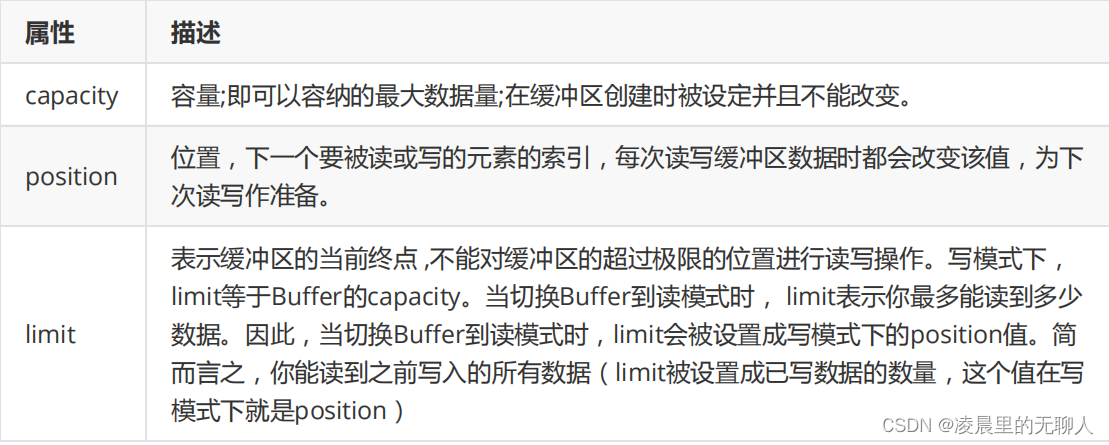
2.3.3 Buffer中的属性

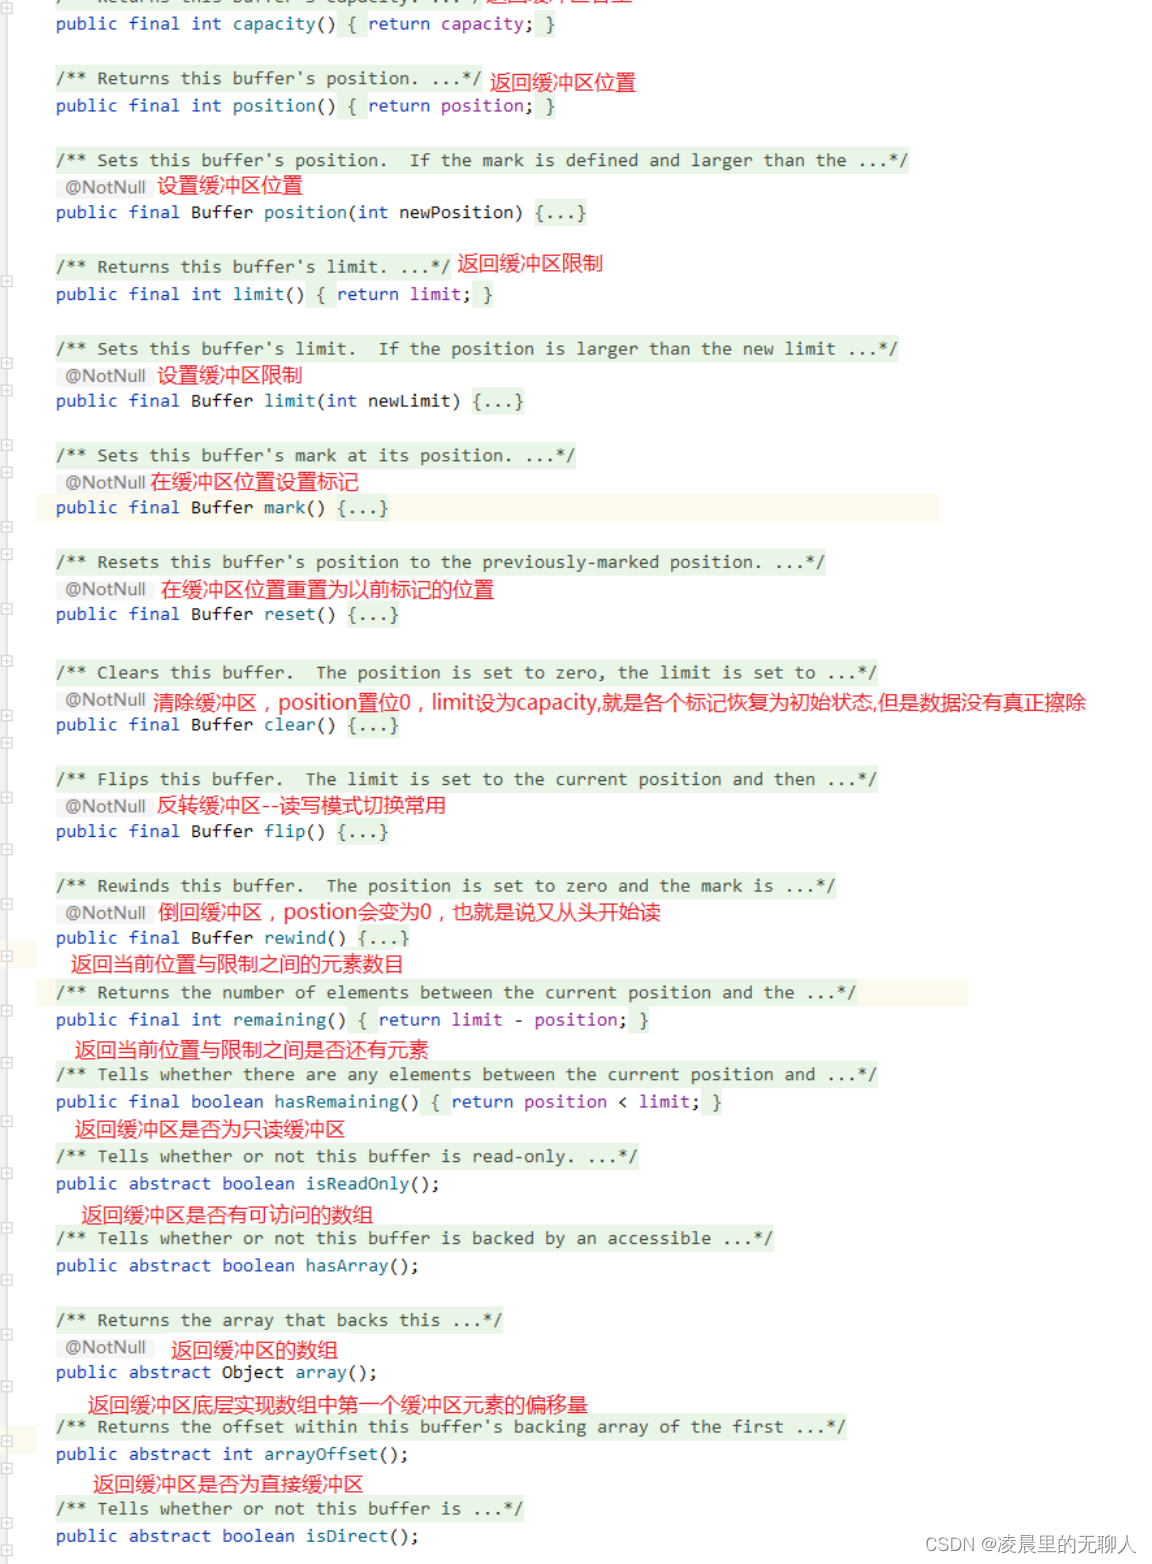
2.3.4 Buffer中的方法
2.3.5 Buffer的基本用法
使用Buffer读写数据一般遵循以下四个步骤:
1、创建缓冲区,写入数据到Buffer
2、调flip()方法将缓冲区改成读取模式
3、从Buffer中读取数据
4、调用clear()方法或者compact()方法
虽然java中的基本数据类型都有对应的Buffer类型与之对应(Boolean除外),但是使用频率最高的是ByteBuffer类。所以先介绍一下ByteBuffer中的常用方法。
ByteBuffer中常用方法
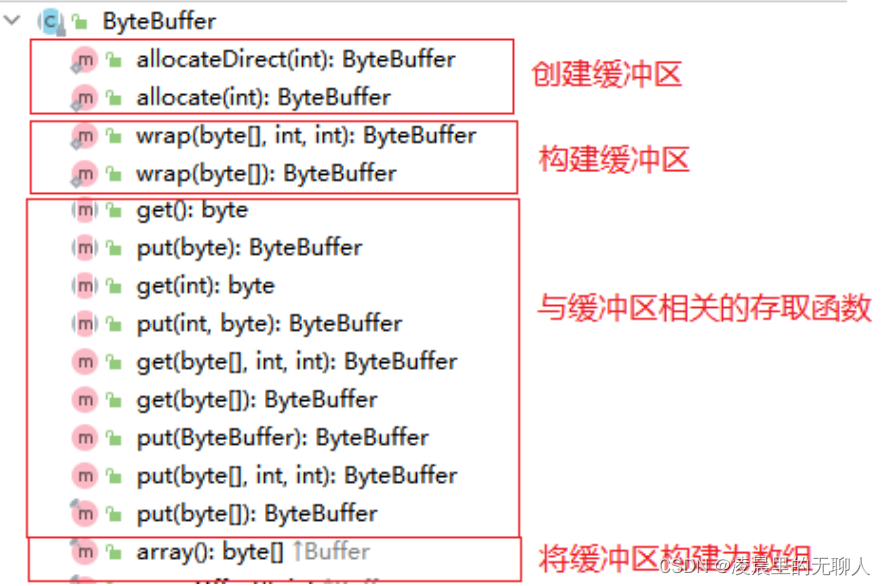
allocate(int):创建间接缓冲区:在堆中开辟,易于管理,垃圾回收器可以回收,空间有限,读写文件 速度较慢。 allocateDirect(int):创建直接缓冲区:不在堆中,物理内存中开辟空间,空间比较大,读写文件速度 快,缺点:不受垃圾回收器控制,创建和销毁耗性能。
2.4 案例
2.4.1 案例1:ByteBuffer的常用方法一
package testIO;
import java.nio.ByteBuffer;
/**
 * Buffer的基本用法
 */
public class BufferTest01 {
    public static void main(String[] args) {
// 1、创建缓冲区,写入数据到Buffer
        ByteBuffer buffer=ByteBuffer.allocate(1024);//创建指定容量的间接缓冲区

 ByteBuffer buffer1=ByteBuffer.allocateDirect(1024);//创建指定容量的直接缓冲区
//写入数据的方式1
//buffer.put("hi,dude".getBytes());
//写入数据的方式2
        buffer.put((byte) 'h');
        buffer.put((byte) 'i');
        buffer.put((byte) ',');
        buffer.put((byte) 'd');
        buffer.put((byte) 'u');
        buffer.put((byte) 'd');
        buffer.put((byte) 'e');
// 2、调flip()方法将缓冲区改成读取模式
        buffer.flip();
// 3、从Buffer中读取数据的
// 方式1:单个自己的读取
/*while(buffer.hasRemaining()) {
byte b = buffer.get();
System.out.println((char) b);
}*/
//读取数据的方式2:
        byte[] data=new byte[buffer.limit()];
        buffer.get(data);
        System.out.println(new String(data));
// 4、调用clear()方法或者compact()方法
        buffer.clear();
        buffer.compact();
    }
}
clear(): position将被置为0,limit被设置成capacity的值。可以理解为Buffer被清空了,但 是Buffer中的数据并未清除,只是这些标记告诉我们可以从哪里开始往Buffer里写数据。如果Buffer中 有一些未读的数据,调用clear()方法,未读数据将“被遗忘”,意味着不再有任何标记会告诉你哪些数据 被读过,哪些还没有.
compact(): 将所有未读的数据拷贝到Buffer起始处。然后将position设到最后一个未读元素正后 面。limit属性依然像clear()方法一样,设置成capacity。现在Buffer准备好写数据了,但是不会覆 盖未读的数据。
2.4.2 案例2:ByteBuffer的常用方法二
ByteBuffer 支持类型化的put和get, put放入的是什么数据类型,get取出来依然是什么类型, 否则可能出现BufferUnderflowException 异常。
        import java.nio.ByteBuffer;
public class BufferTest02 {
    public static void main(String[] args) {
//1、创建buffer
        ByteBuffer buffer=ByteBuffer.allocate(1024);
//2、写入数据:按照类型化方式
        buffer.putChar('K');
        buffer.putLong(1024L);
        buffer.putInt(512);
        buffer.putShort((short) 0);
//3、读写切换
        buffer.flip();
//4、读取数据
        System.out.println(buffer.getChar());
        System.out.println(buffer.getLong());
        System.out.println(buffer.getInt());
        System.out.println(buffer.getShort());
    }
}
2.4.3 案例3:一个普通Buffer转成只读Buffer .
import java.nio.ByteBuffer;
public class ReadOnlyBuffer {
    public static void main(String[] args) {
//创建一个Buffer
        ByteBuffer buffer=ByteBuffer.allocate(64);
//循环放入数据
        for (int i=0;i<buffer.capacity();i++){
            buffer.put((byte) i);
        }
//读写切换
        buffer.flip();
//得到一个只读的buffer
        ByteBuffer readOnlyBuffer = buffer.asReadOnlyBuffer();
        System.out.println("readOnlyBuffer类型:"+readOnlyBuffer.getClass());
//读取数据
        while(readOnlyBuffer.hasRemaining()){
            System.out.println(readOnlyBuffer.get());
        }
//写入数据会抛出异常--ReadOnlyBufferException
        readOnlyBuffer.put((byte) 66);
    }
}

2.5 NIO核心— 通道 Channel
2.5.1 Channel介绍
通道(Channel) :类似于BIO中的stream,例如FileInputStream对象,用来建立到目标(文件,网络套接字,硬件设备等)的一个连接,
但是也有区别:
既可以从通道中读取数据,又可以写数据到通道。但流的读写通常是单向的。
通道可以异步地读写。
通道中的数据总是要先读到一个Buffer,或者总是要从一个Buffer中写入。
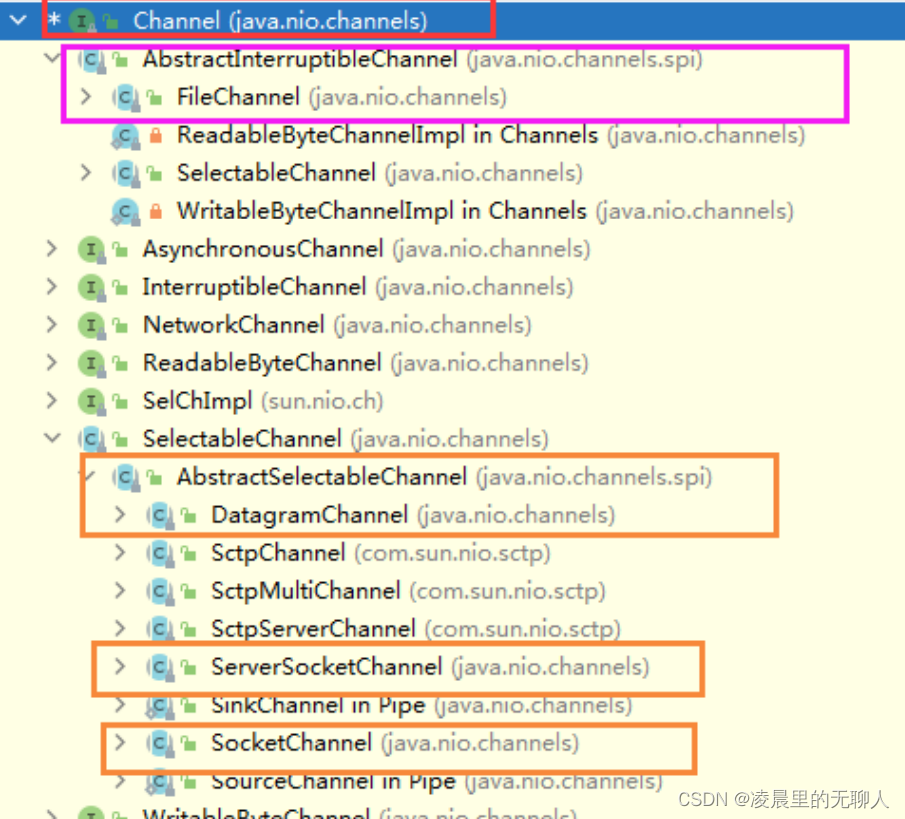
2.5.2 Channel的实现
常用的Channel类有: FileChannel、DatagramChannel、ServerSocketChannel 和SocketChannel.
FileChannel 从文件中读写数据。
DatagramChannel 能通过UDP读写网络中的数据。
SocketChannel 能通过TCP读写网络中的数据。
ServerSocketChannel可以监听新进来的TCP连接,像Web服务器那样。对每一个新进来的连接都会创建一个SocketChannel。
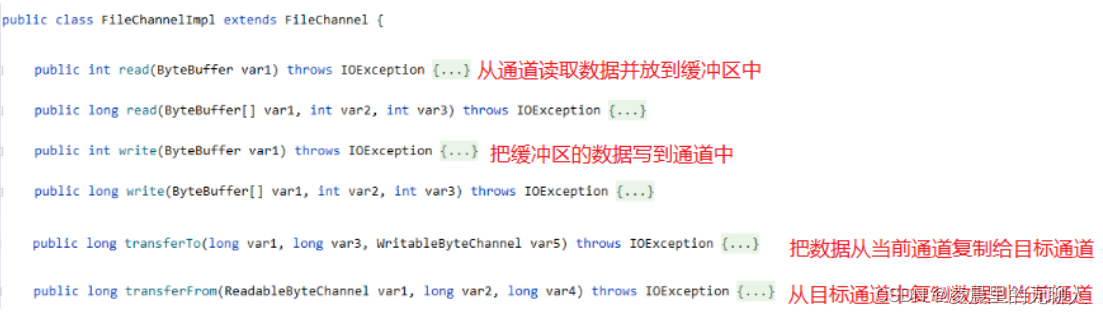
2.5.3 FileChannel
FileChannel主要用来对本地文件进行读写操作,但是FileChannel是一个抽象类,所以我们实际用的更多的是其子类FileChannelImpl,
常用的API
2.6 案例
2.6.1 写入数据到文件
import java.io.FileNotFoundException;
import java.io.FileOutputStream;
import java.io.IOException;
import java.nio.ByteBuffer;
import java.nio.channels.FileChannel;
/**
* 写出数据到本地文件中
* @Author wanglina
* @Version 1.0
*/
public class FileChannelTest01 {
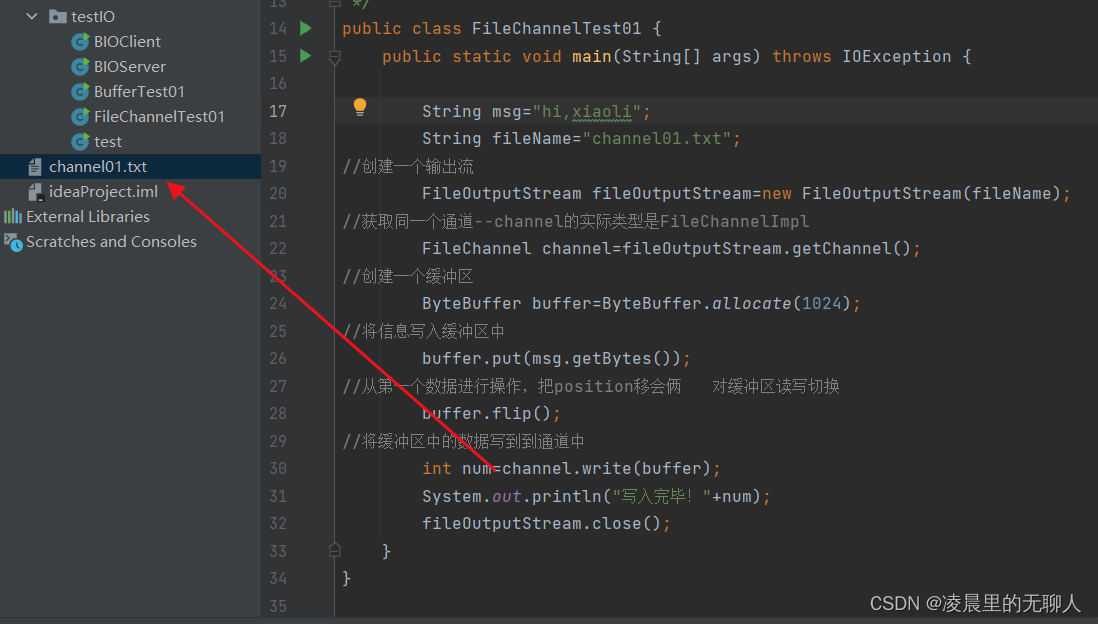
public static void main(String[] args) throws IOException {
String msg="hi,xiaoli";
String fileName="channel01.txt";
//创建一个输出流
FileOutputStream fileOutputStream=new FileOutputStream(fileName);
//获取同一个通道--channel的实际类型是FileChannelImpl
FileChannel channel=fileOutputStream.getChannel();
//创建一个缓冲区
ByteBuffer buffer=ByteBuffer.allocate(1024);
//将信息写入缓冲区中
buffer.put(msg.getBytes());
//从第一个数据进行操作,把position移会俩 对缓冲区读写切换
buffer.flip();
//将缓冲区中的数据写到到通道中
int num=channel.write(buffer);
System.out.println("写入完毕!"+num);
fileOutputStream.close();
}
}
2.6.2读取文件中的数据
import java.io.File;
import java.io.FileInputStream;
import java.io.FileNotFoundException;
import java.io.IOException;
import java.nio.ByteBuffer;
import java.nio.channels.FileChannel;

/**
 * 从本地文件中读取数据
 * @Author wanglina
 * @Version 1.0
 */
public class FileChannelTest02 {
    public static void main(String[] args) throws IOException {
        File file=new File("channel01.txt");
        //创建输入流
        FileInputStream fileInputStream=new FileInputStream(file);
//获取通道
        FileChannel channel = fileInputStream.getChannel();
//创建缓冲区
        ByteBuffer buffer=ByteBuffer.allocate((int) file.length());
//将通道中的数据读取buffer中
        channel.read(buffer);
//将buffer中的字节数组转换为字符串输出
        System.out.println(new String(buffer.array()));
        fileInputStream.close();
    }
}
2.6.3、文件的复制
方式1:非transferFrom方式
import java.io.*;
import java.nio.ByteBuffer;
import java.nio.channels.FileChannel;
/**
 * 实现文件的复制
 * @Author wanglina
 * @Version 1.0
 */
public class FileChannelTest03 {
    public static void main(String[] args) throws IOException {
//准备好要复制的源文件和目标文件
        File file=new File("channel01.txt");
        File fileCopy=new File("channelCopy01.txt");
//创建输入和输出流
        FileInputStream fileInputStream=new FileInputStream(file);
        FileOutputStream fileOutputStream=new FileOutputStream(fileCopy);
//获取两个通道
        FileChannel inChannel = fileInputStream.getChannel();
        FileChannel outChannel = fileOutputStream.getChannel();
//创建缓冲区
        ByteBuffer buffer=ByteBuffer.allocate(1024);
        int len=0;
        while(true){
//将标志位重置
            buffer.clear();
            len=inChannel.read(buffer);
            System.out.println("len="+len);
            if(len==-1){
                break;
            }
//读写切换
            buffer.flip();
//将buffer中的数据写入到了通道中
            outChannel.write(buffer);
        }
        System.out.println("复制完毕!OK!");
        inChannel.close();
        outChannel.close();
        fileInputStream.close();
        fileOutputStream.close();
    }
}
方式2:使用transferFrom方式拷贝
import java.io.*;
import java.nio.channels.FileChannel;
/**
 * 文件的复制--方式2 transferFrom
 * @Author wanglina
 * @Version 1.0
 */
public class FileChannelTest04 {
    public static void main(String[] args) throws IOException {
//要复制的文件和目标文件
        File file=new File("channel01.txt");
        File fileCopy=new File("channel02.txt");
//创建输入流和输出流
        FileInputStream fileInputStream=new FileInputStream(file);
        FileOutputStream fileOutputStream=new FileOutputStream(fileCopy);
//获取两个通道
        FileChannel inChannel=fileInputStream.getChannel();
        FileChannel outChannel=fileOutputStream.getChannel();
//使用transferFrom复制--两个方式适合大文件的复制
        outChannel.transferFrom(inChannel, 0,inChannel.size());
//使用transferTo复制---注意方向
//inChannel.transferTo(0, inChannel.size(),outChannel);
        System.out.println("复制完毕!OK");
        inChannel.close();
        outChannel.close();
        fileInputStream.close();
        fileOutputStream.close();
    }
}
这里说一下Byte 存储的最大容量差不多是几十MB
byte占用1个字节 可表示范围 -128-127 ,为什么有负数可以参考补码的知识。那么当
byte []bytes=new byte[1024];
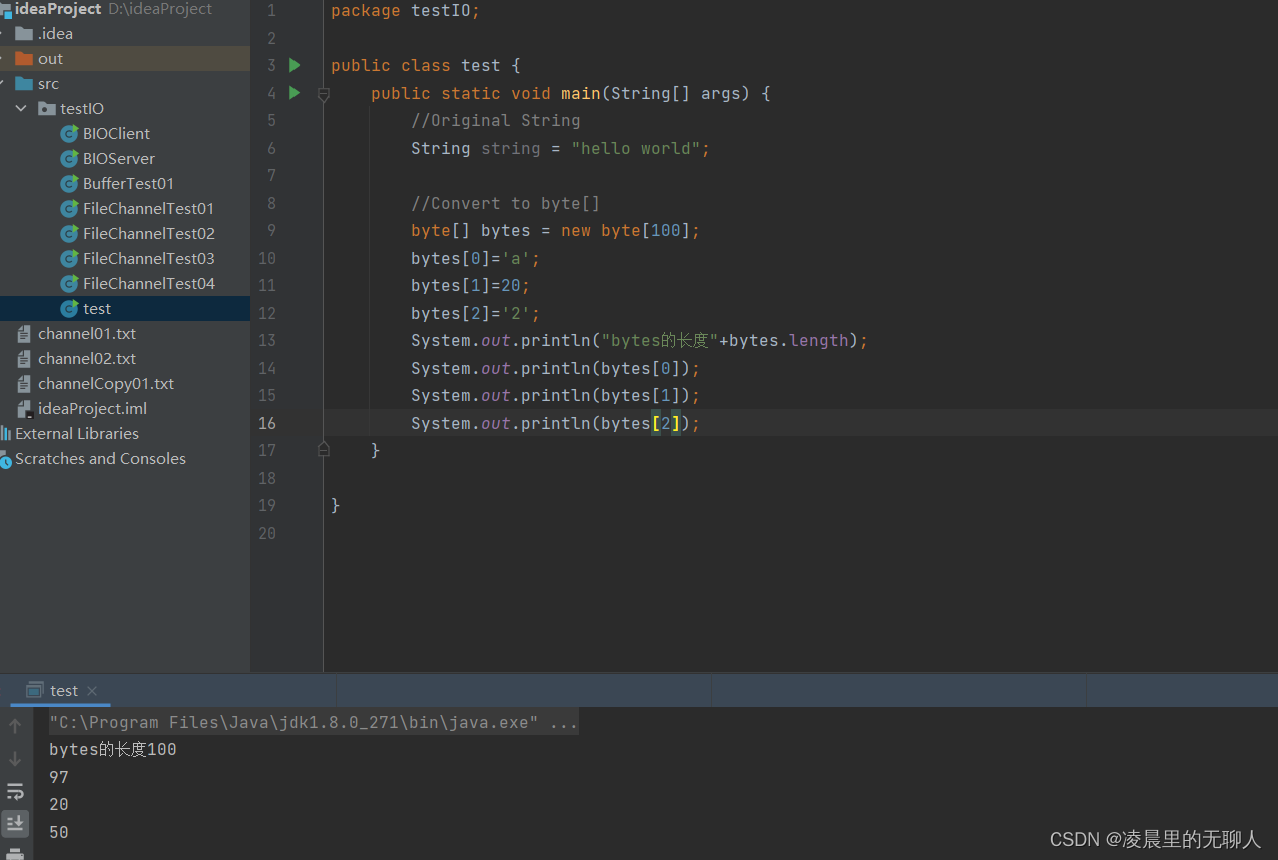
通过这个输出就可以看出来,byte数组,每次存储一个字符或者数字,通过ASCII存储在对应的数组位置上,一个位置一个字节。因为我写的过程突然不太了解这个byte的原理,所以仔细的想了一下。关于Selector的内容放在下一篇了。这个篇幅太长了。
持续学习欢迎关注公众号


 995
995

 被折叠的 条评论
为什么被折叠?
被折叠的 条评论
为什么被折叠?
 到【灌水乐园】发言


