


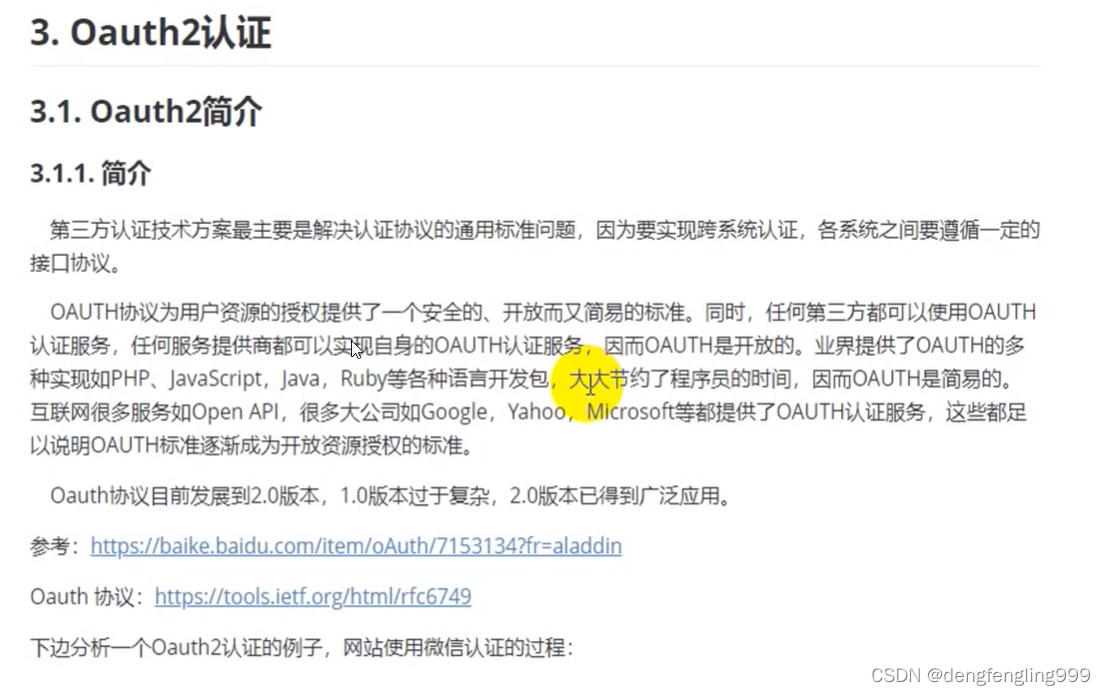
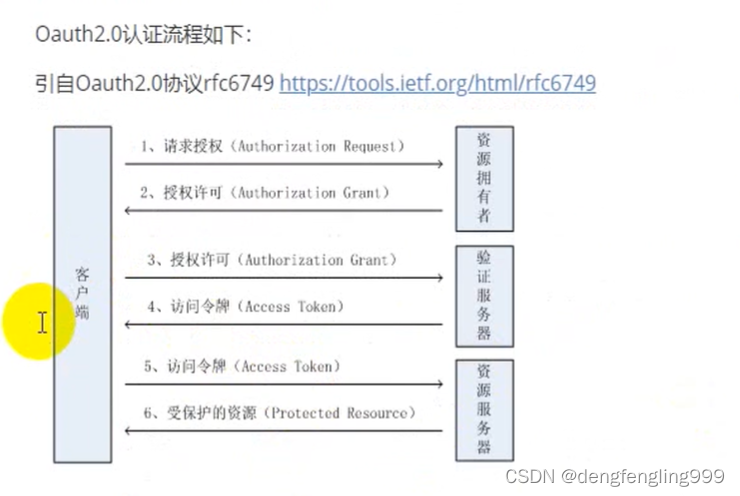
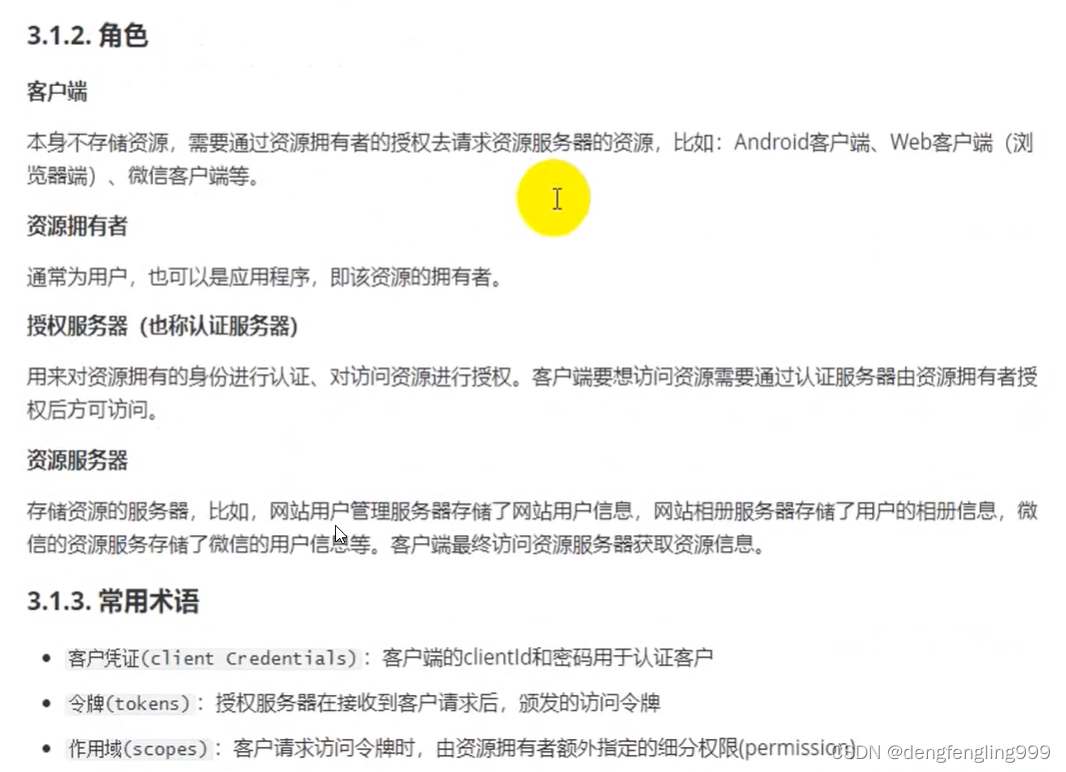
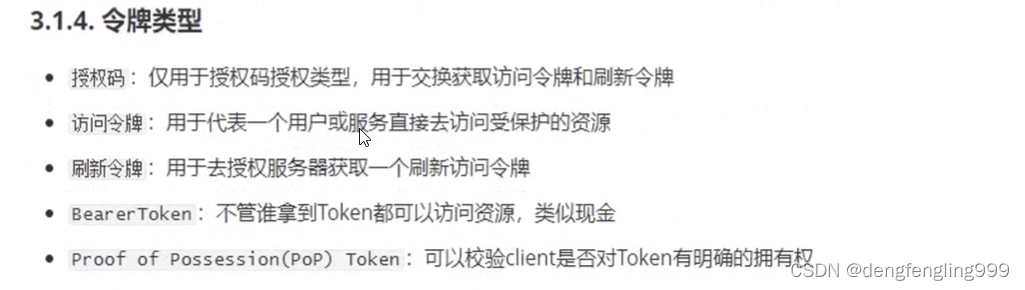
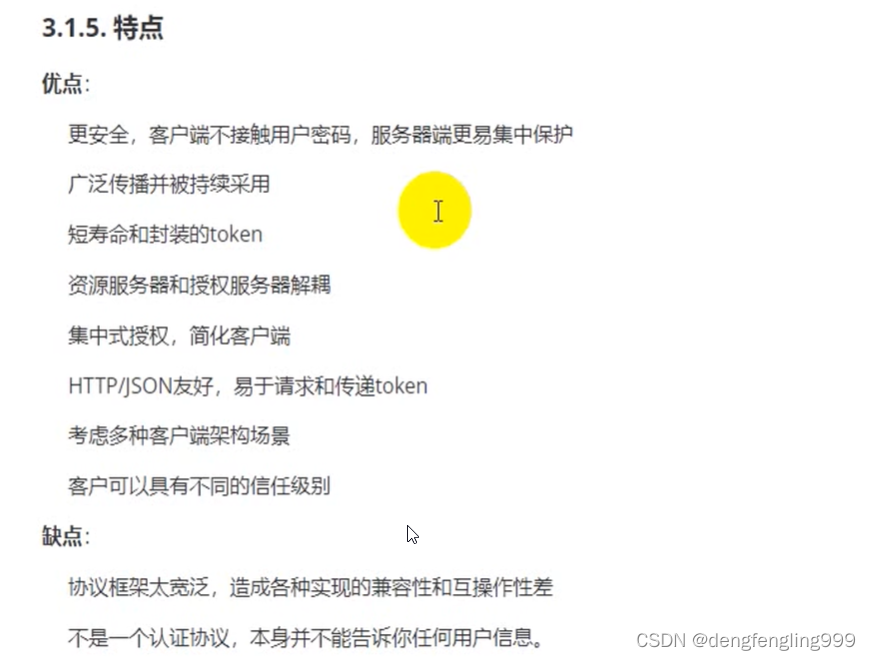
(1)Oauth2协议简介
、
(2)授权模式
四种授权模式:
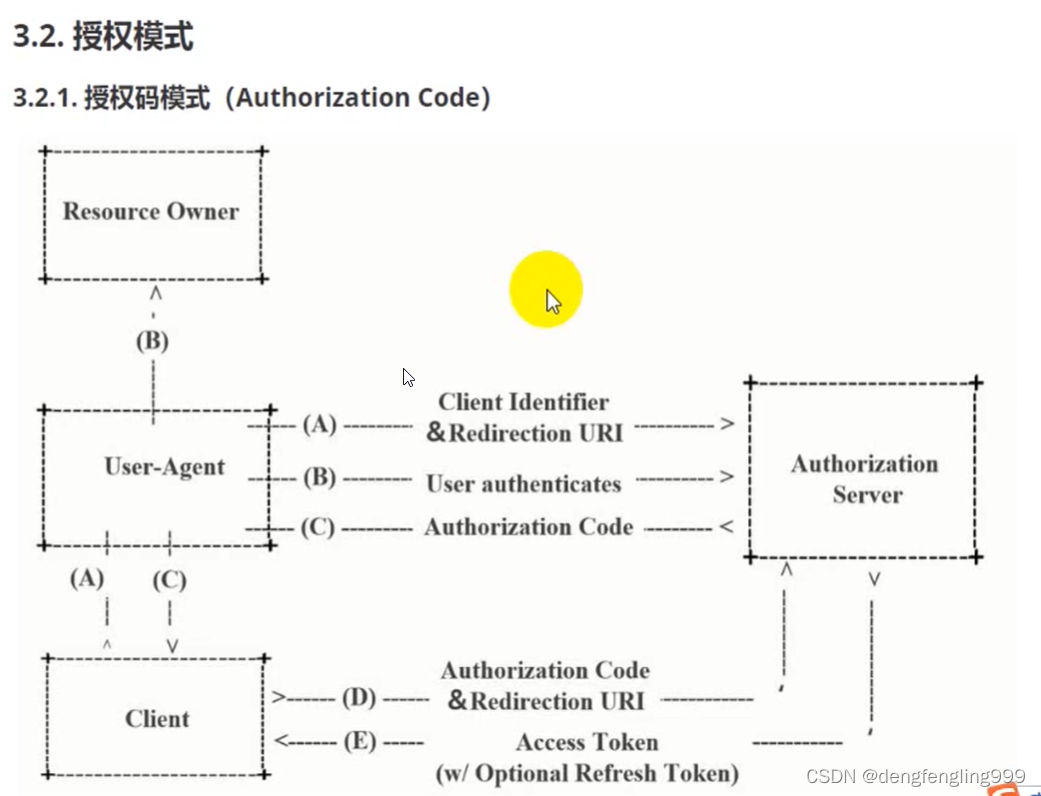
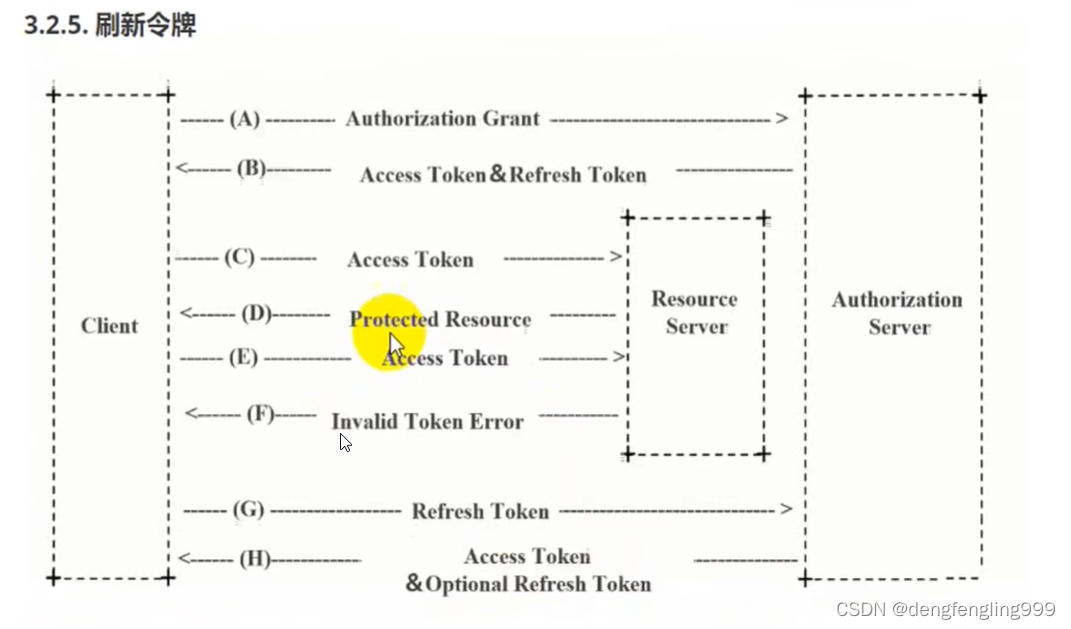
第一种:授权吗模式:是这几种中最复杂和最安全的,而实际工作中用的最多的一种例模式。
它不是直接去获取令牌,而中间经过授权码的形式,先获取授权码,在经过授权码去获取令牌
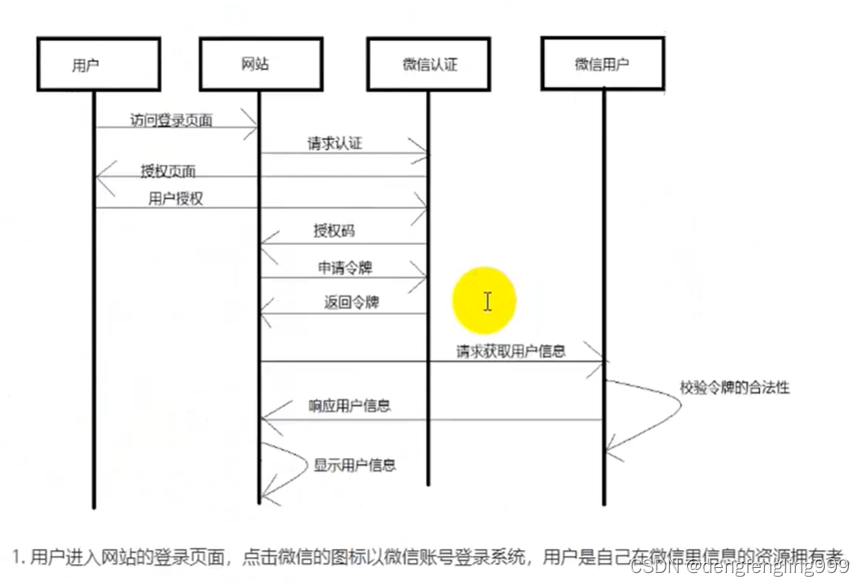
客户端通过客户代理去我们的授权服务器进行授权,它会携带客户端的标识和重定向的URI,到了授权服务器之后呢,会需要用户进行授权,也就是资源拥有者进行用户授权,授权之后呢,授权服务器会根据用户授权的结果返回一个授权码,这时候还没有拿到令牌,只是拿到授权码,客户端那这个授权码和重定向URI再去我们的授权服务器,再去申请我们的一个令牌,授权服务器会根据这次客户端拿过来的授权码区返回一个token或者可选的刷新令牌Refresh token
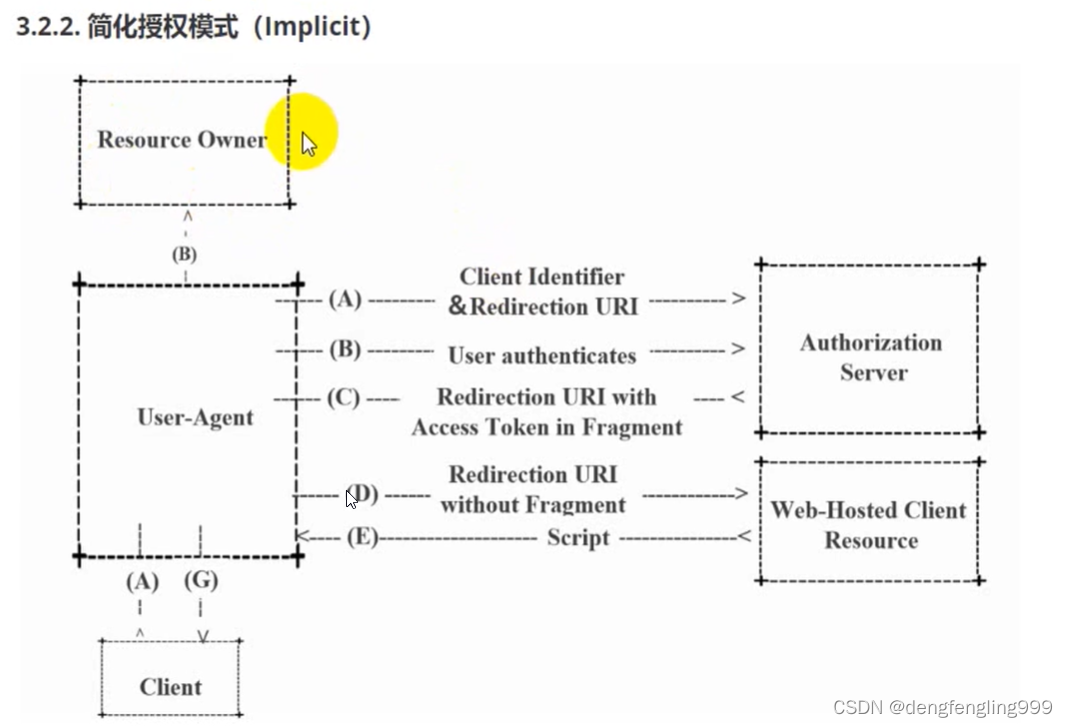
简化授权码模式:
客户端通过浏览器,带上客户端标识和重定向的URI,去授权服务器里面呢要求授权,需要用户惊醒响应的授权,授权之后授权服务器会根据授权的结果返回一个重定向的URI,并且这个URI里面带了token,token是放在Frament里面的,我们通过这个URI怎么去拿Frament里面的token呢?然后再根据URI传给后台的资源,后台资源会返回一个脚本,再根据Script脚本获取token
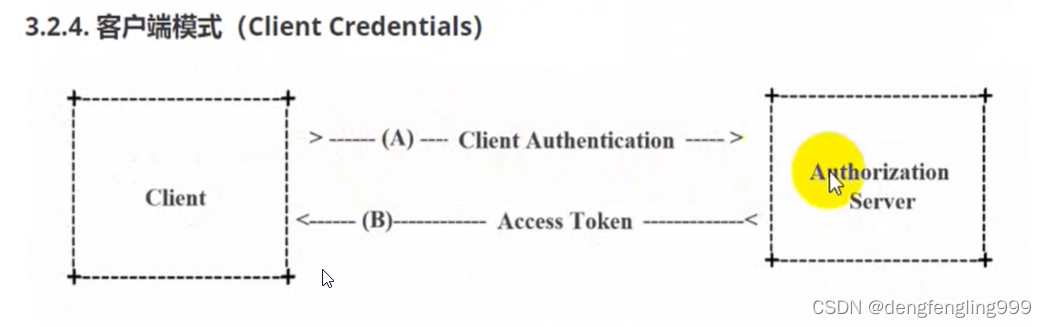
客户端直接去授权服务器授权,没有用到用户
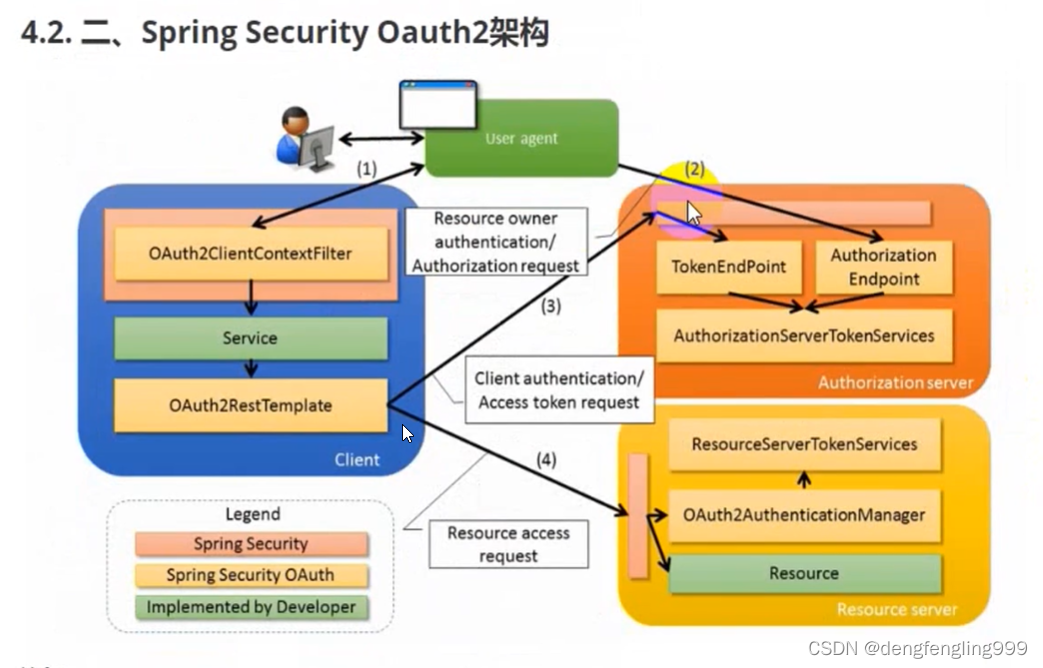
(3)SpringSecurityOauth2架构
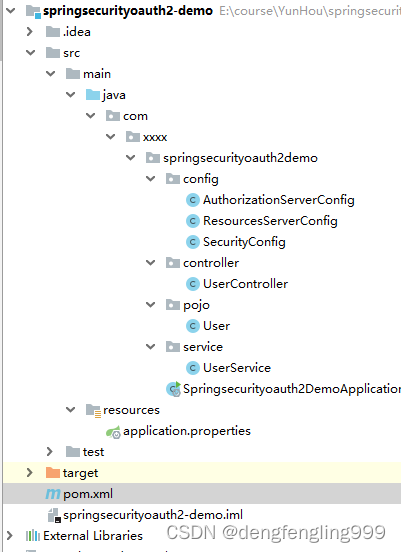
配置类SecurityConfig:需要PasswordEncorder声明@Bean
package com.xxxx.springsecurityoauth2demo.config;

import org.springframework.context.annotation.Bean;
import org.springframework.context.annotation.Configuration;
import org.springframework.security.crypto.bcrypt.BCryptPasswordEncoder;
import org.springframework.security.crypto.password.PasswordEncoder;

@Configuration
public class SecurityConfig {


    @Bean
    public PasswordEncoder passwordEncoder(){
        return new BCryptPasswordEncoder();
    }
}
自定义逻辑登录:需要实现UserDetailService接口、创建PasswordEncoder
UserService
package com.xxxx.springsecurityoauth2demo.service;

import com.xxxx.springsecurityoauth2demo.pojo.User;
import org.springframework.beans.factory.annotation.Autowired;

import org.springframework.security.core.authority.AuthorityUtils;
import org.springframework.security.core.userdetails.UserDetails;
import org.springframework.security.core.userdetails.UserDetailsService;
import org.springframework.security.core.userdetails.UsernameNotFoundException;
import org.springframework.security.crypto.password.PasswordEncoder;
import org.springframework.stereotype.Service;

@Service
public class UserService  implements UserDetailsService {

    //注入passwordEncoder
    @Autowired
    private PasswordEncoder passwordEncoder;


    @Override
    public UserDetails loadUserByUsername(String username) throws UsernameNotFoundException {
        //一般情况下用户名是传进来的,密码是从数据库中查的,这里只是演示,密码自己去写
        String password = passwordEncoder.encode("123456");

        return new User("admin",password, AuthorityUtils.commaSeparatedStringToAuthorityList("admin"));
    }
}
使用自己创建的User类:
package com.xxxx.springsecurityoauth2demo.pojo;

import org.springframework.security.core.GrantedAuthority;
import org.springframework.security.core.userdetails.UserDetails;

import java.util.Collection;
import java.util.List;

public class User implements UserDetails {
    private String username;
    private String password;
    private List<GrantedAuthority> authorities;

    public User(String username, String password, List<GrantedAuthority> authorities) {
        this.username = username;
        this.password = password;
        this.authorities = authorities;
    }

    @Override
    public Collection<? extends GrantedAuthority> getAuthorities() {
        return null;
    }

    @Override
    public String getPassword() {
        return null;
    }

    @Override
    public String getUsername() {
        return null;
    }

    @Override
    public boolean isAccountNonExpired() {
        return false;
    }

    @Override
    public boolean isAccountNonLocked() {
        return false;
    }

    @Override
    public boolean isCredentialsNonExpired() {
        return false;
    }

    @Override
    public boolean isEnabled() {
        return false;
    }
}
配置类:进行继承接口:WebSecurityConfigurerAdapter,实现方法
package com.xxxx.springsecurityoauth2demo.config;

import org.springframework.context.annotation.Bean;
import org.springframework.context.annotation.Configuration;
import org.springframework.security.config.annotation.web.builders.HttpSecurity;
import org.springframework.security.config.annotation.web.configuration.EnableWebSecurity;
import org.springframework.security.config.annotation.web.configuration.WebSecurityConfigurerAdapter;
import org.springframework.security.crypto.bcrypt.BCryptPasswordEncoder;
import org.springframework.security.crypto.password.PasswordEncoder;

@Configuration
@EnableWebSecurity //启动web Security
public class SecurityConfig extends WebSecurityConfigurerAdapter {

    @Override
    protected void configure(HttpSecurity http) throws Exception {

        //关闭csrf
        http.csrf().disable()
                //下面的设置可以使用一个http

                //授权认证 相当于拦截器一样
                .authorizeRequests()
                //放行,不需要被认证
                .antMatchers("/oauth/**","/login/**","/logout/**").permitAll()
                //所有请求都必须被认证,必须登录之后能被访问
                .anyRequest().authenticated()
                //使用and连接 不在另外写http
                .and()
                //表单提交
                .formLogin().permitAll();
    }

    @Bean
    public PasswordEncoder passwordEncoder(){
        return new BCryptPasswordEncoder();
    }
}
Oauth2,有两个服务器,一个是认证的服务器,另一个是资源服务器,下面针对两个服务器进行相应的配置:
授权的配置
新建类:
package com.xxxx.springsecurityoauth2demo.config;
import org.springframework.beans.factory.annotation.Autowired;
import org.springframework.context.annotation.Configuration;
import org.springframework.security.crypto.password.PasswordEncoder;
import org.springframework.security.oauth2.config.annotation.configurers.ClientDetailsServiceConfigurer;
import org.springframework.security.oauth2.config.annotation.web.configuration.AuthorizationServerConfigurerAdapter;
import org.springframework.security.oauth2.config.annotation.web.configuration.EnableAuthorizationServer;
@Configuration //配置类注解
@EnableAuthorizationServer //启用授权服务器的配置
public class AuthorizationServerConfig extends AuthorizationServerConfigurerAdapter {
@Autowired
private PasswordEncoder passwordEncoder;
@Override
public void configure(ClientDetailsServiceConfigurer clients) throws Exception {
clients.inMemory()
//这里使用自定义,正常情况下是授权服务器注册的时候生成的
//配置client-id
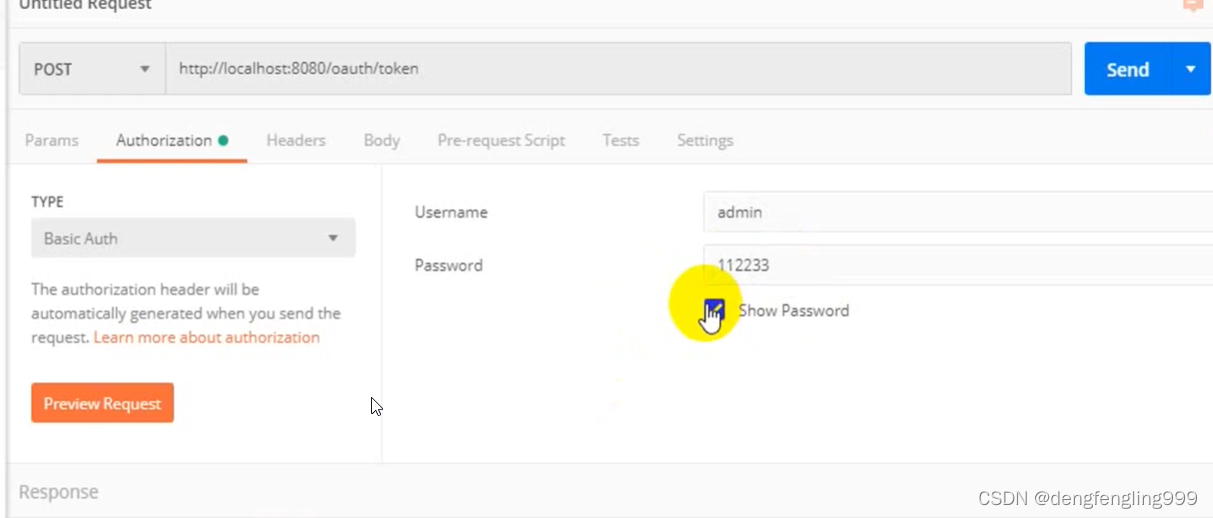
.withClient("admin")
//配置client-secret
.secret(passwordEncoder.encode("112233"))
//配置访问token的有效期
.accessTokenValiditySeconds(3600)
//配置 授权成功后的跳转
.redirectUris("http://www.baidu.com")
//设置授权码类型
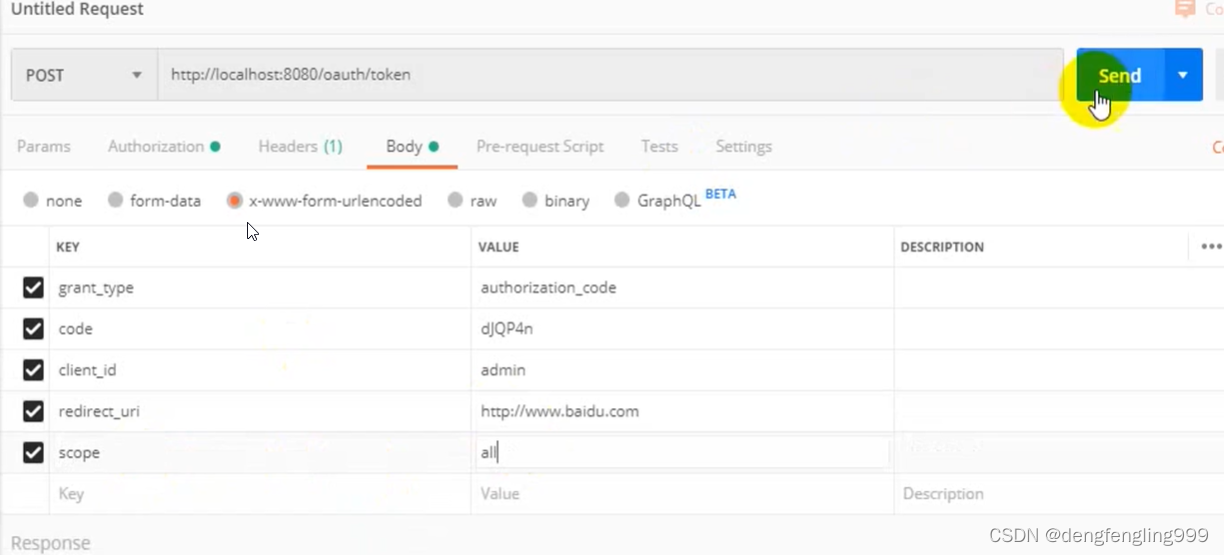
.authorizedGrantTypes("authorization_code");
}
}
资源服务器:
package com.xxxx.springsecurityoauth2demo.config;

import org.springframework.context.annotation.Configuration;
import org.springframework.security.config.annotation.web.builders.HttpSecurity;
import org.springframework.security.oauth2.config.annotation.web.configuration.EnableResourceServer;
import org.springframework.security.oauth2.config.annotation.web.configuration.ResourceServerConfigurerAdapter;

@Configuration
@EnableResourceServer //开启资源服务器
public class ResourcesServerConfig extends ResourceServerConfigurerAdapter {
    @Override
    public void configure(HttpSecurity http) throws Exception {
        授权认证 相当于拦截器一样
        http.authorizeRequests()
                所有请求都必须被认证,必须登录之后能被访问
                .anyRequest().authenticated()
                //and连接 不用谢http了
                .and()
                .requestMatchers()
                //放行user下面的信息,放行的资源,在控制器中编写
                .antMatchers("/user/**");
    }
}
放行的资源:Contrller:
package com.xxxx.springsecurityoauth2demo.controller;

import org.springframework.security.core.Authentication;
import org.springframework.stereotype.Controller;
import org.springframework.web.bind.annotation.RequestMapping;

@Controller
@RequestMapping("/user")
public class UserController {

    //获取当前用户
    @RequestMapping("/getCurrentUser")
    public Object getCurrentUser(Authentication authentication){
        //返回主体
        return authentication.getPrincipal();
    }
}
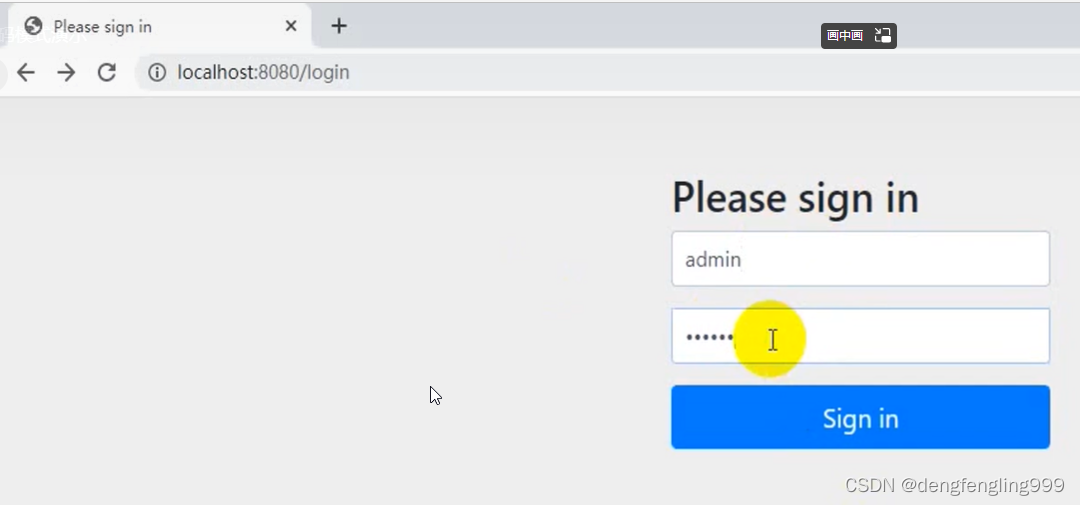
启动项目:
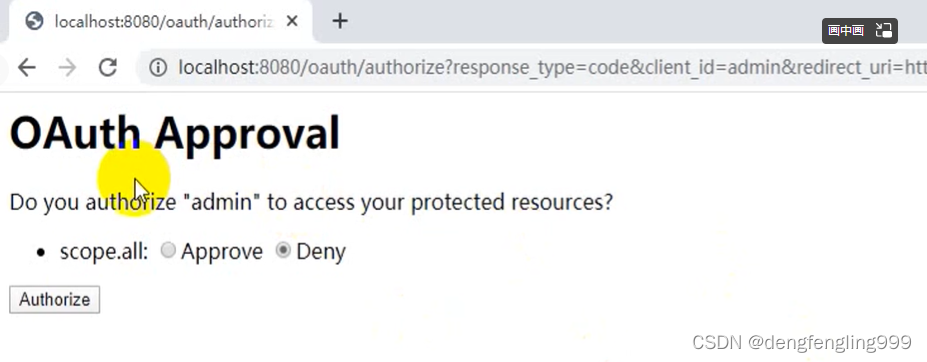
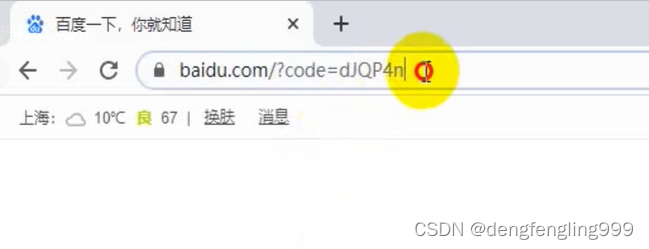
code=后面就是 授权码,通过授权码获取令牌,通过Post的方式,利用Postman发送
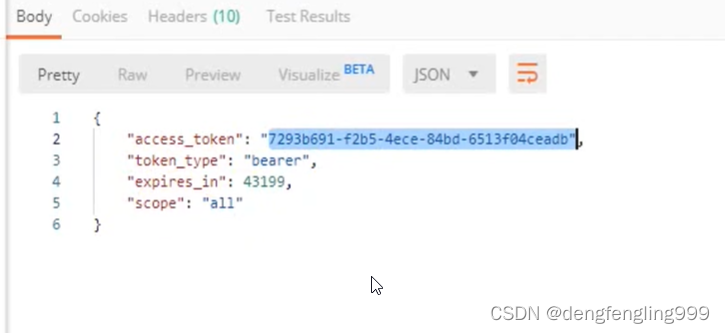
获取到token令牌
在进行:
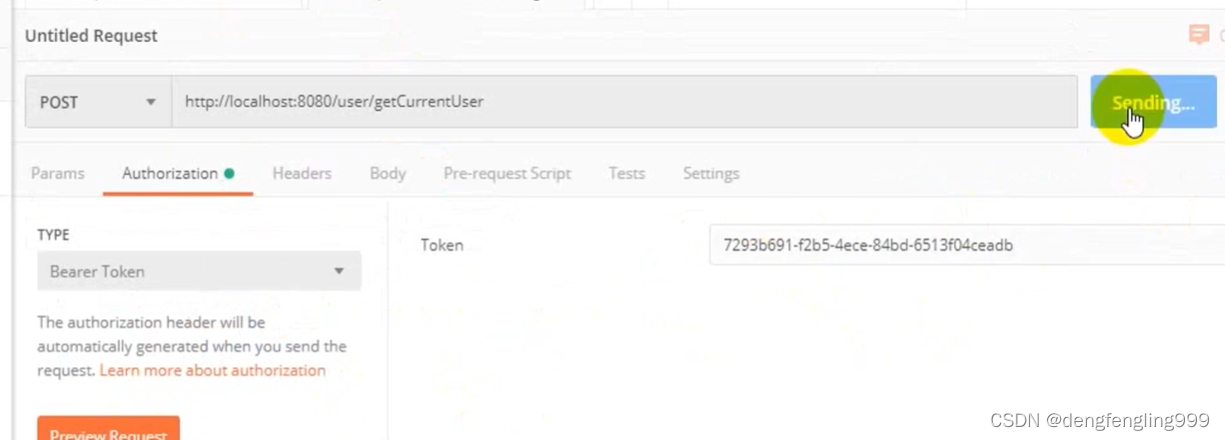
就返回用户的的信息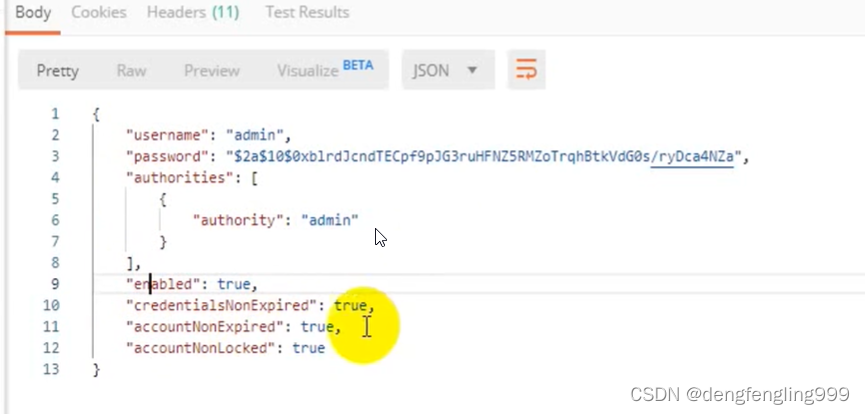


 756
756


 被折叠的 条评论
为什么被折叠?
被折叠的 条评论
为什么被折叠?
 到【灌水乐园】发言


