


ansible是一款由python研发的agentless自动化运维的工具,安装使用简单,现已经被红帽收购
Install
方法一:
wget http://mirrors.opencas.cn/epel//epel-release-latest-7.noarch.rpm
rpm -ivh epel-release-latest-7.noarch.rpm
方法二“:
[root@localhost yum.repos.d]# vim epel.repo
[epel]
name=epel
mirrorlist=http://mirrors.fedoraproject.org/mirrorlist?repo=epel-$releasever&arch=$basearch
enabled=1
gpgcheck=0
[root@localhost yum.repos.d]# yum install ansible
[root@localhost yum.repos.d]# rpm -ql ansible|less
主配置文件:/etc/ansible/ansible.cfg
而被管理的主机的存放列表在:/etc/ansible/hosts
被管理的主机和管理主机使用密钥认证的方式,于是在ansible主机生成公钥发往hosts
cd /etc/ssh/
ssh-keygen -t rsa -f ssh_rsa_key
ssh-copy-id -i ssh_rsa_key.pub root@192.168.1.2
ssh-copy-id -i ssh_rsa_key.pub root@192.168.1.4
但是测试失败了,没找到原因,所以只能暂时使用口令认证的方式了,配置方式:
vim /etc/ansible/hosts
[webapps]
192.168.1.3 ansible_ssh_usr=root ansible_ssh_pass=dyl@1234
192.168.1.4 ansible_ssh_usr=root ansible_ssh_pass=dyl@1234
说明:ansible_ssh_usr=root ansible_ssh_pass=dyl@1234 这三项内容是主机变量类型inventory参数,不是主机变量
Modules
模块分为:核心(自带模块)和自定义模块,常见模块有:
列出可用的模块: ansible-doc -l
查看每个模块的参数:ansible-doc -s module_name
command 可省,但是不支持管道,以下的命令都是key-value格式的,等号两边不能有空格键ansible all -m command -a 'echo hello'
shell
ansible 192.168.52.60 -m shell -a 'cat /etc/shadow | grep root'
script
vim /tmp/bye.sh
#!/bin/bash
echo " this is $(hostname) on $(date +%F) "
mkdir /tmp/peoples
~
ansible webserver -m script -a "/tmp/bye.sh"
yum
安装 ansible webserver -m yum -a 'name=httpd state=present'
卸载 ansible webserver -m yum -a 'name=httpd state=absent'
service
ansible webserver -m service -a 'name=httpd state=started'
ping
ansible dbserver -m ping
copy
ansible webserver -m copy -a "src='/etc/fstab' dest='/tmp/'"
file state={directory|link|touch|absent} ,如果是state为link,则还要指明src=,即链接至哪个文件
ansible webserver -m file -a "path =/tmp/flowers.jpg state=touch "
ansible webserver -m file -a "path='/tmp/flowers.jpg' state=absent"
cron
ansible webserver -m cron -a "minute='*/5' name=sleep job='/bin/hostname &>/dev/null' " 这里不要写state=present,不然在host里面用crontab -l 看不到
删除任务: ansible webserver -m cron -a "name='sleep' state=absent"
user 删除账号时,remove表示删除家目录
创建账号 ansible webserver -m user -a 'name=user1 state=present system=no '
删除账号以及家目录 ansible webserver -m user -a 'name=user1 state=absent remove=yes system=no'
group
ansible webserver -m group -a 'name=beauty state=present '
setup 收集主机的信息,即facts变量,有参数,但是不用指定
ansible dbserver -m setup
template
所有的文件定义格式,由字典和列表组成,格式要求很严格。。。多一个空格都不行。。。比如同一字典和列表必须对其,-后一个空格,kv格式的等号后面不能有空格,比如name={{ username }}
vim /etc/ansible/hosts
[webserver]
192.168.52.59
192.168.52.60
[dbserver]
192.168.52.61
192.168.52.66 ansible_ssh_user=dyl ansible_ssh_pass=m1234
[ubuntu]
192.168.40.1 ansible_ssh_user=deng ansible_ssh_pass=deng ansible_ssh_port=22021
playbooks
playbooks各组件介绍:
1.tags
ansible-playbook host -t tarsname
tars是在每个列表或者字典的最后面定义的,要调用的话,-t 指定tags的名字就成
[root@localhost ansible]# cat second.yml
- hosts: webserver
tasks:
- name: install httpd
yum: name=httpd state=present
- name: start httpd
service: name=httpd state=started
- name: stop httpd.service
service: name=httpd state=stopped
when: ansible_os_family == 'RedHat'
- hosts: ubuntu
remote_user: deng
tasks:
- name: say hello
command: /bin/echo 'hello debian os family!'
tags: hello
when: ansible_os_family == 'Deian'
测试: ansible-playbook -t hello sencond.yml
roles里面的文件路径都采用的是相对路径,比如template的源文件就可以采用相对路径,但是目标文件要复制到远程主机还是需要采用绝对路径的,使用的时候在YAML文件里面调用就是了,里面也可以传递变量值 {roles,vars=xxx}
2.handlers
需要一个触发模块通知他,叫 notify : handlername
首先在本地主机的httpd服务里面修改端口,接下来,将这个配置文件复制到webserver主机上面去
- hosts: webserver
remote_user: root
tasks:
-name: change web port
copy: src=/etc/httpd/conf/httpd.conf dest=/etc/httpd/conf/httpd.conf
notify: restart httpd
handlers:
-name: restart httpd
service: name=httpd state=restarted
3.templates:
采用的是jinja2语法,但是用法和copy模块用法类似,主要在配置文件中引用变量,引用变量是采用双花括符,与copy所不同的是,template支持变量替换,而不仅仅是替换内容
~]#vim /etc/ansible/hosts
[webserver]
192.168.52.59 httpd_port=8081
192.168.52.60 httpd_port=8082
ansible ]#cp /etc/httpd/conf/httpd.conf httpd.conf.j2
ansible ]#vim httpd.conf.j2
Listen {{ httpd_port }}
ansible ]#vim fifth.sh
- host: webservers
remote_user: root
tasks:
- name: change port
template: src=/etc/ansible/httpd.conf.j2 dest=/etc/httpd/conf/httpd.conf
notify: restart httpd
handlers:
- name: restart httpd
service: name=httpd state=restarted
4.tasks
最简单的,都是定义好name,然后调用模块就成了,组合一下命令
]# cat second.yml
- hosts: webserver
tasks:
- name: install httpd
yum: name=httpd state=present
- name: start httpd
service: name=httpd state=started
条件判断:when:
]# cat second.yml
- hosts: webserver
tasks:
- name: install httpd
yum: name=httpd state=present
- name: start httpd
service: name=httpd state=started
- name: stop httpd.service
service: name=httpd state=stopped
when: ansible_os_family == 'RedHat'
循环迭代:
cat forth.sh
- host dbserver
remote_user: root
tasks:
- name: add user accunt
user: name={{ item }} state=present
with_items:
- user1
- user2
- user3
- user4
5.vars
变量:四种:facts,主机变量,组变量,自定义变量(common)
]# cat first.yml
- hosts: webserver
remote_user: root
vars:
username: user1
password: user1
tasks:
- name: add a accout
user: name={{ username }} state=present
- name: Add a password
shell: /bin/echo {{ password }} | /usr/bin/passwd --stdin {{ username }}
facts是由setup模块收集的
主机变量形如:
[groupname]
hostaddress hostvars=xxx
组变量:
[group:vars]
var1=xxx
var2=xxx
自定义变量也是比较容易理解的,形如:
vars:
var1:xxx
var2: xxx
ansible ]#cp /etc/httpd/conf/httpd.conf httpd.conf.j2
6.roles/
rolesdir/
files/
vars/
template/
....
cd /etc/ansible
mkdir -p /roles/webservers/{files,vars,tasks,templates,handlers},每个目录下面都至少有一个main.yml,而templates下面放的是jinja2的配置文档,.j2
cd roles/webservers
vim vars/main.yml
username: nginx
group: nginx
vim tasks/main.yml
- name: change acount
template: src=httpd.conf.j2 dest=/etc/http/conf/httpd.conf
notify: restart httpd
这里需要
cp /etc/httpd/conf/httpd.conf /etc/ansible/roles/webservers/templates/ansible/httpd.conf.j2
vim httpd.conf.j2 ,修改里面的内容 User={{ username }} Group={{ group }}
vim handlers/main.yml
- name: restart httpd
service: name=httpd state=restart
cd ../..
在和roles的同级目录下定义一个文件,调用roles下面的角色
vim webserver.yml
- hosts: webserver
remote_user: root
roles:
- webservers
测试: ansible-playbook webserver.yml
小话题:通过role传送变量可以这么定义:
vim webserver.yml
- hosts: webserver
remote_user: root
roles:
- { role: webservers , username: apache }
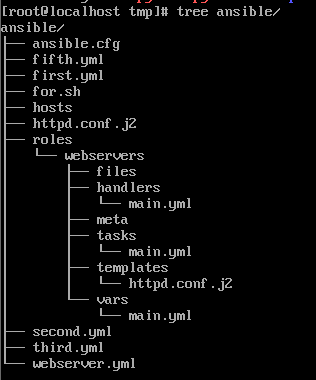
目前,ansible的目录机构如图:
7.inventory 参数:ansible_ssh_usr,ansible_ssh_pass,ansible_ssh_sudo_pass...
8.条件判断和循环(迭代)
条件判断:when, when后面的条件内容是根据setup模块手机到的facts内容里面对应的形如 ansible_os_family=="Debian"之类的,也是写在靠后的位置
迭代:item,形如
tasks:
- name: add user
user: name={{ item }} state=present
with_items:
- user1
- user2
- user3
- user4
或者,扩展用法:?这个
tasks:
- name: add user
user: name={{ item.host }} state=present group={{ item.group }}
with_items:
- { user: 'apple1',group:' group1' }
- { user: 'apple2',group: ' group 2 ' }
说明:冒号后面,花括符内左右两边均要有空格,字典和列表的格式形如 key: value,也可以在花括符里列出
踩过的坑:
1.通过template修改配置文件里面的用户名的时候,发现在vars/main.yml文件里面定义的username在被部署的服务器上不存在,因此需要在tasks/mail.yml里面先创建username,比如nginx


 724
724


 被折叠的 条评论
为什么被折叠?
被折叠的 条评论
为什么被折叠?
 到【灌水乐园】发言


