


梳理了一下自定义View文字排版知识,实现文字环绕图片的效果
#知识点#
- paint.breakText(CharSequence text, int start, int end, boolean measureForwards, float maxWidth, float[] measuredWidth)方法,用来测量当前View一行最多显示多少个字符
-
BitmapFactory如何以最小的内存损耗加载所需要的图片资源。因为如果将一张1000*1000像素的图片显示到100*100的View上,如果不做优化,那么将存在内存的严重浪费
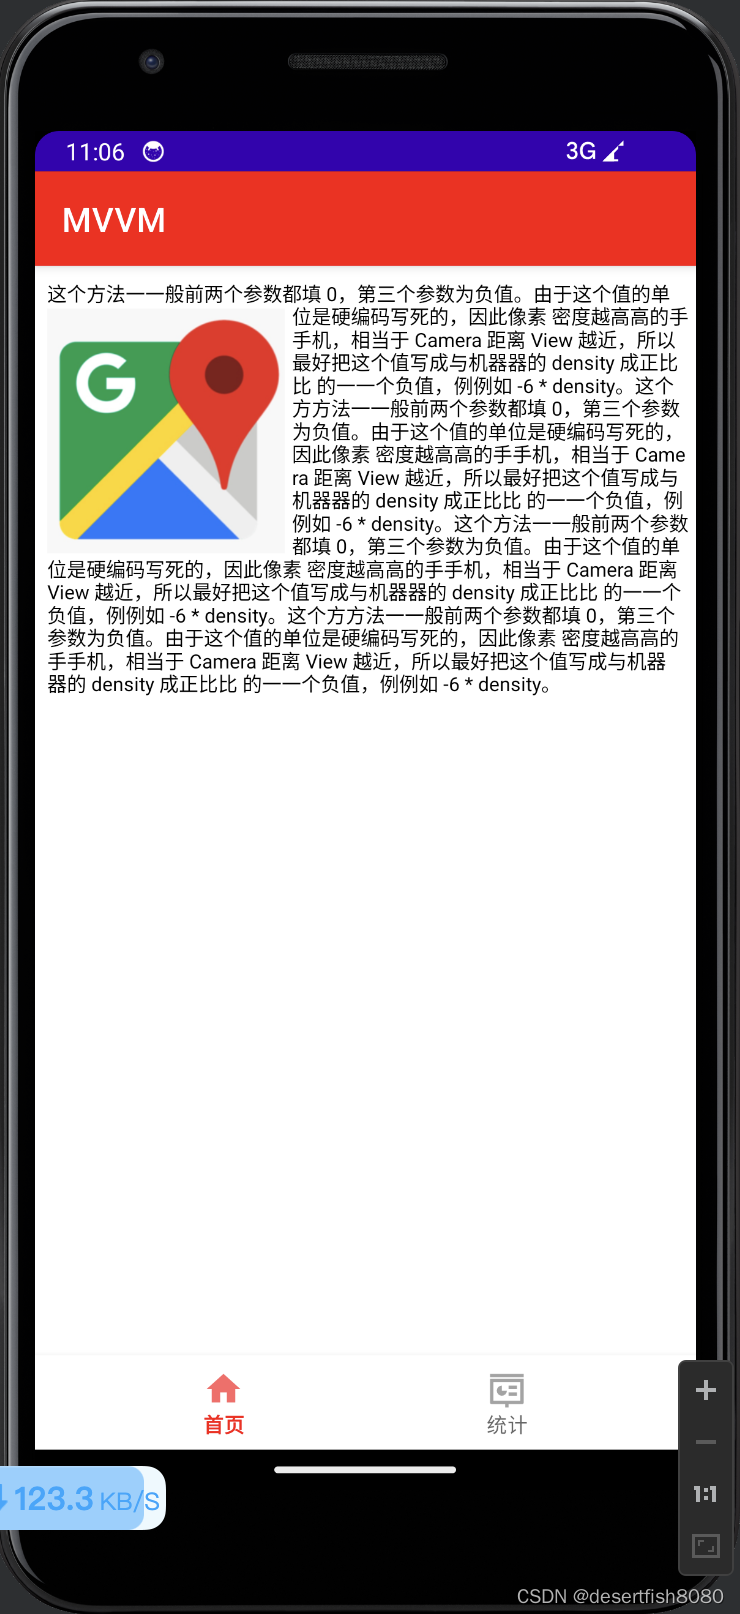
效果图:
代码实现:
package com.ztw.mvvm.view

import android.content.Context
import android.graphics.Bitmap
import android.graphics.BitmapFactory
import android.graphics.Canvas
import android.graphics.Color
import android.graphics.Paint
import android.graphics.Rect
import android.util.AttributeSet
import android.util.Log
import android.view.View
import com.ztw.mvvm.R

class ImageTextView : View {
    constructor(context: Context?) : super(context)
    constructor(context: Context?, attrs: AttributeSet?) : super(context, attrs)
    constructor(context: Context?, attrs: AttributeSet?, defStyleAttr: Int) : super(
        context,
        attrs,
        defStyleAttr
    )

    constructor(
        context: Context?,
        attrs: AttributeSet?,
        defStyleAttr: Int,
        defStyleRes: Int
    ) : super(context, attrs, defStyleAttr, defStyleRes)

    private val paint = Paint().apply {
        isAntiAlias = true
        style = Paint.Style.FILL
        textSize = 32f
        color = Color.BLACK
    }
    private val txt =
        "这个方法⼀一般前两个参数都填 0,第三个参数为负值。由于这个值的单位是硬编码写死的,因此像素 密度越⾼高的⼿手机,相当于 Camera 距离 View 越近,所以最好把这个值写成与机器器的 density 成正⽐比 的⼀一个负值,例例如 -6 * density。这个⽅方法⼀一般前两个参数都填 0,第三个参数为负值。由于这个值的单位是硬编码写死的,因此像素 密度越⾼高的⼿手机,相当于 Camera 距离 View 越近,所以最好把这个值写成与机器器的 density 成正⽐比 的⼀一个负值,例例如 -6 * density。这个方法⼀一般前两个参数都填 0,第三个参数为负值。由于这个值的单位是硬编码写死的,因此像素 密度越⾼高的⼿手机,相当于 Camera 距离 View 越近,所以最好把这个值写成与机器器的 density 成正⽐比 的⼀一个负值,例例如 -6 * density。这个⽅方法⼀一般前两个参数都填 0,第三个参数为负值。由于这个值的单位是硬编码写死的,因此像素 密度越⾼高的⼿手机,相当于 Camera 距离 View 越近,所以最好把这个值写成与机器器的 density 成正⽐比 的⼀一个负值,例例如 -6 * density。"

    private val array = floatArrayOf()
    private var offset = 0
    private var lineLength = 0
    private var lines = 1
    private var lineHeight = 100
    private var padding = 20f
    private val bmpWidth = 400
    private var bitmap: Bitmap? = createBmp(bmpWidth)
    private val bitmapTop: Int
    private val bitmapBottom: Int
    private val bound = Rect()

    init {
        paint.getTextBounds(txt, 0, txt.length, bound)
        bitmapTop = 50 + padding.toInt()
        bitmapBottom = (bitmapTop + (bitmap?.height ?: 0))
    }

    override fun onDraw(canvas: Canvas) {
        super.onDraw(canvas)
        bitmap?.also {
            canvas.drawBitmap(it, padding, bitmapTop.toFloat(), paint)
        }

        do {
            Log.d(null, "lineHeight = $lineHeight")
            offset += lineLength

            val totalHeight = lines * bound.height() + padding.toInt()
            if (totalHeight in bitmapTop..bitmapBottom && bitmap != null) {
                lineLength = paint.breakText(
                    txt,
                    offset,
                    txt.length,
                    true,
                    width.toFloat() - bitmap!!.width - padding * 2,
                    array
                )
                canvas.drawText(
                    txt,
                    offset,
                    offset + lineLength,
                    padding + bmpWidth,
                    padding + lines * paint.fontSpacing,
                    paint
                )

            } else {
                lineLength = paint.breakText(
                    txt,
                    offset,
                    txt.length,
                    true,
                    width.toFloat() - padding * 2,
                    array
                )
                canvas.drawText(
                    txt,
                    offset,
                    offset + lineLength,
                    padding,
                    padding + lines * paint.fontSpacing,
                    paint
                )
            }

            lines++
        } while (offset < txt.length)


    }

    private fun createBmp(height: Int): Bitmap? {
        return try {
            BitmapFactory.Options().apply {
                inJustDecodeBounds = true //指计算图片的轮廓
            }.let {
                BitmapFactory.decodeResource(resources, R.drawable.img, it)
                it.inJustDecodeBounds = false
                //加载图片时,将原始图片按照比例压缩
                it.inDensity = it.outHeight
                it.inTargetDensity = height
                BitmapFactory.decodeResource(resources, R.drawable.img, it)
            }
        } catch (e: Exception) {
            e.printStackTrace()
            null
        }
    }
}


 396
396


 被折叠的 条评论
为什么被折叠?
被折叠的 条评论
为什么被折叠?
 到【灌水乐园】发言


