


最近在学习《Redis入门指南 第2版.pdf》里面提到Redis存储的数据结构,于是在网上搜些资料熟悉下这个些基础知识。我在demo开发中,最容易出错点:redis获取对象的序列化与反序列化,对其数据结构(ValueOperations、SetOperations、ZSetOperations、HashOperations、ListOperations)没弄明白,走了些弯路。接下来开始整合项目。
1、首先创建项目:
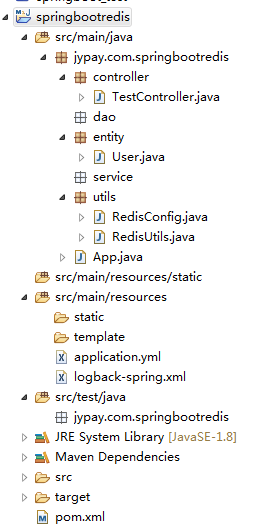
2、创建各个类和分析关键代码:
创建RedisConfig.java类代码如下:
package jypay.com.springbootredis.utils;

import java.io.Serializable;
import org.springframework.boot.autoconfigure.AutoConfigureAfter;
import org.springframework.boot.autoconfigure.data.redis.RedisAutoConfiguration;
import org.springframework.context.annotation.Bean;
import org.springframework.context.annotation.Configuration;
import org.springframework.data.redis.connection.RedisConnectionFactory;
import org.springframework.data.redis.core.RedisTemplate;
import org.springframework.data.redis.serializer.GenericJackson2JsonRedisSerializer;
import org.springframework.data.redis.serializer.StringRedisSerializer;


/**
 * 连接和配置redis的类。
 * @author tangfq
 * @data   2019-12-25
 */
@Configuration
@AutoConfigureAfter(RedisAutoConfiguration.class)
public class RedisConfig {

	@Bean
	public RedisTemplate<Serializable,Object> redisTemplate(RedisConnectionFactory connectionFactory){
		RedisTemplate<Serializable,Object> template=new RedisTemplate<Serializable,Object>();

		//redis存取对象的关键配置
		template.setKeySerializer(new StringRedisSerializer());
		//java对象的序列化和反序列化工具类
		template.setValueSerializer(new GenericJackson2JsonRedisSerializer());
		template.setConnectionFactory(connectionFactory);
		return template;
	}
}
1)在设置ValueSerializer时,要注意是使用GenericJackson2JsonRedisSerializer类。
2)Redis不仅仅支持简单的key-value类型的数据,同时还提供list,set,zset,hash等数据结构的存储。
RedisUtils.java
package jypay.com.springbootredis.utils;


import java.io.Serializable;
import org.slf4j.LoggerFactory;
import org.springframework.beans.factory.annotation.Autowired;
import org.springframework.data.redis.core.RedisTemplate;
import org.springframework.data.redis.core.StringRedisTemplate;
import org.springframework.stereotype.Component;
import ch.qos.logback.classic.Logger;
import io.netty.util.internal.StringUtil;

/**
 * redis操作工具类.</br>
 * (基于RedisTemplate)
 * @author tangfq
 * 2019年12月25日
 */
@Component
public class RedisUtils {

	private static final Logger LOGGER = (Logger) LoggerFactory.getLogger(RedisUtils.class);

	@Autowired
	private StringRedisTemplate stringRedisTemplate;

	@Autowired
	private RedisTemplate<Serializable,Object> objRedisTemplate;


	/**
	 * 读取缓存
	 *
	 * @param key
	 * @return
	 */
	public Object get(String strOrObj,final String key) {
		Object obj=null;
		if(StringUtil.isNullOrEmpty(strOrObj)) {
			return obj;
		}

		if(strOrObj.equals("str")) {
			obj=(Object)stringRedisTemplate.opsForValue().get(key);
		}else if(strOrObj.equals("obj")){
			obj=(Object)objRedisTemplate.opsForValue().get(key);
		}

		return obj;
	}


	/**
	 * 写入缓存
	 * @param strOrObj  要写入缓存的类型是字符串还是对象
	 * @param key       键
	 * @param value     值:字符串
	 * @param obj       值:对象
	 * @return          写入缓存redis操作是否成功,true:成功;false:失败
	 */
	public boolean set(String strOrObj,final String key, String value,Object obj) {
		boolean result = false;
		try {
			if(StringUtil.isNullOrEmpty(strOrObj)) {
				return result;
			}

			if(strOrObj.equals("str")) {
				stringRedisTemplate.opsForValue().set(key, value);
				result=true;
			}else if(strOrObj.equals("obj")){
				objRedisTemplate.opsForValue().set(key, obj);
				result=true;
			}
			LOGGER.info("写入缓存成功!");
		} catch (Exception e) {
			LOGGER.error("写入缓存异常:"+e.getMessage());
		}
		return result;
	}


	/**
	 * 更新缓存
	 * @param strOrObj 要更新的类型是字符串还是对象
	 * @param key      键
	 * @param value    值:字符串
	 * @param obj      值:对象
	 * @return         更新redis操作是否成功,true:成功;false:失败
	 */
	public boolean getAndSet(String strOrObj,final String key, String value,Object obj) {
		boolean result = false;
		try {
			if(StringUtil.isNullOrEmpty(strOrObj)) {
				return result;
			}

			if(strOrObj.equals("str")) {
				stringRedisTemplate.opsForValue().getAndSet(key, value);
				result=true;
			}else if(strOrObj.equals("obj")){
				objRedisTemplate.opsForValue().getAndSet(key, obj);
				result=true;
			}

		} catch (Exception e) {
			LOGGER.error("更新缓存异常:"+e.getMessage());
		}
		return result;
	}


	/**
	 * 删除缓存
	 *
	 * @param strOrObj  要删除缓存的类型是字符串还是对象
	 * @param key       删除的键
	 * @return          删除缓存redis操作是否成功,true:成功;false:失败
	 */
	public boolean delete(String strOrObj,final String key) {
		boolean result = false;
		try {
			if(StringUtil.isNullOrEmpty(strOrObj)) {
				return result;
			}

			if(strOrObj.equals("str")) {
				stringRedisTemplate.delete(key);
				result=true;
			}else if(strOrObj.equals("obj")){
				objRedisTemplate.delete(key);
				result=true;
			}

		} catch (Exception e) {
			LOGGER.error("删除缓存异常:"+e.getMessage());
		}
		return result;
	}
}
3、TestController.java的代码如下:
package jypay.com.springbootredis.controller;

import javax.annotation.Resource;
import org.slf4j.LoggerFactory;
import org.springframework.web.bind.annotation.GetMapping;
import org.springframework.web.bind.annotation.RequestMapping;
import org.springframework.web.bind.annotation.RestController;
import ch.qos.logback.classic.Logger;
import jypay.com.springbootredis.entity.User;
import jypay.com.springbootredis.utils.RedisUtils;


@RestController
public class TestController {

	private static final Logger LOGGER = (Logger) LoggerFactory.getLogger(TestController.class);

	@Resource
	private RedisUtils redisUtils;

	@RequestMapping("/set")
	public String setPOJO() {
		User user=new User();
		user.setAge("11");
		user.setGender("男");
		user.setNickname("tang");
		user.setPassword("11");
		user.setUsername("tfq");
		LOGGER.info("---->set()");
		redisUtils.set("obj","user1","",(Object)user);
		return "存储对象成功";
	}

	@RequestMapping("/get")
	public String getPOJO() {
		LOGGER.info("---->get()");
		User u=(User)redisUtils.get("obj","user1");
		return "username:"+u.getUsername()+",nickname:"+u.getNickname();
	}

	//添加
    @GetMapping(value="/redisAdd")
    public String saveRedis(){
    	LOGGER.info("---->redisAdd()");
    	redisUtils.set("str","tfq","test",null);
    	return "存储字符串成功";
    }

    //获取
    @GetMapping(value="/redisGet")
    public String getRedis(){
    	LOGGER.info("---->redisGet()");
    	return (String)redisUtils.get("str", "tfq");
    }

}
4、Springboot项目的启动类App.java代码如下:
package jypay.com.springbootredis;

import org.springframework.boot.SpringApplication;
import org.springframework.boot.autoconfigure.SpringBootApplication;
import org.springframework.cache.annotation.EnableCaching;
import org.springframework.context.annotation.ComponentScan;


@ComponentScan({"jypay.com.springbootredis.controller","jypay.com.springbootredis.utils"})
@SpringBootApplication
@EnableCaching
public class App
{
	public static void main(String[] args) {

	    SpringApplication.run(App.class, args);
    }
}
注意坑:如果你的RedisConfig.java类与App.java不在同一个包下面,你把要RedisConfig.java所在的包通过ComponentScan扫描到项目中。不然,会报错:Consider defining a bean of type org.springframework.data.redis.core.RedisTemplate in your configuration。
5、在application.yml中配置redis数据库连接信息
server:
  port: 8511
# REDIS
# Redis数据库索引(默认为0)
spring:
  cache:
    type:REDIS #cache指定缓存类型
  redis:
    database:15
    host:localhost
    port:6379
    timeout=2000
6、pom.xml代码:
<project xmlns="http://maven.apache.org/POM/4.0.0"
	xmlns:xsi="http://www.w3.org/2001/XMLSchema-instance"
	xsi:schemaLocation="http://maven.apache.org/POM/4.0.0 http://maven.apache.org/maven-v4_0_0.xsd">
	<modelVersion>4.0.0</modelVersion>
	<groupId>jypay.com</groupId>
	<artifactId>springbootredis</artifactId>
	<packaging>war</packaging>
	<version>0.0.1-SNAPSHOT</version>
	<name>springbootredis Maven Webapp</name>
	<url>http://maven.apache.org</url>

	<parent>
		<groupId>org.springframework.boot</groupId>
		<artifactId>spring-boot-starter-parent</artifactId>
		<version>2.0.3.RELEASE</version>
		<!-- <relativePath /> --> <!-- lookup parent from repository -->
	</parent>

	<properties>
		<java.version>1.8</java.version>
		<project.build.sourceEncoding>UTF-8</project.build.sourceEncoding>
		<project.reporting.outputEncoding>UTF-8</project.reporting.outputEncoding>
	</properties>

	<dependencies>
		<dependency>
			<groupId>org.springframework.boot</groupId>
			<artifactId>spring-boot-starter-web</artifactId>
		</dependency>
		<dependency>
			<groupId>org.springframework.boot</groupId>
			<artifactId>spring-boot-starter-data-redis</artifactId>
		</dependency>
		<dependency>
			<groupId>redis.clients</groupId>
			<artifactId>jedis</artifactId>
		</dependency>
	</dependencies>

	<build>
		<!-- 修改war包名称 -->
		<finalName>springbootredis</finalName>
		<plugins>
	      <plugin>
			<groupId>org.springframework.boot</groupId>
			<artifactId>spring-boot-maven-plugin</artifactId>
		  </plugin>
		</plugins>
	</build>
</project>
7、logback-spring.xml
<?xml version="1.0" encoding="UTF-8"?>
<!DOCTYPE xml>
<configuration scan="true" scanPeriod="60 seconds" debug="false">

    <contextName>springCloudConsulComsumer</contextName>
    <!--设置系统日志目录-->
    <property name="log.path" value="d:\\logs" />
    <!-- <property name="log.path" value="/home/logs/qr_pay" /> -->
    <!--最多保留15天log-->
    <property name="log.maxHistory" value="15" />
    <property name="log.pattern" value="%d{HH:mm:ss.SSS} %contextName [%thread] %-5level %logger{36} - %msg%n" />

    <!--输出到控制台-->
    <appender name="console" class="ch.qos.logback.core.ConsoleAppender">
        <encoder>
            <pattern>${log.pattern}</pattern>
        </encoder>
    </appender>

    <!--输出到文件-->
    <!-- 日志记录器,日期滚动记录 -->
    <appender name="file_info" class="ch.qos.logback.core.rolling.RollingFileAppender">
        <rollingPolicy class="ch.qos.logback.core.rolling.TimeBasedRollingPolicy">
            <!-- 正在记录的日志文件的路径及文件名 -->
            <fileNamePattern>${log.path}/info/info.%d{yyyy-MM-dd}.log</fileNamePattern>
            <MaxHistory>${log.maxHistory}</MaxHistory>
        </rollingPolicy>
        <encoder>
            <pattern>${log.pattern}</pattern>
        </encoder>
        <!-- 此日志文件只记录info级别的 -->
        <filter class="ch.qos.logback.classic.filter.LevelFilter">
            <level>INFO</level>
            <onMatch>ACCEPT</onMatch>
            <onMismatch>DENY</onMismatch>
        </filter>
    </appender>

    <appender name="file_error" class="ch.qos.logback.core.rolling.RollingFileAppender">
        <rollingPolicy class="ch.qos.logback.core.rolling.TimeBasedRollingPolicy">
            <fileNamePattern>${log.path}/error/error.%d{yyyy-MM-dd}.log</fileNamePattern>
        </rollingPolicy>
        <encoder>
            <pattern>${log.pattern}</pattern>
        </encoder>
        <filter class="ch.qos.logback.classic.filter.LevelFilter">
            <level>ERROR</level>
            <onMatch>ACCEPT</onMatch>
            <onMismatch>DENY</onMismatch>
        </filter>
    </appender>

    <appender name="file_debug" class="ch.qos.logback.core.rolling.RollingFileAppender">
        <rollingPolicy class="ch.qos.logback.core.rolling.TimeBasedRollingPolicy">
            <fileNamePattern>${log.path}/debug/debug.%d{yyyy-MM-dd}.log</fileNamePattern>
            <MaxHistory>${log.maxHistory}</MaxHistory>
        </rollingPolicy>
        <encoder>
            <pattern>${log.pattern}</pattern>
        </encoder>
        <filter class="ch.qos.logback.classic.filter.LevelFilter">
            <level>DEBUG</level>
            <onMatch>ACCEPT</onMatch>
            <onMismatch>DENY</onMismatch>
        </filter>
    </appender>

    <root level="debug">
        <!--debug级别输出到文件和控制台-->
        <appender-ref ref="console" />
        <appender-ref ref="file_debug" />
    </root>

    <root level="info">
        <!--info和error级别输出到文件-->
        <appender-ref ref="file_info" />
        <appender-ref ref="file_error" />
     </root>
</configuration>
访问本地浏览器地址:
设值User对象到redis:http://localhost:8511/set
设值String到redis:http://localhost:8511/redisAdd
访问存储到Redis的User对象:http://localhost:8511/get
访问存储到Redis的String对象:http://localhost:8511/redisGet
至此demo搭建完成。如果我写的内容有纰漏之处,请指正。欢迎大家一起讨论,共同学习,一起进步。


 370
370


 被折叠的 条评论
为什么被折叠?
被折叠的 条评论
为什么被折叠?
 到【灌水乐园】发言


