


pytorch构建神经网络
这实际上是杰里米·霍华德 ( Jeremy Howard )的fast.ai课程第5课的作业。我已经展示了使用PyTorch 从头开始构建卷积神经网络是多么容易 。 今天,让我们尝试更深入地研究,看看是否可以编写自己的nn.Linear模块。 为什么开发人员已经在Facebook上编写了自己的PyTorch模块,却浪费了时间?
好吧,对于您而言,您将对所有部件的组装方式有更深入的了解。 通过将您的代码与PyTorch代码进行比较,您将了解为什么以及如何开发这些库。
而且,一旦完成,您将对实现和使用所有这些库有更多的信心,知道它们是如何工作的。 你不会有神话。
最后但并非最不重要的一点是,您可以根据情况修改/调整这些模块。 这是菜鸟和专业人士之间的区别。
好,足够的动力,让我们开始吧。
简单的MNIST一层NN作为背景
首先,我们需要一些“背景”代码来测试我们的模块是否以及性能如何。 让我们建立一个非常简单的单层神经网络来解决旧的MNIST数据集。 下面的代码段(在Jupyter Notebook中运行):
# We'll use fast.ai to showcase how to build your own 'nn.Linear' module
%matplotlib inline
from fastai.basics import *
import sys

# create and download/prepare our MNIST dataset
path = Config().data_path()/ 'mnist'
path.mkdir(parents= True )
!wget http://deeplearning.net/data/mnist/mnist.pkl.gz -P {path}

# Get the images downloaded into data set
with gzip.open(path/ 'mnist.pkl.gz' , 'rb' ) as f:
    ((x_train, y_train), (x_valid, y_valid), _) = pickle.load(f, encoding= 'latin-1' )

# Have a look at the images and shape
plt.imshow(x_train[ 0 ].reshape(( 28 , 28 )), cmap= "gray" )
x_train.shape

# convert numpy into PyTorch tensor
x_train,y_train,x_valid,y_valid = map(torch.tensor, (x_train,y_train,x_valid,y_valid))
n,c = x_train.shape
x_train.shape, y_train.min(), y_train.max()

# prepare dataset and create fast.ai DataBunch for training
bs= 64
train_ds = TensorDataset(x_train, y_train)
valid_ds = TensorDataset(x_valid, y_valid)
data = DataBunch.create(train_ds, valid_ds, bs=bs)

# create a simple MNIST logistic model with only one Linear layer
class Mnist_Logistic (nn.Module) :
    def __init__ (self) :
        super().__init__()
        self.lin = nn.Linear( 784 , 10 , bias= True )

    def forward (self, xb) : return self.lin(xb)

model =Mnist_Logistic()

lr= 2e-2
loss_func = nn.CrossEntropyLoss()

# define update function with weight decay
def update (x,y,lr) :
    wd = 1e-5
    y_hat = model(x)
    # weight decay
    w2 = 0.
    for p in model.parameters(): w2 += (p** 2 ).sum()
    # add to regular loss
    loss = loss_func(y_hat, y) + w2*wd
    loss.requres_grad = True

    loss.backward()
    with torch.no_grad():
        for p in model.parameters():
            p.sub_(lr * p.grad)
            p.grad.zero_()
    return loss.item()

# iterate through one epoch and plot losses
losses = [update(x,y,lr) for x,y in data.train_dl]
plt.plot(losses);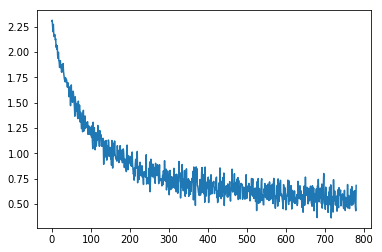
这些代码是不言自明的。 我们在该项目中使用了fast.ai库。 下载MNIST泡菜文件并将其解压缩,将其传输到PyTorch张量中,然后将其填充到fast.ai DataBunch对象中以进行进一步的训练。 然后,我们创建了一个只有一个Linear层的简单神经网络。 我们还编写了自己的update函数,而不是使用torch.optim优化器,因为我们可以从头开始编写我们自己的优化器,这是我们PyTorch学习之旅的下一步。 最后,我们遍历数据集并绘制损失以查看其是否工作以及如何工作。
第一次迭代:使其工作
所有PyTorch模块/层都从torch.nn.Module扩展。
class myLinear (nn.Module) :
在该类中,我们将需要一个__init__ dunder函数来初始化我们的线性层,并需要一个forward函数来进行正向计算。 首先让我们看一下__init__函数。
我们将使用PyTorch官方文档作为构建模块的指南。 在该文档中, nn.Linear模块具有以下属性:
因此,我们将获得以下三个属性:
def __init__ (self, in_features, out_features, bias=True) :
        super().__init__()
        self.in_features = in_features
        self.out_features = out_features
        self.bias = bias
该课程还需要保持权重和偏差参数,以便对其进行培训。 我们还初始化它们。
self.weight = torch.nn.Parameter(torch.randn(out_features, in_features))
self.bias = torch.nn.Parameter(torch.randn(out_features)) 在这里,我们使用了torch.nn.Parameter来设置我们的weight和bias ,否则它将无法训练。
另外,请注意,我们使用torch.randn代替了文档中描述的内容来初始化参数。 这不是进行权重初始化的最佳方法,但我们的目的是首先使它起作用,我们将在下一次迭代中对其进行调整。
好了,现在完成了__init__部分,让我们继续forward功能。 这实际上是简单的部分:
def forward (self, input) :
        _, y = input.shape
        if y != self.in_features:
            sys.exit( f'Wrong Input Features. Please use tensor with {self.in_features} Input Features' )
        output = input @ self.weight.t() + self.bias
        return output
我们首先获得输入的形状,找出输入中有多少列,然后检查输入大小是否匹配。 然后,我们进行矩阵乘法(注意,我们在此处进行了转置以对齐权重)并返回结果。 我们可以通过提供一些数据来测试它是否有效:
my = myLinear(20 , 10 )
a = torch.randn( 5 , 20 )
my(a)
我们有一个5x20的输入,它穿过我们的图层并获得5x10的输出。 您应该得到如下结果:

好的,现在回到我们的神经网络代码,找到Mnist_Logistic类,将self.lin = nn.Linear(784,10, bias=True)更改为self.lin = nn.Linear(784,10, bias=True) self.lin = myLinear(784, 10, bias=True) 。 运行代码,您应该看到如下图所示:
如您所见,它的收敛性不太好(一个历元大约有2.5的损失)。 这可能是因为我们的初始化不佳。 另外,我们没有处理bias部分。 让我们在下一个迭代中修复它。 迭代1的最终代码如下所示:
class myLinear (nn.Module) :
    def __init__ (self, in_features, out_features, bias=True) :
        super().__init__()
        self.in_features = in_features
        self.out_features = out_features
        self.bias = bias
        self.weight = torch.nn.Parameter(torch.randn(out_features, in_features))
        self.bias = torch.nn.Parameter(torch.randn(out_features))


    def forward (self, input) :
        x, y = input.shape
        if y != self.in_features:
            sys.exit( f'Wrong Input Features. Please use tensor with {self.in_features} Input Features' )
        output = input @ self.weight.t() + self.bias
        return output
第二次迭代:正确的权重初始化和偏差处理
我们已经处理了__init__和forward ,但是请记住,我们还有一个bias属性,如果为False ,将不会学习加性偏差。 我们尚未实现。 同样,我们使用torch.nn.randn初始化权重和偏差,这不是最佳的。 让我们解决这个问题。 更新的__init__函数如下所示:
def __init__ (self, in_features, out_features, bias=True) :
        super().__init__()
        self.in_features = in_features
        self.out_features = out_features
        self.bias = bias
        self.weight = torch.nn.Parameter(torch.Tensor(out_features, in_features))
        if bias:
            self.bias = torch.nn.Parameter(torch.Tensor(out_features))
        else :
            self.register_parameter( 'bias' , None )
self.reset_parameters() 首先,当我们创建weight和bias参数时,没有将它们初始化为最后一次迭代。 我们只是为其分配一个常规的Tensor对象。 实际的初始化是在另一个函数reset_parameters ( 将在后面说明 )。
对于bias ,我们添加了一个条件,如果为True ,则执行上一次迭代的操作,但是如果为False ,则将使用register_parameter ('bias',None)为其赋予None值。 现在,对于reset_parameter函数,它看起来像这样:
def reset_parameters (self) :
        torch.nn.init.kaiming_uniform_(self.weight, a=math.sqrt( 5 ))
        if self.bias is not None :
            fan_in, _ torch.nn.init._calculate_fan_in_and_fan_out(self.weight)
            bound = 1 / math.sqrt(fan_in)
            torch.nn.init.uniform_(self.bias, -bound, bound)
上面的代码直接取自PyTorch源代码。 PyTorch进行权重初始化的过程称为kaiming_uniform_ 。 它来自一篇深入研究整流器的文章:在ImageNet分类上超越了人类的性能-He,K.等。 (2015) 。

它的实际作用是通过初始化均值为0且方差为 bound的正态分布初始化权重,从而避免了梯度消失或爆炸的问题( 尽管这里只有一层,在编写Linear类时,我们仍应保持MLN在介意 )。
请注意,对于self.weight ,我们实际上给a a值为math.sqrt(5)而不是math.sqrt(fan_in) ,这在GitHub问题的PyTorch存储库中对此有解释, 对此可能有所解释。
另外,我们可以向模型添加一些extra_repr字符串:
def extra_repr (self) :
        return 'in_features={}, out_features={}, bias={}' .format(
            self.in_features, self.out_features, self.bias is not None
        )
最终模型如下所示:
class myLinear (nn.Module) :
def __init__ (self, in_features, out_features, bias=True) :
super().__init__()
self.in_features = in_features
self.out_features = out_features
self.bias = bias
self.weight = torch.nn.Parameter(torch.Tensor(out_features, in_features))
if bias:
self.bias = torch.nn.Parameter(torch.Tensor(out_features))
else :
self.register_parameter( 'bias' , None )
self.reset_parameters()
def reset_parameters (self) :
torch.nn.init.kaiming_uniform_(self.weight, a=math.sqrt( 5 ))
if self.bias is not None :
fan_in, _ = torch.nn.init._calculate_fan_in_and_fan_out(self.weight)
bound = 1 / math.sqrt(fan_in)
torch.nn.init.uniform_(self.bias, -bound, bound)
def forward (self, input) :
x, y = input.shape
if y != self.in_features:
print( f'Wrong Input Features. Please use tensor with {self.in_features} Input Features' )
return 0
output = input.matmul(weight.t())
if bias is not None :
output += bias
ret = output
return ret
def extra_repr (self) :
return 'in_features={}, out_features={}, bias={}' .format(
self.in_features, self.out_features, self.bias is not None
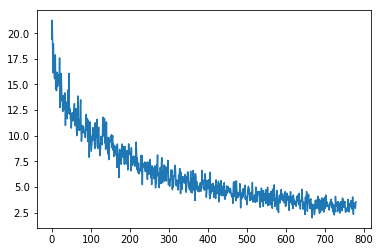
)重新运行代码,您应该可以看到以下图:
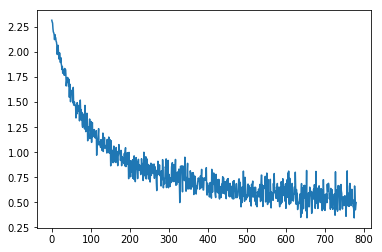
我们可以看到,它在一秒钟内收敛到更快的0.5损失。
结论
我希望这可以帮助您清除这些PyTorch nn.modules上的云。 这似乎很无聊和多余,但有时最快(最短)的方法就是“无聊”的方法。 一旦触及最深处,知道没有“更多”的感觉就变得无价之宝。 您将意识到:
在PyTorch之下,没有技巧,没有神话,没有陷阱,只是坚如磐石的Python代码。
同样,通过编写自己的代码,然后将其与官方源代码进行比较,您将能够看到区别在哪里,并向业内的佼佼者学习。 多么酷啊?
觉得这篇文章有用吗? 在Twitter @lymenlee或我的博客网站wayofnumbers.com上关注我。
先前发布在https://towardsdatascience.com/how-to-build-your-own-pytorch-neural-network-layer-from-scratch-842144d623f6
翻译自: https://hackernoon.com/how-to-build-your-own-pytorch-neural-network-layer-from-scratch-2x6136th
pytorch构建神经网络


 3072
3072

 被折叠的 条评论
为什么被折叠?
被折叠的 条评论
为什么被折叠?
 到【灌水乐园】发言


