


一 使用平台:
使用和风天气提供的接口来查询天气。
全国的省市数据:会返回一段json格式的数据。
http://guolin.tech/api/china
二 创建数据库和表
先在com.Mask weather.android包下新建几个包,用来进行存储。
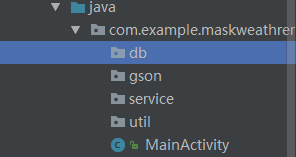
其中db用来存放数据库模型相关的代码,gson用于存放GSON模型相关的代码,service包用于存放服务相关diamante,util用于存放工具相关的代码。
1.添加依赖库的声明
dependencies {
    compile 'org.litepal.android:core:1.4.1'
    compile 'com.squareup.okhttp3:okhttp:3.10.0'
    compile 'com.google.code.gson:gson:2.7'
    compile 'com.github.bumptech.glide:glide:3.7.0'
}
其中包括litepal来对数据库进行操作,okhttp对网络请求进行操作,gson对json数据进行解析,glide用于加载展示图片。
2.添加表对应的三个类:
在db下简历三个类,对应数据库中的三张表。而litepal中的每一个映射的实体类都要继承自DataSupport类。
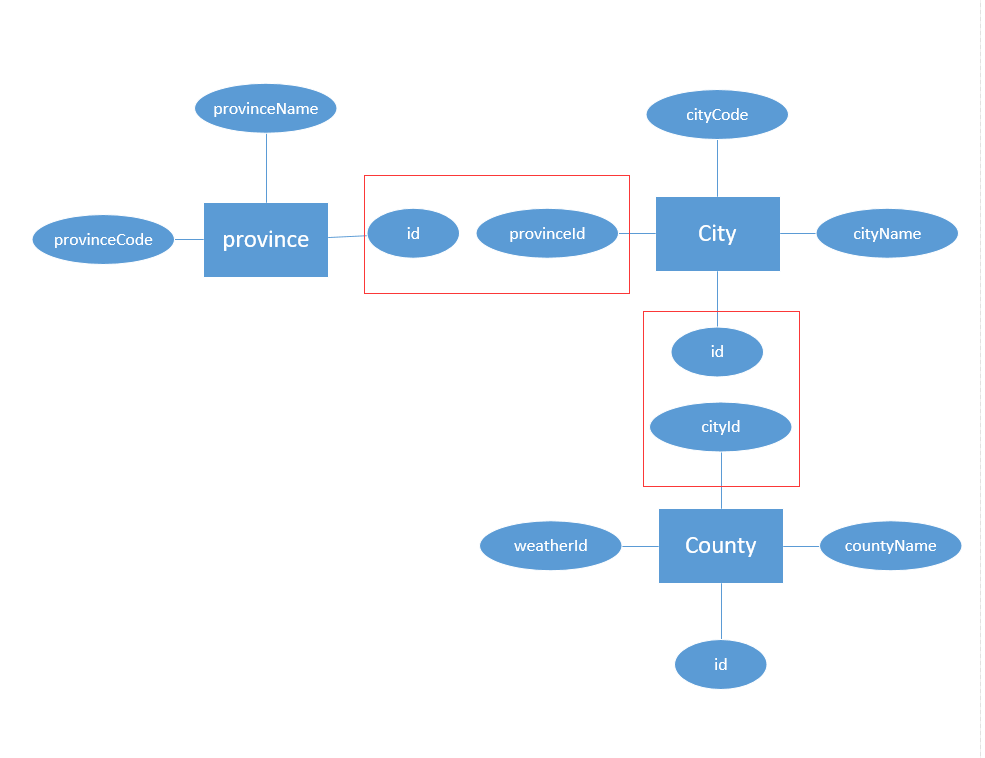
省表:对应province类。
 1 public class Province extends DataSupport {
 2
 3     private int id;
 4     private String provinceName;
 5     private int provinceCode;
 6
 7     public int getId() {
 8         return id;
 9     }
10
11     public void setId(int id) {
12         this.id = id;
13     }
14
15     public String getProvinceName() {
16         return provinceName;
17     }
18
19     public void setProvinceName(String provinceName) {
20         this.provinceName = provinceName;
21     }
22
23     public int getProvinceCode() {
24         return provinceCode;
25     }
26
27     public void setProvinceCode(int provinceCode) {
28         this.provinceCode = provinceCode;
29     }
30 }
市表:city类
 1 public class City extends DataSupport {
 2     private int id;
 3     private String cityName;
 4     private int cityCode;
 5     private int provinceId;
 6
 7     public int getId() {
 8         return id;
 9     }
10
11     public void setId(int id) {
12         this.id = id;
13     }
14
15     public String getCityName() {
16         return cityName;
17     }
18
19     public void setCityName(String cityName) {
20         this.cityName = cityName;
21     }
22
23     public int getCityCode() {
24         return cityCode;
25     }
26
27     public void setCityCode(int cityCode) {
28         this.cityCode = cityCode;
29     }
30
31     public int getProvinceId() {
32         return provinceId;
33     }
34
35     public void setProvinceId(int provinceId) {
36         this.provinceId = provinceId;
37     }
38 }
县表:county类
 1 public class County extends DataSupport {
 2
 3     private int id;
 4     private String countyName;
 5     private String weatherId;
 6     private int cityId;
 7
 8     public int getId() {
 9         return id;
10     }
11
12     public void setId(int id) {
13         this.id = id;
14     }
15
16     public String getCountyName() {
17         return countyName;
18     }
19
20     public void setCountyName(String countyName) {
21         this.countyName = countyName;
22     }
23
24     public String getWeatherId() {
25         return weatherId;
26     }
27
28     public void setWeatherId(String weatherId) {
29         this.weatherId = weatherId;
30     }
31
32     public int getCityId() {
33         return cityId;
34     }
35
36     public void setCityId(int cityId) {
37         this.cityId = cityId;
38     }
39 }
3.配置litepal.xml文件
在app/src/main中new一个Directory,创建一个assets目录,新建一个litepal.xml文件。
 1 <litepal>
 2     <!--数据库名称和版本-->
 3     <dbname value="Mask_weather"/>
 4     <version value="1"/>
 5     <!--将三个实体类添加到映射的列表中-->
 6     <list>
 7         <mapping class="com.example.maskweather.db.City"/>
 8         <mapping class="com.example.maskweather.db.County"/>
 9         <mapping class="com.example.maskweather.db.Province"/>
10     </list>
11
12 </litepal>
配置LitePalApplication。修改AndroidManifest文件如下:
<application
        android:name="org.litepal.LitePalApplication"
这样数据库就建立完成了。
三 遍历全国省市县数据
因为在服务器中可以获取这些数据。服务器:
http://guolin.tech/api/china
1.发送获取服务器数据的网络请求
所以和服务器的交互必不可少,所以在util包中增加一个HttpUtil类用来发送网络请求。
1 /*用来发送http请求*/
2 public class HttpUtil {
3     public static void sendOkHttpRequest(String address,okhttp3.Callback callback){
4         OkHttpClient client = new OkHttpClient();
5         Request request = new Request.Builder().url(address).build();
6         client.newCall(request).enqueue(callback);
7     }
8 }
2.解析json格式的工具类Utility
解析数据的工具类中存放了三种方法,分别用来解析省级数据、市级数据和县级数据。都是布尔型的方法,如果解析成功,返回true。解析成功数据使用save方法保存在数据库中。
 1 public class Utility {
 2     /*
 3     * 解析和处理服务器返回的省级数据
 4     * */
 5     public static boolean handleProvinceResponse(String response) {
 6         if (!TextUtils.isEmpty(response)) {
 7             try {
 8                 /*使用JSONArray和JSONObject来解析json数据
 9                 * 传入的是一个json数组,存放在JSONArray中,依次遍历放在JSONObject中
10                 * 创建一个province实例,取出JSONObject中数据存放*/
11                 JSONArray allProvinces = new JSONArray(response);
12                 for (int i = 0; i < allProvinces.length(); i++) {
13                     JSONObject provinceObject = allProvinces.getJSONObject(i);
14                     Province province = new Province();
15                     province.setProvinceName(provinceObject.getString("name"));
16                     province.setProvinceCode(provinceObject.getInt("id"));
17                     province.save();
18                 }
19                 return true;
20             } catch (JSONException e) {
21                 e.printStackTrace();
22             }
23         }
24         return false;
25     }
26
27     /*
28     * 解析和处理服务器返回的市级数据
29     * */
30     public static boolean handleCityResponse(String response, int provinceId) {
31         if (!TextUtils.isEmpty(response)) {
32             try {
33                 JSONArray allCities = new JSONArray(response);
34                 for (int i = 0; i < allCities.length(); i++) {
35                     JSONObject cityObject = allCities.getJSONObject(i);
36                     City city = new City();
37                     city.setCityName(cityObject.getString("name"));
38                     city.setCityCode(cityObject.getInt("id"));
39                     city.setProvinceId(provinceId);
40                     city.save();
41                 }
42                 return true;
43             } catch (JSONException e) {
44                 e.printStackTrace();
45             }
46         }
47         return false;
48     }
49
50     /*
51     * 解析和处理服务器返回的县级数据
52     * */
53     public static boolean handleCountyResponse(String response,int cityId){
54         if(!TextUtils.isEmpty(response)){
55             try {
56                 JSONArray allCounties = new JSONArray(response);
57                 for (int i=0;i<allCounties.length();i++){
58                     JSONObject countyObject = allCounties.getJSONObject(i);
59                     County county = new County();
60                     county.setCountyName(countyObject.getString("name"));
61                     county.setWeatherId(countyObject.getString("weather_id"));
62                     county.setCityId(cityId);
63                     county.save();
64                 }
65                 return true;
66             } catch (JSONException e) {
67                 e.printStackTrace();
68             }
69         }
70         return false;
71     }
72 }
以上就完成了两个工具类的编写。
3.使用碎片写choose_area,xml布局
在这个碎片布局中,定义了一个头布局作为标题栏,将高度设为actionBar的高度,颜色设为colorPrimary。在头布局中放了一个Testview和一个后退的button。
在标题栏下面放了一个listview用来存放
 1 <LinearLayout xmlns:android="http://schemas.android.com/apk/res/android"
 2     android:layout_width="match_parent"
 3     android:layout_height="match_parent"
 4     android:background="#ffffff"
 5     android:orientation="vertical">
 6
 7     <!--头布局作为标题栏 包括一个文本和一个返回按键-->
 8     <RelativeLayout
 9         android:layout_width="match_parent"
10         android:layout_height="?attr/actionBarSize"
11         android:background="?attr/colorPrimary">
12
13         <TextView
14             android:id="@+id/title_text"
15             android:layout_width="wrap_content"
16             android:layout_height="wrap_content"
17             android:layout_centerInParent="true"
18             android:textColor="#fff"
19             android:textSize="20sp" />
20
21         <Button
22             android:id="@+id/back_button"
23             android:layout_width="25dp"
24             android:layout_height="25dp"
25             android:layout_alignParentLeft="true"
26             android:layout_centerVertical="true"
27             android:layout_marginLeft="10dp"
28             android:background="@drawable/ic_back" />
29
30     </RelativeLayout>
31
32     <ListView
33         android:id="@+id/list_view"
34         android:layout_width="match_parent"
35         android:layout_height="match_parent" />
36 </LinearLayout>
4.编写遍历省市县数据的碎片
在编写碎片时,首先声明一系列元素。其中包括三个省市县登记、进度框、Testview、button、和listview原件。列表适配器和数据列表。
省市县列表以及选中的省市。以及当前选中的级别。
 1 public class ChooseAreaFragment extends Fragment {
 2     public static final int LEVEL_PROVINCE = 0;
 3     public static final int LEVEL_CITY = 1;
 4     public static final int LEVEL_COUNTY = 2;
 5
 6     private ProgressDialog progressDialog;
 7
 8     private TextView titleText;
 9     private Button backButton;
10     private ListView listView;
11
12     private ArrayAdapter<String> adapter;
13     private List<String> dataList = new ArrayList<>();
14
15     /*省列表*/
16     private List<Province> provincesList;
17
18     /*市列表*/
19     private List<City> cityList;
20
21     /*县列表*/
22     private List<County> countyList;
23
24     /*选中的省份*/
25     private Province selectProvince;
26
27     /*选中的城市*/
28     private City selectCity;
29
30     /*当前选中的级别*/
31     private int currentLevel;
碎片初始化,并实例化各种控件。同时创造一个listview的适配器用来给listview传送数据。
 1     /*碎片初始化,将各种控件实例化
 2     * 创建一个listView的适配器,将适配器与listview绑定*/
 3     @Override
 4     public View onCreateView(LayoutInflater inflater, ViewGroup container,
 5                              Bundle savedInstanceState) {
 6         View view = inflater.inflate(R.layout.choose_area, container, false);
 7         titleText = (TextView) view.findViewById(R.id.title_text);
 8         backButton = (Button) view.findViewById(R.id.back_button);
 9         listView = (ListView) view.findViewById(R.id.list_view);
10         adapter = new ArrayAdapter<String>(getContext(), android.R.layout.simple_list_item_1, dataList);
11         listView.setAdapter(adapter);
12         return view;
13     }
为listview和button添加点击事件,currentLevel表示现在的级别。通过点击事件,调用相应的方法,来查询相关的省市县。
 1     /*为listview和button设置了点击事件,currentLevel表示现在处于的级别*/
 2     @Override
 3     public void onActivityCreated(Bundle saveInstanceState) {
 4         super.onActivityCreated(saveInstanceState);
 5         listView.setOnItemClickListener(new AdapterView.OnItemClickListener() {
 6             @Override
 7             public void onItemClick(AdapterView<?> adapterView, View view, int position, long id) {
 8                 if (currentLevel == LEVEL_PROVINCE) {
 9                     selectProvince = provincesList.get(position);
10                     queryCities();
11                 } else if (currentLevel == LEVEL_CITY) {
12                     selectCity = cityList.get(position);
13                     queryCounties();
14                 }
15             }
16         });
17         backButton.setOnClickListener(new View.OnClickListener() {
18             @Override
19             public void onClick(View view) {
20                 if (currentLevel == LEVEL_COUNTY) {
21                     queryCities();
22                 } else if (currentLevel == LEVEL_CITY) {
23                     queryProvinces();
24                 }
25             }
26         });
27         queryProvinces();
28     }
然后是查询省市县的具体方法,三个大体流程差不多,都是先设置标题栏的文字和后退按键。
然后在省市县列表先将数据库中的相应数据加入到列表中。
判断列表是否为空,如果不为空的话,说明在数据库中有相关的数据,将适配器的数据datalist清空,然后遍历这个列表,将列表中的数据都添加到datalist中。
遍历结束后,更新listview的数据对其进行通知,并将选择移动到首位。然后改相关的等级。
如果列表为空,调用queryFromService方法,传入地址和类型,进行对服务器数据的访问请求。
 1     /*
 2     * 查询全国所有的省,先从数据库查,没有的话从服务器上查询
 3     * */
 4     private void queryProvinces() {
 5         titleText.setText("中国");
 6         backButton.setVisibility(View.GONE);//在最初设为不可见
 7         provincesList = DataSupport.findAll(Province.class);
 8         if (provincesList.size() > 0) {
 9             dataList.clear();
10             for (Province province : provincesList) {
11                 dataList.add(province.getProvinceName());
12             }
13             adapter.notifyDataSetChanged(); //更新了listview中数据,对其进行通知
14             listView.setSelection(0);  //将选择移到列表开始
15             currentLevel = LEVEL_PROVINCE;
16         } else {
17             String address = "http://guolin.tech/api/china";
18             queryFromServer(address, "province");
19         }
20     }
21
22     /*
23     * 查询选中省内全部的市 优先从数据库查询,没有就从网上查询
24     * */
25     private void queryCities() {
26         titleText.setText(selectProvince.getProvinceName());
27         backButton.setVisibility(View.VISIBLE);
28         cityList = DataSupport.where("provinceid=?",
29                 String.valueOf(selectProvince.getId())).find(City.class);
30         if (cityList.size() > 0) {
31             dataList.clear();
32             for (City city : cityList) {
33                 dataList.add(city.getCityName());
34             }
35             adapter.notifyDataSetChanged();
36             listView.setSelection(0);
37             currentLevel = LEVEL_CITY;
38         } else {
39             int provinceCode = selectProvince.getProvinceCode();
40             String address = "http://guolin.tech/api/china/" + provinceCode;
41             queryFromServer(address, "city");
42         }
43     }
44
45     /*
46     * 查询选中市内所有的县 优先从数据库查询,其次从服务器查询
47     * */
48     private void queryCounties() {
49         titleText.setText(selectCity.getCityName());
50         backButton.setVisibility(View.VISIBLE);
51         countyList = DataSupport.where("cityid=?",
52                 String.valueOf(selectCity.getCityCode())).find(County.class);
53         if (countyList.size() > 0) {
54             dataList.clear();
55             for (County county : countyList) {
56                 dataList.add(county.getCountyName());
57             }
58             adapter.notifyDataSetChanged();
59             listView.setSelection(0);
60             currentLevel = LEVEL_COUNTY;
61         }else{
62             int provinceCode = selectProvince.getProvinceCode();
63             int cityCode = selectCity.getCityCode();
64             String address = "http://guolin.tech/api/china/"+provinceCode+"/"+cityCode;
65             queryFromServer(address,"country");
66         }
67     }
queryFromService()方法对服务器进行数据查询,首先调出进度加载框。然后调用HttpUil的发送网络请求,并传入地址。
如果加载服务器数据失败,则调用返回主线程处理逻辑,关闭进度框,并发送提示加载失败。
如果加载服务器数据成功,先初始化返回数据,布尔型result,result用来判断是否查询成功。
判断查询数据类型,然后进行json数据解析(在utility中解析相关类型数据)解析出对应的数据。
如果查询成功,返回主线程进行ui修改,关闭进度框,并再次执行相关等级的查询(此时就在数据库中查询,然后加入到listview的datalist中显示出来。)。
 1     /*
 2     * 显示进度对话框
 3     * */
 4     private void showProgressDialog() {
 5         if (progressDialog == null) {
 6             progressDialog = new ProgressDialog(getActivity());
 7             progressDialog.setMessage("正在加载...");
 8             progressDialog.setCanceledOnTouchOutside(false);
 9         }
10         progressDialog.show();
11     }
12
13     /*
14     * 关闭进度对话框
15     * */
16     private void closeProgressDialog() {
17         if (progressDialog != null) {
18             progressDialog.dismiss();
19         }
20     }
21 }
最后是两个具体方法,显示进度框和关闭进度框。


 97
97


 被折叠的 条评论
为什么被折叠?
被折叠的 条评论
为什么被折叠?
 到【灌水乐园】发言


