


webapi框架搭建系列博客
前言
c#的依赖注入框架有unity、autofac,两个博主都用过,感觉unity比较简单而autofac的功能相对更丰富(自然也更复杂一点),本篇将基于前几篇已经创建好的webapi项目,引入autofac功能。
前面我们已经搭建好webapi,并用了owin技术。这篇的autofac也将基于这两种技术进行开发。
步骤
引入包
using System.Reflection;
using Autofac;
using Autofac.Integration.WebApi;
using webapi.example;

namespace webapi.AutoFac
{
    public static class ContainerBuilerCommon
    {
        public static IContainer GetWebApiContainer()
        {
            var builder = new ContainerBuilder();
       // 注册webapi的所有控制器
            builder.RegisterApiControllers(Assembly.GetExecutingAssembly());
        // 注册一个用于测试的组件。
            builder.RegisterType<Chinese>().As<People>();
            return builder.Build();
        }
    }
}
除了builder.RegisterApiControllers(Assembly.GetExecutingAssembly())是注册webapi控制器,其它所有的代码都是autofac本身的用法。
autofac的用法可总结为三步:
1、创建container buildervar builder = new ContainerBuilder();
autofac怎么注册组件可以参考官网:http://autofac.readthedocs.io/en/latest/register/registration.html
3、生成依赖注入容器(如果是webapi则将容器传给webapi的DependencyResolver对象)
config.DependencyResolver = new AutofacWebApiDependencyResolver(container);
用于测试的people接口和两个接口的实现类如下
  public interface People
    {
        string Language();
    }

    public class Chinese : People
    {
        public string Language()
        {
            return "汉语";
        }
    }

    public class American:People
    {
        public string Language()
        {
            return "english";
        }
    }
owin管道配置
 public class Startup
    {
        /// <summary>
        /// owin的http请求管道配置函数
        /// </summary>
        /// <param name="app"></param>
        public void Configuration(IAppBuilder app)
        {
            #region 写在前面的配置
            // 获取webapi的配置
            var config = WebApiConfig.OwinWebApiConfiguration(new HttpConfiguration());
            // 获取webapi的依赖注入容器
            var container = ContainerBuilerCommon.GetWebApiContainer();
            // 配置webapi的依赖注入
            config.DependencyResolver = new AutofacWebApiDependencyResolver(container);
            #endregion

            #region owin组件注册(要注意顺序)
            app.UseAutofacMiddleware(container);// 先注册autofac组件,需要依赖注入功能的组件在此后注册
            app.UseAutofacWebApi(config);//注册AutofacWebApi组件后再注册WebApi组件
            app.UseWebApi(config);
            #endregion
        }
WebApiConfig类代码如下(非核心代码)
using System.Web.Http;

namespace webapi.Configs
{
    /// <summary>
    /// webapi 配置类
    /// </summary>
    public static class WebApiConfig
    {

        /// <summary>
        /// 返回webapi的httpconfiguration配置
        /// 用于webapi应用于owin技术时使用
        /// </summary>
        /// <returns></returns>
        public static HttpConfiguration OwinWebApiConfiguration(HttpConfiguration config)
        {
            config.MapHttpAttributeRoutes();//开启属性路由
            config.Routes.MapHttpRoute(
                name: "DefaultApi",
                routeTemplate: "api/{controller}/{id}",
                defaults: new { id = RouteParameter.Optional }
            );
            return config;
        }
    }
}
测试依赖注入是否正常
创建IOCTestController控制器
/// <summary>
/// 本代码用来测试依赖注入是否正常
/// </summary>
namespace webapi.example
{
    public class IOCTestController : ApiController
    {
        private People _people;
        public IOCTestController(People people)
        {
            _people = people;
        }

        public IHttpActionResult GetLanguage()
        {
            return Ok(_people.Language());
        }
    }
}
注意:控制器里的_people没有用new的方法去创建,而是交给了控制器的构造函数,并且控制器的创建已经配置成由autofac进行依赖注入,如下代码
config.DependencyResolver = new AutofacWebApiDependencyResolver(container);所以autofac会在创建IOCTestController时用Chinese代替接口people
builder.RegisterType<Chinese>().As<People>();
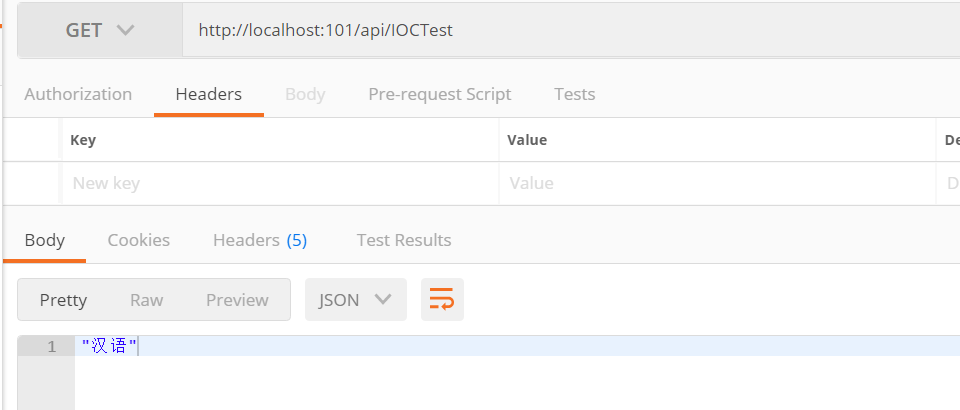
测试结果如下:


 907
907


 被折叠的 条评论
为什么被折叠?
被折叠的 条评论
为什么被折叠?
 到【灌水乐园】发言


